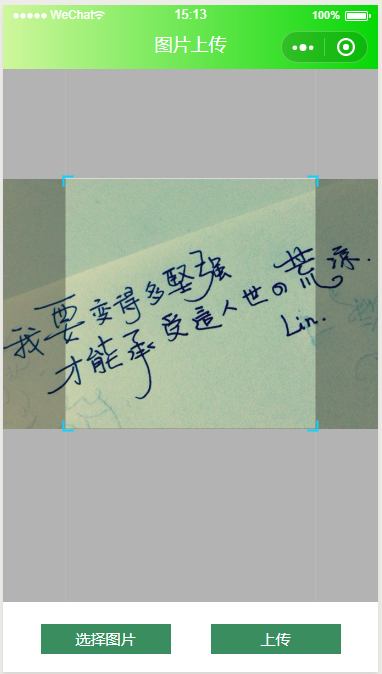
本篇博客用于解决微信小程序图片裁剪问题
图片裁剪常用于头像选择和图片合成等。
图片裁剪解决方案:
目前网络上知名的微信小程序图片裁剪插件是we-cropper(文末有链接)
操作步骤:下载好we-cropper文件夹,拷贝到小程序目录,可以放在pages列表中。
第一步:wxml中引入插件的wxml,使用模板,编写按钮绑定事件。
第二步,js中引入插件的js,设置参数,初始化对象。
请看下方操作:
wxml中:
<import src="../we-cropper/we-cropper.wxml"/>
<view class="imgDisposeBlock">
      <view class='titleBar'>
        图片上传
      </view>

      <view class='imgDisposeArea'>
          <template is="we-cropper" data="{{...cropperOpt}}"/>
      </view>

      <view class='imgDisposeControlLine'>
            <view class='editBtn reelectBtn' bindtap="uploadTap">选择图片</view>
            <view class='editBtn editPerfectBtn' bindtap="getCropperImage">上传</view>
      </view>


</view>
wxss中:
/* pages/weCoperStudy/weCoperStudy.wxss */
page{
  width: 100%;
  height: 100%;
}


.titleBar{
  width: 100vw;
  height: 128rpx;
  position: fixed;
  top:0;
  left: 0;
  z-index:100;
  text-align: center;
  line-height: 158rpx;
  font-size: 36rpx;
  color:#fff;
  background: linear-gradient(to right,  #cff79c 0%,#06d806 100%);
}

.imgDisposeBlock{
  position: absolute;
  z-index: 99;
  left:0;
  top:0;
  width:100vw;
  height:100vh;
  background: rgb(0, 0, 0);
  overflow: hidden;
}

.imgDisposeArea{
  width:100vw;
  height:90vh;
  overflow: hidden;
  background: #FFF;
}

.imgDisposeControlLine{
  width: 100vw;
  height:10vh;
  position: relative;
  background: #fff;
}

.editBtn{
  position: absolute;
  top:50%;
  transform: translateY(-50%);
  width:260rpx;
  height: 60rpx;
  background: #3a8d5f;
  font-size: 30rpx;
  text-align: center;
  line-height: 60rpx;
  color:#fff;
}

.editBtn.reelectBtn{
  left:10%;
}


.editBtn.editPerfectBtn{
  right:10%;
}

.finalCanvasClass{
  position:absolute;
  top:-600%;
  left:0;
  z-index:15;
  transform-origin: left top;
  transform: scale(0.25);
}

.letterCanvasClass{
  position:absolute;
  top:-9999rpx;
  left:0;
  transform-origin: left top;
  transform: scale(0.25);
  z-index: -1;
}

.letterSrcClass{
  position:absolute;
  z-index:1;
  top:0;
  left:0;
  width:100%;
  height:100%;

}


/* 截图canvas放大 真机上不行*/
/* .cropper{
  transform-origin: left top;
  transform: scale(0.25);
} */

.shadowBlock{
  width:100%;
  height:100%;
  background:#f7f7f7;
  position: absolute;
  top:0;
  left:0;
  z-index: 99;
}
小程序js代码:
// pages/weCoperStudy/weCoperStudy.js

import WeCropper from '../we-cropper/we-cropper.js'

const device = wx.getSystemInfoSync() // 获取设备信息
const width = device.windowWidth // 示例为一个与屏幕等宽的正方形裁剪框
const devicePixelRatio = device.pixelRatio
const height = device.windowHeight - 70
const fs = width / 750 * 2

Page({

  /**
   * 页面的初始数据
   */
  data: {
    imgSrc:'',//确定裁剪后的图片
    cropperOpt: {
      id: 'cropper',
       width, // 画布宽度
      height: height, // 画布高度
      scale: 2.5, // 最大缩放倍数
      zoom: 8, // 缩放系数
      cut: {
        x: (width - 250) / 2, // 裁剪框x轴起点(width * fs * 0.128) / 2
        y: (height * 0.5 - 250 * 0.5), // 裁剪框y轴期起点
         250, // 裁剪框宽度
        height: 250// 裁剪框高度
      }
    },
  },

  touchStart(e) {
    this.cropper.touchStart(e)
  },
  touchMove(e) {
    this.cropper.touchMove(e)
  },
  touchEnd(e) {
    this.cropper.touchEnd(e)
  },

  uploadTap() {

    const self = this

    wx.chooseImage({
      count: 1, // 默认9
      sizeType: ['original', 'compressed'], // 可以指定是原图还是压缩图,默认二者都有
      sourceType: ['album', 'camera'], // 可以指定来源是相册还是相机,默认二者都有
      success(res) {
        const src = res.tempFilePaths[0];

        self.wecropper.pushOrign(src);
      }
    })
  },

  getCropperImage() {
    let that = this;
    wx.showToast({
      title: '上传中',
      icon: 'loading',
      duration: 20000
    })
    // 如果有需要两层画布处理模糊,实际画的是放大的那个画布
    this.wecropper.getCropperImage((src) => {
      if (src) {
        that.setData({
          imgSrc: src
        })
        wx.hideToast()
        // wx.previewImage({
        //   current: '', // 当前显示图片的http链接
        //   urls: [src] // 需要预览的图片http链接列表
        // })
      } else {
        console.log('获取图片地址失败,请稍后重试')
      }
    })
  },

  /**
   * 生命周期函数--监听页面加载
   */
  onLoad: function (options) {
    const { cropperOpt } = this.data

    this.cropper = new WeCropper(cropperOpt)
      .on('ready', (ctx) => {
        console.log(`wecropper is ready for work!`)
      })
      .on('beforeImageLoad', (ctx) => {
        wx.showToast({
          title: '上传中',
          icon: 'loading',
          duration: 20000
        })
      })
      .on('imageLoad', (ctx) => {
        wx.hideToast()
      })

    //刷新画面
    this.wecropper.updateCanvas()

  }

})
效果参考图,插件提供了双指缩放和移动来调整截取区域,如果截图模糊可以用两层模板,其中隐藏一层放大倍数,最终也是截取放大的canvas,不过需要个人去计算调整相关参数:
插件下载:https://github.com/we-plugin/we-cropper
参考教程:https://we-plugin.github.io/we-cropper/#/
裁剪框四个角的颜色和大小和蒙层透明度请自行在we-cropper.js中查找修改:
尝试搜索“color”关键词,大概在900行左右(版本we-cropper v1.2.0)。
