人脸检测及识别python实现系列(6)——终篇:从实时视频流识别出“我”
终于到了最后一步,激动时刻就要来临了,先平复一下心情,把剩下的代码加上,首先是为Model类增加一个预测函数:
 1     #识别人脸
 2     def face_predict(self, image):
 3         #依然是根据后端系统确定维度顺序
 4         if K.image_dim_ordering() == 'th' and image.shape != (1, 3, IMAGE_SIZE, IMAGE_SIZE):
 5             image = resize_image(image)                             #尺寸必须与训练集一致都应该是IMAGE_SIZE x IMAGE_SIZE
 6             image = image.reshape((1, 3, IMAGE_SIZE, IMAGE_SIZE))   #与模型训练不同,这次只是针对1张图片进行预测
 7         elif K.image_dim_ordering() == 'tf' and image.shape != (1, IMAGE_SIZE, IMAGE_SIZE, 3):
 8             image = resize_image(image)
 9             image = image.reshape((1, IMAGE_SIZE, IMAGE_SIZE, 3))
10
11         #浮点并归一化
12         image = image.astype('float32')
13         image /= 255
14
15         #给出输入属于各个类别的概率,我们是二值类别,则该函数会给出输入图像属于0和1的概率各为多少
16         result = self.model.predict_proba(image)
17         print('result:', result)
18
19         #给出类别预测:0或者1
20         result = self.model.predict_classes(image)
21
22         #返回类别预测结果
23         return result[0]
这个函数是提供给外部模块使用的,外部模块用它来预测哪个是“我”,哪个不是“我”。代码很简单,注释也很详细,就不多解释了。接下来我们新建一个python文件:face_predict_use_keras.py,然后为这个文件添加如下代码:
 1 #-*- coding: utf-8 -*-
 2
 3 import cv2
 4 import sys
 5 import gc
 6 from face_train_use_keras import Model
 7
 8 if __name__ == '__main__':
 9     if len(sys.argv) != 2:
10         print("Usage:%s camera_id
" % (sys.argv[0]))
11         sys.exit(0)
12
13     #加载模型
14     model = Model()
15     model.load_model(file_path = './model/me.face.model.h5')
16
17     #框住人脸的矩形边框颜色
18     color = (0, 255, 0)
19
20     #捕获指定摄像头的实时视频流
21     cap = cv2.VideoCapture(int(sys.argv[1]))
22
23     #人脸识别分类器本地存储路径
24     cascade_path = "/usr/local/share/OpenCV/haarcascades/haarcascade_frontalface_alt2.xml"
25
26     #循环检测识别人脸
27     while True:
28         _, frame = cap.read()   #读取一帧视频
29
30         #图像灰化,降低计算复杂度
31         frame_gray = cv2.cvtColor(frame, cv2.COLOR_BGR2GRAY)
32
33         #使用人脸识别分类器,读入分类器
34         cascade = cv2.CascadeClassifier(cascade_path)
35
36         #利用分类器识别出哪个区域为人脸
37         faceRects = cascade.detectMultiScale(frame_gray, scaleFactor = 1.2, minNeighbors = 3, minSize = (32, 32))
38         if len(faceRects) > 0:
39             for faceRect in faceRects:
40                 x, y, w, h = faceRect
41
42                 #截取脸部图像提交给模型识别这是谁
43                 image = frame[y - 10: y + h + 10, x - 10: x + w + 10]
44                 faceID = model.face_predict(image)
45
46                 #如果是“我”
47                 if faceID == 0:
48                     cv2.rectangle(frame, (x - 10, y - 10), (x + w + 10, y + h + 10), color, thickness = 2)
49
50                     #文字提示是谁
51                     cv2.putText(frame,'Dady',
52                                 (x + 30, y + 30),                      #坐标
53                                 cv2.FONT_HERSHEY_SIMPLEX,              #字体
54                                 1,                                     #字号
55                                 (255,0,255),                           #颜色
56                                 2)                                     #字的线宽
57                 else:
58                     pass
59
60         cv2.imshow("识别朕", frame)
61
62         #等待10毫秒看是否有按键输入
63         k = cv2.waitKey(10)
64         #如果输入q则退出循环
65         if k & 0xFF == ord('q'):
66             break
67
68     #释放摄像头并销毁所有窗口
69     cap.release()
70     cv2.destroyAllWindows()
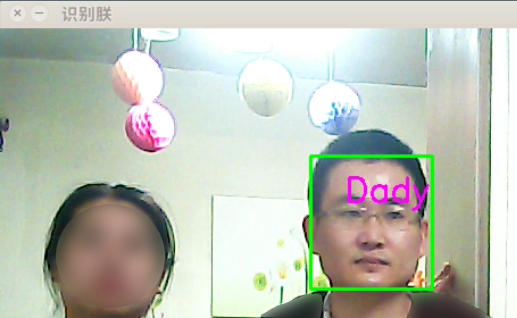
这个就是我们的最终程序,它能够从USB拍摄的实时视频流中找出哪一个是我,先看识别结果:

执行结果符合预期,值得庆贺。至此,本系列完结。