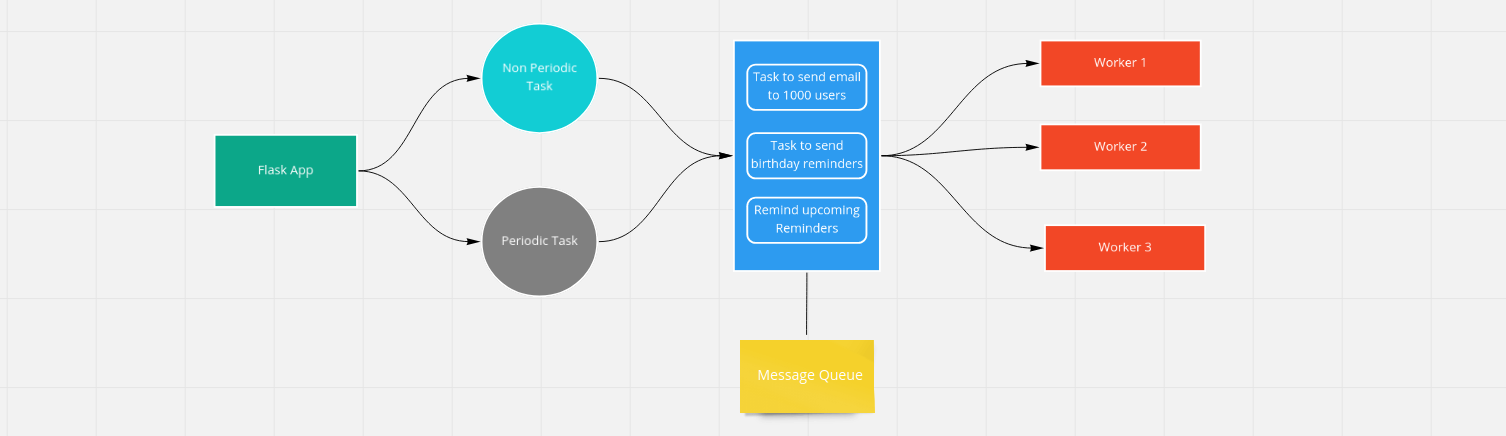
flask 利用 celery 和 MQ的流程图如下:
celery 集群架构图如下:
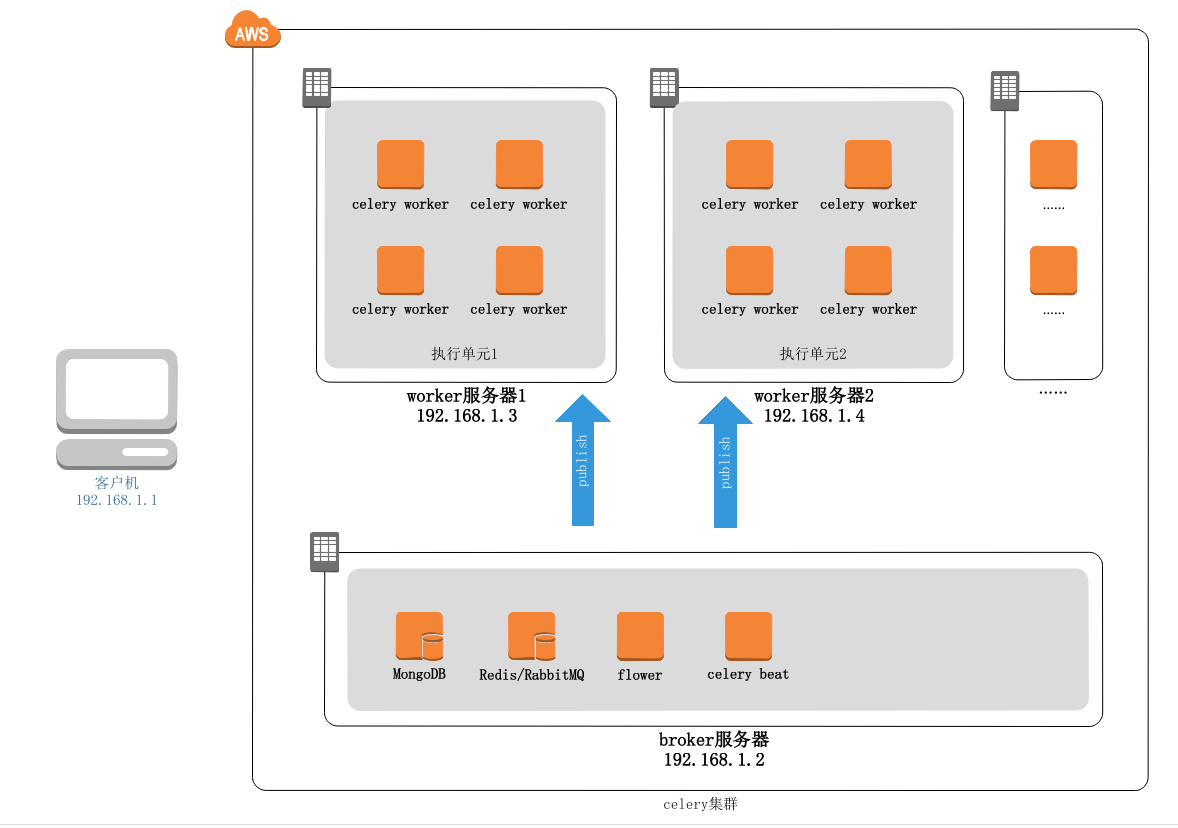
Multiple machines are connected by message brokers like rabbitmq, Kafka and etc. All the worker machines must have same code base. When client machine calls the function defined in worker machines, celery will send the message, perform loading balancing routing and collect result if necessary.
一、 flask 和 celery 客户端项目:
项目结构:
src
├── api
│   ├── ...
    ...
├── requirements.txt
├── static
├── tasks
│   ├── __init__.py
│   ├── asyn_tasks.py
│   ├── celery.py
│   └── create_celery.py
└── templates
    ├── ...


# api 中是 flask 的代码;flask 和 celery相关的配置也在其中
# tasks 中是 celery 相关的代码
celery 相关示例代码: celery 客户端
tasks/celery.py
from __future__ import absolute_import
from tasks.create_celery import make_celery

import os
from flask import Flask

from api.conf.settings import envs    # envs 中有全部的配置类

app = Flask(__name__)
env = os.environ.get("FLASK_ENV", "develop")
config = envs.get(env)

app.config.from_object(config)    # 加载 flask 的配置

celery = make_celery(app)
tasks/create_celery.py
from __future__ import absolute_import
from celery import Celery


def make_celery(app):
    celery = Celery(
        app.import_name,
        backend=app.config['CELERY_RESULT_BACKEND'],
        broker=app.config['CELERY_BROKER_URL'],
        include=['tasks.asyn_tasks']
    )
    celery.conf.update(app.config)

    class ContextTask(celery.Task):
        def __call__(self, *args, **kwargs):
            with app.app_context():
                return self.run(*args, **kwargs)

    celery.Task = ContextTask
    return celery
tasks/asyn_tasks.py -- 任务模块
from __future__ import absolute_import
import json
import requests
from tasks.celery import celery


@celery.task
def async_send_single_msg(obj_dict, mobile, text):  # code :验证码; mobile:手机号

    params = {
        "apikey": obj_dict.get("api_key"),
        "mobile": mobile,
        "text": text
    }
    print("sms param--->", params)
    response = requests.post(obj_dict.get("send_single_url"), data=params)
    res_dict = json.loads(response.text)  # 对 response.text 序列化
    return res_dict
celery 客户端
在 flask 项目中需要用到 celery 异步任务的时候,要把上面的 任务模块 (asyn_tasks) 导入,如下:
from tasks import asyn_tasks    # 导入 celery 的任务模块

def send_single_msg(obj_dict, mobile, text):  # code :验证码; mobile:手机号
    asyn_tasks.async_send_single_msg.delay(obj_dict, mobile, text)   # 利用 celery 语法去实现异步任务
二、部署在另一台主机上的 celery worker 项目
项目结构:celery_tasks 是项目根目录
celery_tasks
├── tasks
│   ├── __init__.py
│   ├── asyn_tasks.py
│   ├── celery.py
│   ├── celeryconfig.py
│   └── create_celery.py
celery worker 示例代码:
tasks/celery.py
from __future__ import absolute_import
from tasks.create_celery import make_celery

celery = make_celery()

# 因为该项目中有自己的 celery 配置文件, 所以不再需要利用 flask 去加载相关配置
tasks/create_celery.py
from __future__ import absolute_import
from celery import Celery
from tasks import celeryconfig


def make_celery():
    celery = Celery(
        'tasks',
        backend=celeryconfig.CELERY_RESULT_BACKEND,
        broker=celeryconfig.CELERY_BROKER_URL,
        include=['tasks.asyn_tasks']
    )
    # 直接利用 celeryconfig 文件去加载配置
    celery.conf.update(broker_transport_options=celeryconfig.BROKER_TRANSPORT_OPTIONS)

    return celery
tasks/asyn_tasks.py
from __future__ import absolute_import
import json
import requests
from tasks.celery import celery


@celery.task
def async_send_single_msg(obj_dict, mobile, text):  # code :验证码; mobile:手机号

    params = {
        "apikey": obj_dict.get("api_key"),
        "mobile": mobile,
        "text": text
    }
    print("sms param--->", params)
    response = requests.post(obj_dict.get("send_single_url"), data=params)
    res_dict = json.loads(response.text)  # 对 response.text 序列化
    return res_dict

# 这个文件为任务模块
tasks/celeryconfig.py
from kombu.utils.url import safequote

# celery 相关配置

CELERY_RESULT_BACKEND = "redis://127.0.0.1:6379/2"

CELERY_BROKER_URL = "sqs://{aws_access_key}:{aws_secret_key}@".format(
    aws_access_key=safequote("xxxxxxxxx"),
    aws_secret_key=safequote("xxx"),
)

# AWS SQS 相关配置

BROKER_TRANSPORT_OPTIONS = {'region': 'cn-northwest-1'}
celery 配置 链接:
https://docs.celeryproject.org/en/stable/userguide/configuration.html
三、部署
步骤一中内容为项目代码,应该部署在自己的 web 服务器;步骤二中内容是 celery worker 项目的代码,可根据自己的需要部署在多台服务器上(集群)。
步骤一和二中的 tasks 目录中的代码本质上是一样的,主要区别在于相关配置的加载上。
步骤二中的代码部署到服务器上之后,可利用相关命令启动 celery worker,如下:
celery -A tasks.celery.celery worker --loglevel=INFO
如果你只想让步骤一中的 celery (tasks中的代码)做 celery 客户端,那么不上该 web 服务器上启动上面的命令即可。
celery worker 相关命令 链接:
https://docs.celeryproject.org/en/latest/userguide/workers.html
celery集群参考链接:
https://www.213.name/archives/1105
celery 异步任务参考链接:
https://www.cnblogs.com/sellsa/p/9757905.html
获取 celery 异步任务执行状态的参考链接:
https://juejin.im/post/6844903944762687502
celery 文档: