Filter总共有五种,Authorization Filter,Resource Filter,Exception Filter,Action Filter,Result Filter
Exception Filter 设置

新增全局异常过滤器GlobalExceptionFilter.cs,

当出现异常时进入此方法,可在这针对不同的异常做相关处理并返回指定数据,避免直接把错误暴露给用户
public class GlobalExceptionFilter : IExceptionFilter
{
    public void OnException(ExceptionContext context)
    {
        Exception ex = context.Exception;
        string errMsg = "GlobalExceptionFilter-OnException:" +                 ex.Message;
        if (context.Exception.GetType() == typeof(ExecuteException))
     {
        //针对不同的自定义异常,做不同处理
        MsgModel<string> msgModel = new MsgModel<string>()
        {
            Status = false,
            Msg = errMsg,
            Errcode = "AA001"
        };
        context.Result = new JsonResult(msgModel);
        context.ExceptionHandled = true;
    }
    else
    {
      context.Result = new JsonResult(errMsg);
      context.ExceptionHandled = true;
    }

    LogHelper.Error(errMsg);
  }
}
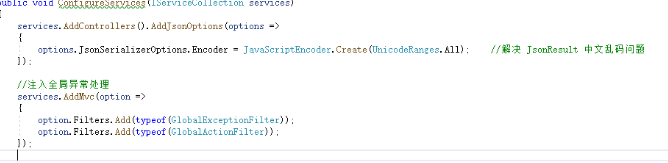
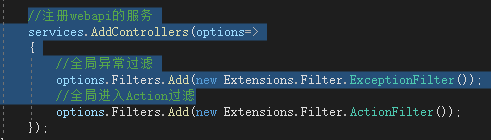
然后在Startup.cs 注入过滤器
Action Filter 设置
新增全局过滤器GlobalActionFilter.cs
在方法执行前后,会跳转至以下两个方法,方便追踪接口执行情况
public class GlobalActionFilter : IActionFilter
{
    public void OnActionExecuted(ActionExecutedContext context)
    {
    //LogHelper.Info("OnActionExecuted");
    //执行方法后执行这
   }

  public void OnActionExecuting(ActionExecutingContext context)
  {
  //LogHelper.Info("OnActionExecuting");
  //执行方法前先执行这
  }
}
Authonization Filter
权限控制过滤器
通过 Authonization Filter 可以实现复杂的权限角色认证、登陆授权等操作
/// <summary>
    /// 实现自定义授权
    /// </summary>
    public class AuthorizeFilter : IAuthorizationFilter
    {
        /// <summary>
        /// 请求验证,当前验证部分不要抛出异常,ExceptionFilter不会处理
        /// </summary>
        /// <param name="context"></param>
        public void OnAuthorization(AuthorizationFilterContext context)
        {
//这里可以做复杂的权限控制操作
//if (context.HttpContext.User.Identity.Name != "1") //简单的做一个示范
//{
// //未通过验证则跳转到无权限提示页
// RedirectToActionResult content = new RedirectToActionResult("NoAuth", "Exception", null);
// context.Result = content;
//
        }
    }
Resource Filter
资源过滤器
可以通过Resource Filter 进行资源缓存、防盗链等操作。
使用Resource Filter 要求实现IResourceFilter 抽象接口
public class ResourceFilter : Attribute,IResourceFilter
    {
        public void OnResourceExecuted(ResourceExecutedContext context)
        {
            // 执行完后的操作
        }

        public void OnResourceExecuting(ResourceExecutingContext context)
        {
            // 执行中的过滤器管道
        }
    }
Result Filter
结果过滤器,可以对结果进行格式化、大小写转换等一系列操作。
使用Result Filter 需要实现IResultFilter 抽象接口,接口要求实现OnResultExecuting 方法 和OnResultExecuted 方法
OnResultExecuting:Called before the action result executes. 在操作结果执行之前调用OnResultExecuted:Called after the action result executes. 在操作结果执行之后调用
public class ResultFilter : Attribute, IResultFilter
 {
        public void OnResultExecuted(ResultExecutedContext context)
        {
            // 在结果执行之后调用的操作...
        }

        public void OnResultExecuting(ResultExecutingContext context)
        {
            // 在结果执行之前调用的一系列操作
        }
    }
完毕 可以在全局注入
中间件
中间件是一种装配到应用管道以处理请求和响应的软件。 每个组件:
- 选择是否将请求传递到管道中的下一个组件。
- 可在管道中的下一个组件前后执行工作。
请求委托用于生成请求管道。 请求委托处理每个 HTTP 请求。
/// <summary>
    /// 中间件
    /// 记录请求和响应数据
    /// </summary>
    public class RequestMiddleware
    {

        private readonly RequestDelegate _next;

        /// <summary>
        /// 日志接口
        /// </summary>
        private static Logger logger = LogManager.GetCurrentClassLogger();

        private Stopwatch _stopwatch;

        public RequestMiddleware(RequestDelegate next)
        {
            _stopwatch = new Stopwatch();
            _next = next;
        }

        public async Task InvokeAsync(HttpContext context)
        {
            // 过滤,只有接口
            if (context.Request.Path.Value.ToLower().Contains("api"))
            {
                context.Request.EnableBuffering();
                Stream originalBody = context.Response.Body;

                _stopwatch.Restart();

                // 获取 Api 请求内容
                var requestContent = await GetRequesContent(context);


                // 获取 Api 返回内容
                using (var ms = new MemoryStream())
                {
                    context.Response.Body = ms;

                    await _next(context);
                    ms.Position = 0;

                    await ms.CopyToAsync(originalBody);
                }

                context.Response.Body = originalBody;

                _stopwatch.Stop();

                var eventInfo = new LogEventInfo();
                eventInfo.Message = "Success";
                eventInfo.Properties["Elapsed"] = _stopwatch.ElapsedMilliseconds;
                eventInfo.Properties["RequestBody"] = requestContent;

                logger.Trace(eventInfo);
            }
            else
            {
                await _next(context);
            }
        }

        private async Task<string> GetRequesContent(HttpContext context)
        {
            var request = context.Request;
            var sr = new StreamReader(request.Body);

            var content = $"{await sr.ReadToEndAsync()}";

            if (!string.IsNullOrEmpty(content))
            {
                request.Body.Position = 0;
            }

            return content;
        }
    }
然后在Startup
// 请求日志监控
            app.UseMiddleware<RequestMiddleware>();
AOP拦截器
其实好多项目中,做一些数据拦截、数据缓存都有Aop的概念,只是实现方式不一样;之前大家可能都会利用过滤器来实现Aop的功能,如果是Asp.NetCore的话,也可能会使用中间件; 而这种实现方式都是在请求过程中进行拦截,如果我们想在服务层中做切面的话,那种方式显然不好使了,需要用到“真正的Aop”。
真正的Aop”其实就是动态代理
LogInterceptor 设置
安装Castle.Core,Autofac.Extras.DynamicProxy
新建LogInterceptor.cs ,继承IInterceptor
   public class LogInterceptor : IInterceptor
    {
        public void Intercept(IInvocation invocation)
        {
            try
            {
                invocation.Proceed();
                Dapper.Logger.LogHelper.logger.Info(invocation.Method.Name);
            }
            catch (Exception ex)
            {
                Dapper.Logger.LogHelper.logger.Error(invocation.Method.Name + " " + ex.ToString());
            }
        }
    }
在Startup.cs 新增以下代码
针对某个类或者某个方法做拦截时
首先新建一个拦截器 MyInterceptor
    public class MyInterceptor : IInterceptor
    {
        public void Intercept(IInvocation invocation)
        {
            try
            {
                invocation.Proceed();
                NLogHelper.logger.Info(invocation.Method.Name);
            }
            catch (Exception ex)
            {
                NLogHelper.logger.Error(invocation.Method.Name + " " + ex.ToString());
            }
        }
    }
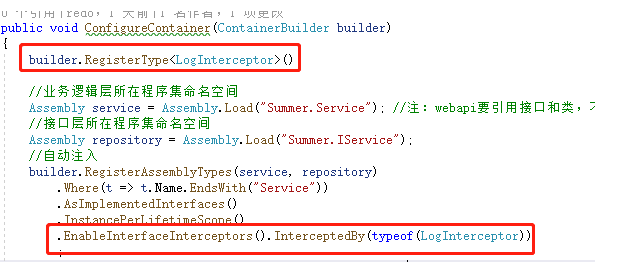
然后Startup.cs 中ConfigureContainer代码如下
把LogInterceptor 代码注释,但是要保留接口拦截EnableInterfaceInterceptors() ,注入MyInterceptor
public void ConfigureContainer(ContainerBuilder builder)
    {
        //builder.RegisterType<LogInterceptor>();

        builder.RegisterType<MyInterceptor>();

        builder.RegisterType<DbFactory>().As<IDbFactory>();

        //业务逻辑层所在程序集命名空间
        Assembly service = Assembly.Load("Summer.Service"); //注:webapi要引用接口和类,不然这里读不到
                                                            //接口层所在程序集命名空间
        Assembly repository = Assembly.Load("Summer.IService");
        //自动注入
        builder.RegisterAssemblyTypes(service, repository)
        .Where(t => t.Name.EndsWith("Service"))
        .AsImplementedInterfaces()
        .InstancePerLifetimeScope()
        .EnableInterfaceInterceptors() //开启接口拦截
                                       //.InterceptedBy(typeof(LogInterceptor)) //设置全局拦截器,统一由LogInterceptor拦截所有接口的调用
        ;
    }
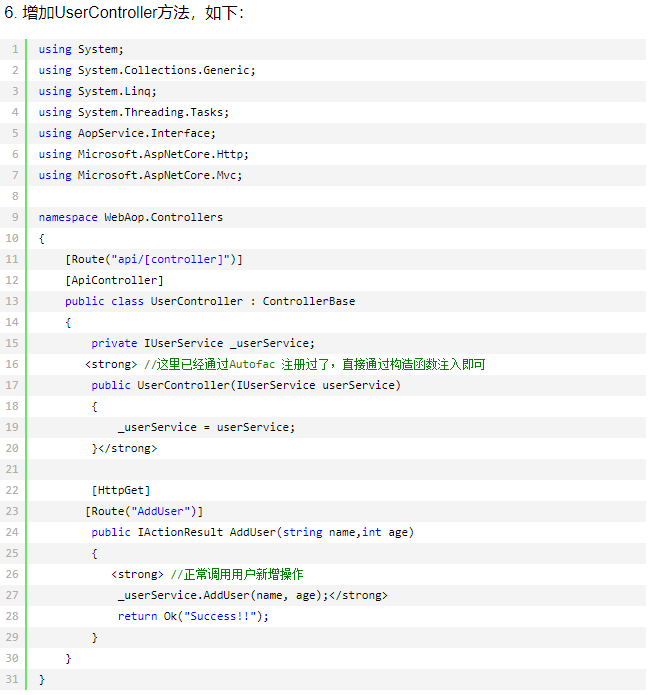
然后在需要拦截的接口中添加以下代码

拦截器设置完毕,当调用ITestService 的全部方法都会跳转拦截器
Filter和 LogInterceptor 可以同时共存,执行顺序是:
ActionFilter 的OnActionExecuting =》LogInterceptor 的Intercept =》ActionFilter 的OnActionExecuted
如果接口有异常,不会跳转LogInterceptor ,而是进入ExceptionFilter,顺序是:
ActionFilter 的OnActionExecuting =》ActionFilter 的OnActionExecuted =》ExceptionFilter 的OnException
原文 https://www.cnblogs.com/redo/p/12575119.html
AOP的应用
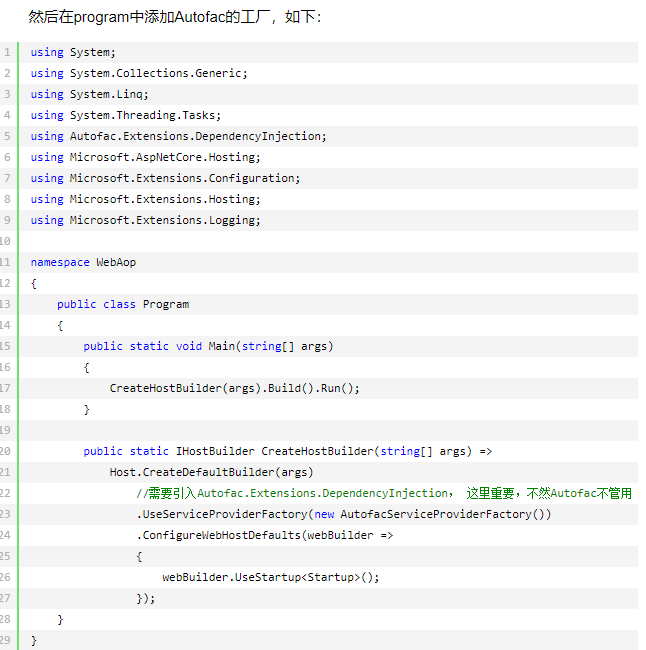
引入三个包,通过Nuget安装,Autofac开头,如下

注: 其中Autofac.Extras.DynamicProxy就是AOP相关组件,其中包含了Castle.Core,所以不用单独安装Castle.Core.


总结:
AOP在做一些业务前置或后置处理上时很有用的,使用比较灵活,无需修改原有代码逻辑,比起修改原有代码维护相对好多啦!!!