参考文档:
-
CEPH OBJECT GATEWAY:http://docs.ceph.com/docs/master/radosgw/
一.环境准备
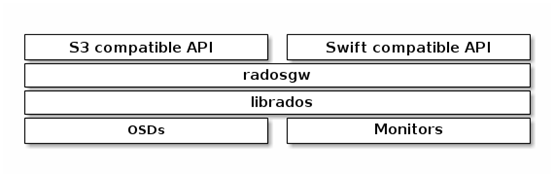
1. Ceph Object Gateway框架
Ceph Object Gateway是对象存储接口,构建在librados之上,为应用提供restful类型的网关。其支持两种接口:
-
S3-compatible API:兼容AWS S3 Restful接口;
-
Swift-compaible API:兼容Openstack Swift接口。
2. 环境
以《CEPH LIO iSCSI Gateway》中的环境为基础,即:
|
Hostname |
IP |
Service |
Remark |
|
ceph01 |
public:172.30.200.57 cluster:192.30.200.57 |
1. centos7.5 with kernel v4.18.7-1; 2. ceph-13.2.1 mimic (stable),已部署 3. ntp已部署; 4. 禁用selinux; 5. 禁用firewalld或iptables,rgw内嵌civetweb默认采用7480端口。 |
|
|
ceph02 |
public:172.30.200.58 cluster:192.30.200.58 |
||
|
ceph03 |
public:172.30.200.59 cluster:192.30.200.59 |
||
|
ceph-client |
172.30.200.50 |
二.部署Ceph RGW
1. 创建ceph mds
# 通过部署服务器部署,格式:ceph-deploy install --rgw Gateway-NODE1 [Gateway-NODE2 …];
# 如因网络原因导致安装不成功,可在各节点独立安装:ceph-radosgw ceph-common
[root@ceph01 ~]# su - cephde
[cephde@ceph01 ~]$ cd cephcluster/
[cephde@ceph01 cephcluster]$ ceph-deploy install --rgw ceph01 ceph02 ceph03
2. 创建对象网关实例
Ceph 对象存储使用 Ceph 对象网关守护进程( radosgw ,RGW),内嵌了Civetweb服务器与FastCGI 模块。
其中Civetweb服务器默认使用tcp 7480端口。
1)变更默认端口(option)
# 变更Civetweb服务器默认端口,可修改ceph.conf文件,增加[client.rgw.<GATEWAY-NODE>]字段,其中“GATEWAY-NODE”为所在网关节点的短主机名,即:hostname -s;
# 可在部署服务器修改后分发到各网关节点,也可在各网关节点独立修改;
# [client.rgw.<GATEWAY-NODE>]字段与[global]字段在相同层级,且1个网关节点使用1个字段,其中”client”表示客户端配置,“rgw”表示客户端类型,“GATEWAY-NODE”标识实例名;
[cephde@ceph01 cephcluster]$ cat ceph.conf
[client.rgw.ceph01]
rgw_frontends = "civetweb port=80"
[client.rgw.ceph02]
rgw_frontends = "civetweb port=80"
[client.rgw.ceph03]
rgw_frontends = "civetweb port=80"

# 从部署服务器分发ceph.conf
[cephde@ceph01 cephcluster]$ ceph-deploy --overwrite-conf config push ceph01 ceph02 ceph03
2)创建实例
# 在部署服务器创建实例;
# 创建后,在各网关节点对应的守护进程启动;
# 如果ceph.conf配置文件变更,可在对应节点重启服务
[cephde@ceph01 cephcluster]$ ceph-deploy rgw create ceph01 ceph02 ceph03

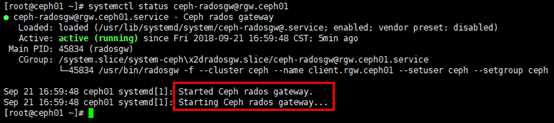
# 查看服务
[root@ceph01 ~]# systemctl status ceph-radosgw@rgw.ceph01
# 查看端口
[root@ceph01 ~]# netstat -tunlp | grep radosgw

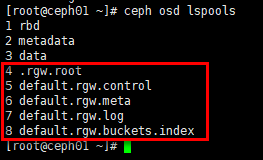
# 创建实例后,同时创建部分默认pool;
# 或:”rados df” 与 “ceph osd pool ls”
[root@ceph01 ~]# ceph osd lspools
3)访问
# 格式:http://RGW-IP:port
[root@ceph01 ~]# curl http://172.30.200.57
# 如果网关实例正常运行,响应如下:
<?xml version="1.0" encoding="UTF-8"?>
<ListAllMyBucketsResult xmlns="http://s3.amazonaws.com/doc/2006-03-01/">
    <Owner>
        <ID>anonymous</ID>
        <DisplayName></DisplayName>
    </Owner>
    <Buckets>
    </Buckets>
</ListAllMyBucketsResult>
三.验证
使用REST接口验证,步骤如下:
-
首先创建适用于s3接口的ceph对象网关用户;
-
基于已创建的用户,创建适用于swift接口的子用户;
-
验证用户是否能访问网关。
1. 创建用户
1)创建用于S3访问的RADOSGW用户
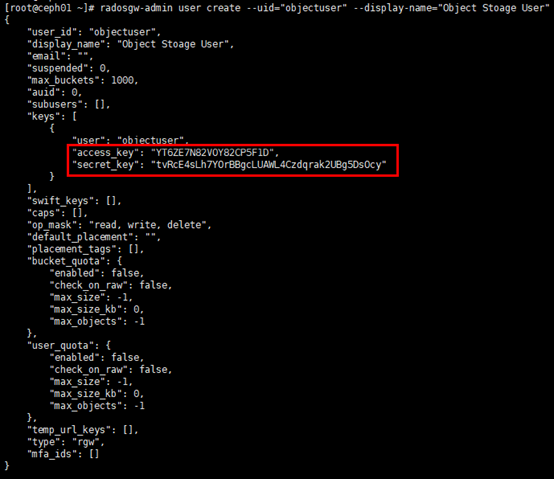
# “--uid”与“--display-name”自定义;
# 返回结果中,keys->access_key 与 keys->secret_key 是访问验证时需要的值
[root@ceph01 ~]# radosgw-admin user create --uid="objectuser" --display-name="Object Stoage User"
2)创建SWITF用户
Swift用户创建分两步:
- 创建子用户;
- 生成秘钥。
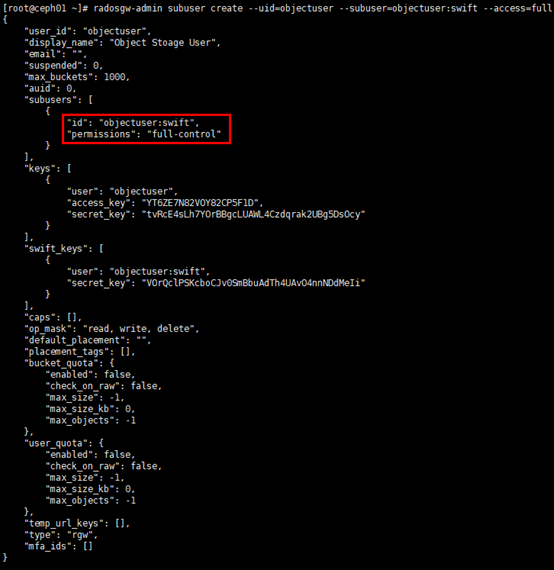
# 创建子用户,基于已创建的s3用户;
# 赋予全权限
[root@ceph01 ~]# radosgw-admin subuser create --uid=objectuser --subuser=objectuser:swift --access=full
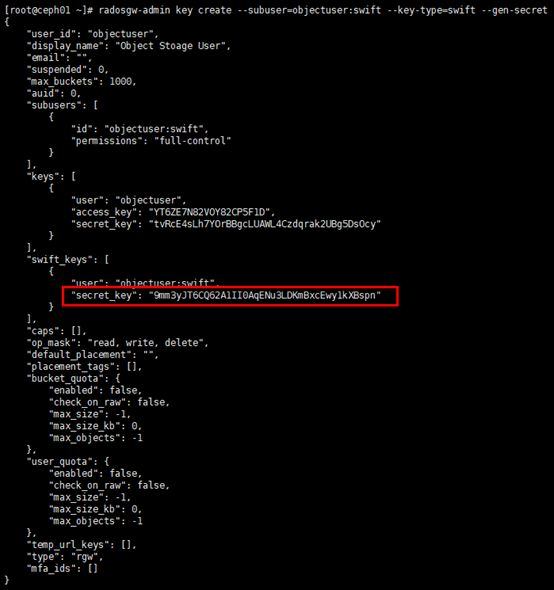
# 生成秘钥;
# 返回结果中,swift_keys ->secret_key 是访问验证时需要的值
[root@ceph01 ~]# radosgw-admin key create --subuser=objectuser:swift --key-type=swift --gen-secret
2. 访问验证
1)测试S3访问
测试采用python脚本完成,脚本流程如下:测试脚本连接radosgw,创建bucket,list bucket。
# 客户端需要安装python-boto
[root@ceph-client ~]# yum install -y python-boto

# 编辑测试脚本;
# 注意”access_key”,”secret_key”,”host”与”port”值修改
[root@ceph-client ~]# vim s3.py
import boto.s3.connection

access_key = 'YT6ZE7N82VOY82CP5F1D'
secret_key = 'tvRcE4sLh7YOrBBgcLUAWL4Czdqrak2UBg5DsOcy'
conn = boto.connect_s3(
        aws_access_key_id=access_key,
        aws_secret_access_key=secret_key,
        host='172.30.200.57', port=80,
        is_secure=False, calling_format=boto.s3.connection.OrdinaryCallingFormat(),
       )

bucket = conn.create_bucket('my-new-bucket')
for bucket in conn.get_all_buckets():
    print "{name} {created}".format(
        name=bucket.name,
        created=bucket.creation_date,
)

# 运行脚本,返回结果符合预期
[root@ceph-client ~]# python s3.py

2)测试Swift访问
测试采用swift客户端进行。
# 安装swift客户端
[root@ceph-client ~]# yum install python-setuptools
[root@ceph-client ~]# easy_install pip
[root@ceph-client ~]# pip install --upgrade setuptools
[root@ceph-client ~]# pip install --upgrade python-swiftclient

# 命令格式:swift -A http://{IP ADDRESS}:{port}/auth/1.0 -U USER:swift -K '{swift_secret_key}' list;
# 这里基于s3测试生成的bucket,list bucker,返回结果符合预期
[root@ceph-client ~]# swift -A http://172.30.200.57/auth/1.0 -U objectuser:swift -K '9mm3yJT6CQ62A1II0AqENu3LDKmBxcEwy1kXBspn' list
