1.memcache使用环境搭建
1.安装memcached服务器

安装方法 以管理员身份打开cmd,在cmd中执行如下命令:

注意:在执行该命令时必须在memcached.exe文件下执行.
2.开启服务
注意:要重新打开cmd控制台,再执行开启服务命令

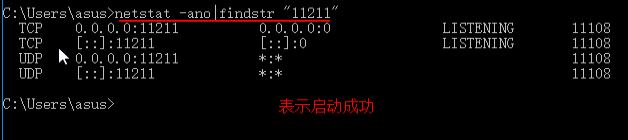
3.查看是否启动成功
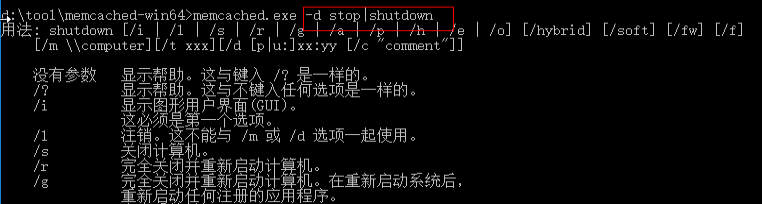
4.关闭memcache缓存服务器
到此安装启动查看是否启动成功关闭服务完成!
2.memcached与spring整合并使用
1.拷贝jar包

注意:如果项目中没有日志包必须拷贝日志包
2.编写与spring整合的配置文件: spring-memcached.xml
 1 <?xml version="1.0" encoding="UTF-8"?>
 2 <beans xmlns="http://www.springframework.org/schema/beans"
 3        xmlns:xsi="http://www.w3.org/2001/XMLSchema-instance"
 4        xsi:schemaLocation="http://www.springframework.org/schema/beans
 5         http://www.springframework.org/schema/beans/spring-beans.xsd">
 6     <!-- XMemcachedClientFactoryBean工厂配置-->
 7     <bean id="memcachedClient" class="net.rubyeye.xmemcached.utils.XMemcachedClientFactoryBean">
 8         <property name="servers" value="${memcache.servers}"/>
 9         <property name="weights" value="${memcache.servers.weight}"/>
10         <property name="sessionLocator">
11             <bean class="net.rubyeye.xmemcached.impl.KetamaMemcachedSessionLocator"/>
12         </property>
13         <property name="transcoder">
14             <bean class="net.rubyeye.xmemcached.transcoders.SerializingTranscoder"/>
15         </property>
16         <property name="bufferAllocator">
17             <bean class="net.rubyeye.xmemcached.buffer.SimpleBufferAllocator"/>
18         </property>
19     </bean>
20     <!--自己封装的api类-->
21     <bean class="com.day02.sation.map.MemcachedAccess">
22         <property name="memcachedClient" ref="memcachedClient"/>
23     </bean>
24
25 </beans>
使用到的服务器参数配置:
memcache.servers=127.0.0.1:11211
memcache.servers.weight=1
3.编写封装的API类 MemcachedAccess.java
 1 package com.day02.sation.map;
 2
 3 import net.rubyeye.xmemcached.MemcachedClient;
 4 import net.rubyeye.xmemcached.exception.MemcachedException;
 5 import java.util.concurrent.TimeoutException;
 6
 7 /**
 8  * Created by Administrator on 1/4.
 9  */
10 public class MemcachedAccess {
11     private MemcachedClient memcachedClient;
12
13     /**
14      * 缓存时间
15      * @param key
16      * @param time
17      * @param value
18      * @return
19      */
20     public boolean put(String key,Integer time,String value){
21         try {
22             boolean add = memcachedClient.add(key, time, value);
23             return add;
24         } catch (TimeoutException e) {
25             e.printStackTrace();
26         } catch (InterruptedException e) {
27             e.printStackTrace();
28         } catch (MemcachedException e) {
29             e.printStackTrace();
30         }
31         return false;
32     }
33
34     /**
35      *添加
36      * @param key
37      * @param value
38      * @return
39      */
40     public boolean put(String key,String value){
41         try {
42             boolean add = memcachedClient.add(key, 1*24*60, value);
43             return add;
44         } catch (TimeoutException e) {
45             e.printStackTrace();
46         } catch (InterruptedException e) {
47             e.printStackTrace();
48         } catch (MemcachedException e) {
49             e.printStackTrace();
50         }
51         return false;
52     }
53
54     /**
55      * 获取
56      * @param key
57      * @return
58      */
59     public String get(String key){
60         try {
61             String value= (String)memcachedClient.get(key);
62             return value;
63         } catch (TimeoutException e) {
64             e.printStackTrace();
65         } catch (InterruptedException e) {
66             e.printStackTrace();
67         } catch (MemcachedException e) {
68             e.printStackTrace();
69         }
70         return null;
71     }
72
73     /**
74      * 清除缓存
75      */
76     public void flushAll(){
77         try {
78             memcachedClient.flushAll();
79         } catch (TimeoutException e) {
80             e.printStackTrace();
81         } catch (InterruptedException e) {
82             e.printStackTrace();
83         } catch (MemcachedException e) {
84             e.printStackTrace();
85         }
86     }
87
88     public MemcachedClient getMemcachedClient() {
89         return memcachedClient;
90     }
91
92     public void setMemcachedClient(MemcachedClient memcachedClient) {
93         this.memcachedClient = memcachedClient;
94     }
95 }
4.将spring-memcached.xml于spring主配置文件进行关联
<!--引入memcached.xml文件-->
<import resource="classpath:spring/spring-memcached.xml"/>
5..测试MemcachedAccess.java是否可用
 1 package com.day02.sation.test;
 2
 3 import com.day02.sation.map.MemcachedAccess;
 4 import org.junit.Test;
 5 import org.junit.runner.RunWith;
 6 import org.springframework.beans.factory.annotation.Autowired;
 7 import org.springframework.test.context.ContextConfiguration;
 8 import org.springframework.test.context.junit4.SpringJUnit4ClassRunner;
 9
10 /**
11  * Created by Administrator on 12/27.
12  */
13 @RunWith(SpringJUnit4ClassRunner.class)
14 @ContextConfiguration("classpath:spring-config.xml")
15 public class TestMemcache {
16     @Autowired
17     private MemcachedAccess memcachedAccess;
18
19     @Test
20     public void testGetList() {
21         //添加一对值
22         memcachedAccess.put("name", "wuji");
23         //取出缓存中的值
24         String name = memcachedAccess.get("name");
25         System.out.println("name=  " + name);
26         //清除所有缓存
27         memcachedAccess.flushAll();
28         //再次获取值,检查是否已经清除
29         String name2 = memcachedAccess.get("name");
30         System.out.println("name2=  " + name2);
31     }
32 }
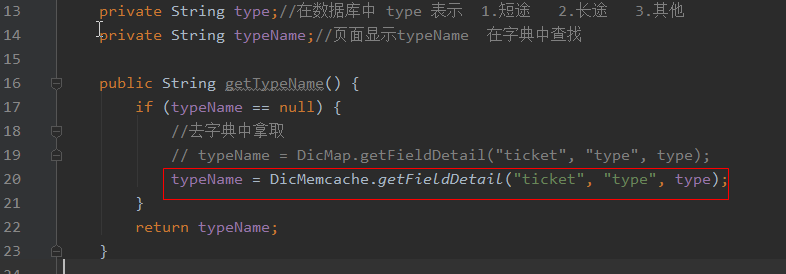
6.memcache在实际生产中做数据字典缓存使用案例
 1 package com.day02.sation.map;
 2
 3 import com.day02.sation.dao.IDicDao;
 4 import com.day02.sation.model.Dic;
 5 import org.springframework.context.ApplicationContext;
 6 import org.springframework.context.support.ClassPathXmlApplicationContext;
 7
 8 import java.util.List;
 9
10 /**
11  * Created by Administrator on 1/3.
12  */
13
14 public class DicMemcache {
15     private static IDicDao dicDao;
16     private static MemcachedAccess memcachedAccess;
17     static {
18         //获取应用上下文对象
19         ApplicationContext ctx = new ClassPathXmlApplicationContext("spring-config.xml");
20         //获取dicDao实例
21         dicDao = ctx.getBean(IDicDao.class);
22         //获取MemcachedAccess实例
23         memcachedAccess = ctx.getBean(MemcachedAccess.class);
24         //调用方法初始化字典
25         addMapValue();
26     }
27
28     public static String getFieldDetail(String tableName, String fieldName, String filedValue) {
29         String key = tableName + "_" + fieldName + "_" + filedValue;
30         String value = memcachedAccess.get(key);
31         if (value == null) { //如果 value 为空 重新查询数据库
32             Dic dicQuery = new Dic();
33             dicQuery.setTableName(tableName);
34             dicQuery.setFieldName(fieldName);
35             dicQuery.setFieldValue(filedValue);
36
37             Dic dic = dicDao.getDic(dicQuery);
38             if (dic != null) {//数据有该值
39                 String fieldDescribe = dic.getFieldDescribe();
40                 memcachedAccess.put(key, fieldDescribe);
41                 return fieldDescribe;
42             }
43             value = "暂无";
44         }
45         return value;
46     }
47
48     /**
49      * 初始化字典数据
50      */
51     private static void addMapValue() {
52         List<Dic> list = dicDao.getList();
53         for (int i = 0; i < list.size(); i++) {
54             Dic dic = list.get(i);
55             String tableName = dic.getTableName();
56             String fieldName = dic.getFieldName();
57             String fieldValue = dic.getFieldValue();
58             String key = tableName + "_" + fieldName + "_" + fieldValue;
59             String fieldDescribe = dic.getFieldDescribe();
60             memcachedAccess.put(key, fieldDescribe);
61         }
62
63     }
64 }
7.调用获取值
到此memcache的使用到此结束!