步骤 1 : 可运行项目
本知识点是建立在 上一个知识点 的基础上进行的改进
首先下载一个简单的可运行项目作为演示:网盘链接:http://t.cn/A6Al5mmq
下载后解压,比如解压到 E:projectspringboot 目录下
步骤 2 : css 文件
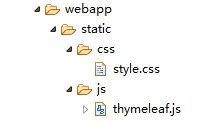
在 webapp 目录下新建 static/css 目录,然后新建 style.css 文件
div.showing{
    80%;
    margin:20px auto;
    border:1px solid grey;
    padding:30px;
}

.even{
    background-color: red;
}
.odd{
    background-color: green;
}
步骤 3 : js 文件
在 webapp 目录下新建 static/js 目录,然后新建 thymeleaf.js 文件
function testFunction(){
    alert("test Thymeleaf.js!");
}
步骤 4 : 修改 hello.html
通过 th:href="@{/static/css/style.css}" 和 th:src="@{/static/js/thymeleaf.js}" 引入 css 和 js 文件
<link rel="stylesheet" type="text/css" media="all" href="../../webapp/static/css/style.css" th:href="@{/static/css/style.css}"/>
<script type="text/javascript" src="../../webapp/static/js/thymeleaf.js" th:src="@{/static/js/thymeleaf.js}"></script>
注意几点:
- 使用 @ 这种方式引入,在渲染后的 html 里会自动生成 上下文路径,既如图所示的 /thymeleaf 这个路径
- 如果使用浏览器直接打开当前的 hello.html, 依然可以看到 css 和 js 效果,因为如下代码起作用:
href="../../webapp/static/css/style.css"
src="../../webapp/static/js/thymeleaf.js"
所以这样就非常方便前端开发和测试
- 在 header 标签里有这么一段:
<script>
testFunction();
</script>
用以表示访问 thymeleaf.js 里的 testFunction函数
完整 hello.html:
<!DOCTYPE HTML>
<html xmlns:th="http://www.thymeleaf.org">
<head>
    <title>hello</title>
    <meta http-equiv="Content-Type" content="text/html; charset=UTF-8" />
    <link rel="stylesheet" type="text/css" media="all" href="../../webapp/static/css/style.css" th:href="@{/static/css/style.css}"/>
    <script type="text/javascript" src="../../webapp/static/js/thymeleaf.js" th:src="@{/static/js/thymeleaf.js}"></script>

    <script>
    testFunction();
    </script>

</head>
<body>
<div class="showing">

<p th:text="${name}" >name</p>
<p th:text="'Hello! ' + ${name} + '!'" >hello world</p>
<p th:text="|Hello! ${name}!|" >hello world</p>

</div>

</body>

</html>
步骤 5 : 测试
运行 Application, 然后访问如下地址进行测试:
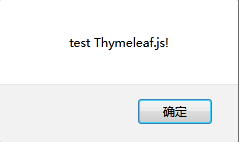
如图所示,可以看到 一个 js 的对话框,以及灰色的边框效果。
这两个效果是通过 @URL 外部引用 css 文件和 js 文件得到的。

更多关于 Springboot-thymeleaf-url 详细内容,点击学习: https://t.cn/A6Ag8wtM