Spring Boot简明教程之数据访问(三):MyBatis
文章目录
MyBatis简介
MyBatis 是支持普通 SQL 查询,存储过程和高级映射的优秀持久层框架。MyBatis 消除 了几乎所有的 JDBC 代码和参数的手工设置以及结果集的检索。MyBatis 使用简单的 XML 或注解用于配置和原始映射,将接口和 Java 的 POJOs(Plain Old Java Objects,普通的 Java 对象)映射成数据库中的记录。对于MyBatis的更多介绍和基本使用可以查看这篇文章:Mybatis环境配置以及使用,在Spring Boot中有通过注解和使用XML配置两种方式进行数据访问,接下类我们将分别介绍这两种方式:
使用注解进行数据访问
项目创建
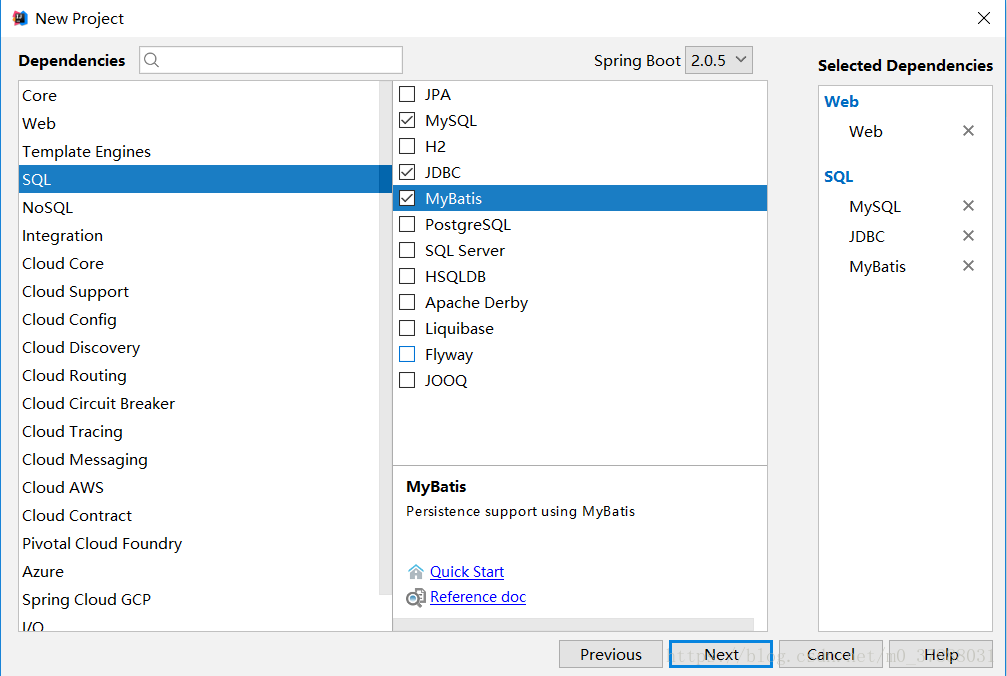
创建的过程和我们的第一篇文章:SpringBoot简明教程之快速创建第一个SpringBoot应用大致相同,差别只是我们在挑选所需要的组件时,除了Web组件外,我们需要添加如下三个组件:MyBatis、MySQL、JDBC
或者在pox.xml文件中,加入如下依赖:
<dependency>
	<groupId>org.springframework.boot</groupId>
	<artifactId>spring-boot-starter-jdbc</artifactId>
</dependency>
<dependency>
	<groupId>org.springframework.boot</groupId>
	<artifactId>spring-boot-starter-web</artifactId>
</dependency>
<dependency>
	<groupId>org.mybatis.spring.boot</groupId>
	<artifactId>mybatis-spring-boot-starter</artifactId>
	<version>1.3.2</version>
</dependency>
<dependency>
	<groupId>mysql</groupId>
	<artifactId>mysql-connector-java</artifactId>
	<scope>runtime</scope>
</dependency>
我们在这次的依赖中发现了一个新的依赖:mybatis-spring-boot-starter,这个依赖并不是Spring Boot官方提供的,而是MyBatis提供的关于快速集成 Spring Boot 的一个组件包。这样可以减少大量的配置。
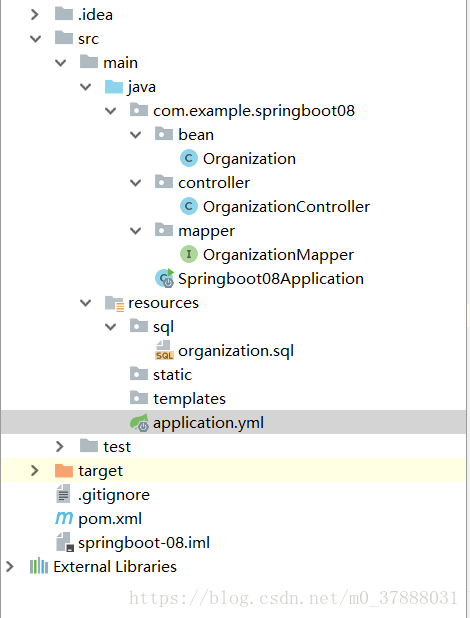
项目目录
创建数据库文件
organization.sql
CREATE TABLE `organization` (
  `id` bigint(20) NOT NULL AUTO_INCREMENT,
  `active` smallint(1) NOT NULL,
  `company_name` varchar(30) NOT NULL,
  PRIMARY KEY (`id`)
) ENGINE=InnoDB AUTO_INCREMENT=1 DEFAULT CHARSET=utf8;
创建Organization实体
public class Organization {
    private Integer id;
    private Integer active;
    private String companyName;
//省略Getter、Setter方法
}
编写配置文件application.yml
server:
  port: 9090

spring:
  datasource:
    driver-class-name: com.mysql.jdbc.Driver
    url: jdbc:mysql://localhost:3306/springboot?useSSL=false
    username: root
    password:
    schema: classpath:sql/*.sql
    initialization-mode: always
编写Mapper接口
public interface OrganizationMapper {

    @Select("SELECT * FROM organization where id = #{id}")
    Organization getOrganizationById (Integer id);

    @Delete("DELETE FROM organization where id = #{id}")
    int delOrganizationById (Integer id);

    @Options(useGeneratedKeys = true,keyProperty = "id")  //使用自增主键
    @Insert("INSERT INTO organization(active,company_name) VALUES (#{active},#{companyName})")
    int insertOrganization(Organization organization);

}
编写Controller
@RestController
public class OrganizationController {
    @Autowired
    OrganizationMapper organizationMapper;

    @GetMapping("/get/{id}")
    public Organization getOrganizationById (@PathVariable("id") Integer id){
        return  organizationMapper.getOrganizationById(id);
    }

    @GetMapping("/del/{id}")
    int delOrganizationById (@PathVariable("id") Integer id){
        return organizationMapper.delOrganizationById(id);
    }

    @GetMapping("/insert")
    Organization insertOrganization(Organization organization){
         organizationMapper.insertOrganization(organization);
         return organization;
    }
}
修改启动类
@MapperScan(value = "com.example.springboot08.mapper")
@SpringBootApplication
public class Springboot08Application {
	public static void main(String[] args) {
		SpringApplication.run(Springboot08Application.class, args);
	}
}
数据访问:
插入数据:
访问:http://localhost:9090/insert?companyName=IBM&active=1
浏览器返回:{"id":1,"active":1,"companyName":"IBM"}
http://localhost:9090/insert?companyName=Oracle&active=0
浏览器返回:{"id":2,"active":0,"companyName":"Oracle"}
查询
访问:http://localhost:9090/get/2
浏览器返回:{"id":2,"active":0,"companyName":null}
这是我们发现刚刚成功插入的数据,现在查询时companyName却为null,这是为什么呢?
因为我们在数据表中改字段为company_name,而我们在实体类organization中却为:companyName,所以我们在查询的过程中,MyBatis无法进行映射,所以我们就需要去开启驼峰命名规则:
更改配置文件application.yml:
server:
  port: 9090
spring:
  datasource:
    driver-class-name: com.mysql.jdbc.Driver
    url: jdbc:mysql://localhost:3306/springboot?useSSL=false
    username: root
    password:
    schema: classpath:sql/*.sql
    initialization-mode: never
mybatis:
  configuration:
    map-underscore-to-camel-case: true # 开启驼峰命名
然后我们再次访问:http://localhost:9090/get/2
浏览器返回:{"id":2,"active":0,"companyName":"Oracle"},我们就成功的进行了查询。
删除
访问:http://localhost:9090/del/2
浏览器返回:1
使用XML配置进行数据访问
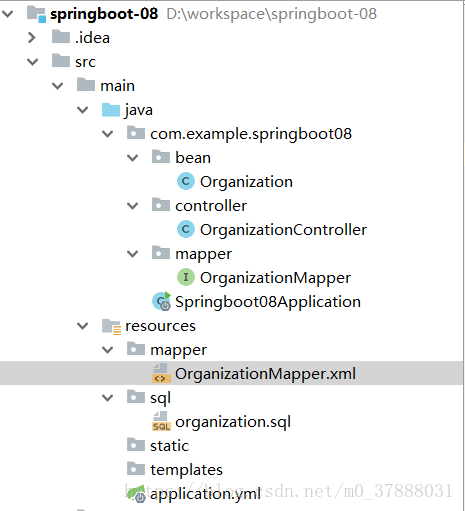
项目目录
Mapper接口编写
public interface OrganizationMapper{

    Organization getOrganizationById (Integer id);

    int insertOrganization(Organization organization);

    int delOrganizationById (Integer id);
}
Mapper文件编写
OrganizationMapper.xml
<?xml version="1.0" encoding="UTF-8"?>
<!DOCTYPE mapper PUBLIC "-//mybatis.org//DTD Mapper 3.0//EN"
        "http://mybatis.org/dtd/mybatis-3-mapper.dtd">
<mapper namespace="com.example.springboot08.mapper.OrganizationMapper">
    <select id="getOrganizationById" resultType="com.example.springboot08.bean.Organization">
        SELECT * FROM organization where id = #{id}
    </select>

    <insert id="insertOrganization" parameterType="com.example.springboot08.bean.Organization" useGeneratedKeys="true" keyProperty="id">
        INSERT INTO organization(active,company_name) VALUES (#{active},#{companyName})
    </insert>
    <delete id="delOrganizationById" parameterType="Integer">
        DELETE FROM organization where id = #{id}
    </delete>
</mapper>
编写配置文件application.yml
server:
  port: 9090

spring:
  datasource:
    driver-class-name: com.mysql.jdbc.Driver
    url: jdbc:mysql://localhost:3306/springboot?useSSL=false
    username: root
    password:
    schema: classpath:sql/*.sql
    initialization-mode: never
mybatis:
  configuration:
    map-underscore-to-camel-case: true
  mapper-locations:
    - classpath:mapper/*.xml   # 指定Mapper目录
数据访问
插入数据
访问:http://localhost:9090/insert?companyName=alibaba&active=1
浏览器返回:{"id":3,"active":1,"companyName":"alibaba"}
查询
访问:http://localhost:9090/get/1
浏览器返回:{"id":1,"active":1,"companyName":"IBM"}
删除
访问:http://localhost:9090/del/1
浏览器返回:1
总结
我们这里介绍了有关Spring Boot集成MyBatis的使用,以及如何通过注解和XML配置的方式进行数据访问。至于在具体采用哪种方式进行数据访问,则根据项目的实际情况进行选择即可。
源码地址
联系作者