好久没来园子里写东西了,自己感觉原因挺多,可能是由于每天工作后的疲惫,也可能是由于疲惫后的贪婪。没用的话就不多说了,现在开始说一下今天要介绍的内容。
从标题可以看出咱们今天是要介绍一下关于win8的东西,关于win8的我就不多说了,本人从第一个win8项目到现在也有大半年的时间了,使用过程中有太多的感慨。。。此处省略几百字。。。
好了,废话不说了,开始进入正题。
关于win8中的GridView控件,凡是接触过win8应用的朋友们都知道90%以上的应用都是使用的这个数据绑定控件。关于我使用中的一些体会来和大家分享一下,希望能给予更多更好的建议。
今天要介绍的内容主要有两点:
1、GridView分组绑定数据
2、GridView使用不同的项模板
注:同样也适用于ListView的实现方式
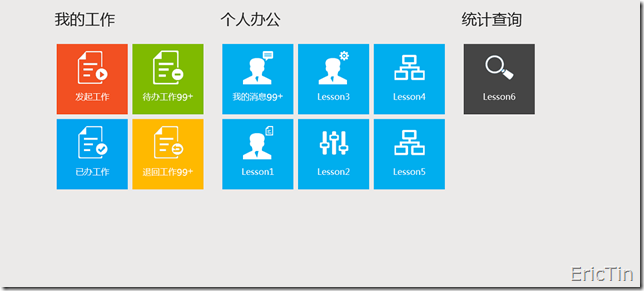
介绍实现方式之前咱们先看一下最终的实现效果。
从图上我们可以看出数据是以分组的形式来呈现的,当然还用到了我们比较关心的问题,多个项模板。到底有几个项模板呢,下面我们一起来看下Code吧。
- 先看一下GridView的xaml实现代码
1: <GridView x:Name="ItemGridView" Grid.Row="1" Height="500" Margin="120,10,20,0"
2: VerticalAlignment="Top" HorizontalAlignment="Left"
3: SelectionMode="None"
4: IsItemClickEnabled="True"
5: ScrollViewer.HorizontalScrollBarVisibility="Hidden"
6: ItemTemplateSelector="{StaticResource TemplateSelector}"
7: ItemsSource="{Binding Source={StaticResource ItemView}}"
8: >
9: <GridView.GroupStyle>
10: <GroupStyle>
11: <GroupStyle.HeaderTemplate>
12: <DataTemplate>
13: <Grid Margin="0">
14: <TextBlock Text="{Binding Key}" Style="{StaticResource GroupTitleStyle}"></TextBlock>
15: </Grid>
16: </DataTemplate>
17: </GroupStyle.HeaderTemplate>
18: <GroupStyle.Panel>
19: <ItemsPanelTemplate>
20: <VariableSizedWrapGrid Orientation="Vertical" Margin="0,0,30,0"/>
21: </ItemsPanelTemplate>
22: </GroupStyle.Panel>
23: </GroupStyle>
24: </GridView.GroupStyle>
25: <GridView.ItemsPanel>
26: <ItemsPanelTemplate>
27: <StackPanel Orientation="Horizontal"></StackPanel>
28: </ItemsPanelTemplate>
29: </GridView.ItemsPanel>
30: </GridView>
怎么样,这段代码看起来不是太难懂吧,我们一起来简单分析一下。
针对GridView的一些简单属性这里我就不说了,不太明白的朋友可以看下msdn上的帮助文档。先说一下ItemsSource这个属性,在这里我们可以看到
ItemsSource="{Binding Source={StaticResource ItemView}}",通过这句话我们可以看到ItemsSource需要绑定一个ItemView数据源,这个数据源就来源于我们在resource中定义的
CollectionViewSource,请看代码:
 <Page.Resources>
      <CollectionViewSource x:Name="ItemView" IsSourceGrouped="True"/>
 </Page.Resources>
说到这里简单解释一下,使用CollectionViewSource是为了满足GridView分组的实现。下面我们接着了解后台代码的实现:
-
在这里我们先定义一个分组的对象,这个对象实现了List<T>的泛型集合
1: public class GroupInfoList<T> : List<T>
2: {
3: public GroupInfoList() { }
4:
5: public object Key { get; set; }
6:
7: public new IEnumerator<T> GetEnumerator()
8: {
9: return (IEnumerator<T>)base.GetEnumerator();
10: }
11: }
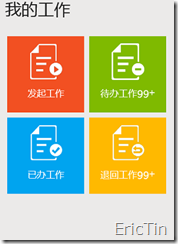
从上面的代码我们可以看出,每一个分组的对象都提供了一组分组的数据,如图
这组数据的实现方式如下:
1: GroupInfoList<WorkItem> groupItem = new GroupInfoList<WorkItem>
2: {
3: new WorkItem { Background = "#F25022", IsShowCount = false, Name = "发起工作", MenuIcon = "/Common/Icons/iconA01.png" },
4: new WorkItem { Background = "#00A4EF", IsShowCount = false, Name = "已办工作", MenuIcon = "/Common/Icons/iconA02.png" },
5: new WorkItem { Background = "#7FBA00", Count = 99, IsShowCount = true, Name = "待办工作", MenuIcon = "/Common/Icons/iconA03.png" },
6: new WorkItem { Background = "#FFB900", Count = 99, IsShowCount = true, Name = "退回工作", MenuIcon = "/Common/Icons/iconA04.png" }
7: };
8: groupItem.Key = "我的工作";
注:代码中用到的WorkItem是定义的一个类,这里就不贴出来了,我会在文章的最后把源码放上去,以供参考。
说道这里我相信大家也都明白怎么对GridView进行分组绑定数据了吧。下面这行代码实现了数据源的绑定:
ItemView.Source = new List<GroupInfoList<WorkItem>>{ groupItem };
- 实现多模板的选择
根据上图可以看出,每一项不一样的地方就是有没有显示笔数。所以我在这里定义了两个项模板,一个是带有笔数的模板,一个是不带有笔数的模板。看代码:
1: <Page.Resources>
2:
3: <!--带有工作笔数模版-->
4: <DataTemplate x:Key="WorkCountTemplate">
5: <Grid HorizontalAlignment="Center" VerticalAlignment="Center" Width="151" Height="150" Background="{Binding Background}">
6: <StackPanel>
7: <Image Source="{Binding MenuIcon}" Margin="0" Stretch="None" Width="64" Height="100"/>
8: <StackPanel Orientation="Horizontal" HorizontalAlignment="Center" VerticalAlignment="Bottom" Margin="0,0,0,10">
9: <TextBlock Text="{Binding Name}" Foreground="White" FontFamily="微软雅黑" FontSize="18" />
10: <TextBlock Text="{Binding Count}" Foreground="White" FontFamily="微软雅黑" FontSize="20" />
11: <TextBlock Text="+" Foreground="White" FontFamily="SimHei" FontSize="22" FontWeight="Normal"/>
12: </StackPanel>
13: </StackPanel>
14: </Grid>
15: </DataTemplate>
16:
17: <!--不带有工作笔数模版-->
18: <DataTemplate x:Key="NoneWorkCountTemplate">
19: <Grid HorizontalAlignment="Center" VerticalAlignment="Center" Width="151" Height="150" Background="{Binding Background}">
20: <StackPanel>
21: <Image Source="{Binding MenuIcon}" Stretch="None" Margin="0" Width="64" Height="100"/>
22: <StackPanel Orientation="Horizontal" HorizontalAlignment="Center" VerticalAlignment="Bottom" Margin="0,0,0,10">
23: <TextBlock Text="{Binding Name}" Foreground="White" FontFamily="微软雅黑" FontSize="18" />
24: </StackPanel>
25: </StackPanel>
26: </Grid>a
27: </DataTemplate>
28:
29: </Page.Resources>
我们在资源中定义了两个项模板,怎么来使用呢?这里先说一下实现方式,我们需要先定义一个类用来继承系统提供的DataTemplateSelector类,这个类的系统定义是这样的,启用应用程序级别的自定义模板选择逻辑。在DataTemplateSelector类中提供了一个虚方法SelectTemplateCore,这个方法为我们提供了一种选择模板的方式,我们需要重写并实现这个方法,通过这种方式就可以实现模板的选择了。接下来看后台代码的实现:
1: public class CustomerTemplateSelector : DataTemplateSelector
2: {
3: public DataTemplate WorkCountTemplate { get; set; }
4:
5: public DataTemplate NoneWorkCountTemplate { get; set; }
6:
7: protected override DataTemplate SelectTemplateCore(object item, DependencyObject container)
8: {
9: if (item is WorkItem)
10: {
11: if ((item as WorkItem).IsShowCount)
12: {
13: return WorkCountTemplate;
14: }
15: return NoneWorkCountTemplate;
16: }
17: return base.SelectTemplateCore(item, container);
18: }
19: }
是不是看上去如此的简单呢,接下来我们还需要做一个操作,就是怎么在前台使用我们定义的这个类,方法很简单,代码如下:
1: <Page.Resources>
2: <local:CustomerTemplateSelector x:Key="TemplateSelector"
3: WorkCountTemplate="{StaticResource WorkCountTemplate}"
4: NoneWorkCountTemplate="{StaticResource NoneWorkCountTemplate}"
5: />
6: </Page.Resources>
在这里简单说一下,
WorkCountTemplate="{StaticResource WorkCountTemplate}"这句代码的涵义,第一个WorkCountTemplate是我们在类中定义的WorkCountTemplate属性,
第二个WorkCountTemplate就是我们在资源中定义的WorkCountTemplate模板。最后,我们在GridView中怎么使用呢,请看代码:
ItemTemplateSelector="{StaticResource TemplateSelector}"
以上这些内容就是我们今天介绍的内容,怎么样?有没有看明白呢,如果你的答案是No的话,没关系,我会很热情的接收你的建议和意见。谢谢!
源码的下载链接为:Lesson1.zip
特别声明:本文版权归作者和博客园共有,欢迎转载,但未经作者同意必须保留此段声明,且在文章页面明显位置给出原文连接,否则保留追究法律责任的权利。

