一. RabbitMQ队列
rabbitmq 消息队列
解耦:一个程序间 把两个耦合度降低
异步:天生解决耦合
优点:解决排队问题
缺点:不能保证任务被及时的执行
应用场景:去哪儿网 12306网站
同步
优点:保证任务及时执行
缺点:不能解决排队问题,导致时间被浪费
大并发 Web Linux上 近几年使用的是nginx 内部epoll异步 承载10000-20000并发
pv=page visit 页面访问量 每天上亿 10server web cluster集群
uv=user visit 用户访问量 每天600多万
qps=每秒查询率QPS是对一个特定的查询服务器在规定时间内所处理流量多少的衡量标准。
队列的作用
1、存储消息、数据
2、保证消息顺序
3、保证数据的交付
python消息队列中:
只能同个进程多个线程访问使用
为什么使用rabbitmq instead of python queue
python消息队列中:
只能同个进程多个线程访问使用,且不能跨进程
a.安装
#Centos7 安装

#注意/etc/hosts文件 ip和主机名对应
wget https://github.com/rabbitmq/rabbitmq-server/releases/download/rabbitmq_v3_6_10/rabbitmq-server-3.6.10-1.el7.noarch.rpm
yum install epel-release -y
yum install rabbitmq-server-3.6.10-1.el7.noarch.rpm
rabbitmq-plugins enable rabbitmq_management
cp /usr/share/doc/rabbitmq-server-3.6.10/rabbitmq.config.example /etc/rabbitmq/rabbitmq.config
systemctl restart rabbitmq-server
systemctl status rabbitmq-server

#创建用户 授权
rabbitmqctl  add_user alex alex3714
rabbitmqctl set_permissions -p / alex ".*" ".*" ".*"
b. 创建用户 授权


#远程连接rabbitmq server的话,需要配置权限

#创建用户
rabbitmqctl  add_user alex alex3714

#同时还要配置权限,允许从外面访问
rabbitmqctl set_permissions -p / alex ".*" ".*" ".*"

  set_permissions [-p vhost] {user} {conf} {write} {read}

  vhost
  The name of the virtual host to which to grant the user access, defaulting to /.

  user
  The name of the user to grant access to the specified virtual host.

  conf
  A regular expression matching resource names for which the user is granted configure permissions.

  write
  A regular expression matching resource names for which the user is granted write permissions.

  read
  A regular expression matching resource names for which the user is granted read permissions.
c. python rabbitMQ module 安装
pip install pika
or
easy_install pika
or
源码

https://pypi.python.org/pypi/pika
二. 事例
a. 服务端和客户端一对一
一个P向queue发送一个message,一个C从该queue接收message并打印。

send.py
producer,连接至RabbitMQ Server,声明队列,发送message,关闭连接,退出。
import pika

credentials = pika.PlainCredentials("egon","egon123")                     #授权的账号 密码
connection = pika.BlockingConnection(
    pika.ConnectionParameters('192.168.11.106',credentials=credentials))  #建立socket

channel = connection.channel()            #创建rabbitmq协议通道

channel.queue_declare(queue='hello')      #通过通道生成一个队列

#message不能直接发送给queue,需经exchange到达queue,此处使用以空字符串标识的默认的exchange
#使用默认exchange时允许通过routing_key明确指定message将被发送给哪个queue
#body参数指定了要发送的message内容
channel.basic_publish(exchange='',
                      routing_key='hello',      #队列
                      body='Hello World!')      #内容
print(" [x] Sent 'Hello World!'")
connection.close() #关闭与RabbitMq Server间的连接
receive.py
consumer,连接至RabbitMQ Server,声明队列,接收消息并进行处理这里为打印出消息,退出。
import pika

credentials = pika.PlainCredentials("egon","egon123")                     #授权的账号 密码
connection = pika.BlockingConnection(
    pika.ConnectionParameters('192.168.11.106',credentials=credentials))  #建立socket

channel = connection.channel()

#声明queue,确认要从中接收message的queue
#queue_declare函数是幂等的,可运行多次,但只会创建一次
#若可以确信queue是已存在的,则此处可省略该声明,如producer已经生成了该queue
#但在producer和consumer中重复声明queue是一个好的习惯
channel.queue_declare(queue='hello')

#定义回调函数
#一旦从queue中接收到一个message回调函数将被调用

def callback(ch, method, properties, body):
    print(ch)              #上面channel = connection.channel()对象
    print(method)          #除了服务端本身的数据,还带一些参数
    print(properties)      #属性
    print(body)            #byte数据


channel.basic_consume(callback,
                      queue='hello',
                      no_ack=True)

#从queue接收message的参数设置
#包括从哪个queue接收message,用于处理message的callback,是否要确认message
#默认情况下是要对消息进行确认的,以防止消息丢失。
#此处将no_ack明确指明为True,不对消息进行确认。

print(' Waiting for messages. To exit press CTRL+C')
channel.start_consuming()

receive.py
b. 消息持久化
1. 模拟客户端中断 观察服务端队列的数据会不会返回(不会)
#- 开启一个服务端,两个客户端

#- 服务端向队列中存放一个值,一客户端从队列中取到数据,在睡20秒期间中断,表示出错,它不会报告给服务端
#- 这时队列中为零,另一客户端也不会取到值
# no_ack=True 表示客户端处理完了不需要向服务端确认消息
import pika

credentials = pika.PlainCredentials("egon","egon123")                     #授权的账号 密码
connection = pika.BlockingConnection(
    pika.ConnectionParameters('192.168.11.106',credentials=credentials))  #建立socket

channel = connection.channel()            #创建rabbitmq协议通道

channel.queue_declare(queue='hello')      #通过通道生成一个队列

channel.basic_publish(exchange='',
                      routing_key='hello',      #队列
                      body='Hello World!')      #内容
print(" [x] Sent 'Hello World!'")
connection.close()
import pika
import time

credentials = pika.PlainCredentials("egon","egon123")                     #授权的账号 密码
connection = pika.BlockingConnection(
    pika.ConnectionParameters('192.168.11.106',credentials=credentials))  #建立socket

channel = connection.channel()


channel.queue_declare(queue='hello')


def callback(ch, method, properties, body):
    print("received msg...start process",body)
    time.sleep(10)
    print("end process...")


channel.basic_consume(callback,
                      queue='hello',
                      no_ack=True)

print(' Waiting for messages. To exit press CTRL+C')
channel.start_consuming()
2. 模拟客户端中断 观察服务端队列的数据会不会返回(会)
#1. 生产者端发消息时,加参数 消息持久化
    properties=pika.BasicProperties(
        delivery_mode=2,  # make message persistent
    ),
#2. 消费者端,消息处理完毕时,发送确认包
    ch.basic_ack(delivery_tag=method.delivery_tag)

    channel.basic_consume(callback, #取到消息后,调用callback 函数
      queue='task1',)
      #no_ack=True) #消息处理后,不向rabbit-server确认消息已消费完毕
#- 开启一个服务端,两个客户端
#- 服务端向队列中存放一个值,一客户端从队列中取到数据,在睡20秒期间中断,表示出错,它会报给服务端,服务端队列还有值
#- 这时启动另一客户端还可以取到值
import pika

credentials = pika.PlainCredentials("egon","egon123")                     #授权的账号 密码
connection = pika.BlockingConnection(
    pika.ConnectionParameters('192.168.11.106',credentials=credentials))  #建立socket

channel = connection.channel()            #创建rabbitmq协议通道

channel.queue_declare(queue='hello',durable=True)      #通过通道生成一个队列

channel.basic_publish(exchange='',
                      routing_key='hello',      #队列
                      properties=pika.BasicProperties(
                          delivery_mode=2,  # make message persistent
                      ),
                      body='Hello World!')      #内容
print(" [x] Sent 'Hello World!'")
connection.close()
import pika
import time

credentials = pika.PlainCredentials("egon","egon123")                     #授权的账号 密码
connection = pika.BlockingConnection(
    pika.ConnectionParameters('192.168.11.106',credentials=credentials))  #建立socket

channel = connection.channel()


channel.queue_declare(queue='hello')


def callback(ch, method, properties, body):
    print("received msg...start process",body)
    time.sleep(10)
    print("end process...")
    ch.basic_ack(delivery_tag=method.delivery_tag)


channel.basic_consume(callback,
                      queue='hello',
                      )

print(' Waiting for messages. To exit press CTRL+C')
channel.start_consuming()
c. 消息的公平分发
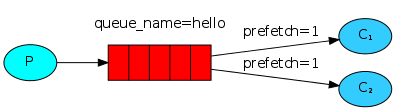
消息的公平分发 可以在各个消费者端,配置perfetch=1,
意思就是告诉RabbitMQ在我这个消费者当前消息还没处理完的时候
就不要再给我发新消息了。就会分配给其他消费者端
import pika

credentials = pika.PlainCredentials("egon","egon123")                     #授权的账号 密码
connection = pika.BlockingConnection(
    pika.ConnectionParameters('192.168.11.106',credentials=credentials))  #建立socket

channel = connection.channel()            #创建rabbitmq协议通道

channel.queue_declare(queue='hello',durable=True)      #通过通道生成一个队列

channel.basic_publish(exchange='',
                      routing_key='hello',      #队列
                      properties=pika.BasicProperties(
                          delivery_mode=2,  # make message persistent
                      ),
                      body='Hello World!')      #内容
print(" [x] Sent 'Hello World!'")
connection.close()
import pika
import time

credentials = pika.PlainCredentials("egon","egon123")                     #授权的账号 密码
connection = pika.BlockingConnection(
    pika.ConnectionParameters('192.168.11.106',credentials=credentials))  #建立socket

channel = connection.channel()


channel.queue_declare(queue='hello')


def callback(ch, method, properties, body):
    print("received msg...start process",body)
    time.sleep(10)
    print("end process...")
    ch.basic_ack(delivery_tag=method.delivery_tag)

channel.basic_qos(prefetch_count=1)#可以在各个消费者端,配置perfetch=1
channel.basic_consume(callback,
                      queue='hello',
                      )

print(' Waiting for messages. To exit press CTRL+C')
channel.start_consuming()
d:PublishSubscribe(消息发布订阅)
之前的例子都基本都是1对1的消息发送和接收,即消息只能发送到指定的queue里,但有些时候你想让你的消息被所有的Queue收到,类似广播的效果,这时候就要用到exchange了,
Exchange在定义的时候是有类型的,以决定到底是哪些Queue符合条件,可以接收消息


fanout: 所有bind到此exchange的queue都可以接收消息 广播
direct: 通过routingKey和exchange决定的那个唯一的queue可以接收消息 组播
topic:所有符合routingKey(此时可以是一个表达式)的routingKey所bind的queue可以接收消息 规则播

   表达式符号说明:#代表一个或多个字符,*代表任何字符
      例:#.a会匹配a.a,aa.a,aaa.a等
          *.a会匹配a.a,b.a,c.a等
     注:使用RoutingKey为#,Exchange Type为topic的时候相当于使用fanout

headers: 通过headers 来决定把消息发给哪些queue
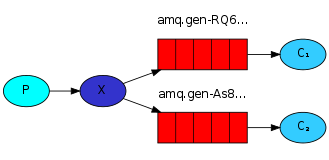
1、fanout 广播:
#服务端:
  - 不需要申明队列
#客户端:
  - 每个客户端都需要申明一个队列,自动设置队列名称,收听广播,当收听完后queue删除
  - 把队列绑定到exchange上
#注意:客户端先打开,服务端再打开,客户端会收到消息

#应用:
  - 微博粉丝在线,博主发消息,粉丝可以收到
import pika
import sys
import time


credentials = pika.PlainCredentials("egon","egon123")                     #授权的账号 密码
connection = pika.BlockingConnection(
    pika.ConnectionParameters('172.16.42.128',credentials=credentials))  #建立socket

channel = connection.channel()                             #创建rabbitmq协议通道

channel.exchange_declare(exchange='logs',type='fanout')

message = ' '.join(sys.argv[1:]) or "info: Hello World!"
channel.basic_publish(exchange='logs',
                      routing_key='',
                      body=message)
print(" Send %r" % message)
connection.close()
import pika
import time

credentials = pika.PlainCredentials("egon","egon123")                     #授权的账号 密码
connection = pika.BlockingConnection(
    pika.ConnectionParameters('172.16.42.128',credentials=credentials))  #建立socket

channel = connection.channel()

channel.exchange_declare(exchange='logs',
                         type='fanout')

result = channel.queue_declare(exclusive=True)  # 不指定queue名字,rabbit会随机分配一个名字,exclusive=True会在使用此queue的消费者断开后,自动将queue删除
queue_name = result.method.queue

channel.queue_bind(exchange='logs',queue=queue_name)    #把queue绑定到exchange

print(' [*] Waiting for logs. To exit press CTRL+C')


def callback(ch, method, properties, body):
    print(" [x] %r" % body)


channel.basic_consume(callback,
                      queue=queue_name,
                      no_ack=True)

channel.start_consuming()
2、direct 组播:
#客户端一:
    - python3 receive1.py info
#客户端二:
    - python3 receive1.py  error
#客户端三:
    - python3 receive1.py  warning
#客户端四:
    - python3 receive1.py  warning error info
#服务端:
    - python3 receive1.py  warning
import pika
import sys
import time


credentials = pika.PlainCredentials("egon","egon123")                   #授权的账号 密码
connection = pika.BlockingConnection(
    pika.ConnectionParameters('172.16.42.128',credentials=credentials))  #建立socket

channel = connection.channel()                  #创建rabbitmq协议通道

channel.exchange_declare(exchange='direct_logs',type='direct')

severity = sys.argv[1] if len(sys.argv) > 1 else 'info'

message = ' '.join(sys.argv[2:]) or 'Hello World!'

channel.basic_publish(exchange='direct_logs',
                      routing_key=severity,
                      body=message)

print(" Send %r:%r" % (severity, message))
connection.close()
import pika
import time
import sys

credentials = pika.PlainCredentials("egon","egon123")                     #授权的账号 密码
connection = pika.BlockingConnection(
    pika.ConnectionParameters('172.16.42.128',credentials=credentials))  #建立socket

channel = connection.channel()

channel.exchange_declare(exchange='direct_logs',type='direct')

result = channel.queue_declare(exclusive=True)
queue_name = result.method.queue

severities = sys.argv[1:]
if not severities:
    sys.stderr.write("Usage: %s [info] [warning] [error]
" % sys.argv[0])
    sys.exit(1)

for severity in severities:
    channel.queue_bind(exchange='direct_logs',
                       queue=queue_name,
                       routing_key=severity)

print(' [*] Waiting for logs. To exit press CTRL+C')


def callback(ch, method, properties, body):
    print(" [x] %r:%r" % (method.routing_key, body))


channel.basic_consume(callback,
                      queue=queue_name,
                      no_ack=True)
channel.start_consuming()
3、topic 规则播
#客户端一:
    - python3 receive1.py *.django
#客户端二:
    - python3 receive1.py mysql.error
#客户端三:
    - python3 receive1.py mysql.*

#服务端:
    - python3 receive1.py  #匹配相应的客户端
import pika
import sys
import time


credentials = pika.PlainCredentials("egon","egon123")                   #授权的账号 密码
connection = pika.BlockingConnection(
    pika.ConnectionParameters('172.16.42.128',credentials=credentials))  #建立socket

channel = connection.channel()                  #创建rabbitmq协议通道

channel.exchange_declare(exchange='topic_logs',type='topic')

routing_key = sys.argv[1] if len(sys.argv) > 1 else 'anonymous.info'

message = ' '.join(sys.argv[2:]) or 'Hello World!'
channel.basic_publish(exchange='topic_logs',
                      routing_key=routing_key,
                      body=message)

print(" [x] Sent %r:%r" % (routing_key, message))
import pika
import time
import sys

credentials = pika.PlainCredentials("egon","egon123")                     #授权的账号 密码
connection = pika.BlockingConnection(
    pika.ConnectionParameters('172.16.42.128',credentials=credentials))  #建立socket

channel = connection.channel()

channel.exchange_declare(exchange='topic_logs',type='topic')

result = channel.queue_declare(exclusive=True)
queue_name = result.method.queue

binding_keys = sys.argv[1:]
if not binding_keys:
    print(sys.argv[1:])
    sys.stderr.write("Usage: %s [binding_key]...
" % sys.argv[0])
    sys.exit(1)

for binding_key in binding_keys:
    channel.queue_bind(exchange='topic_logs',
                       queue=queue_name,
                       routing_key=binding_key)

print(' [*] Waiting for logs. To exit press CTRL+C')


def callback(ch, method, properties, body):
    print(" [x] %r:%r" % (method.routing_key, body))


channel.basic_consume(callback,
                      queue=queue_name,
                      no_ack=True)

channel.start_consuming()