I like it, 总结自:http://www.cnblogs.com/angeldevil/p/3729808.html和http://blog.csdn.net/redarmy_chen/article/details/26976463和http://www.open-open.com/lib/view/open1369637365753.html,,其实第一次看到还有来自http://www.cnblogs.com/xiaoweiz/p/3916790.html,感谢你们的文章,受益匪浅
下面就来概要的分析和使用以下这个Async-Http吧:
项目官方网站:http://loopj.com/android-async-http/
源码下载:https://github.com/loopj/android-async-http
Overview
An asynchronous callback-based Http client for Android built on top of Apache’s HttpClient libraries. All requests are made outside of your app’s main UI thread, but any callback logic will be executed on the same thread as the callback was created using Android’s Handler message passing.
基于异步回调的Http客户端为Android构建,是基于Apache HttpClient库的。所有的请求都是位于应用程序主线程 UI 之外,但任何回调逻辑将相同的线程上执行回调,使用Android的处理程序创建消息传递。
Features
- Make asynchronous HTTP requests, handle responses in anonymous callbacks
- 进行异步HTTP请求,处理响应在匿名回调中完成
- HTTP requests happen outside the UI thread
- HTTP请求发生在UI线程之外
- Requests use a threadpool to cap concurrent resource usage
- 请求使用threadpool,限制并发资源使用情况
- GET/POST params builder (RequestParams)
- GET / POST参数构建使用(RequestParams)
- Multipart file uploads with no additional third party libraries
- Multipart 文件上传,没有额外的第三方库
- Tiny size overhead to your application, only 25kb for everything
- 在你的应用程序上利用很小的开销,仅仅25 kb就可以做一切
- Automatic smart request retries optimized for spotty mobile connections
- 自动智能请求重试,优化了质量不一的移动连接
- Automatic gzip response decoding support for super-fast requests
- 自动解码支持gzip反应速度超快的请求
- Binary file (images etc) downloading with
BinaryHttpResponseHandler 二进制文件(图片等)的下载,使用BinaryHttpResponseHandler- Built-in response parsing into JSON with
JsonHttpResponseHandler 内置响应解析成JSON,使用JsonHttpResponseHandler- Persistent cookie store, saves cookies into your app’s SharedPreferences
- 持久化cookie存储,保存cookie到你的应用程序的SharedPreferences
主要类介绍:
- AsyncHttpRequest
继承自Runnabler,被submit至线程池执行网络请求并发送start,success等消息
- AsyncHttpResponseHandler
接收请求结果,一般重写onSuccess及onFailure接收请求成功或失败的消息,还有onStart,onFinish等消息
- TextHttpResponseHandler
继承自AsyncHttpResponseHandler,只是重写了AsyncHttpResponseHandler的onSuccess和onFailure方法,将请求结果由byte数组转换为String
- JsonHttpResponseHandler
继承自TextHttpResponseHandler,同样是重写onSuccess和onFailure方法,将请求结果由String转换为JSONObject或JSONArray
- BaseJsonHttpResponseHandler
继承自TextHttpResponseHandler,是一个泛型类,提供了parseResponse方法,子类需要提供实现,将请求结果解析成需要的类型,子类可以灵活地使用解析方法,可以直接原始解析,使用gson等。
- RequestParams
请求参数,可以添加普通的字符串参数,并可添加File,InputStream上传文件
- AsyncHttpClient
核心类,使用HttpClient执行网络请求,提供了get,put,post,delete,head等请求方法,使用起来很简单,只需以url及RequestParams调用相应的方法即可,还可以选择性地传入Context,用于取消Content相关的请求,同时必须提供ResponseHandlerInterface(AsyncHttpResponseHandler继承自ResponseHandlerInterface)的实现类,一般为AsyncHttpResponseHandler的子类,AsyncHttpClient内部有一个线程池,当使用AsyncHttpClient执行网络请求时,最终都会调用sendRequest方法,在这个方法内部将请求参数封装成AsyncHttpRequest(继承自Runnable)交由内部的线程池执行。
- SyncHttpClient
继承自AsyncHttpClient,同步执行网络请求,AsyncHttpClient把请求封装成AsyncHttpRequest后提交至线程池,SyncHttpClient把请求封装成AsyncHttpRequest后直接调用它的run方法。
请求流程:

- 调用AsyncHttpClient的get或post等方法发起网络请求
- 所有的请求都走了sendRequest,在sendRequest中把请求封装为了AsyncHttpRequest,并添加到线程池执行
- 当请求被执行时(即AsyncHttpRequest的run方法),执行AsyncHttpRequest的makeRequestWithRetries方法执行实际的请求,当请求失败时可以重试。并在请求开始,结束,成功或失败时向请求时传的ResponseHandlerInterface实例发送消息
- 基本上使用的都是AsyncHttpResponseHandler的子类,调用其onStart,onSuccess等方法返回请求结果。
通过AsyncHttpClient类的实例就可以执行网络请求,包括get、put、post、head、delete。并指定一个ResponseHandlerInterface的实例接收请求结果。
一个简单例子:
1.新建项目,去官网下载zip包,解压,打开releases文件,把里面最新的jar包,考入项目工程libs目录下,引入包。
2.通过1,就可以使用了,很简单,下面是自己写的demo,用它提供的各种不同方法完成从服务器获取一个json数据:
 1 package com.http;
 2 import com.loopj.android.http.AsyncHttpClient;
 3 import com.loopj.android.http.AsyncHttpResponseHandler;
 4 import com.loopj.android.http.BinaryHttpResponseHandler;
 5 import com.loopj.android.http.JsonHttpResponseHandler;
 6 import com.loopj.android.http.RequestParams;
 7
 8 public class HttpUtil {
    //官方建议使用一个静态的AsyncHttpClient
 9     private static     AsyncHttpClient client =new AsyncHttpClient();    //实例话对象
10     static
11     {
12         client.setTimeout(11000);   //设置链接超时,如果不设置,默认为10s
13     }
14     public static void get(String urlString,AsyncHttpResponseHandler res)    //用一个完整url获取一个string对象
15     {
16         client.get(urlString, res);
17     }
18     public static void get(String urlString,RequestParams params,AsyncHttpResponseHandler res)   //url里面带参数
19     {
20         client.get(urlString, params,res);
21     }
22     public static void get(String urlString,JsonHttpResponseHandler res)   //不带参数,获取json对象或者数组
23     {
24         client.get(urlString, res);
25     }
26     public static void get(String urlString,RequestParams params,JsonHttpResponseHandler res)   //带参数,获取json对象或者数组
27     {
28         client.get(urlString, params,res);
29     }
30     public static void get(String uString, BinaryHttpResponseHandler bHandler)   //下载数据使用,会返回byte数据
31     {
32         client.get(uString, bHandler);
33     }
34     public static AsyncHttpClient getClient()
35     {
36         return client;
37     }
38 }
这个类主要列出了我们常用的get方法,在要使用的地方,调用该类就行了。
具体使用的类:
  1 package com.http;
  2
  3 import java.io.File;
  4 import java.io.FileOutputStream;
  5
  6 import org.json.JSONArray;
  7 import org.json.JSONObject;
  8
  9 import android.app.Activity;
 10 import android.app.ProgressDialog;
 11 import android.os.Bundle;
 12 import android.os.Environment;
 13 import android.util.Log;
 14 import android.view.View;
 15 import android.widget.TextView;
 16 import android.widget.Toast;
 17
 18 import com.loopj.android.http.AsyncHttpResponseHandler;
 19 import com.loopj.android.http.BinaryHttpResponseHandler;
 20 import com.loopj.android.http.JsonHttpResponseHandler;
 21 import com.loopj.android.http.RequestParams;
 22
 23 public class MainActivity extends Activity {
 24     private TextView textView; // 顶部textview
 25     private ProgressDialog pDialog;
 26     private TextView textView2; // 下面textview,显示获取的所有数据
 27     @Override
 28     protected void onCreate(Bundle savedInstanceState) {
 29         super.onCreate(savedInstanceState);
 30         setContentView(R.layout.activity_main);
 31         textView = (TextView) findViewById(R.id.text);
 32         textView2 = (TextView) findViewById(R.id.text2);
 33     }
 34     public void method1(View view) {
 35         pDialog = ProgressDialog.show(this, "请稍等", "数据加载中");
 36         String urlString = "http://client.azrj.cn/json/cook/cook_list.jsp?type=1&p=2&size=10"; // 一個獲取菜谱的url地址
 37         HttpUtil.get(urlString, new AsyncHttpResponseHandler() {
 38             public void onSuccess(String arg0) { // 获取数据成功会调用这里
 39                 pDialog.dismiss();
 40                 textView.setText("获取json数据成功,看下面");
 41                 textView2.setText(arg0);
 42                 Log.i("hck", arg0);
 43             };
 44             public void onFailure(Throwable arg0) { // 失败,调用
 45                 Toast.makeText(MainActivity.this, "onFailure",
 46                         Toast.LENGTH_LONG).show();
 47             };
 48             public void onFinish() { // 完成后调用,失败,成功,都要掉
 49             };
 50         });
 51     }
 52     public void method2(View view) {
 53         String urlString = "http://client.azrj.cn/json/cook/cook_list.jsp?";
 54         RequestParams params = new RequestParams(); // 绑定参数
 55         params.put("type", "1");
 56         params.put("p", "2");
 57         params.put("size", "10");
 58         HttpUtil.get(urlString, params, new JsonHttpResponseHandler() {
 59             public void onSuccess(JSONArray arg0) { // 成功后返回一个JSONArray数据
 60                 Log.i("hck", arg0.length() + "");
 61                 try {
 62                     textView.setText("菜谱名字:"
 63                             + arg0.getJSONObject(2).getString("name")); //返回的是JSONArray, 获取JSONArray数据里面的第2个JSONObject对象,然后获取名字为name的数据值
 64                 } catch (Exception e) {
 65                     Log.e("hck", e.toString());
 66                 }
 67             };
 68             public void onFailure(Throwable arg0) {
 69                 Log.e("hck", " onFailure" + arg0.toString());
 70             };
 71             public void onFinish() {
 72                 Log.i("hck", "onFinish");
 73             };
 74             public void onSuccess(JSONObject arg0) {   //返回的是JSONObject,会调用这里
 75                 Log.i("hck", "onSuccess ");
 76                 try {
 77                     textView.setText("菜谱名字:"
 78                             + arg0.getJSONArray("list").getJSONObject(0)
 79                                     .getString("name"));
 80                 } catch (Exception e) {
 81                     Log.e("hck", e.toString());
 82                 }
 83             };
 84         });
 85     }
 86     public void method3(View view) {
 87         String urlString = "http://client.azrj.cn/json/cook/cook_list.jsp?type=1&p=2&size=10";
 88         HttpUtil.get(urlString, new JsonHttpResponseHandler() {
 89             public void onSuccess(JSONObject arg0) {
 90                 try {
 91                     textView.setText("菜谱名字:"
 92                             + arg0.getJSONArray("list").getJSONObject(1)
 93                                     .getString("name"));
 94                 } catch (Exception e) {
 95                     Log.e("hck", e.toString());
 96                 }
 97             };
 98         });
 99     }
100     public void method4(View view) {
101         String urlString = "http://client.azrj.cn/json/cook/cook_list.jsp?";
102         final RequestParams params = new RequestParams();
103         params.put("type", "1");
104         params.put("p", "2");
105         params.put("size", "10");
106         HttpUtil.get(urlString, params, new AsyncHttpResponseHandler() {
107             public void onSuccess(String arg0) {
108                 try {
109                     JSONObject jObject = new JSONObject(arg0);
110                     textView.setText("菜谱名字:"
111                             + jObject.getJSONArray("list").getJSONObject(2)
112                                     .getString("name"));
113                     Log.i("hck", params.getEntity().toString());
114                 } catch (Exception e) {
115                 }
116             };
117         });
118     }
119     public void method5(View view) {
120         String url = "http://f.hiphotos.baidu.com/album/w%3D2048/sign=38c43ff7902397ddd6799f046dbab3b7/9c16fdfaaf51f3dee973bf7495eef01f3b2979d8.jpg";
121         HttpUtil.get(url, new BinaryHttpResponseHandler() {
122             @Override
123             public void onSuccess(byte[] arg0) {
124                 super.onSuccess(arg0);
125                 File file = Environment.getExternalStorageDirectory();
126                 File file2 = new File(file, "cat");
127                 file2.mkdir();
128                 file2 = new File(file2, "cat.jpg");
129                 try {
130                     FileOutputStream oStream = new FileOutputStream(file2);
131                     oStream.write(arg0);
132                     oStream.flush();
133                     oStream.close();
134                     textView.setText("可爱的猫咪已经保存在sdcard里面");
135                 } catch (Exception e) {
136                     e.printStackTrace();
137                     Log.i("hck", e.toString());
138                 }
139             }
140         });
141     }
142 }
布局文件如下:
 1 <ScrollView
 2     xmlns:android="http://schemas.android.com/apk/res/android"
 3     xmlns:tools="http://schemas.android.com/tools"
 4     android:layout_width="match_parent"
 5     android:layout_height="match_parent"
 6     android:orientation="vertical"
 7       android:gravity="center_horizontal"
 8     >
 9     <LinearLayout
10     android:layout_width="fill_parent"
11     android:layout_height="fill_parent"
12     android:orientation="vertical"
13       android:gravity="center_horizontal">
14     <TextView
15         android:textColor="#FF0000"
16         android:textSize="16sp"
17        android:layout_marginTop="20dp"
18      android:gravity="center_horizontal"
19         android:id="@+id/text"
20         android:layout_width="wrap_content"
21         android:layout_height="wrap_content"
22         android:text="获取数据完成后会显示在这里" />
23 <Button
24     android:layout_marginTop="50dp"
25     android:id="@+id/bt1"
26     android:layout_width="wrap_content"
27     android:layout_height="wrap_content"
28     android:text="第一种"
29     android:onClick="method1"
30     />
31 <Button
32     android:id="@+id/bt2"
33     android:layout_width="wrap_content"
34     android:layout_height="wrap_content"
35     android:text="第2种"
36     android:onClick="method2"
37     />
38 <Button
39     android:id="@+id/bt3"
40     android:layout_width="wrap_content"
41     android:layout_height="wrap_content"
42     android:text="第3种"
43       android:onClick="method3"
44     />
45 <Button
46     android:id="@+id/bt4"
47     android:layout_width="wrap_content"
48     android:layout_height="wrap_content"
49     android:text="第4种"
50       android:onClick="method4"
51     />
52 <Button
53     android:id="@+id/bt5"
54     android:layout_width="wrap_content"
55     android:layout_height="wrap_content"
56     android:text="第5种"
57       android:onClick="method5"
58     />
59   <TextView
60         android:textColor="#FF0000"
61         android:textSize="16sp"
62        android:layout_marginTop="20dp"
63      android:gravity="center_horizontal"
64         android:id="@+id/text2"
65         android:layout_width="wrap_content"
66         android:layout_height="wrap_content"
67          />
68 </LinearLayout>
69 </ScrollView>
很简单很实用,上面只是get方法的,上传数据,和这个也差不多,大家自己建个服务器,试试。记得加入网文网络的权限和向sdcard的访问权限。
其他说明及总结
(转自http://www.cnblogs.com/angeldevil/p/3729808.html,总结嘛,就把大神的想法感受等一起分享了,自己再消化,大家一起学习)
Android-Async-Http的使用非常简单,通过AsyncHttpClient发起请求就可以了,如果需要添加参数,直接传一个RequestParams过去,而且参数可以是String、File和InputStream,可以很方便地上传文件。
每个请求都需要传一个ResponseHandlerInterface的实例用以接收请求结果或请求失败,请求结束等通知,一般是AsyncHttpResponseHandler的子类。
通过BinaryHttpResponseHandler可以发起二进制请求,如请求图片。
通过TextHttpResponseHandler可以发起返回结果为字符串的请求,一般这个使用较多。
也可以使用它的子类JsonHttpResponseHandler,返回结果是一个JSONObject或JSONArray。不过感觉这个类作用不大,一是有另一个类BaseJsonHttpResponseHandler,可以直接解析返回的JSON数据,二是JsonHttpResponseHandler的方法太复杂了,有太多的onSuccess和onFailure方法,都不知道重写哪个了。
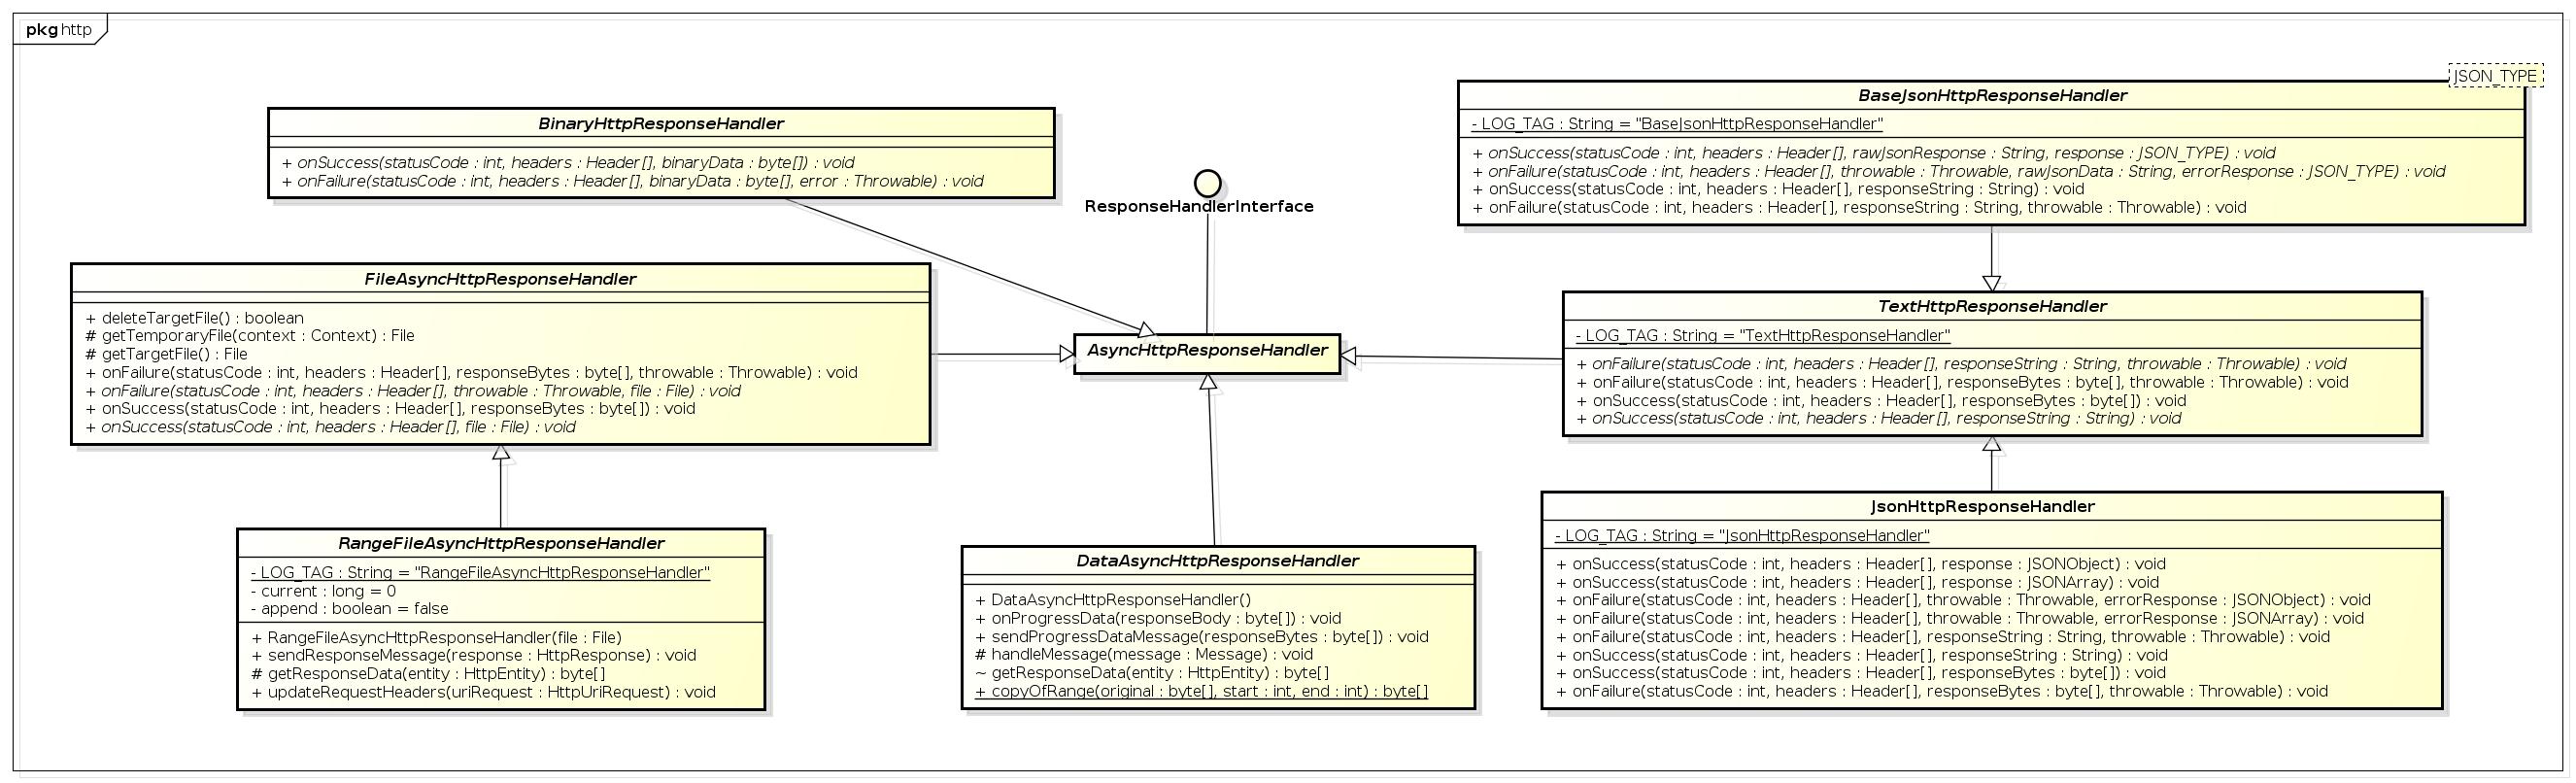
如上图所示,每个子类有太多的onSuccess和onFailure了,尤其是JsonHttpResponseHandler,这应该算是这个类库的不足吧。所以平时使用时基本不使用JsonHttpResponseHandler,而是直接使用TextHttpResponseHandler,当然也可以使用BaseJsonHttpResponseHandler。
这个类库还有一点不足,就是onSuccess等方法一般会在主线程执行,其实这么说不严谨,看代码吧:
 1 public AsyncHttpResponseHandler() {
 2     boolean missingLooper = null == Looper.myLooper();
 3     // Try to create handler
 4     if (!missingLooper)
 5         handler = new ResponderHandler(this);
 6     else {
 7         // There is no Looper on this thread so synchronous mode should be used.
 8         handler = null;
 9         setUseSynchronousMode(true);
10         Log.i(LOG_TAG, "Current thread has not called Looper.prepare(). Forcing synchronous mode.");
11     }
12     // Init Looper by calling postRunnable without an argument.
13     postRunnable(null);
14 }
可以看到,内部使用了Handler,当新建AsyncHttpResponseHandler的实例的时候会获取当前线程的Looper,如果为空就启用同步模式,即所有的回调都会在执行请求的线程中执行,当在一个普通的后台线程时这样执行是正常的,而我们一般都会在主线程发请请求,结果就是所有的回调都会在主线程中执行,这就限制了我们在onSuccess中执行耗时操作,比如请求成功后将数据持久化到数据库。
不过可以看到创建Handler的时候使用了Looper对象,所以我们就可以改进一下其构造函数,添加一个Looper参数(同步修改子类),这样所有的回调就都会在Looper所在线程执行,这样我们只需要开启一个HandlerThread就行了。但这样和Looper为空时一样有一个弊端,如果要更新UI操作的话,还需要向一个主线程的Handler发送消息让UI更新。还有第二个弊端,所有回调都在同一个HandlerThread中执行,如果一个处理耗时太久会阻塞后面的请求结果处理,如果只是简单地写个数据库影响应该不大,如果真耗时太久,为这个耗时处理再开个线程吧。