本文包括以下部分:
- 排序(Sorting )
- 检索(Searching )
- 分页(Paging)
排序(Sorting)
本节中以 Student 实体为例演示排序.
在 Controller中添加排序功能
Step 1: 打开 StudentController.cs ,使 Index() 方法如下:
public ActionResult Index(string Sorting_Order)
{
    ViewBag.SortingName = String.IsNullOrEmpty(Sorting_Order) ? "Name_Description" : "";
    ViewBag.SortingDate = Sorting_Order == "Date_Enroll" ? "Date_Description" : "Date";

var students = from stu in db.Students select stu;

switch (Sorting_Order)
    {
case "Name_Description":
        students = students.OrderByDescending(stu=> stu.FirstName);
break;
case "Date_Enroll":
        students = students.OrderBy(stu => stu.EnrollmentDate);
break;
case "Date_Description":
        students = students.OrderByDescending(stu => stu.EnrollmentDate);
break;
default:
        students = students.OrderBy(stu => stu.FirstName);
break;
    }
return View(students.ToList());
}
代码中参数 Sorting_Order 为URL中动态获取. string类型,默认为升序.
在视图中表头中添加排序超链接
Step 2: 打开ViewsStudentIndex.cshtml ,修改代码如下:
<p>
@Html.ActionLink("Create New", "Create")
</p>

<table class="table">
<tr>
<th>
            @Html.ActionLink("First Name", "Index", new { Sorting_Order = ViewBag.SortingName })
</th>
<th>
            Last Name
</th>
<th>
            @Html.ActionLink("Enrollment Date", "Index", new { Sorting_Order = ViewBag.SortingDate })
</th>
<th></th>
</tr>

@foreach (var item in Model) {
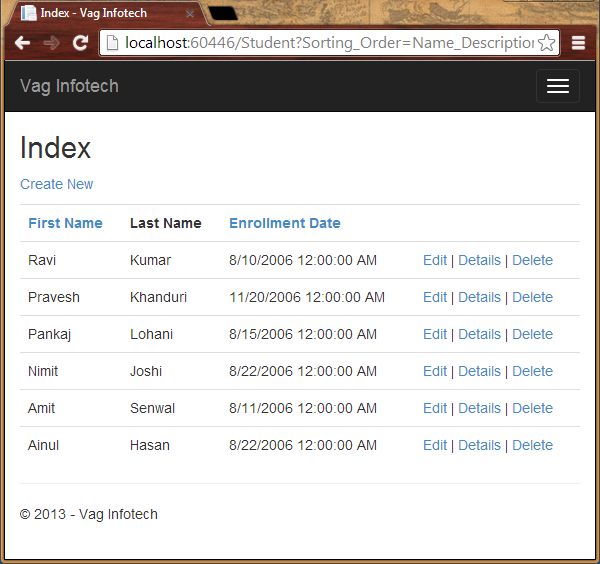
Step 3: 运行查看效果.
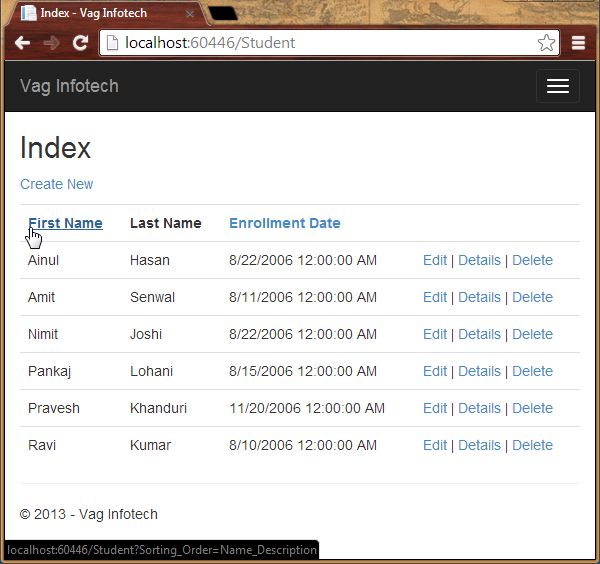
Step 4: 单击表头中First Name列 ,查看排序功能.
检索(Searching)
在 Controller中添加查询功能
Step 1: 打开 StudentController.cs ,修改Index() 方法如下:
public ActionResult Index(string Sorting_Order, string Search_Data)
{
    ViewBag.SortingName = String.IsNullOrEmpty(Sorting_Order) ? "Name_Description" : "";
    ViewBag.SortingDate = Sorting_Order == "Date_Enroll" ? "Date_Description" : "Date";
var students = from stu in db.Students select stu;

    {
        students = students.Where(stu => stu.FirstName.ToUpper().Contains(Search_Data.ToUpper())
            || stu.LastName.ToUpper().Contains(Search_Data.ToUpper()));
    }
switch (Sorting_Order)
    {
case "Name_Description":
        students = students.OrderByDescending(stu=> stu.FirstName);
break;
case "Date_Enroll":
        students = students.OrderBy(stu => stu.EnrollmentDate);
break;
case "Date_Description":
        students = students.OrderByDescending(stu => stu.EnrollmentDate);
break;
default:
        students = students.OrderBy(stu => stu.FirstName);
break;
    }
return View(students.ToList());
}
代码中我们添加了 Search_Data 参数并使用LINQ 表达式.
在视图中添加查询按钮
Step 2: 打开 ViewsStudentIndex.cshtml ,修改代码如下:
<p>
@Html.ActionLink("Create New", "Create")
</p>
@using (Html.BeginForm())
{
<p>
        Search Name: @Html.TextBox("Search_Data", ViewBag.FilterValue as string)
<input type="submit" value="Find" />
</p>
}
<table class="table">
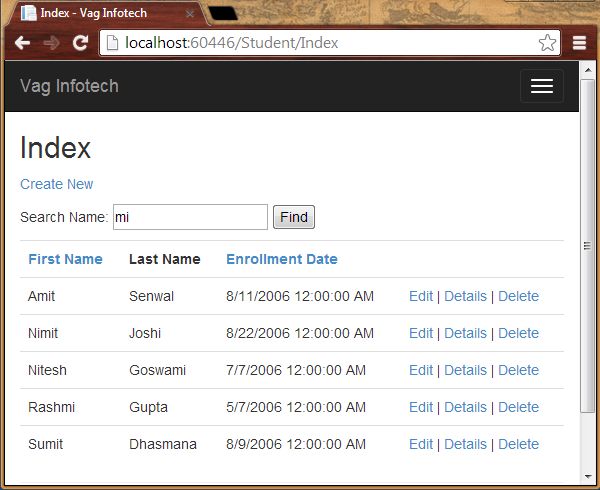
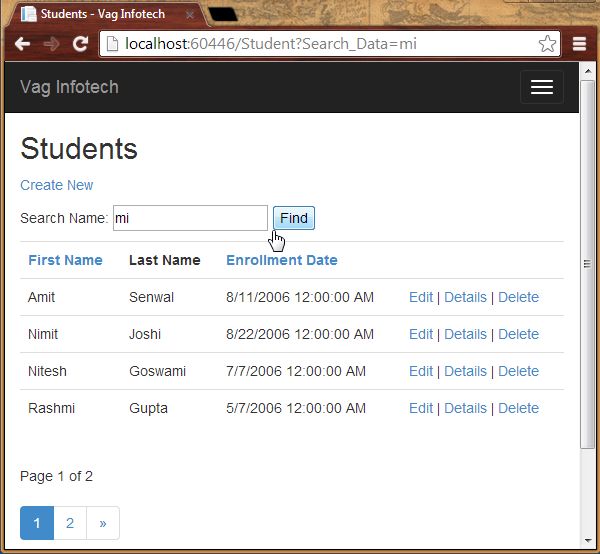
Step 3: 运行程序,输入检索条件.
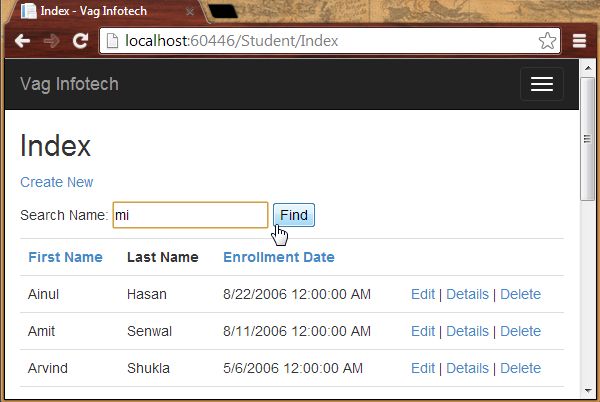
查看检索结果
分页(Paging)
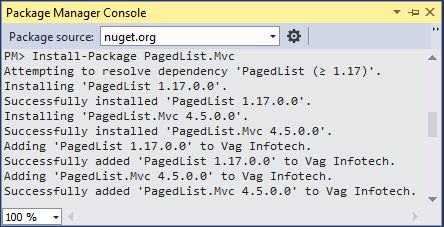
为了演示分页功能,我们将使用PagedList.Mvc控件,你可以通过NuGet 获取安装.
安装PagedList.Mvc NuGet Package
Step 1: 打开 Package 管理平台, "Tools" -> "Library Package Manager".
Step 2: 输入下列命令:
Install-Package PagedList.Mvc
添加分页功能
Step 3: 打开StudentController.cs 并添加下列命名空间:
using PagedList;
Step 4: 修改Index() 方法如下:
public ActionResult Index(string Sorting_Order, string Search_Data, string Filter_Value, int? Page_No)
{
    ViewBag.CurrentSortOrder = Sorting_Order;
    ViewBag.SortingName = String.IsNullOrEmpty(Sorting_Order) ? "Name_Description" : "";
    ViewBag.SortingDate = Sorting_Order == "Date_Enroll" ? "Date_Description" : "Date";
if (Search_Data != null)
    {
        Page_No = 1;
    }
else
    {
        Search_Data = Filter_Value;
    }
    ViewBag.FilterValue = Search_Data;
var students = from stu in db.Students select stu;
if (!String.IsNullOrEmpty(Search_Data))
    {
        students = students.Where(stu => stu.FirstName.ToUpper().Contains(Search_Data.ToUpper())
            || stu.LastName.ToUpper().Contains(Search_Data.ToUpper()));
    }
switch (Sorting_Order)
    {
case "Name_Description":
        students = students.OrderByDescending(stu=> stu.FirstName);
break;
case "Date_Enroll":
        students = students.OrderBy(stu => stu.EnrollmentDate);
break;
case "Date_Description":
        students = students.OrderByDescending(stu => stu.EnrollmentDate);
break;
default:
        students = students.OrderBy(stu => stu.FirstName);
break;
    }
int Size_Of_Page = 4;
int No_Of_Page = (Page_No ?? 1);
return View(students.ToPagedList(No_Of_Page, Size_Of_Page));
}
在视图中添加分页控件
Step 5: 打开 ViewsStudentIndex.cshtml ,修改代码如下:
@model PagedList.IPagedList<Vag_Infotech.Models.Student>
@using PagedList.Mvc;
<link href="~/Content/PagedList.css" rel="stylesheet" />
@{
    ViewBag.Title = "Students";
}
<h2>Students</h2>
<p>
@Html.ActionLink("Create New", "Create")
</p>
@using (Html.BeginForm("Index", "Student", FormMethod.Get))
{
<p>
        Search Name: @Html.TextBox("Search_Data", ViewBag.FilterValue as string)
<input type="submit" value="Find" />
</p>

}
<table class="table">
<tr>
<th>
@Html.ActionLink("First Name", "Index", new { Sorting_Order = ViewBag.SortingName, Filter_Value = ViewBag.FilterValue })
</th>
<th>
            Last Name
</th>
<th>
@Html.ActionLink("Enrollment Date", "Index", new { Sorting_Order = ViewBag.SortingDate, Filter_Value = ViewBag.FilterValue })
</th>
<th></th>
</tr>
@foreach (var item in Model) {
<tr>
<td>
@Html.DisplayFor(modelItem => item.FirstName)
</td>
<td>
@Html.DisplayFor(modelItem => item.LastName)
</td>
<td>
@Html.DisplayFor(modelItem => item.EnrollmentDate)
</td>
<td>
@Html.ActionLink("Edit", "Edit", new { id=item.ID }) |
@Html.ActionLink("Details", "Details", new { id=item.ID }) |
@Html.ActionLink("Delete", "Delete", new { id=item.ID })
</td>
</tr>
}
</table>
<br />
Page @(Model.PageCount < Model.PageNumber ? 0 : Model.PageNumber) of @Model.PageCount
@Html.PagedListPager(Model, Page_No =>Url.Action("Index",
new { Page_No, Sorting_Order= ViewBag.CurrentSortOrder, Filter_Value = ViewBag.FilterValue }))
注意@model 类型由List类型对象变为 PagedList 类型对象.
Step 6: 运行程序,查看分页效果.
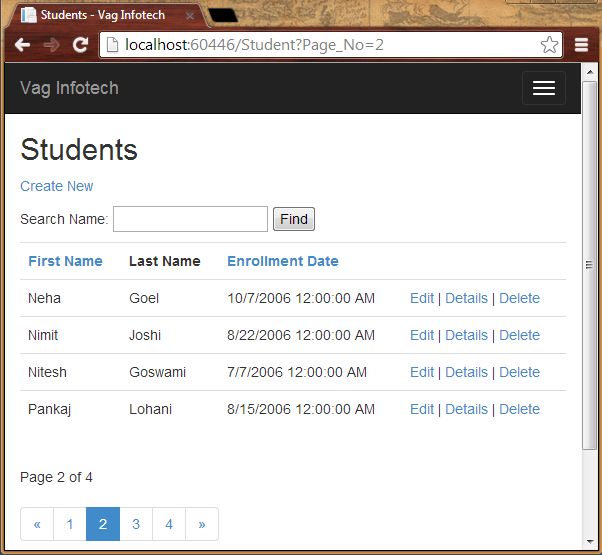
Step 7: 再试一下检索功能.
总结
本文演示了在ASP.NET MVC中进行排序、查询、分页功能.