Jquery 简介
jQuery是一个兼容多浏览器的javascript库,核心理念是write less,do more(写得更少,做得更多),对javascript进行了封装,是的更加便捷的开发,并且在兼容性方面十分优秀。
利用jquer来操作的目的有两个:
1、获取标签
2、来对标签的内容做修改
基本:
1 <body>
2       <div id="n1"> python</div>
3
4       <script src='xxxx.js'></script>
5       <script>
6             //$  等于jQuery,是封装的一个对象,可以直接 . 来调用
7            $('#n1').text('hello,python')
8       </script>
9 </body>
并列选择
1 $('.c1 , a , #n2').text('ok') #将会遍历到这三个对应的标签,然后text输出
层级选择器
1     <script>
2
3         $('#n3 div .c3 span a').text('kkkk') #层级选择,中间以空格分开
4
5         #('#n3 a').text('kkkk') #如果下面只有一个按标签,这样这么简写,因为n3是包含下面所有内容的,这样写不高效,不如直接定义一个
          id,或class
6     </script>
层级:
1 $("form input")           //找form下面所有的input后代
2
3 $("form > input")         //只找儿子辈的input标签
4
5 $("label + input")        //只找label标签后面紧跟着input的标签
6
7 $("form ~ input")         //找与form同辈的input标签
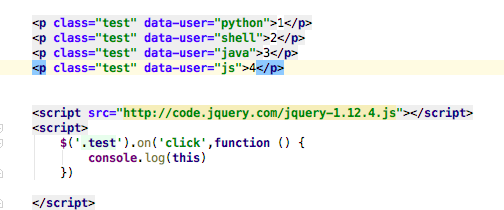
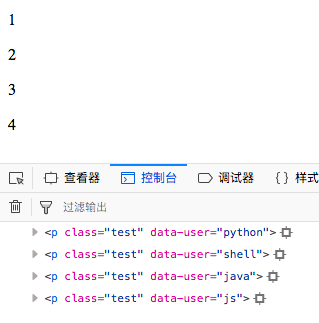
this
分别点击1,2,3,4 会显示其作用的行
下面对this封装一下
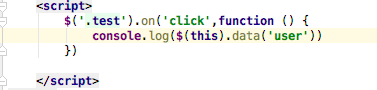
这里还有一个$(this).attr('user') ,两者的区别是data有缓存,访问的次数多了之后能快一些
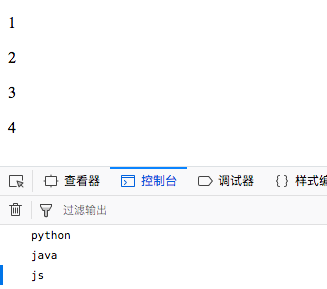
再点击就会显示其值
菜单目录小练习:
结果:

实现点击其中之一其他隐藏,


 1 <!DOCTYPE html>
 2 <html lang="en">
 3 <head>
 4     <meta charset="UTF-8">
 5     <title>Title</title>
 6     <style>
 7         .menu{
 8             float:left;
 9             width:20%;
10             background: pink;
11             height: 500px;
12
13         }
14         .zhuti{
15             float:left;
16             width:80%;
17             background: blue;
18             height: 500px;
19         }
20         .hide{
21             display:none
22         }
23     </style>
24 </head>
25 <body>
26
27     <div>
28         <div class="menu">
29             <div class="item">
30                 <div class="title" onclick="diandian(this)">菜单一</div>     //this,代表当前行。$(this).text() 显示"菜单一"
31                 <div class="body hide">
32                     <div>1.1</div>
33                     <div>1.2</div>
34                     <div>1.3</div>
35                 </div>
36
37             </div>
38             <div class="item">
39                 <div class="title" onclick="diandian(this)">菜单二</div>
40                 <div class="body hide">
41                     <div>2.1</div>
42                     <div>2.2</div>
43                     <div>2.3</div>
44                 </div>
45
46             </div>
47             <div class="item">
48                 <div class="title" onclick="diandian(this)">菜单三</div>
49                 <div class="body hide">
50                     <div>3.1</div>
51                     <div>3.2</div>
52                     <div>3.3</div>
53                 </div>
54
55             </div>
56         </div>
57
58
59         <div class="zhuti">猪蹄</div>
60     </div>
61
62     <script src="jquery.min.js"></script>
63     <script>
64         function diandian(ths){
65             $(ths).next().removeClass('hide')
66             $(ths).parent().siblings().find('.body').addClass('hide')
67         }
68     </script>
69 </body>
70 </html>
标题栏小练习:
结果:

点击标题栏,下面的内容随之变化
 1 <!DOCTYPE html>
 2 <html lang="en">
 3 <head>
 4     <meta charset="UTF-8">
 5     <title>Title</title>
 6     <style>
 7         .tab-box .caidan{
 8             background: #dddddd;
 9             border:1px solid #dddddd;
10         }
11         .tab-box .neirong{
12             border:1px solid #dddddd;
13         }
14         .hide{
15             display: none;
16         }
17         .current{
18             background-color: red;
19             color: white;
20         }
21
22     </style>
23 </head>
24 <body>
25
26     <div class="tab-box">
27         <div class="caidan">
28             <a python="c1"  onclick="changetab(this)">菜单一</a>
29             <a python="c2"  onclick="changetab(this)">菜单二</a>
30             <a python="c3"  onclick="changetab(this)">菜单三</a>
31         </div>
32
33         <div class="neirong">
34             <div id="c1" class="hide">内容一</div>
35             <div id="c2" class="hide">内容二</div>
36             <div id="c3" class="hide">内容三</div>
37         </div>
38
39     </div>
40
41     <script src="jquery.min.js"></script>
42     <script>
43
44         function changetab(ths) {
45             $(ths).addClass('current').siblings().removeClass('current')
46
47             var contentID = $(ths).attr('python')
48             temp = '#' + contentID
49             $(temp).removeClass('hide').siblings().addClass('hide')
50         }
51     </script>
52 </body>
53 </html>
多选框小练习:
结果:
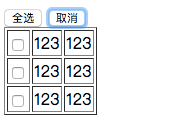
点击全选或者取消,实现全选或者不全选
实现的逻辑:主要用到了prop属性,这个是专门针对checkbox、rediobox来使用的,其他的用attr即可实现。
prop可填入两个参数,如果填入一个,则是获取这个元素的属性值,填入两个就是给这个元素赋值
 1 <!DOCTYPE html>
 2 <html lang="en">
 3 <head>
 4     <meta charset="UTF-8">
 5     <title>Title</title>
 6 </head>
 7 <body>
 8
 9     <div>
10         <input type="button" value="全选" onclick="SelectAll()"/>
11         <input type="button" value="取消" onclick="ClearAll()" />
12
13     </div>
14
15     <div>
16         <table border="1">
17             <tr>
18                 <td><input type="checkbox"/></td>
19                 <td>123</td>
20                 <td>123</td>
21             </tr>
22             <tr>
23                 <td><input type="checkbox"/></td>
24                 <td>123</td>
25                 <td>123</td>
26             </tr>
27             <tr>
28                 <td><input type="checkbox"/></td>
29                 <td>123</td>
30                 <td>123</td>
31             </tr>
32         </table>
33
34     </div>
35     <script src="jquery.min.js"></script>
36     <script>
37         function SelectAll(){
38             //$('table input[type="checkbox"]').prop('checked',true)
39             $('table :checkbox').prop('checked',true)
40         }
41         function ClearAll() {
42             $('table :checkbox').prop('checked',false)
43         }
44     </script>
45 </body>
46 </html>
多选框取反小练习
结果:

技术点:这里面用到了jquery中的each,他是封装的js中的 for( var i in XXX) 和for(i=1,i<100,i++)这两种循环的方式
 1 <!DOCTYPE html>
 2 <html lang="en">
 3 <head>
 4     <meta charset="UTF-8">
 5     <title>Title</title>
 6 </head>
 7 <body>
 8
 9     <div>
10         <input type="button" value="全选" onclick="SelectAll()"/>
11         <input type="button" value="取消" onclick="ClearAll()" />
12         <input type="button" value="取反" onclick="reverseAll()" />
13
14     </div>
15
16     <div>
17         <table border="1">
18             <tr>
19                 <td><input type="checkbox"/></td>
20                 <td>123</td>
21                 <td>123</td>
22             </tr>
23             <tr>
24                 <td><input type="checkbox"/></td>
25                 <td>123</td>
26                 <td>123</td>
27             </tr>
28             <tr>
29                 <td><input type="checkbox"/></td>
30                 <td>123</td>
31                 <td>123</td>
32             </tr>
33         </table>
34
35     </div>
36     <script src="jquery.min.js"></script>
37     <script>
38         function SelectAll(){
39             //$('table input[type="checkbox"]').prop('checked',true)
40             $('table :checkbox').prop('checked',true)
41         }
42         function ClearAll() {
43             $('table :checkbox').prop('checked',false)
44         }
45         function reverseAll() {
46             $('table :checkbox').each(function () {
47                 var ischecked = $(this).prop('checked')
48                 if(ischecked){
49                     $(this).prop('checked',false)
50                 }else{
51                     $(this).prop('checked',true)
52                 }
53             })
54
55         }
56     </script>
57 </body>
58 </html>
Jquery 之for循环
for循环的两种方式:
 1             var numlist = [11,22,33,44]
 2             $.each(numlist,function (i,item) {
 3                 console.log(i,item)             //i,下标  item,值
 4             })
 5
 6
 7
 8             $('table :checkbox').each(function () {             //现获取到元素列表,再循环
 9                 var ischecked = $(this).prop('checked')
10                 if(ischecked){
11                     $(this).prop('checked',false)
12                 }else{
13                     $(this).prop('checked',true)
14                 }
15             })
返回顶部实例
 1 <!DOCTYPE html>
 2 <html lang="en">
 3 <head>
 4     <meta charset="UTF-8">
 5     <title>Title</title>
 6     <style>
 7         .go-top{
 8             position:fixed;
 9             right:0;
10             bottom:0;
11         }
12         .hide{
13             display:none;
14         }
15     </style>
16 </head>
17 <body>
18     <div style="height: 2000px;background-color: #dddddd">
19         XXXX
20
21         <div id="id1" style="height: 100px;background-color:blue;overflow:auto">    //overflow:auto 显示在一个框内,通过下拉框来控制
22             <p>xxx</p>
23             <p>xxx</p>
24             <p>xxx</p>
25             <p>xxx</p>
26             <p>xxx</p>
27             <p>xxx</p>
28             <p>xxx</p>
29             <p>xxx</p>
30             <p>xxx</p>
31             <p>xxx</p>
32             <p>xxx</p>
33         </div>
34     </div>
35
36     <div class="go-top hide">
37         <a onclick="GoTop()">返回顶部</a>
38     </div>
39     <script src="jquery.min.js"></script>
40     <script>
41
42         window.onscroll = function(){                             //控制鼠标的滑动事件,滑动超过100后才显示返回顶部按钮
43             var currentTop = $(window).scrollTop();
44             if(currentTop >100){
45                 $('.go-top').removeClass('hide')
46             }else{
47                 $('.go-top').addClass('hide')
48             }
49         }
50
51         function GoTop(){                                       //返回顶部事件
52             $(window).scrollTop(0)
53         }
54     </script>
55
56 </body>
57 </html>
滚动菜单
实现效果:
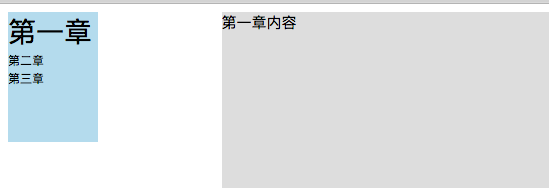
每出现对应的章节,菜单栏就会变大
原理:页面向下拉的过程就如同拉窗帘一样,我们可以通过,下拉了多少(a)与每块的div到顶部的高度(b)和每块div底部到顶部的高度(c)来判断,如 c>a>b 就要找到这个div对应的章节,使其做显示。
代码:
 1 <!DOCTYPE html>
 2 <html lang="en">
 3 <head>
 4     <meta charset="UTF-8">
 5     <title>Title</title>
 6     <style>
 7         .caidan{
 8             float:left;
 9             width:15%;
10             height: 800px;
11         }
12         .neirong{
13             float: left;
14             width:80%;
15         }
16         .nrgao{
17             height:800px;
18             background-color:#dddddd;
19         }
20         .zicaidan{
21             width:90px;
22             height:130px;
23             background: #b4dbed;
24         }
25         .fixed{
26             position:fixed;
27         }
28     </style>
29 </head>
30 <body>
31
32     <div>
33         <div class="caidan ">
34             <div class="zicaidan fixed">
35                 <div auto-to="function1">第一章</div>
36                 <div auto-to="function2">第二章</div>
37                 <div auto-to="function3">第三章</div>
38             </div>
39         </div>
40         <div class="neirong">
41             <div class="nrgao" menu="function1">第一章内容</div>
42             <div class="nrgao" menu="function2">第二章内容</div>
43             <div class="nrgao" menu="function3">第三章内容</div>
44         </div>
45     </div>
46
47     <script src="jquery.min.js"></script>
48     <script>
49         window.onscroll = function(){
50             var ws = $(window).scrollTop()
51             $('.neirong').children().each(function () {
52                 var offs = $(this).offset();
53                 var offtop = offs.top;
54
55                 var tatal = offtop + $(this).height();
56
57                 if(ws > offtop && ws < tatal) {
58                     //div小的时候,最后一块显示不出来,需要判断试下是否到底部了,如果是,直接就显示最后一个
59                     //     滑动的长度               窗口的大小                整个文档的大小
60                     if ($(window).scrollTop() + $(window).height() == $(document).height()) {
61                         $('.zicaidan').children(':last').css("fontSize", '28px').siblings().css("fontSize", '12px');
62                     } else {
63                         var t = $(this).attr('menu')
64                         var target = 'div[auto-to="' + t + '"]'
65                         $('.zicaidan').children(target).css("fontSize", '28px').siblings().css("fontSize", '12px');
66
67                     }
68                 }
69             })
70
71         }
72     </script>
73
74 </body>
75 </html>
Jquery之事件
一、
$(document).ready(function(){
})
$(function(){
})
这两种写法都是一样的,都是页面加载完成做的事件
二、
$(XXX).click(function(){})
$(XXX).bind('click',function(){})
这两种是一样的,只不过下面的这一种再click可以变成不同的时间。
有绑定事件,当然也有解绑事件,unbind
三、
$('ul').deleagte('li','click',function(){})
这种是当需要到的时候才会去绑定事件,用法就是,当通过bind绑定事件,如果再添加的新的标签,其新的标签不会生效,而使用这种方法可以使新添加的标签也能够生效。
Jquery实例:拖动面板
效果:
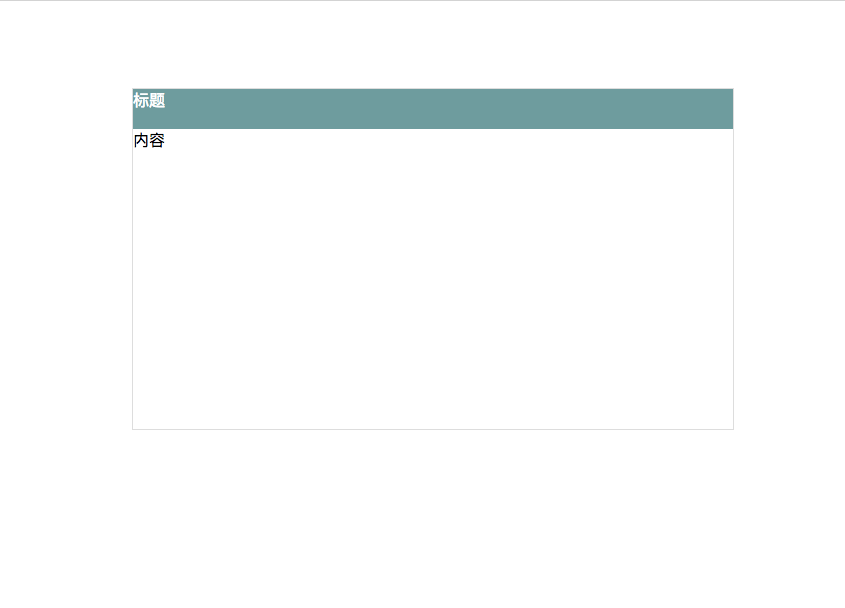
鼠标点击标题栏,然后就可以拖动到任意位置。
原理:记录一下当前这个大的div到左和上的距离,然后计算鼠标滑动前的距离,然后再计算鼠标滑动后的距离,然后有滑动后的距离,减去滑动前的距离,再给div加上就是他的新位置。
 1 <!DOCTYPE html>
 2 <html lang="en">
 3 <head>
 4     <meta charset="UTF-8">
 5     <title>Title</title>
 6 </head>
 7 <body>
 8
 9     <div style="border:1px solid #ddd; 600px; position:absolute;">
10         <div id="title" style="background-color:cadetblue;height:40px;color:white;">标题</div>
11         <div style="height:300px;">内容</div>
12     </div>
13
14
15     <script src="jquery.min.js"></script>
16     <script>
17         $(function(){
18             $('#title').mouseover(function(){
19                 $(this).css('cursor','move')
20
21
22             }).mousedown(function (e) {
23                 var _event = e || window.event;
24
25                 var ord_x = _event.clientX
26                 var ord_y = _event.clientY
27
28                 var parent_left = $(this).parent().offset().left;
29                 var parent_top = $(this).parent().offset().top;
30
31                 $(this).bind('mousemove',function (e) {
32                     var _new_event = e || window.event
33                     var new_x = _new_event.clientX
34                     var new_y = _new_event.clientY
35
36                     var x = parent_left + (new_x - ord_x)
37                     var y = parent_top + (new_y - ord_y)
38
39                     $(this).parent().css('left',x+'px')
40                     $(this).parent().css('top',y+'px')
41                 })
42             }).mouseup(function(){
43                 $(this).unbind('mousemove')
44             })
45         })
46     </script>
47 </body>
48 </html>
Jquery 之 ajax
页面获取数据的结构

原始ajax请求代码:
 1 <!DOCTYPE html>
 2 <html lang="en">
 3 <head>
 4     <meta charset="UTF-8">
 5     <title>Title</title>
 6 </head>
 7 <body>
 8
 9     <div>
10         <input type="button" value="获取节目" onclick="submitData();" />
11         <div id="container"></div>
12     </div>
13
14
15     <script src="jquery.min.js"></script>
16     <script>
17         function submitData (){
18             $.ajax({
19                 url:'http://www.jxntv.cn/data/jmd-jxtv2.html',
20                 data:{},
21                 type:'GET',
22                 dataType:'jsonp',             //解决跨域的问题
23                 jsonp:'callback',
24                 jsonpCallback:'list',
25                 success:function(arg){
26                     console.log(arg)
27                     var jsonpArray = arg.data;
28                     $.each(jsonpArray,function(k,v){
29                         var wwk = v.week;
30                         var temp = "<h1>" + wwk + "</h1>"
31                         $('#container').append(temp);
32                         var listArray = v.list
33                         $.each(listArray,function (kk,yy) {
34                             var link = yy.link
35                             var name = yy.name
36                             var tempNew = "<a href='" + link +"'>" + name+ "</a></br>"
37                             $('#container').append(tempNew)
38                         })
39
40                     })
41                 }
42
43             })
44         }
45     </script>
46 </body>
47 </html>