一、概要
我们经常用到Canvas.drawBitmap方法,却很少用到Canvas.drawBitmapMesh方法。这个方法为我们做图片变形提供了无限可能,同时也对数学功底有较高的要求。下面先看一下方法介绍:
   /**
     * Draw the bitmap through the mesh, where mesh vertices are evenly distributed across the
     * bitmap. There are meshWidth+1 vertices across, and meshHeight+1 vertices down. The verts
     * array is accessed in row-major order, so that the first meshWidth+1 vertices are distributed
     * across the top of the bitmap from left to right. A more general version of this method is
     * drawVertices().
     *
     * Prior to API level {@value Build.VERSION_CODES#P} vertOffset and colorOffset were ignored,
     * effectively treating them as zeros. In API level {@value Build.VERSION_CODES#P} and above
     * these parameters will be respected.
     *
     * @param bitmap The bitmap to draw using the mesh
     * @param meshWidth The number of columns in the mesh. Nothing is drawn if this is 0
     * @param meshHeight The number of rows in the mesh. Nothing is drawn if this is 0
     * @param verts Array of x,y pairs, specifying where the mesh should be drawn. There must be at
     *            least (meshWidth+1) * (meshHeight+1) * 2 + vertOffset values in the array
     * @param vertOffset Number of verts elements to skip before drawing
     * @param colors May be null. Specifies a color at each vertex, which is interpolated across the
     *            cell, and whose values are multiplied by the corresponding bitmap colors. If not
     *            null, there must be at least (meshWidth+1) * (meshHeight+1) + colorOffset values
     *            in the array.
     * @param colorOffset Number of color elements to skip before drawing
     * @param paint May be null. The paint used to draw the bitmap
     */
    public void drawBitmapMesh(@NonNull Bitmap bitmap, int meshWidth, int meshHeight,
            @NonNull float[] verts, int vertOffset, @Nullable int[] colors, int colorOffset,
            @Nullable Paint paint) {
        super.drawBitmapMesh(bitmap, meshWidth, meshHeight, verts, vertOffset, colors, colorOffset,
                paint);
    }
简单翻译一下:
- 此方法将Bitmap看做一张网,通过网的形状决定图片绘制形状
- meshWidth和meshHeight分别为横向和纵向分割网格数
- 所有网格顶点均匀分布,且排序为从左到右,从上到下
- verts为变换后所有网格顶点的坐标数组
- Android P版本之前vertOffset和colorOffset两个参数无效
下面通过一张简图来解释BitmapMesh的绘制原理:

如上,原图均匀分割成8*8格,对应(8+1)*(8+1)个顶点,假设原顶点坐标数组为origs[],通过遍历并按照特定算法重新计算后,得出新顶点坐标数组verts[],drawBitmapMesh根据verts[]重新绘制图片。
原理很好理解,本质上是两个数组的变换,关键是变换算法的设计。
二、实例讲解
下面通过一个简单实例讲解Canvas.drawBitmapMesh的具体用法,先看效果图:

核心代码如下:
public class BitmapMeshView extends TextView {


    //横向、纵向划分格数:80*80
    private static final int WIDTH = 80;
    private static final int HEIGHT = 80;
    private Bitmap bitmap = null;
    //顶点数:81*81
    private final int COUNT = (WIDTH + 1) * (HEIGHT + 1);
    //顶点坐标数组
    private final float[] orig = new float[COUNT * 2];
    //转换后顶点坐标数组
    private final float[] verts = new float[COUNT * 2];
    float bitmapWidth;
    float unitWidth;
    float bitmapHeight;
    float halfHeight;
    private static final double HALF_PI = Math.PI / 2;

    @Override
    public boolean onTouchEvent(MotionEvent event) {
        startPlay();
        return super.onTouchEvent(event);
    }

    public void startPlay() {
        initBitmap();
        ValueAnimator va = ValueAnimator.ofFloat(0, 1.3f);  //因变形区域是0.3,所以最大1.3才能保证完全展开
        va.setDuration(1200);
        va.addUpdateListener(new ValueAnimator.AnimatorUpdateListener() {

            @Override
            public void onAnimationUpdate(ValueAnimator animation) {
                float value = (float) animation.getAnimatedValue();
                calcuVerts(value);
                invalidate();
            }
        });
        va.start();
    }

    private void initBitmap() {
        if (bitmap == null) {
            buildDrawingCache();  //获取View截图
            bitmap = getDrawingCache();
            bitmapWidth = bitmap.getWidth();
            unitWidth = bitmapWidth * 0.3f;  //变形区域长度
            bitmapHeight = bitmap.getHeight();
            halfHeight = bitmapHeight / 2;  //1/2高度

            /*算出顶点原始坐标*/
            int index = 0;
            for (int y = 0; y <= HEIGHT; y++) {
                float fy = bitmapHeight * y / HEIGHT;
                for (int x = 0; x <= WIDTH; x++) {
                    float fx = bitmapWidth * x / WIDTH;
                    orig[index * 2 + 0] = verts[index * 2 + 0] = fx;
                    orig[index * 2 + 1] = verts[index * 2 + 1] = fy;
                    index += 1;
                }
            }
        }
    }

    /**
     * 计算转换后的顶点坐标
     * @param input 已展开比例
     */
    private void calcuVerts(float input) {
        for (int j = 0; j <= HEIGHT; j++) {
            for (int i = 0; i <= WIDTH; i++) {
                float startX = input * bitmapWidth; //变形部分最右端x值
                float cx = i * 1.0f / WIDTH * bitmapWidth;  //当前顶点x坐标
                float cy = j * 1.0f / HEIGHT * bitmapHeight;  //当前顶点y坐标
                float toHalf = cy - halfHeight;  //距离垂直中线的距离
                if (cx >= startX) { //右侧未展开区域
                    verts[(j * (WIDTH + 1) + i) * 2 + 1] = halfHeight;  //计算y坐标
                    verts[(j * (WIDTH + 1) + i) * 2] = cx;  //计算x坐标
                } else if (cx <= startX - unitWidth) { //左侧完全展开区域
                    verts[(j * (WIDTH + 1) + i) * 2 + 1] = cy;
                    verts[(j * (WIDTH + 1) + i) * 2] = cx;
                } else { // 中间正在展开区域
                    float ratio = (startX - cx) / unitWidth;
                    verts[(j * (WIDTH + 1) + i) * 2 + 1] = (float) (halfHeight + toHalf * Math.sin(HALF_PI * ratio));
                    verts[(j * (WIDTH + 1) + i) * 2] = (float) (cx - toHalf * Math.cos(HALF_PI * ratio) * 1f);
                }
            }
        }
    }

    @Override
    protected void onDraw(Canvas canvas) {
        if (bitmap != null) {
            canvas.drawBitmapMesh(bitmap, WIDTH, HEIGHT, verts, 0, null, 0, null);
        } else {
            super.onDraw(canvas);
        }
    }

}
代码注释已经非常详细,不再一一解读。正如上面所说,drawBitmapMesh的重点是顶点坐标变换算法的设计,体现在本示例即是calcuVerts(float input)函数的设计。这是我们下面讲解的重点:
首先看下图
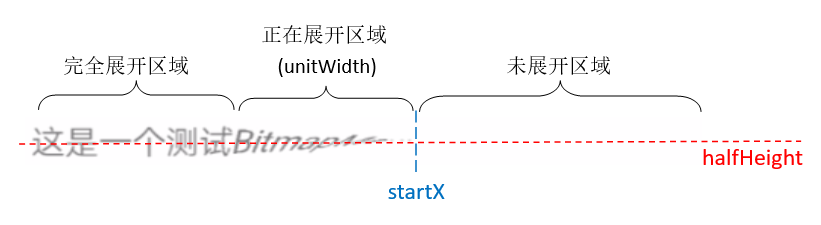
我们把这条文本分成三段:完全展开区域、正在展开区域、未展开区域。我们需要分别计算出这三段文本对应的顶点坐标:
(1)完全展开区域的顶点坐标和原始坐标是一样的:
 else if (cx <= startX - unitWidth) { //左侧完全展开区域
      verts[(j * (WIDTH + 1) + i) * 2 + 1] = cy;
      verts[(j * (WIDTH + 1) + i) * 2] = cx;
 }
(2)未展开区域的顶点y坐标都是halfHeight
if (cx >= startX) { //右侧未展开区域
      verts[(j * (WIDTH + 1) + i) * 2 + 1] = halfHeight;  //计算y坐标
      verts[(j * (WIDTH + 1) + i) * 2] = cx;  //计算x坐标
}
(3)重点是正在展开区域的坐标计算
我们把正在展开区域放大,假设(cx,cy)是其中某个原顶点坐标,(cx',cy')是经过计算变换后的顶点坐标,算法的重点是通过(cx,cy)计算出(cx',cy')。

根据动画效果不难想象点 (cx',cy') 实际上位于点 (cx,cy) 绕 (cx,halfHeiht) 圆心的弧线上,参考上面的辅助线
$cy' = halfHeight - h = halfHeight - |toHalf| * sinθ$
$cx' = cx + w = cx + |toHalf| * cosθ$
我们继续分析,在变形区域内,
- (cx,cy)距startX越远,展开幅度越大,θ角度越大,最大为90°,即(cx',cy')和(cx,cy)重合
- (cx,cy)距startX越近,展开幅度越小,θ角度越小,最小为0°,即(cx',cy')位于中线上
- θ角度呈线性变化,即θ = HALF_PI * (startX - cx) / unitWidth
- 因View坐标系Y轴是向下的,所以toHalf实际上是负值
综上分析,得出正在展开区域的顶点坐标算法:
 else { // 中间正在展开区域
      float ratio = (startX - cx) / unitWidth;
      verts[(j * (WIDTH + 1) + i) * 2 + 1] = (float) (halfHeight + toHalf * Math.sin(HALF_PI * ratio));
      verts[(j * (WIDTH + 1) + i) * 2] = (float) (cx - toHalf * Math.cos(HALF_PI * ratio) * 1f);
 }
上述(1)(2)(3)共同组成了目标顶点坐标的算法。
再结合动画原理,startX从0到bitmapWidth+unitWidth过渡,就形成了文本完全展开的动画。
三、总结
Canvas的drawBitmapMesh方法是一个很强大的存在,但是想用它做出逼真的效果需要很强的数学和物理基础。坐标变换算法的设计和代码实现是该方法的关键。下面列举两个Github上的开源项目:
Github源码地址:https://github.com/NanBox/RippleLayout
对应博客地址:https://blog.csdn.net/a49220824/article/details/70476008

Github源码地址:https://github.com/DeesonWoo/MyDrawBitmapMeshDemo