一、基础知识点
1、安装centos 7虚拟机扩充知识点:
DHCP : DHCP(动态主机配置协议)是一个局域网的网络协议。指的是由服务器控制一段IP地址范围,客户机登录服务器时就可以自动获得服务器分配的IP地址和子网掩码。默认情况下,DHCP作为Windows Server的一个服务组件不会被系统自动安装,还需要管理员手动安装并进行必要的配置
DNS: 可以把域名地址转换成ip地址
主机名:生产环境,要有意义 地址+楼层+房间号+业务
swap分区:交换分区,也就是虚拟内存,当物理内存不够的时候,一些长时间没有什么操作的程序,会被转移到swap中来,释放出其占用的物理内存
关于分区
linux 分区结构为树结构, windows 为森林结构,所以有C盘D盘之类的, 而linux /分区就是根分区, swap可以理解为虚拟内存, /boot 这是个目录, 可以分成一个分区,然后挂载到/boot目录, 也可以只用一个/分区, 里面会有boot目录的,保存的是引导文件,内核等等的东东
2、Shell提示符
# $ = 普通用户, # = root用户(超级管理员)
### [root@l92 ~]#
# root:当前登录用户
# @ :没有意义
# 192:主机名称,如果很长会显示不全,通过hostname查看
# ~:当前用户所在家目录
# #:通常指超级管理员
# $:普通用户
[root@192 ~]# whoami
root

[root@192 ~]# useradd jack
[root@192 ~]# passwd jack
Changing password for user jack.
New password:
BAD PASSWORD: The password is a palindrome
Retype new password:
passwd: all authentication tokens updated successfully.
[root@192 ~]# su jack
[root@192 ~]# cd root   提示没有权限
3、shell基础语法
#命令       选项        参数
command [-options] [arguments]

# 例子
[root@192 ~]# ls
anaconda-ks.cfg
[root@192 ~]#  ls -a # 命令+选项
.  ..  anaconda-ks.cfg  .bash_logout  .bash_profile  .bashrc  .cshrc  .tcshrc
[root@192 ~]# ls -a /home/ #命令+选项+参数
.  ..  nq
#选项: 用于调节命令的输出效果
    #以 “-”引导短格式选项(单个字符),例如“-l”
    #以“--”引导长格式选项(多个字符),例如“--color”
    #多个短格式选项可以写在一起,只用一个“-”引导,例如“-al”
'''
[root@192 ~]# ls -a -l
total 24
dr-xr-x---.  2 root root  114 Dec 30 20:25 .
dr-xr-xr-x. 17 root root  224 Dec 30 20:24 ..
-rw-------.  1 root root 1465 Dec 30 20:25 anaconda-ks.cfg
-rw-r--r--.  1 root root   18 Dec 29  2013 .bash_logout
等价于ls -la
[root@192 ~]# ls -la
total 24
dr-xr-x---.  2 root root  114 Dec 30 20:25 .
dr-xr-xr-x. 17 root root  224 Dec 30 20:24 ..
-rw-------.  1 root root 1465 Dec 30 20:25 anaconda-ks.cfg
-rw-r--r--.  1 root root   18 Dec 29  2013 .bash_logout
等价于 ls -al
[root@192 ~]# ls -al
total 24
dr-xr-x---.  2 root root  114 Dec 30 20:25 .
dr-xr-xr-x. 17 root root  224 Dec 30 20:24 ..
-rw-------.  1 root root 1465 Dec 30 20:25 anaconda-ks.cfg
-rw-r--r--.  1 root root   18 Dec 29  2013 .bash_logout
'''

#参数: 命令操作的对象,如文件、目录名等
# 选项和参数可以出现位置调换,命令,选项,参数之间要至少有一个空格
# 命令必须开头, 选项和参数位置可以发生变化
二、Bash shell 基本特性
1、安装补全软件、ifconfig软件
# ifconfig 在7的版本没有,需要装软件
yum insatll net-tools -y
yum insatll net-tools

# yum install bash-completion -y   补齐选项
ls - 两下tab建,所有的选项都会提示出来
2、常用快捷建
Ctrl + a    #光标跳转至正在输入的命令行的首部
Ctrl + e    #光标跳转至正在输入的命令行的尾部
Ctrl + c    #终止前台运行的程序
Ctrl + d    #在shell中,ctrl-d表示推出当前shell。
Ctrl + z    #将任务暂停,挂至后台
Ctrl + l    #清屏,和clear命令等效。
Ctrl + k    #删除从光标到行末的所有字符
Ctrl + u    #删除从光标到行首的所有字符
Ctrl + r    #搜索历史命令, 利用关键字,Tab建选中
Ctrl + w    #按单词或空格进行向前删除
Ctrl + 左右建 #按单词或空格进行向前向后跳

#在命令行前加面加 "#" 则该命令不会被执行
3、历史命令history
'''
-w 保存命令历史到历史文件
-c 清空命令历史记录, 不会情况文件
-d 删除命令历史的第 N 条行
!行数  执行第几行命令
'''
[root@192 ~]# history -d 10 #删除第10条历史记录
[root@192 ~]# history
    1  systemctl stop firewalld.service
    2  ping www.baidu.com
    3  netstat -rn
    4  route add -host 192.168.92.3 dev eth0:0
    5  ping www.baidu.com
    6  ifconfig
    7  yum install net-tools -y
    8  ifconfig
    9  yum install bash-completion
   10  history
   11  history -d 10 #删除第10条历史记录
   12  history
[root@192 ~]# !5 #执行第5行命令
[root@192 ~]# history -w #保存历史集合,保存到当前用户的家目录 .bash_history
[root@192 ~]# history -c #清空历史命令
三、文件管理知识点
i、文件目录结构:
linux下CentOS7系统目录结构如下:
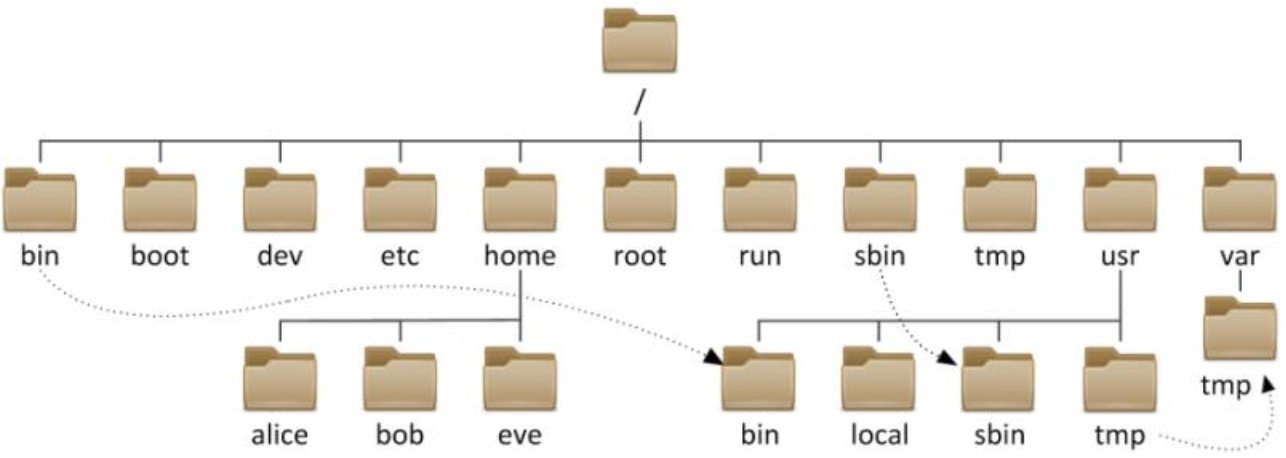
1、存放命令的目录bin、sbin
/bin,普通用户使用的命令 /bin/ls,/bin/date
/sbin,管理员使用的命令
注意:一般bin路径下存放的都是可执行文件
[root@192 sbin]# poweroff  #关机
[root@192 sbin]# service     #恢复
[root@192 sbin]# useradd username #添加用户
......
2、存放用户数据的家目录 /home 和 /root
/home 普通用户家目录,默认是/home/username/
/root 超级管理员root的家目录,普通用户无权操作
~ 表示root家目录
[root@192 ~]# useradd test1
[root@192 ~]# passwd test1
Changing password for user test1.
New password:
BAD PASSWORD: The password is shorter than 8 characters
Retype new password:
passwd: all authentication tokens updated successfully.
[root@192 ~]# ls /home/
nq  test1
[root@192 ~]#
3、系统文件目录usr
/usr,相当于C:Windows
/usr/local,软件安装的目录,相当于C:Program
/usr/bin/,普通用户使用的应用程序(重要)
/usr/sbin,管理员使用的应用程序(重要)
/usr/lib,库文件Glibc 32bit
/usr/lib64,库文件Glibc 64bit
'''
df -h #df -h查看系统中文件的使用情况
Size 分割区总容量
Used 已使用的大小
Avail 剩下的大小
Use% 使用的百分比
Mounted on 路径地址
'''
[root@192 usr]# df -h
Filesystem      Size  Used Avail Use% Mounted on
devtmpfs        980M     0  980M   0% /dev
tmpfs           991M     0  991M   0% /dev/shm
tmpfs           991M  9.5M  981M   1% /run
tmpfs           991M     0  991M   0% /sys/fs/cgroup
/dev/sda2        18G  1.3G   17G   8% /
/dev/sda1      1020M  132M  889M  13% /boot
tmpfs           199M     0  199M   0% /run/user/0

'''
du -sh * 查看当前目录下各个文件及目录占用空间大小
du -sh /usr/
'''
[root@192 usr]# du -sh *
60M    bin
0    etc
0    games
36K    include
695M    lib
108M    lib64
12M    libexec
0    local
39M    sbin
207M    share
0    src
0    tmp
[root@192 usr]# du -sh /usr/
1.1G    /usr/
4、系统启动目录 /boot
/boot 存放的是系统启动相关的文件,比如:grub(引导装在程序)
[root@192 boot]# ls
config-3.10.0-1160.el7.x86_64                            initramfs-3.10.0-1160.el7.x86_64.img
efi                                                      symvers-3.10.0-1160.el7.x86_64.gz
grub                                                     System.map-3.10.0-1160.el7.x86_64
grub2                                                    vmlinuz-0-rescue-365e7da98b7b497f9affe1f0f8bb5489
initramfs-0-rescue-365e7da98b7b497f9affe1f0f8bb5489.img  vmlinuz-3.10.0-1160.el7.x86_64
5、配置文件目录 /etc (最重要的)
/etc,极其重要,后续所有服务的配置都在这个目录中
/etc/sysconfig/network-script/ifcfg-,网络配置文件,网卡配置是ifcfg-ens32
/etc/hostname,系统主机名配置文件,主机名很重要,有些特殊服务要依赖主机名,没有主机名会报错起不来;修改了要重启:reboot
/etc/resolv.conf,dns客户端配置文件,域名解析服务器,一般我们不配置,因为网卡的配置好了,会覆盖掉它,网卡的优先级高
/etc/hosts,本地域名解析配置文件,域名解析,先找自己的hosts,再去域名解析
[root@192 network-scripts]# ls  #网络配置文件
ifcfg-ens32  ifdown-ippp  ifdown-routes    ifup          ifup-ipv6   ifup-ppp       ifup-tunnel
ifcfg-lo     ifdown-ipv6  ifdown-sit       ifup-aliases  ifup-isdn   ifup-routes    ifup-wireless
ifdown       ifdown-isdn  ifdown-Team      ifup-bnep     ifup-plip   ifup-sit       init.ipv6-global
ifdown-bnep  ifdown-post  ifdown-TeamPort  ifup-eth      ifup-plusb  ifup-Team      network-functions
ifdown-eth   ifdown-ppp   ifdown-tunnel    ifup-ippp     ifup-post   ifup-TeamPort  network-functions-ipv6
6、可变目录/var和临时目录/tmp 、/var/tmp
/var,存放一些变化文件,比如/var/log/下的日志文件,登陆日志
/var/tmp,进程产生的临时文件
/tmp,系统临时目录,任何用户都可以使用
7、设备目录文件/dev
/dev,存放设备文件,比如硬盘,硬盘分区,光驱,等等
/dev/sd 硬盘设备,比如:linux中磁盘文件叫sd,第一个硬盘叫a,第二个叫b,sda1表示第一个磁盘的第一个分区,sdb4:第二个硬盘的第四个分区(服务可以插很多硬盘)
/dev/null,黑洞设备,只进不出。类似于垃圾回收站
/dev/random,生成随机数的设备
/dev/zero,能远远不断的产生数据,类似于取款机,随时随地取钱
 4、dev/zero例子:源源不断取数据
dd if=/dev/zero of=/opt/test.txt bs=1M count=1024
'''
dd:用指定大小的块拷贝一个文件,并在拷贝的同时进行指定的转换。
if=文件名:输入文件名,缺省为标准输入。即指定源文件。< if=input file >
of=文件名:输出文件名,缺省为标准输出。即指定目的文件。< of=output file >
 bs=bytes:同时设置读入/输出的块大小为bytes个字节。
 count=blocks:仅拷贝blocks个块,块大小等于ibs指定的字节数。
'''
8、虚拟文件系统目录 /proc 目录(对应进程停止,proc对应目录会被删除)
/proc,反映系统当前进程的实时状态 :process
[root@192 dev]# ls /proc
1     1485  233  275  31   446  530  96         execdomains  kpagecount    partitions     timer_stats
10    1486  234  276  32   447  536  acpi       fb           kpageflags    sched_debug    tty
1047  1490  235  277  33   448  544  buddyinfo  filesystems  loadavg       schedstat      uptime
1052  15    236  278  363  45   558  bus        fs           locks         scsi           version
1054  16    24   279  395  451  590  cgroups    interrupts   mdstat        self           vmallocinfo
11    17    244  280  4    453  6    cmdline    iomem        meminfo       slabinfo       vmstat
1138  18    245  281  41   47   60   consoles   ioports      misc          softirqs       zoneinfo
1158  19    246  282  42   499  7    cpuinfo    irq          modules       stat
1162  2     248  283  43   5    8    crypto     kallsyms     mounts        swaps
1229  20    249  284  439  522  885  devices    kcore        mpt           sys
1249  21    251  285  44   523  886  diskstats  keys         mtrr          sysrq-trigger
13    22    255  286  440  528  887  dma        key-users    net           sysvipc
14    23    256  30   444  529  9    driver     kmsg         pagetypeinfo  timer_list
9、其他目录
/run:系统运行是所需文件,以前防止在/var/run中,后来拆分成独立的/run目录。重启后重新生成对应的目录数据
#1 media:提供设备的挂载点,媒体文件
# linux 新增了盘符,需要手动挂载
# 把光盘里的数据,挂载到media目录
mount  /dev/cdrom /media/

# 2 mnt:提供设备的挂载点(同上)

# 3 opt:第三方工具,第三方软件默认安装的(mysql...)

# run :下有pid,log结尾的文件
ls /run
cat sshd.pid  # 进程运行的pid号,放在文件中
ps aux |grep sshd

# .lock文件的作用,锁机制
# 假设现在执行
yum install tree
# 再开一个窗口执行相同命令
yum install tree
'''
Another app is currently holding the yum lock; waiting for it to exit...
  The other application is: yum
    Memory :  71 M RSS (470 MB VSZ)
    Started: Tue Aug 18 00:26:31 2020 - 00:24 ago
    State  : Sleeping, pid: 6191
'''
cat /run/yum.pid
ii、文件管理操作
1、相对路径和绝对路径
相对路径:是从当前位置开始,比如:. 或者 .. 这样的,一般都是相对路径
绝对路径:是从起始位置开始,比如(linux系统),从/开始的路径,如:/home/nq
# 切换目录的方法:

# cd 绝对路径 cd /etc/hostname
# cd 相对路径 cd test/abc cd . cd ..

# cd      #切换目录,例: cd /etc
# cd -    #切换回上一次所在的目录
# cd ~    #切换回当前用户的家目录,注意:root和普通用户是否有所不同吗?
# cd .    #代表当前目录,一般在拷贝、移动等情况下使用 cp /etc/hostname ./
# cd ..   #切换回当前目录的上级目录
2、文件(touch)文件夹(mkdir)创建、复制、移动、删除
# 创建目录
# 选项:-v 显示详细信息  -p 递归创建目录
# mkdir dir1
# mkdir /home/od/dir1 /home/od/dir2
# mkdir -v /home/od/{dir3,dir4}
# mkdir -pv /home/od/dir5/dir6
# mkdir -pv /home/{od/{diu,but},boy}

# 创建文件
# touch file                    #无则创建,有则修改时间
# touch file2 file3
# touch /home/od/file4 file5
# touch file{a,b,c}             #{}集合,等价 touch a b c
# touch file{1..10}
# touch file{a..z
# 复制:
# cp file /tmp/file_copy
# cp name /tmp/name         #不修改名称
# cp file /tmp/             #不修改名称
# cp -p file /tmp/file_p    #-p保持原文件或目录的属性
# cp -r  /etc/ /tmp/        #复制目录需要使用-r参数, 递归复制
# cp -rv /etc/hosts /etc/hostname /tmp  #拷贝多个文件至一个目录
# cp -rv /etc/{hosts,hosts.bak}
# cp -rv /etc/hosts{,-org}

#复制 hello文件到test2文件夹下
[root@192 test1]# cp hello test2
[root@192 test1]# ls test2
hello
# 复制 test2文件夹到test3文件夹下
[root@192 test1]# cp /test2 test3
[root@192 test1]# ls test3
test2
移动
# mv file file1             #原地移动算改名
# mv file1 /tmp/            #移动文件至tmp目录
# mv /tmp/file1 ./          #移动tmp目录的文件至当前目录
# mv dir/ /tmp/             #移动目录至/tmp目录下

# touch file{1..3}
# mv file1 file2 file3 /opt/    #移动多个文件或至同一个目录

# mkdir dir{1..3}
# mv dir1/ dir2/ dir3/ /opt     #移动多个目录至同一个目录

[root@192 test1]# mv hello hello1
[root@192 test1]# ls
hello1  test2  test3  {test3}  world

[root@192 test1]# ls test3
test2
[root@192 test1]# mv ./test3/test2 ./
[root@192 test1]# ls
hello  test2  test3  {test3}  world
[root@192 test1]# ls test3
[root@192 test1]#
删除
#选项:-r: 递归 -f: 强制删除 -v: 详细过程
# rm  file.txt      #删除文件, 默认rm存在alias别名,rm -i所以会提醒是否删除文件
# rm -f file.txt    #删除文件, 不提醒
# rm -r dir/        #递归删除目录,会提示 dir是目录路径
# rm -rf dir/       #强制删除目录,不提醒(慎用)

[root@192 test1]# rm hello1
rm: remove regular empty file ‘hello1’? y
[root@192 test1]# rm -f  world
[root@192 test1]# ls
test2  test3  {test3}

# 删除当前路径下的test2文件夹
[root@192 test1]# rm ./test2
rm: remove regular empty file ‘./test2’? y
[root@192 test1]# ls
test3  {test3}
3、查看文件文件内容命令
# cat 命令
[root@192 test1]# cat test.txt #正常查看文件的方式
hello world
thank
bye
[root@192 test1]# cat -n test.txt #带行数的查看文件方式
     1    hello world
     2    thank
     3    bye

[root@192 test1]# cat -A test.txt  #查看文件中特殊符合,像tab键之类
hello world$
thank$
bye$

[root@192 test1]# tac test.txt  #倒序查看文件
bye
thank
hello world
[root@192 test1]# cat >> test1.txt <<EOF  #管道输入
> adc
> cdf
> EOF
[root@192 test1]# cat test1.txt
adc
cdf
'''
less、more 命令
'''
# less /etc/services    #使用光标上下翻动,空格进行翻页,q退出
# more /etc/services    #使用回车上下翻动,空格进行翻页,q退出(有百分比)
'''
# ----------------head 命令------------------
head filename 默认是前十行
head -n5 filename #查看前5行,(n可加可不加)
还可以应用在查看进程上 ps aux | head -3

#----------------tail 命令-------------------
跟head一样,只不过tail是查看尾部
# tail test.txt  # 查看文件尾部,默认10行
# tail -20 test.txt  # 查看文件尾部20行
# tail -f test.txt #-f动态查看文件尾部的变化
# tailf test.txt   #查看文件尾部的变化
'''
[root@192 test1]# head -n2 test.txt # 查看文件前3行
hello world
thank
[root@192 test1]# ps aux|head -2  # 查看前三个进程
USER        PID %CPU %MEM    VSZ   RSS TTY      STAT START   TIME COMMAND
root          1  0.0  0.3 127904  6548 ?        Ss   20:26   0:01 /usr/lib/systemd/systemd --switched-root --system --deserialize 22

'''
# ----------------------grep文件内容过滤------------------
 grep "^root" test.txt    #匹配以root开头的行
 grep "bash$" test.txt     #匹配以bash结尾的行
 grep -i "ftp" test.txt    #忽略大小写匹配
 grep  -Ei "sync$|ftp" test.txt    #匹配文件中包含sync结尾或ftp字符串
 grep -n -A 2 "Failed" test.txt #匹配test文件中Failed字符串,并打印它的下2行
 grep -n -B 2 "Failed" test.txt #匹配test文件中Failed字符串,并打印它的上2行
 grep -n -C 2 "Failed" test.txt #匹配test文件中Failed字符串,并打印它的上下2行
'''
[root@192 test1]# grep "^hello" test.txt #匹配hello 开头的的内容
hello world
[root@192 test1]# grep "you$" test.txt   #匹配you 结尾的的内容
hao are you
[root@192 test1]# grep -i "ftp" /etc/passwd  # -i 表示忽略大小写
ftp:x:14:50:FTP User:/var/ftp:/sbin/nologin
[root@192 test1]# grep -EI "sync$|ftp" /etc/passwd #匹配文件中包含sync结尾或ftp字符串
sync:x:5:0:sync:/sbin:/bin/sync
ftp:x:14:50:FTP User:/var/ftp:/sbin/nologin
[root@192 test1]# grep -n -A 1 "yes" test.txt #查看yes下的一行
7:yes
8-saglj
[root@192 test1]# grep -n -B 1 "yes" test.txt #查看yes上的一行
6-good bye
7:yes
[root@192 test1]# grep -n -C 1 "yes" test.txt #查看yes上下一行
6-good bye
7:yes
8-saglj

# 上翻,下翻
control+b:下翻
control+f:上翻
4、wget、curl和文件上传与下载(rz、sz)
wget 文件url #下载文件到当前目录
wget -O 保存路径 文件url #下载文件到指定的路径
#curl是一款很强大的http命令行工具
'''
语法:curl [参数] [url]
-A/--user-agent <string>              设置用户代理发送给服务器
-b/--cookie <name=string/file>    cookie字符串或文件读取位置
-c/--cookie-jar <file>                    操作结束后把cookie写入到这个文件中
-C/--continue-at <offset>            断点续转
-D/--dump-header <file>              把header信息写入到该文件中
-e/--referer                                  来源网址
-f/--fail                                          连接失败时不显示http错误
-o/--output                                  把输出写到该文件中
-O/--remote-name                      把输出写到该文件中,保留远程文件的文件名
-r/--range <range>                      检索来自HTTP/1.1或FTP服务器字节范围
-s/--silent                                    静音模式。不输出任何东西
-T/--upload-file <file>                  上传文件
-u/--user <user[:password]>      设置服务器的用户和密码
-w/--write-out [format]                什么输出完成后
-x/--proxy <host[:port]>              在给定的端口上使用HTTP代理
-#/--progress-bar                        进度条显示当前的传送状态
'''
curl url 文件浏览,比如:curl http://www.baidu.com #浏览百度网页
curl -O 保存路径 url 将url的内容下载到指定的路径

# yum install lrzsz
# 本地文件上传到服务器
rz filename
# 服务器文件下载到本子
sz 文件路径
5、命令查找
#文件查找命令:locate、which、whereis、find
locate /etc/sh       #搜索etc目录下所有以sh开头的文件
locate -i /etc/sh    #搜索etc目录下,所有以sh开头的文件,忽略大小写
which ls  #查找ls命令的绝对路径

whereis ls       #查找命令的路径、帮助手册、等
whereis -b ls    #仅显示命令所在的路径,仅看二进制

# 对于内核相关的一些命令,用which whereis 是无法查询到的,需要使用type采查询
type -a ls        #查看命令的绝对路径(包括别名)
type -a for
6、字符处理命令(sort、uniq、cut、sed、awk、wc)
'''
sort [OPTION]... [FILE]...
-r:倒序
-n:按数字排序
-t:指定分隔符(默认空格)
-k:指定第几列, 指定几列几字符(指定1,1  3.1,3.3)
'''
[root@192 ~]# sort -t ":" -n -k2 file.txt #按照数字排列
d:1
c:2
# uniq:去重,删除重复的行,并统计出重复的行数,必须是紧挨着的才可以删除(必须配置sord)
sort file.txt | uniq    #去重
sort file.txt | uniq -c # 去重,并计算出重复的次数

#cut 截区字段
cut -d " " -f2,5 filename #把字符串按“ ” 分割,取出第2和第5个
'''
wc统计行数
#wc [OPTION]... [FILE]...
#选项:-l显示文件行数 -c显示文件字节 -w显示文件单词
'''
wc -l filename #统计文件有多少行
ls | wc -l # 统计当前路径下有多少文件和文件夹
ps aux |grep ssh | wc -l # 统计有多少个ssh相关的进程
7、文件属性及类型
-rw-------. 1 root root 4434 May 30 13:58 ks.cfg
#
-rw-------. ①:第一个字符是文件类型,其他则是权限
1           ②:硬链接次数
root        ③:文件属于哪个用户
root        ④:文件属于哪个组
4434        ⑤:文件大小
May30 13:58 ⑥⑦⑧:最新修改的时间与日期
ks.cfg      ⑨:文件或目录名称
#文件类型:
-   #普通文件(文本, 二进制, 压缩, 图片, 日志等)
d   #目录文件
b   #设备文件(块设备)存储设备硬盘 /dev/sda1, /dev/sda2
c   #设备文件(字符设备),终端 /dev/tty1, /dev/zero
s   #套接字文件, 进程间通信(socket)
p   #管道文件
l   #链接文件
# 查看文件类型
file filename