RabbitMQ队列
RabbitMQ是一个在AMQP基础上完整的,可复用的企业消息系统。他遵循Mozilla Public License开源协议。
MQ全称为Message Queue, 消息队列(MQ)是一种应用程序对应用程序的通信方法。应用程序通过读写出入队列的消息(针对应用程序的数据)来通信,而无需专用连接来链接它们。消息传递指的是程序之间通过在消息中发送数据进行通信,而不是通过直接调用彼此来通信,直接调用通常是用于诸如远程过程调用的技术。排队指的是应用程序通过队列来通信。队列的使用除去了接收和发送应用程序同时执行的要求。RabbitMQ可以,多个程序同时使用RabbitMQ ,但是必须队列名称不一样。采用erlang语言,属于爱立信公司开发的。
消息中间件 --->就是消息队列
异步方式:不需要立马得到结果,需要排队
同步方式:需要实时获得数据,坚决不能排队
subprocess 的Q也提供不同进程之间的沟通
应用场景:
电商秒杀活动
抢购小米手机
堡垒机批量发送文件
Centos6.x系统编译安装RabbitMQ
一、系统环境
[root@rabbitmq ~]# cat /etc/redhat-release
CentOS release 6.6 (Final)
[root@rabbitmq ~]# uname -r
2.6.32-504.el6.x86_64
二、安装erlang环境
1、安装依赖包:
yum install gcc ncurses ncurses-base ncurses-devel ncurses-libs ncurses-static ncurses-term ocaml-curses -y
yum install ocaml-curses-devel openssl-devel zlib-devel openssl-devel perl xz xmlto m4 kernel-devel -y
2、下载otp_src_19.3.tar.gz
   wget http://erlang.org/download/otp_src_19.3.tar.gz

3、tar xvf otp_src_19.3.tar.gz

4、cd otp_src_19.3

5、./configure --prefix=/usr/local/erlang --with-ssl --enable-threads --enable-smp-support --enable-kernel-poll --enable-hipe --without-javac

6、make && make install

7、配置erlang环境:
   echo "export PATH=$PATH:/usr/local/erlang/bin" >>/etc/profile

   #使环境变量配置生效
   source /etc/profile

7、配置解析
[root@rabbitmq otp_src_19.3]#
echo "127.0.0.1 rabbitmq" >>/etc/hosts    #rabbitmq改成你自己主机名

备注:
启动rabbitmq报错:
ERROR: epmd error for host bogon: timeout (timed out)
[root@rabbitmq ~]# hostname
rabbitmq
然后再执行下面这步
echo "127.0.0.1 rabbitmq" >>/etc/hosts
三、安装rabbitmq
1、下载rabbitmq-server-generic-unix-3.6.5.tar.xz
2、tar xvf rabbitmq-server-generic-unix-3.6.5.tar.xz
3、mv rabbitmq_server-3.6.5/ /usr/local/rabbitmq
4、启动:
    #启动rabbitmq服务
    /usr/local/rabbitmq/sbin/rabbitmq-server
    #后台启动
    /usr/local/rabbitmq/sbin/rabbitmq-server -detached
    #关闭rabbitmq服务
    /usr/local/rabbitmq/sbin/rabbitmqctl stop
    或
    ps -ef | grep rabbit 和 kill -9 xxx

    #开启插件管理页面
    /usr/local/rabbitmq/sbin/rabbitmq-plugins enable rabbitmq_management

    #创建用户
    /usr/local/rabbitmq/sbin/rabbitmqctl add_user rabbitadmin 123456
    /usr/local/rabbitmq/sbin/rabbitmqctl set_user_tags rabbitadmin administrator

  #给用户授权
  /usr/local/rabbitmq/sbin/rabbitmqctl set_permissions -p / rabbitadmin ".*" ".*" ".*"
#语法:
|
1
|
set_permissions [-p <vhost>] <user> <conf> <write> <read> |
四、登录RabbitMQ_web页面

登录账号信息
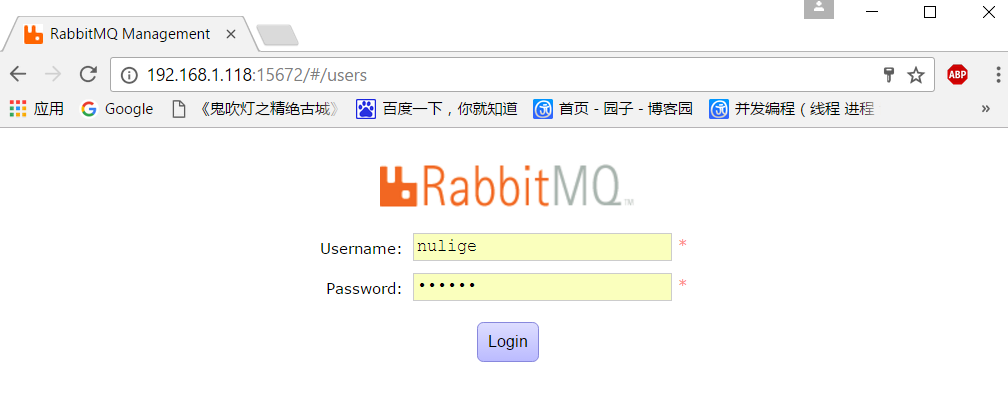
 #WEB登录
  http://IP:15672
  用户名:rabbitadmin
  密码:123456
在Centos7.x系统上安装RabbitMQ
1、系统环境
[root@rabbitmq sbin]# cat /proc/version
Linux version 3.10.0-327.el7.x86_64 (builder@kbuilder.dev.centos.org) (gcc version 4.8.3 20140911 (Red Hat 4.8.3-9) (GCC) ) #1 SMP Thu Nov 19 22:10:57 UTC 2015
1.1、Centos7.x关闭防火墙
1 [root@rabbitmq /]# systemctl stop firewalld.service
2
3 [root@rabbitmq /]# systemctl disable firewalld.service
4 Removed symlink /etc/systemd/system/dbus-org.fedoraproject.FirewallD1.service.
5 Removed symlink /etc/systemd/system/basic.target.wants/firewalld.service.
如果不想关闭防火墙,可以通过如下方法处理:
1 开放5672端口:
2
3 firewall-cmd --zone=public --add-port=5672/tcp --permanent
4 firewall-cmd --reload
2、下载erlang和rabbitmq-server的rpm
http://www.rabbitmq.com/releases/erlang/erlang-19.0.4-1.el7.centos.x86_64.rpm
http://www.rabbitmq.com/releases/rabbitmq-server/v3.6.6/rabbitmq-server-3.6.6-1.el7.noarch.rpm
3、安装erlang
[root@rabbitmq ~]# cd /server/scripts/
[root@rabbitmq scripts]# ll
total 23508
-rw-r--r--. 1 root root 18580960 Jan 28 10:04 erlang-19.0.4-1.el7.centos.x86_64.rpm
-rw-r--r--. 1 root root 5487706 Jan 28 10:04 rabbitmq-server-3.6.6-1.el7.noarch.rpm
[root@rabbitmq scripts]# rpm -ivh erlang-19.0.4-1.el7.centos.x86_64.rpm
测试erlang是否安装成功:
[root@rabbitmq scripts]# erl
Erlang/OTP 19 [erts-8.0.3] [source] [64-bit] [smp:2:2] [async-threads:10] [hipe] [kernel-poll:false]
Eshell V8.0.3 (abort with ^G)
1> 5+6.
11
2> halt(). #退出
4、安装socat (备注:安装RabbitMQ必须先安装socat依赖,否则会报错)
[root@rabbitmq scripts]# yum install socat
5、安装RabbitMQ
[root@rabbitmq scripts]# rpm -ivh rabbitmq-server-3.6.6-1.el7.noarch.rpm
启动和关闭:
/sbin/service rabbitmq-server start #启动服务
/sbin/service rabbitmq-server stop #关闭服务
/sbin/service rabbitmq-server status #查看服务状态
示例:
 1 [root@rabbitmq ~]# service rabbitmq-server status
 2 Redirecting to /bin/systemctl status  rabbitmq-server.service
 3 ● rabbitmq-server.service - RabbitMQ broker
 4    Loaded: loaded (/usr/lib/systemd/system/rabbitmq-server.service; disabled; vendor preset: disabled)
 5    Active: active (running) since Sat 2017-01-28 20:20:46 CST; 8h ago
 6  Main PID: 2892 (beam.smp)
 7    Status: "Initialized"
 8    CGroup: /system.slice/rabbitmq-server.service
 9            ├─2892 /usr/lib64/erlang/erts-8.0.3/bin/beam.smp -W w -A 64 -P 1048576 -t 5000000 -st...
10            ├─3027 /usr/lib64/erlang/erts-8.0.3/bin/epmd -daemon
11            ├─3143 erl_child_setup 1024
12            ├─3153 inet_gethost 4
13            └─3154 inet_gethost 4
14
15 Jan 28 20:20:43 rabbitmq rabbitmq-server[2892]: RabbitMQ 3.6.6. Copyright (C) 2007-2016 Pivot...nc.
16 Jan 28 20:20:43 rabbitmq rabbitmq-server[2892]: ##  ##      Licensed under the MPL.  See http...om/
17 Jan 28 20:20:43 rabbitmq rabbitmq-server[2892]: ##  ##
18 Jan 28 20:20:43 rabbitmq rabbitmq-server[2892]: ##########  Logs: /var/log/rabbitmq/rabbit@ra...log  #日志存放地址
19 Jan 28 20:20:43 rabbitmq rabbitmq-server[2892]: ######  ##        /var/log/rabbitmq/rabbit@ra...log
20 Jan 28 20:20:43 rabbitmq rabbitmq-server[2892]: ##########
21 Jan 28 20:20:43 rabbitmq rabbitmq-server[2892]: Starting broker...
22 Jan 28 20:20:45 rabbitmq rabbitmq-server[2892]: systemd unit for activation check: "rabbitmq-...ce"
23 Jan 28 20:20:46 rabbitmq systemd[1]: Started RabbitMQ broker.
24 Jan 28 20:20:46 rabbitmq rabbitmq-server[2892]: completed with 0 plugins.
25 Hint: Some lines were ellipsized, use -l to show in full.
#查看端口
1 [root@rabbitmq sbin]# ps -ef|grep rabbitmq
2 rabbitmq  2892     1  0 Jan28 ?        00:01:39 /usr/lib64/erlang/erts-8.0.3/bin/beam.smp -W w -A 64 -P 1048576 -t 5000000 -stbt db -zdbbl 32000 -K true -- -root /usr/lib64/erlang -progname erl -- -home /var/lib/rabbitmq -- -pa /usr/lib/rabbitmq/lib/rabbitmq_server-3.6.6/ebin -noshell -noinput -s rabbit boot -sname rabbit@rabbitmq -boot start_sasl -kernel inet_default_connect_options [{nodelay,true}] -sasl errlog_type error -sasl sasl_error_logger false -rabbit error_logger {file,"/var/log/rabbitmq/rabbit@rabbitmq.log"} -rabbit sasl_error_logger {file,"/var/log/rabbitmq/rabbit@rabbitmq-sasl.log"} -rabbit enabled_plugins_file "/etc/rabbitmq/enabled_plugins" -rabbit plugins_dir "/usr/lib/rabbitmq/lib/rabbitmq_server-3.6.6/plugins" -rabbit plugins_expand_dir "/var/lib/rabbitmq/mnesia/rabbit@rabbitmq-plugins-expand" -os_mon start_cpu_sup false -os_mon start_disksup false -os_mon start_memsup false -mnesia dir "/var/lib/rabbitmq/mnesia/rabbit@rabbitmq" -kernel inet_dist_listen_min 25672 -kernel inet_dist_listen_max 25672
3 rabbitmq  3027     1  0 Jan28 ?        00:00:00 /usr/lib64/erlang/erts-8.0.3/bin/epmd -daemon
4 rabbitmq  3143  2892  0 Jan28 ?        00:00:01 erl_child_setup 1024
5 rabbitmq  3153  3143  0 Jan28 ?        00:00:00 inet_gethost 4
6 rabbitmq  3154  3153  0 Jan28 ?        00:00:00 inet_gethost 4
7 root     24739 21359  0 03:18 pts/0    00:00:00 grep --color=auto rabbitmq
6、RabbitMQ使用方法
[root@rabbitmq scripts]# cd /sbin/
[root@rabbitmq sbin]# ./rabbitmq-plugins list
Configured: E = explicitly enabled; e = implicitly enabled
| Status: * = running on rabbit@rabbitmq
|/
[ ] amqp_client 3.6.6
[ ] cowboy 1.0.3
[ ] cowlib 1.0.1
[ ] mochiweb 2.13.1
[ ] rabbitmq_amqp1_0 3.6.6
[ ] rabbitmq_auth_backend_ldap 3.6.6
[ ] rabbitmq_auth_mechanism_ssl 3.6.6
[ ] rabbitmq_consistent_hash_exchange 3.6.6
[ ] rabbitmq_event_exchange 3.6.6
[ ] rabbitmq_federation 3.6.6
[ ] rabbitmq_federation_management 3.6.6
[ ] rabbitmq_jms_topic_exchange 3.6.6
[ ] rabbitmq_management 3.6.6
[ ] rabbitmq_management_agent 3.6.6
[ ] rabbitmq_management_visualiser 3.6.6
[ ] rabbitmq_mqtt 3.6.6
[ ] rabbitmq_recent_history_exchange 1.2.1
[ ] rabbitmq_sharding 0.1.0
[ ] rabbitmq_shovel 3.6.6
[ ] rabbitmq_shovel_management 3.6.6
[ ] rabbitmq_stomp 3.6.6
[ ] rabbitmq_top 3.6.6
[ ] rabbitmq_tracing 3.6.6
[ ] rabbitmq_trust_store 3.6.6
[ ] rabbitmq_web_dispatch 3.6.6
[ ] rabbitmq_web_stomp 3.6.6
[ ] rabbitmq_web_stomp_examples 3.6.6
[ ] sockjs 0.3.4
[ ] webmachine 1.10.3
#查看状态
[root@rabbitmq sbin]# ./rabbitmqctl status
Status of node rabbit@rabbitmq ...
[{pid,2892},
{running_applications,[{rabbit,"RabbitMQ","3.6.6"},
{mnesia,"MNESIA CXC 138 12","4.14"},
{rabbit_common,[],"3.6.6"},
{xmerl,"XML parser","1.3.11"},
{os_mon,"CPO CXC 138 46","2.4.1"},
{ranch,"Socket acceptor pool for TCP protocols.",
"1.2.1"},
{sasl,"SASL CXC 138 11","3.0"},
{stdlib,"ERTS CXC 138 10","3.0.1"},
{kernel,"ERTS CXC 138 10","5.0.1"}]},
{os,{unix,linux}},
{erlang_version,"Erlang/OTP 19 [erts-8.0.3] [source] [64-bit] [smp:2:2] [async-threads:64] [hipe] [kernel-poll:true]
"},
{memory,[{total,39981872},
{connection_readers,0},
{connection_writers,0},
{connection_channels,0},
{connection_other,0},
{queue_procs,2832},
{queue_slave_procs,0},
{plugins,0},
{other_proc,13381568},
{mnesia,60888},
{mgmt_db,0},
{msg_index,45952},
{other_ets,952928},
{binary,13072},
{code,17760058},
{atom,752561},
{other_system,7012013}]},
{alarms,[]},
{listeners,[{clustering,25672,"::"},{amqp,5672,"::"}]},
{vm_memory_high_watermark,0.4},
{vm_memory_limit,768666828},
{disk_free_limit,50000000},
{disk_free,17276772352},
{file_descriptors,[{total_limit,924},
{total_used,2},
{sockets_limit,829},
{sockets_used,0}]},
{processes,[{limit,1048576},{used,138}]},
{run_queue,0},
{uptime,1060},
{kernel,{net_ticktime,60}}]
#查看队列消息
[root@rabbitmq sbin]# rabbitmqctl list_queues
Listing queues ...
hello 1
...done.
#新增用户命令,并设置用户名和密码
语法:
rabbitmqctl add_user Username Password
示例:
增加用户名:admin,密码:admin
[root@rabbitmq sbin]# ./rabbitmqctl add_user admin admin
Creating user "admin" ...
#设置用户权限命令(权限:超级管理员)
[root@rabbitmq sbin]# ./rabbitmqctl set_user_tags admin administraotr
Setting tags for user "admin" to [administraotr] ...
#查看用户列表命令
[root@rabbitmq sbin]# ./rabbitmqctl list_users
Listing users ...
admin [administraotr]
guest [administrator]
#删除用户命令
rabbitmqctl delete_user Username
#修改用户的密码命令
rabbitmqctl change_password Username Newpassword
#启用web管理
[root@rabbitmq sbin]# ./rabbitmq-plugins enable rabbitmq_management
The following plugins have been enabled:
mochiweb
webmachine
rabbitmq_web_dispatch
amqp_client
rabbitmq_management_agent
rabbitmq_management
Applying plugin configuration to rabbit@rabbitmq... started 6 plugins.
#查看rabbitmq安装目录
[root@rabbitmq sbin]# whereis rabbitmq
rabbitmq: /usr/lib/rabbitmq /etc/rabbitmq
#出于安全考虑,guest这个默认用户只能通过http://localhost:15672来登录,其他的IP无法直接用这个guest帐号访问。
我们可以通过修改配置文件来实现远程登录管理界面。
#添加配置文件rabbitmq.config
[root@rabbitmq ~]# cd /etc/rabbitmq/
[root@rabbitmq rabbitmq]# vi rabbitmq.config #默认没有这个文件,需要自己创建
[
{rabbit, [{tcp_listeners, [5672]}, {loopback_users, ["nulige"]}]}
].
#添加用户为:nulige ,密码:123456
[root@rabbitmq /]# cd /sbin/
[root@rabbitmq sbin]# rabbitmqctl add_user nulige 123456
Creating user "nulige" ...
#用户设置为administrator才能远程访问
[root@rabbitmq sbin]# rabbitmqctl set_user_tags nulige administrator
Setting tags for user "nulige" to [administrator] ...
[root@rabbitmq sbin]# rabbitmqctl set_permissions -p / nulige ".*" ".*" ".*"
Setting permissions for user "nulige" in vhost "/" ...
语法:
set_permissions [-p <vhost>] <user> <conf> <write> <read>
#设置完成,重启服务生效
service rabbitmq-server stop
service rabbitmq-server start
此时就可以从外部访问了,但此时再看log文件,发现内容还是原来的,还是显示没有找到配置文件,可以手动删除这个文件再重启服务,不过这不影响使用。
1 rm rabbit@mythsky.log  #删除日志文件再重启服务
2 service rabbitmq-server stop
3 service rabbitmq-server start
访问网站方法:
http://ip:15672/#/users
7、用户角色
按照个人理解,用户角色可分为五类,超级管理员, 监控者, 策略制定者, 普通管理者以及其他。
(1) 超级管理员(administrator)
可登陆管理控制台(启用management plugin的情况下),可查看所有的信息,并且可以对用户,策略(policy)进行操作。
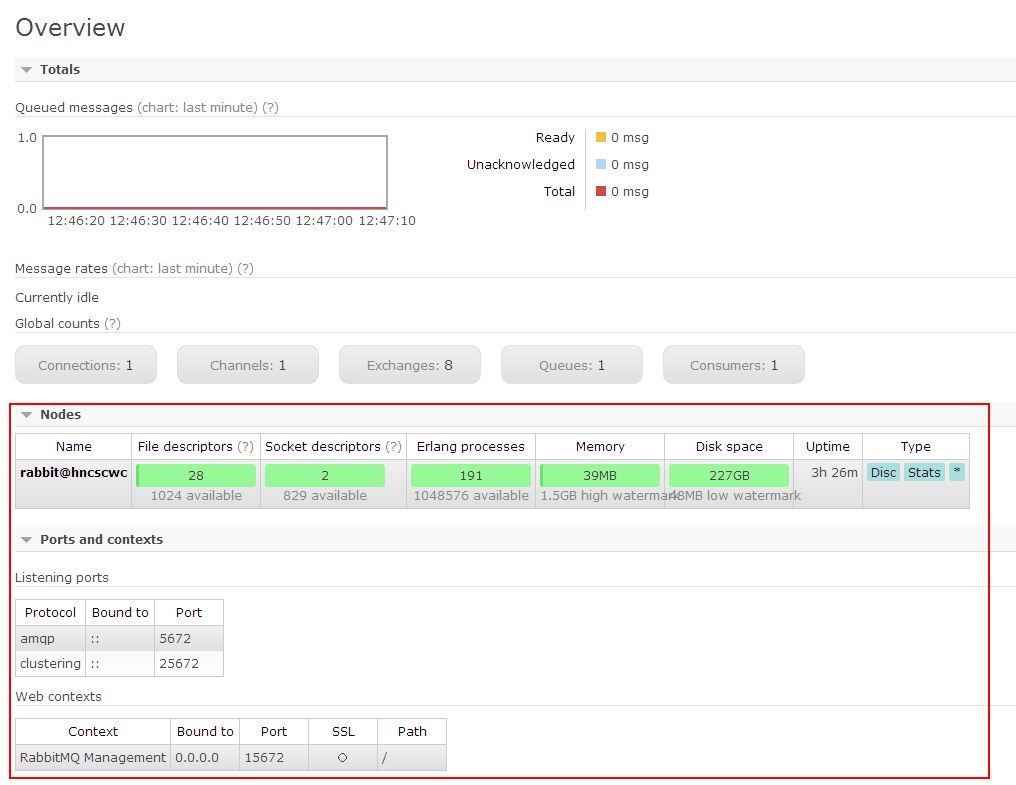
(2) 监控者(monitoring)
可登陆管理控制台(启用management plugin的情况下),同时可以查看rabbitmq节点的相关信息(进程数,内存使用情况,磁盘使用情况等)
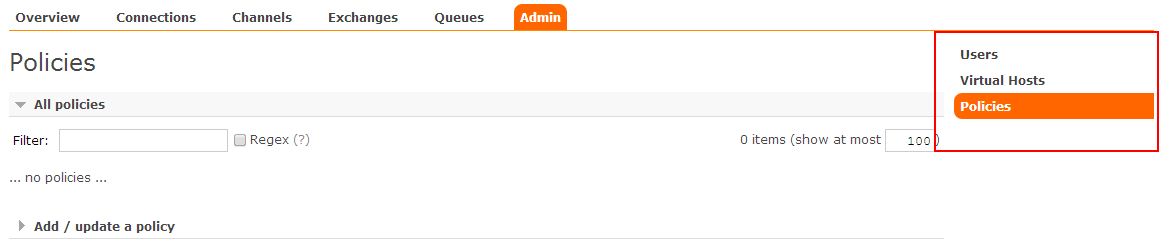
(3) 策略制定者(policymaker)
可登陆管理控制台(启用management plugin的情况下), 同时可以对policy进行管理。但无法查看节点的相关信息(上图红框标识的部分)。

与administrator的对比,administrator能看到这些内容
(4) 普通管理者(management)
仅可登陆管理控制台(启用management plugin的情况下),无法看到节点信息,也无法对策略进行管理。
(5) 其他
无法登陆管理控制台,通常就是普通的生产者和消费者。
了解了这些后,就可以根据需要给不同的用户设置不同的角色,以便按需管理。
设置用户角色的命令为:
rabbitmqctl set_user_tags User Tag
User为用户名, Tag为角色名(对应于上面的administrator,monitoring,policymaker,management,或其他自定义名称)。
也可以给同一用户设置多个角色,例如
rabbitmqctl set_user_tags hncscwc monitoring policymaker
8、用户权限
用户权限指的是用户对exchange,queue的操作权限,包括配置权限,读写权限。配置权限会影响到exchange,queue的声明和删除。读写权限影响到从queue里取消息,向exchange发送消息以及queue和exchange的绑定(bind)操作。
例如: 将queue绑定到某exchange上,需要具有queue的可写权限,以及exchange的可读权限;向exchange发送消息需要具有exchange的可写权限;从queue里取数据需要具有queue的可读权限。详细请参考官方文档中"How permissions work"部分。
相关命令为:
(1) 设置用户权限
rabbitmqctl set_permissions -p VHostPath User ConfP WriteP ReadP
(2) 查看(指定hostpath)所有用户的权限信息
rabbitmqctl list_permissions [-p VHostPath]
(3) 查看指定用户的权限信息
rabbitmqctl list_user_permissions User
(4) 清除用户的权限信息
rabbitmqctl clear_permissions [-p VHostPath] User
命令详细参考官方文档:rabbitmqctl
安装参考文章:http://www.cnblogs.com/liaojie970/p/6138278.html
RabbitMQ系统优化参考:http://www.blogjava.net/qbna350816/archive/2016/08/02/431415.aspx
官网优化参考地址:http://www.rabbitmq.com/configure.html
mac系统安装
参考: http://www.rabbitmq.com/install-standalone-mac.html
9、安装python rabbitMQ module (在windows系统上面安装)
|
1
2
3
4
5
6
7
|
pip install pikaoreasy_install pikaor源码 https://pypi.python.org/pypi/pika |
10、几种典型的使用场景,参考官网:
https://www.rabbitmq.com/tutorials/tutorial-one-python.html
一、实现最简单的队列通信

send端
 1 #!/usr/bin/env python
 2 import pika
 3
 4 connection = pika.BlockingConnection(pika.ConnectionParameters(
 5                'localhost'))      #localhost改成:192.168.1.118
 6 channel = connection.channel()    #建立了rabbit协议的通道
 7
 8 #声明queue
 9 channel.queue_declare(queue='hello')
10
11 #n RabbitMQ a message can never be sent directly to the queue, it always needs to go through an exchange.
12 channel.basic_publish(exchange='',
13                       routing_key='hello',
14                       body='Hello World!')
15 print(" [x] Sent 'Hello World!'")
16 connection.close()
receive端
 1 #!/usr/bin/env python
 2 # -*- coding:utf-8 -*-
 3 #Author: nulige
 4
 5 import pika
 6
 7 connection = pika.BlockingConnection(pika.ConnectionParameters(
 8     'localhost'))
 9 channel = connection.channel()
10
11 # You may ask why we declare the queue again ‒ we have already declared it in our previous code.
12 # We could avoid that if we were sure that the queue already exists. For example if send.py program
13 # was run before. But we're not yet sure which program to run first. In such cases it's a good
14 # practice to repeat declaring the queue in both programs.
15 #通道的实例
    channel.queue_declare(queue='hello')
16
17
18 def callback(ch, method, properties, body):
19     print(" [x] Received %r" % body)
20
21 #收到消息就调用这个
22 channel.basic_consume(callback,
23                       queue='hello',
24                       no_ack=True)
25
26 print(' [*] Waiting for messages. To exit press CTRL+C')
27 channel.start_consuming()    #开始消息,是个死循环,一直监听收消息
在linux系统中,通过: rabbitmqctl list_queues 查看消息。
二、Work Queues (一个发消息,两个收消息,收消息是公平的依次分发)

在这种模式下,RabbitMQ会默认把p发的消息依次分发给各个消费者(c),跟负载均衡差不多。
消息提供者代码
 1 import pika
 2 import time
 3 connection = pika.BlockingConnection(pika.ConnectionParameters(
 4     'localhost'))
 5 channel = connection.channel()
 6
 7 # 声明queue
 8 channel.queue_declare(queue='task_queue')
 9
10 # n RabbitMQ a message can never be sent directly to the queue, it always needs to go through an exchange.
11 import sys
12
13 message = ' '.join(sys.argv[1:]) or "Hello World! %s" % time.time()
14 channel.basic_publish(exchange='',
15                       routing_key='task_queue',
16                       body=message,
17                       properties=pika.BasicProperties(
18                           delivery_mode=2,  # make message persistent(就是消息持久化)
19                       )
20                       )
21 print(" [x] Sent %r" % message)
22 connection.close()
消费者代码
 1 #_*_coding:utf-8_*_
 2
 3 import pika, time
 4
 5 connection = pika.BlockingConnection(pika.ConnectionParameters(
 6     'localhost'))
 7 channel = connection.channel()
 8
 9
10 def callback(ch, method, properties, body):
11     print(" [x] Received %r" % body)
12     time.sleep(20)
13     print(" [x] Done")
14     print("method.delivery_tag",method.delivery_tag)
15     ch.basic_ack(delivery_tag=method.delivery_tag)   #消息者端吃完包子,返回包子标识符
16
17
18 channel.basic_consume(callback,
19                       queue='task_queue',
20                       no_ack=True  #no_ack=True消息不需要确认,默认no_ack=false,消息需要确认
21                       )
22
23 print(' [*] Waiting for messages. To exit press CTRL+C')
24 channel.start_consuming()
此时,先启动消息生产者,然后再分别启动3个消费者,通过生产者多发送几条消息,你会发现,这几条消息会被依次分配到各个消费者身上
Doing a task can take a few seconds. You may wonder what happens if one of the consumers starts a long task and dies with it only partly done. With our current code once RabbitMQ delivers message to the customer it immediately removes it from memory. In this case, if you kill a worker we will lose the message it was just processing. We'll also lose all the messages that were dispatched to this particular worker but were not yet handled.
But we don't want to lose any tasks. If a worker dies, we'd like the task to be delivered to another worker.
In order to make sure a message is never lost, RabbitMQ supports message acknowledgments. An ack(nowledgement) is sent back from the consumer to tell RabbitMQ that a particular message had been received, processed and that RabbitMQ is free to delete it.
If a consumer dies (its channel is closed, connection is closed, or TCP connection is lost) without sending an ack, RabbitMQ will understand that a message wasn't processed fully and will re-queue it. If there are other consumers online at the same time, it will then quickly redeliver it to another consumer. That way you can be sure that no message is lost, even if the workers occasionally die.
There aren't any message timeouts; RabbitMQ will redeliver the message when the consumer dies. It's fine even if processing a message takes a very, very long time.
Message acknowledgments are turned on by default. In previous examples we explicitly turned them off via the no_ack=True flag. It's time to remove this flag and send a proper acknowledgment from the worker, once we're done with a task.
1 def callback(ch, method, properties, body):
2     print " [x] Received %r" % (body,)
3     time.sleep( body.count('.') )
4     print " [x] Done"
5     ch.basic_ack(delivery_tag = method.delivery_tag)
6
7 channel.basic_consume(callback,
8                       queue='hello')
Using this code we can be sure that even if you kill a worker using CTRL+C while it was processing a message, nothing will be lost. Soon after the worker dies all unacknowledged messages will be redelivered。
三、消息持久化
We have learned how to make sure that even if the consumer dies, the task isn't lost(by default, if wanna disable use no_ack=True). But our tasks will still be lost if RabbitMQ server stops.
When RabbitMQ quits or crashes it will forget the queues and messages unless you tell it not to. Two things are required to make sure that messages aren't lost: we need to mark both the queue and messages as durable.
First, we need to make sure that RabbitMQ will never lose our queue. In order to do so, we need to declare it as durable:
|
1
|
channel.queue_declare(queue='hello', durable=True) |
Although this command is correct by itself, it won't work in our setup. That's because we've already defined a queue called hello which is not durable. RabbitMQ doesn't allow you to redefine an existing queue with different parameters and will return an error to any program that tries to do that. But there is a quick workaround - let's declare a queue with different name, for exampletask_queue:
|
1
|
channel.queue_declare(queue='task_queue', durable=True) |
This queue_declare change needs to be applied to both the producer and consumer code.
At that point we're sure that the task_queue queue won't be lost even if RabbitMQ restarts. Now we need to mark our messages as persistent - by supplying a delivery_mode property with a value 2.
|
1
2
3
4
5
6
|
channel.basic_publish(exchange='', routing_key="task_queue", body=message, properties=pika.BasicProperties( delivery_mode = 2, # make message persistent )) |
四、消息公平分发
如果Rabbit只管按顺序把消息发到各个消费者身上,不考虑消费者负载的话,很可能出现,一个机器配置不高的消费者那里堆积了很多消息处理不完,同时配置高的消费者却一直很轻松。为解决此问题,可以在各个消费者端,配置perfetch=1,意思就是告诉RabbitMQ在我这个消费者当前消息还没处理完的时候就不要再给我发新消息了。
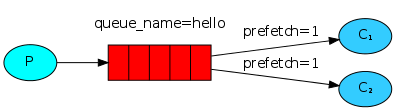
1 channel.basic_qos(prefetch_count=1)
生产者端带消息持久化+公平分发的完整代码
 1 #!/usr/bin/env python
 2 import pika
 3 import sys
 4
 5 connection = pika.BlockingConnection(pika.ConnectionParameters(
 6         host='localhost'))
 7 channel = connection.channel()
 8 #队列持久化
 9 channel.queue_declare(queue='task_queue', durable=True)
10
11 message = ' '.join(sys.argv[1:]) or "Hello World!"
12 #消息持久化
   channel.basic_publish(exchange='',
13                       routing_key='task_queue',
14                       body=message,
15                       properties=pika.BasicProperties(
16                          delivery_mode = 2, # make message persistent
17                       ))
18 print(" [x] Sent %r" % message)
19 connection.close()
消费者端
 1 #!/usr/bin/env python
 2 import pika
 3 import time
 4
 5 connection = pika.BlockingConnection(pika.ConnectionParameters(
 6         host='localhost'))
 7 channel = connection.channel()
 8
 9 channel.queue_declare(queue='task_queue', durable=True)
10 print(' [*] Waiting for messages. To exit press CTRL+C')
11
12 def callback(ch, method, properties, body):
13     print(" [x] Received %r" % body)
14     time.sleep(body.count(b'.'))
15     print(" [x] Done")
16     ch.basic_ack(delivery_tag = method.delivery_tag)
17
18 channel.basic_qos(prefetch_count=1)
19 channel.basic_consume(callback,
20                       queue='task_queue')
21
22 channel.start_consuming()
示例:
rabbit.py (发送消息)
 1 import pika
 2
 3 credentials = pika.PlainCredentials('nulige', '123456')
 4 # connection = pika.BlockingConnection(pika.ConnectionParameters(host=url_1,
 5 #                                      credentials=credentials, ssl=ssl, port=port))
 6 connection = pika.BlockingConnection(pika.ConnectionParameters(
 7     host='192.168.1.118',credentials=credentials))
 8
 9 channel = connection.channel()
10
11 # 声明queue
12 channel.queue_declare(queue='nulige',durable=True)
13
14 # n RabbitMQ a message can never be sent directly to the queue, it always needs to go through an exchange.
15 channel.basic_publish(exchange='',
16                       routing_key='nulige', #send msg to this queue
17                       body='Hello World!23',
18                       properties=pika.BasicProperties(
19                           delivery_mode=2,  # make message persistent
20                       )
21                       )
22
23
24 print(" [x] Sent 'Hello World!2'")
25 connection.close()
rabbit_recv.py (接收消息)
 1 import pika
 2 import time
 3 credentials = pika.PlainCredentials('nulige', '123456')
 4 connection = pika.BlockingConnection(pika.ConnectionParameters(
 5     host='192.168.1.118',credentials=credentials))
 6
 7 channel = connection.channel()
 8 # You may ask why we declare the queue again ‒ we have already declared it in our previous code.
 9 # We could avoid that if we were sure that the queue already exists. For example if send.py program
10 # was run before. But we're not yet sure which program to run first. In such cases it's a good
11 # practice to repeat declaring the queue in both programs.
12 channel.queue_declare(queue='nulige',durable=True)
13
14
15 def callback(ch, method, properties, body):
16     print(ch, method, properties)
17
18     print(" [x] Received %r" % body)
19     time.sleep(1)
20
21
22 channel.basic_consume(callback,
23                       queue='nulige',
24                       #no_ack=True
25                       )
26 channel.basic_qos(prefetch_count=1)
27 print(' [*] Waiting for messages. To exit press CTRL+C')
28 channel.start_consuming()
执行结果:


1 #rabbit.py
2 [x] Sent 'Hello World!2'
3
4 #rabbit_recv.py
5  [*] Waiting for messages. To exit press CTRL+C
6 <pika.adapters.blocking_connection.BlockingChannel object at 0x00FD1E30> <Basic.Deliver(['consumer_tag=ctag1.883a735474834f829e65e14225e90ca4', 'delivery_tag=1', 'exchange=', 'redelivered=True', 'routing_key=nulige'])> <BasicProperties(['delivery_mode=2'])>
7  [x] Received b'Hello World!23'
五、PublishSubscribe(消息发布订阅)
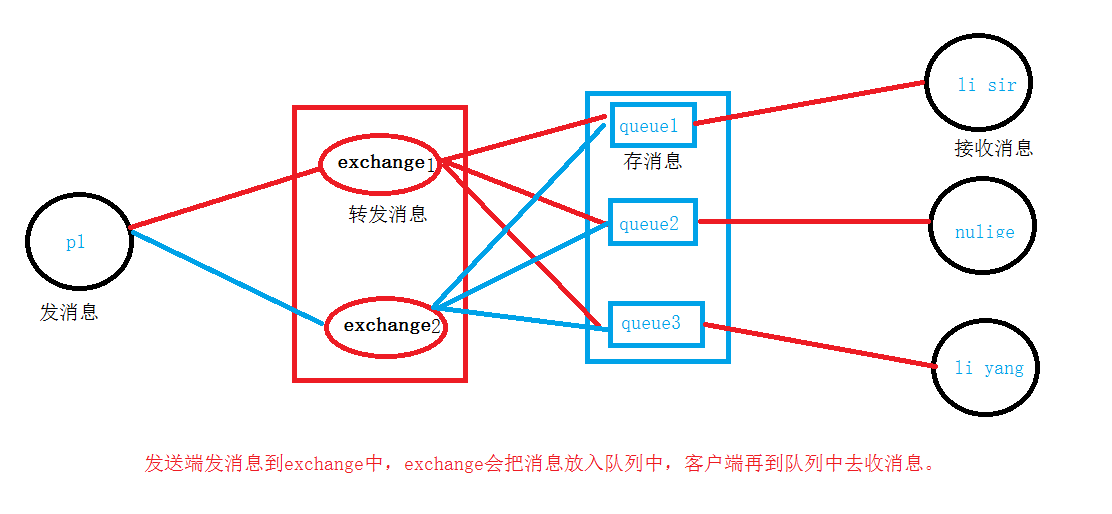
之前的例子都基本都是1对1的消息发送和接收,即消息只能发送到指定的queue里,但有些时候你想让你的消息被所有的Queue收到,类似广播的效果,这时候就要用到exchange了,
An exchange is a very simple thing. On one side it receives messages from producers and the other side it pushes them to queues. The exchange must know exactly what to do with a message it receives. Should it be appended to a particular queue? Should it be appended to many queues? Or should it get discarded. The rules for that are defined by the exchange type.
译:
交换是件很简单的事。在一端从生产者那里收消息,并将它们推送到queue中。Exchange必须非常清楚的知道。他从生产者那里收到的消息,要发给谁? 他是应该被追加到一个具体的queue里,还是发送到多个queue里,或者它应该被丢弃。该规则由Exchange类型定义。
Exchange的作用就是转发消息,给订阅者发消息。
Exchange在定义的时候是有类型的,以决定到底是哪些Queue符合条件,可以接收消息。(一共有四种类型)
1、fanout: 所有bind到此exchange的queue都可以接收消息 (给所有人发消息)
2、direct: 通过routingKey和exchange决定的那个唯一的queue可以接收消息 (给指定的一些queue发消息)
3、topic(话题):所有符合routingKey(此时可以是一个表达式)的routingKey所bind的queue可以接收消息 (给订阅话题的人发消息)
表达式符号说明:#代表一个或多个字符,*代表任何字符
示例:#.a会匹配a.a,aa.a,aaa.a等
*.a会匹配a.a,b.a,c.a等
备注:使用RoutingKey为#,Exchange Type为topic的时候相当于使用fanout
4、headers: 通过headers 来决定把消息发给哪些queue (通过消息头,决定发送给哪些队列)

一、fanout方式
应用场景:
例如:视频直播
例如:新浪微博
一个明星,他有几千万的订阅用户,粉丝们想要收到他发送的微博消息(这里指:微博订阅的在线用户发送消息,不发给不在线的用户,发送消息)
rabbit_fanout_send.py(发送端)
 1 import pika
 2 import sys
 3
 4 credentials = pika.PlainCredentials('nulige', '123456')
 5 connection = pika.BlockingConnection(pika.ConnectionParameters(
 6     host='192.168.1.118',credentials=credentials))
 7
 8 channel = connection.channel()
 9 channel.exchange_declare(exchange='logs', type='fanout') #发送消息类型为fanout,就是给所有人发消息
10
11 #如果等于空,就输出hello world!
12 message = ' '.join(sys.argv[1:]) or "info: Hello World!"
13
14
15 channel.basic_publish(exchange='logs',
16                       routing_key='',
17                       body=message)
18
19 print(" [x] Sent %r" % message)
20 connection.close()
rabbit_fanout_send.py(接收端)
 1 import pika
 2
 3 credentials = pika.PlainCredentials('nulige', '123456')
 4 connection = pika.BlockingConnection(pika.ConnectionParameters(
 5     host='192.168.1.118',credentials=credentials))
 6
 7 channel = connection.channel()
 8
 9 channel.exchange_declare(exchange='logs',type='fanout')#指定发送类型
10 #必须能过queue来收消息
11 result = channel.queue_declare(exclusive=True)  # 不指定queue名字,rabbit会随机分配一个名字,exclusive=True会在使用此queue的消费者断开后,自动将queue删除
12
13 queue_name = result.method.queue
14
15 channel.queue_bind(exchange='logs',queue=queue_name)  #随机生成的Q,绑定到exchange上面。
16
17 print(' [*] Waiting for logs. To exit press CTRL+C')
18
19 def callback(ch, method, properties, body):
20     print(" [x] %r" % body)
21
22
23 channel.basic_consume(callback,
24                       queue=queue_name,
               #no_ack=True,
25                       )
26 channel.start_consuming()
执行结果:
 1 方法一:直接运行pycharm
 2 [x] Sent 'info: Hello World!'
 3
 4 方法二:在命令行运行,用传参的方式(打开多个终端,发送消息)
 5
 6 终端1
 7 C:UsersAdministrator>d:
 8 D:>cd pythonday42
 9 D:pythonday42>python3 rabbit_fanout_send.py test  #发送一个test消息
10 [x] Sent 'test'
11
12
13 终端2
14 C:UsersAdministrator>d:
15 D:>cd pythonday42
16 D:pythonday42>python3 rabbit_fanout_send.py welcome
17 [x] Sent 'welcome'
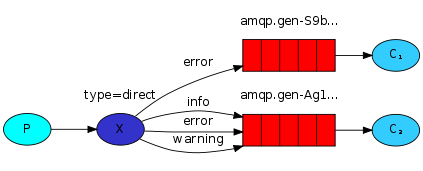
二、有选择的接收消息(exchange type=direct)
RabbitMQ还支持根据关键字发送,即:队列绑定关键字,发送者将数据根据关键字发送到消息exchange,exchange根据 关键字 判定应该将数据发送至指定队列。
示例:
rabbit_direct_send.py(发送端)
 1 import pika
 2 import sys
 3
 4 credentials = pika.PlainCredentials('nulige', '123456')
 5 connection = pika.BlockingConnection(pika.ConnectionParameters(
 6     host='192.168.1.118',credentials=credentials))
 7
 8 channel = connection.channel()
 9
10 channel.exchange_declare(exchange='direct_logs',type='direct') #指定类型
11
12 severity = sys.argv[1] if len(sys.argv) > 1 else 'info'  #严重程序,级别;判定条件到底是info,还是空,后面接消息
13
14 message = ' '.join(sys.argv[2:]) or 'Hello World!'  #消息
15
16 channel.basic_publish(exchange='direct_logs',
17                       routing_key=severity, #绑定的是:error  指定关键字(哪些队列绑定了,这个级别,那些队列就可以收到这个消息)
18                       body=message)
19
20 print(" [x] Sent %r:%r" % (severity, message))
21 connection.close()
rabbit_direct_recv.py(接收端)
 1 import pika
 2 import sys
 3
 4 credentials = pika.PlainCredentials('nulige', '123456')
 5 connection = pika.BlockingConnection(pika.ConnectionParameters(
 6     host='192.168.1.118',credentials=credentials))
 7 channel = connection.channel()
 8
 9 channel.exchange_declare(exchange='direct_logs',type='direct')
10 result = channel.queue_declare(exclusive=True)
11 queue_name = result.method.queue
12
13 severities = sys.argv[1:]   #接收那些消息(指info,还是空),没写就报错
14 if not severities:
15     sys.stderr.write("Usage: %s [info] [warning] [error]
" % sys.argv[0]) #定义了三种接收消息方式info,warning,error
16     sys.exit(1)
17
18 for severity in severities: #[error  info  warning],循环severities
19     channel.queue_bind(exchange='direct_logs',
20                        queue=queue_name,
21                        routing_key=severity)  #循环绑定关键字
22 print(' [*] Waiting for logs. To exit press CTRL+C')
23
24 def callback(ch, method, properties, body):
25     print(" [x] %r:%r" % (method.routing_key, body))
26
27 channel.basic_consume(callback,queue=queue_name,)
28 channel.start_consuming()
执行结果:
 1 首先,设置接收类型为:info、warning、 error 三个中的其中一种或多种类型,再从发送端指定发送给那种类型,后面再接要发送的消息。
 2
 3 #接收端
 4 D:pythonday42>python3 rabbit_direct_recv.py info error  #指定接收类型为info、erron
 5
 6  [*] Waiting for logs. To exit press CTRL+C
 7  [x] 'error':b'err_hpappend'  #接收到的消息
 8
 9 D:pythonday42>python3 rabbit_direct_recv.py info warning  #指定接收类型为warning
10
11  [*] Waiting for logs. To exit press CTRL+C
12  [x] 'warning':b'nulige'  #接收到的消息
13
14
15 #发送端                                        发送类型   消息
16 D:pythonday42>python3 rabbit_direct_send.py error err_hpappend
17  [x] Sent 'error':'err_hpappend'
18 D:pythonday42>python3 rabbit_direct_send.py warning nulige
19 [x] Sent 'warning':'nulige'
三、更细致的消息过滤
Although using the direct exchange improved our system, it still has limitations - it can't do routing based on multiple criteria.
In our logging system we might want to subscribe to not only logs based on severity, but also based on the source which emitted the log. You might know this concept from the syslog unix tool, which routes logs based on both severity (info/warn/crit...) and facility (auth/cron/kern...).
That would give us a lot of flexibility - we may want to listen to just critical errors coming from 'cron' but also all logs from 'kern'.

topi: 意思是话题
To receive all the logs run:
python receive_logs_topic.py "#" #绑定#号,就是收所有消息,相当于广播
To receive all logs from the facility "kern":
python receive_logs_topic.py "kern.*" #以kern开头
Or if you want to hear only about "critical" logs:
python receive_logs_topic.py "*.critical" #以critical结尾
You can create multiple bindings:
python receive_logs_topic.py "kern.*" "*.critical" #收kern开头并且以critical结尾(相当于收两个)
And to emit a log with a routing key "kern.critical" type:
python emit_log_topic.py "kern.critical" "A critical kernel error" #发消息到kern.critical里,内容是:
A critical kernel error
示例:
rabbit_topic_send.py (生产者是发送端)
 1 import pika
 2 import sys
 3
 4 credentials = pika.PlainCredentials('nulige', '123456')
 5 connection = pika.BlockingConnection(pika.ConnectionParameters(
 6     host='192.168.1.118',credentials=credentials))
 7
 8 channel = connection.channel()
 9
10 channel.exchange_declare(exchange='topic_logs',type='topic') #指定类型
11
12 routing_key = sys.argv[1] if len(sys.argv) > 1 else 'anonymous.info'
13
14 message = ' '.join(sys.argv[2:]) or 'Hello World!'  #消息
15
16 channel.basic_publish(exchange='topic_logs',
17                       routing_key=routing_key,
18                       body=message)
19 print(" [x] Sent %r:%r" % (routing_key, message))
20 connection.close()
rabbit_topic_recv.py (消费者是接收端)单向的
 1 import pika
 2 import sys
 3
 4 credentials = pika.PlainCredentials('nulige', '123456')
 5 connection = pika.BlockingConnection(pika.ConnectionParameters(
 6     host='192.168.1.118',credentials=credentials))
 7
 8 channel = connection.channel()
 9 channel.exchange_declare(exchange='topic_logs',type='topic')
10
11 result = channel.queue_declare(exclusive=True)
12 queue_name = result.method.queue
13
14 binding_keys = sys.argv[1:]
15 if not binding_keys:
16     sys.stderr.write("Usage: %s [binding_key]...
" % sys.argv[0])
17     sys.exit(1)
18
19 for binding_key in binding_keys:
20     channel.queue_bind(exchange='topic_logs',
21                        queue=queue_name,
22                        routing_key=binding_key)
23
24 print(' [*] Waiting for logs. To exit press CTRL+C')
25
26 def callback(ch, method, properties, body):
27     print(" [x] %r:%r" % (method.routing_key, body))
28
29 channel.basic_consume(callback,queue=queue_name)
30
31 channel.start_consuming()
执行结果:
 1 #接收端
 2 D:pythonday42>python3 rabbit_topic_recv.py error
 3  [*] Waiting for logs. To exit press CTRL+C
 4  [x] 'error':b'mysql has error'
 5
 6
 7 D:pythonday42>python3 rabbit_topic_recv.py *.warning mysql.*
 8  [*] Waiting for logs. To exit press CTRL+C
 9  [x] 'mysql.error':b'mysql has error'
10
11
12 D:pythonday42>python3 rabbit_topic_send.py mysql.info "mysql has error"
13  [x] Sent 'mysql.info':'mysql has error'
14
15
16 D:pythonday42>python3 rabbit_topic_recv.py *.error.*
17  [*] Waiting for logs. To exit press CTRL+C
18  [x] 'mysql.error.':b'mysql has error'
19
20
21 #发送端                                指定类型:error      消息内容
22 D:pythonday42>python3 rabbit_topic_send.py error "mysql has error"
23  [x] Sent 'error':'mysql has error'
24
25
26 D:pythonday42>python3 rabbit_topic_send.py mysql.error "mysql has error"
27  [x] Sent 'mysql.error':'mysql has error'
28  [x] 'mysql.info':b'mysql has error'
29
30
31 D:pythonday42>python3 rabbit_topic_send.py mysql.error. "mysql has error"
32  [x] Sent 'mysql.error.':'mysql has error'
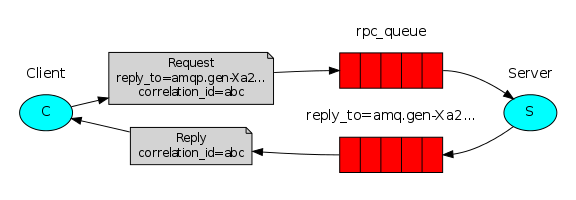
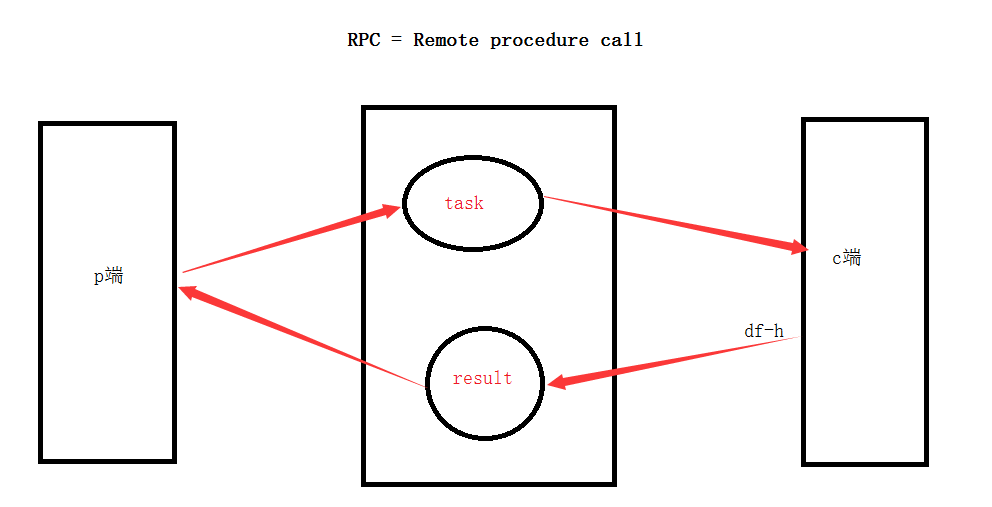
四、Remote procedure call (RPC) 双向的
To illustrate how an RPC service could be used we're going to create a simple client class. It's going to expose a method named call which sends an RPC request and blocks until the answer is received:
|
1
2
3
|
fibonacci_rpc = FibonacciRpcClient()result = fibonacci_rpc.call(4)print("fib(4) is %r" % result) |
应用场景:
示例:实现RPC服务功能
代码:
rabbit_rpc_send.py(生产者是发送端)
 1 import pika
 2 import uuid
 3
 4 class SSHRpcClient(object):
 5     def __init__(self):
 6         credentials = pika.PlainCredentials('nulige', '123456')
 7         self.connection = pika.BlockingConnection(pika.ConnectionParameters(
 8                             host='192.168.1.118',credentials=credentials))
 9
10         self.channel = self.connection.channel()
11
12         result = self.channel.queue_declare(exclusive=True) #客户端的结果必须要返回到这个queue
13         self.callback_queue = result.method.queue
14
15         self.channel.basic_consume(self.on_response,queue=self.callback_queue) #声明从这个queue里收结果
16
17     def on_response(self, ch, method, props, body):
18         if self.corr_id == props.correlation_id: #任务标识符
19             self.response = body
20             print(body)
21
22     # 返回的结果,放在callback_queue中
23     def call(self, n):
24         self.response = None
25         self.corr_id = str(uuid.uuid4()) #唯一标识符
26         self.channel.basic_publish(exchange='',
27                                    routing_key='rpc_queue3',  #声明一个Q
28                                    properties=pika.BasicProperties(
29                                        reply_to=self.callback_queue,
30                                        correlation_id=self.corr_id,
31                                    ),
32                                    body=str(n))
33
34         print("start waiting for cmd result ")
35         count = 0
36         while self.response is None: #如果命令没返回结果
37             print("loop ",count)
38             count +=1
39             self.connection.process_data_events() #以不阻塞的形式去检测有没有新事件
40             #如果没事件,那就什么也不做, 如果有事件,就触发on_response事件
41         return self.response
42
43 ssh_rpc = SSHRpcClient()
44
45 print(" [x] sending cmd")
46 response = ssh_rpc.call("ipconfig")
47
48 print(" [.] Got result ")
49 print(response.decode("gbk"))
rabbit_rpc_recv.py(消费端是接收端)
 1 import pika
 2 import time
 3 import subprocess
 4
 5 credentials = pika.PlainCredentials('nulige', '123456')
 6 connection = pika.BlockingConnection(pika.ConnectionParameters(
 7     host='192.168.1.118', credentials=credentials))
 8
 9 channel = connection.channel()
10 channel.queue_declare(queue='rpc_queue3')
11
12 def SSHRPCServer(cmd):
13
14     print("recv cmd:",cmd)
15     cmd_obj = subprocess.Popen(cmd.decode(),shell=True,stdout=subprocess.PIPE,stderr=subprocess.PIPE)
16
17     result = cmd_obj.stdout.read() or cmd_obj.stderr.read()
18     return result
19
20 def on_request(ch, method, props, body):
21
22     print(" [.] fib(%s)" % body)
23     response = SSHRPCServer(body)
24
25     ch.basic_publish(exchange='',
26                      routing_key=props.reply_to,
27                      properties=pika.BasicProperties(correlation_id=
28                                                          props.correlation_id),
29                      body=response)
30
31 channel.basic_consume(on_request, queue='rpc_queue3')
32 print(" [x] Awaiting RPC requests")
33 channel.start_consuming()
执行结果:
先启动接收端,再发送消息,直接会返回结果
  1 #启动接收端
  2
  3 C:Python3.5python3.exe D:/python/day42/rabbit_rpc_recv.py
  4  [x] Awaiting RPC requests
  5  [.] fib(b'ipconfig')
  6 recv cmd: b'ipconfig'
  7  [.] fib(b'ipconfig')
  8 recv cmd: b'ipconfig'
  9
 10 #启动发送端
 11 C:Python3.5python3.exe D:/python/day42/rabbit_rpc_send.py
 12  [x] sending cmd
 13 start waiting for cmd result
 14 loop  0
 15 loop  1
 16 loop  2
 17 loop  3
 18 loop  4
 19 loop  5
 20 loop  6
 21 loop  7
 22 loop  8
 23 loop  9
 24 loop  10
 25 loop  11
 26 loop  12
 27 loop  13
 28 loop  14
 29 loop  15
 30 loop  16
 31 loop  17
 32 loop  18
 33 loop  19
 34 loop  20
 35 loop  21
 36 loop  22
 37 loop  23
 38 loop  24
 39 loop  25
 40 loop  26
 41 loop  27
 42 loop  28
 43 loop  29
 44 loop  30
 45 loop  31
 46 loop  32
 47 loop  33
 48 loop  34
 49 loop  35
 50 loop  36
 51 loop  37
 52 loop  38
 53 loop  39
 54 loop  40
 55 loop  41
 56 loop  42
 57 loop  43
 58 loop  44
 59 loop  45
 60 loop  46
 61 loop  47
 62 loop  48
 63 loop  49
 64 loop  50
 65 loop  51
 66 loop  52
 67 loop  53
 68 loop  54
 69 loop  55
 70 loop  56
 71 loop  57
 72 loop  58
 73 loop  59
 74 loop  60
 75 loop  61
 76 loop  62
 77 loop  63
 78 loop  64
 79 loop  65
 80 loop  66
 81 loop  67
 82 loop  68
 83 loop  69
 84 loop  70
 85 loop  71
 86 loop  72
 87 loop  73
 88 loop  74
 89 loop  75
 90 loop  76
 91 loop  77
 92 loop  78
 93 loop  79
 94 loop  80
 95 loop  81
 96 loop  82
 97 loop  83
 98 loop  84
 99 loop  85
100 loop  86
101 loop  87
102 loop  88
103 loop  89
104 loop  90
105 loop  91
106 loop  92
107 loop  93
108 loop  94
109 loop  95
110 loop  96
111 loop  97
112 loop  98
113 loop  99
114 loop  100
115 loop  101
116 loop  102
117 loop  103
118 loop  104
119 loop  105
120 loop  106
121 loop  107
122 loop  108
123 loop  109
124 loop  110
125 loop  111
126 loop  112
127 loop  113
128 loop  114
129 loop  115
130 loop  116
131 loop  117
132 loop  118
133 loop  119
134 loop  120
135 loop  121
136 loop  122
137 loop  123
138 loop  124
139 loop  125
140 loop  126
141 loop  127
142 loop  128
143 loop  129
144 loop  130
145 loop  131
146 loop  132
147 loop  133
148 loop  134
149 loop  135
150 loop  136
151 loop  137
152 loop  138
153 loop  139
154 loop  140
155 loop  141
156 loop  142
157 loop  143
158 loop  144
159 loop  145
160 loop  146
161 loop  147
162 loop  148
163 loop  149
164 loop  150
165 loop  151
166 loop  152
167 loop  153
168 loop  154
169 loop  155
170 loop  156
171 loop  157
172 loop  158
173 loop  159
174 loop  160
175 loop  161
176 loop  162
177 loop  163
178 loop  164
179 loop  165
180 loop  166
181 loop  167
182 loop  168
183 loop  169
184 loop  170
185 loop  171
186 loop  172
187 loop  173
188 loop  174
189 loop  175
190 loop  176
191 loop  177
192 loop  178
193 loop  179
194 loop  180
195 loop  181
196 loop  182
197 loop  183
198 loop  184
199 loop  185
200 loop  186
201 loop  187
202 loop  188
203 loop  189
204 loop  190
205 loop  191
206 loop  192
207 loop  193
208 loop  194
209 loop  195
210 loop  196
211 loop  197
212 loop  198
213 loop  199
214 loop  200
215 loop  201
216 loop  202
217 loop  203
218 loop  204
219 loop  205
220 loop  206
221 loop  207
222 loop  208
223 loop  209
224 loop  210
225 loop  211
226 loop  212
227 loop  213
228 loop  214
229 loop  215
230 loop  216
231 loop  217
232 loop  218
233 loop  219
234 loop  220
235 loop  221
236 loop  222
237 loop  223
238 loop  224
239 loop  225
240 loop  226
241 loop  227
242 loop  228
243 loop  229
244 loop  230
245 loop  231
246 loop  232
247 loop  233
248 loop  234
249 loop  235
250 loop  236
251 loop  237
252 loop  238
253 loop  239
254 loop  240
255 loop  241
256 loop  242
257 loop  243
258 loop  244
259 loop  245
260 loop  246
261 loop  247
262 loop  248
263 loop  249
264 loop  250
265 loop  251
266 loop  252
267 loop  253
268 loop  254
269 loop  255
270 loop  256
271 loop  257
272 loop  258
273 loop  259
274 loop  260
275 loop  261
276 loop  262
277 loop  263
278 loop  264
279 loop  265
280 loop  266
281 loop  267
282 loop  268
283 loop  269
284 loop  270
285 loop  271
286 loop  272
287 loop  273
288 loop  274
289 loop  275
290 loop  276
291 loop  277
292 loop  278
293 loop  279
294 loop  280
295 loop  281
296 loop  282
297 loop  283
298 loop  284
299 loop  285
300 loop  286
301 loop  287
302 loop  288
303 loop  289
304 loop  290
305 loop  291
306 loop  292
307 loop  293
308 loop  294
309 loop  295
310 loop  296
311 loop  297
312 loop  298
313 loop  299
314 loop  300
315 loop  301
316 loop  302
317 loop  303
318 loop  304
319 loop  305
320 loop  306
321 loop  307
322 loop  308
323 loop  309
324 loop  310
325 loop  311
326 loop  312
327 loop  313
328 loop  314
329 loop  315
330 loop  316
331 loop  317
332 loop  318
333 loop  319
334 loop  320
335 loop  321
336 loop  322
337 loop  323
338 loop  324
339 loop  325
340 loop  326
341 loop  327
342 loop  328
343 loop  329
344 loop  330
345 loop  331
346 loop  332
347 loop  333
348 loop  334
349 loop  335
350 loop  336
351 loop  337
352 loop  338
353 loop  339
354 loop  340
355 loop  341
356 loop  342
357 loop  343
358 loop  344
359 loop  345
360 loop  346
361 loop  347
362 loop  348
363 loop  349
364 loop  350
365 loop  351
366 loop  352
367 loop  353
368 loop  354
369 loop  355
370 loop  356
371 loop  357
372 loop  358
373 loop  359
374 loop  360
375 b'
Windows IP Configuration


Ethernet adapter Ethernet:

   Media State . . . . . . . . . . . : Media disconnected
   Connection-specific DNS Suffix  . :

Wireless LAN adapter Local Area Connection* 2:

   Media State . . . . . . . . . . . : Media disconnected
   Connection-specific DNS Suffix  . :

Ethernet adapter VMware Network Adapter VMnet1:

   Connection-specific DNS Suffix  . :
   Link-local IPv6 Address . . . . . : fe80::edb6:d8a0:9517:fadc%2
   IPv4 Address. . . . . . . . . . . : 192.168.44.1
   Subnet Mask . . . . . . . . . . . : 255.255.255.0
   Default Gateway . . . . . . . . . :

Ethernet adapter VMware Network Adapter VMnet8:

   Connection-specific DNS Suffix  . :
   Link-local IPv6 Address . . . . . : fe80::c8a4:f848:81a4:ba9a%13
   IPv4 Address. . . . . . . . . . . : 192.168.30.1
   Subnet Mask . . . . . . . . . . . : 255.255.255.0
   Default Gateway . . . . . . . . . :

Wireless LAN adapter Wi-Fi:

   Connection-specific DNS Suffix  . : router
   Link-local IPv6 Address . . . . . : fe80::2062:f3d:b7ef:baea%10
   IPv4 Address. . . . . . . . . . . : 192.168.1.4
   Subnet Mask . . . . . . . . . . . : 255.255.255.0
   Default Gateway . . . . . . . . . : 192.168.1.1

Tunnel adapter isatap.{77BACB60-6B87-4077-A7A9-CCEE10FB8D2A}:

   Media State . . . . . . . . . . . : Media disconnected
   Connection-specific DNS Suffix  . :

Tunnel adapter isatap.router:

   Media State . . . . . . . . . . . : Media disconnected
   Connection-specific DNS Suffix  . : router

Tunnel adapter isatap.{07620AA4-09C8-49DE-95CD-7280A381F533}:

   Media State . . . . . . . . . . . : Media disconnected
   Connection-specific DNS Suffix  . :

Tunnel adapter Teredo Tunneling Pseudo-Interface:

   Connection-specific DNS Suffix  . :
   IPv6 Address. . . . . . . . . . . : 2001:0:338c:24f4:2c13:6728:e4d5:9d9b
   Link-local IPv6 Address . . . . . : fe80::2c13:6728:e4d5:9d9b%23
   Default Gateway . . . . . . . . . : ::
'
376  [.] Got result
377
378 Windows IP Configuration
379
380
381 Ethernet adapter Ethernet:
382
383    Media State . . . . . . . . . . . : Media disconnected
384    Connection-specific DNS Suffix  . :
385
386 Wireless LAN adapter Local Area Connection* 2:
387
388    Media State . . . . . . . . . . . : Media disconnected
389    Connection-specific DNS Suffix  . :
390
391 Ethernet adapter VMware Network Adapter VMnet1:
392
393    Connection-specific DNS Suffix  . :
394    Link-local IPv6 Address . . . . . : fe80::edb6:d8a0:9517:fadc%2
395    IPv4 Address. . . . . . . . . . . : 192.168.44.1
396    Subnet Mask . . . . . . . . . . . : 255.255.255.0
397    Default Gateway . . . . . . . . . :
398
399 Ethernet adapter VMware Network Adapter VMnet8:
400
401    Connection-specific DNS Suffix  . :
402    Link-local IPv6 Address . . . . . : fe80::c8a4:f848:81a4:ba9a%13
403    IPv4 Address. . . . . . . . . . . : 192.168.30.1
404    Subnet Mask . . . . . . . . . . . : 255.255.255.0
405    Default Gateway . . . . . . . . . :
406
407 Wireless LAN adapter Wi-Fi:
408
409    Connection-specific DNS Suffix  . : router
410    Link-local IPv6 Address . . . . . : fe80::2062:f3d:b7ef:baea%10
411    IPv4 Address. . . . . . . . . . . : 192.168.1.4
412    Subnet Mask . . . . . . . . . . . : 255.255.255.0
413    Default Gateway . . . . . . . . . : 192.168.1.1
414
415 Tunnel adapter isatap.{77BACB60-6B87-4077-A7A9-CCEE10FB8D2A}:
416
417    Media State . . . . . . . . . . . : Media disconnected
418    Connection-specific DNS Suffix  . :
419
420 Tunnel adapter isatap.router:
421
422    Media State . . . . . . . . . . . : Media disconnected
423    Connection-specific DNS Suffix  . : router
424
425 Tunnel adapter isatap.{07620AA4-09C8-49DE-95CD-7280A381F533}:
426
427    Media State . . . . . . . . . . . : Media disconnected
428    Connection-specific DNS Suffix  . :
429
430 Tunnel adapter Teredo Tunneling Pseudo-Interface:
431
432    Connection-specific DNS Suffix  . :
433    IPv6 Address. . . . . . . . . . . : 2001:0:338c:24f4:2c13:6728:e4d5:9d9b
434    Link-local IPv6 Address . . . . . : fe80::2c13:6728:e4d5:9d9b%23
435    Default Gateway . . . . . . . . . : ::