一、Java线程与系统内核线程
Java虚拟机使用的是KLT线程模型。Java线程创建依赖于系统内核,通过JVM调用系统库创建内核线程,内核线程与Java-Thread是1:1的映射关系。

- 并发:CPU在多个线程之间来回切换调度。
- 并行:多核CPU同时处理多个线程。
二、线程池
线程是稀缺资源,它的创建与销毁时一个相对偏重且耗资源的操作,而Java线程依赖于内核线程,创建线程需要进行操作系统状态切换,为避免资源过度消耗需要设法重用线程执行多个任务。线程池就是一个线程缓存,负责对线程进行统一分配、调优与监控。线程池提供了一种限制和管理资源(包括执行一个任务)。 每个线程池还维护一些基本统计信息,例如已完成任务的数量。
1.为什么要用线程池?什么时候用线程池?
多线程的优点:
- 减少阻塞,tomcat、Ajax
- 避免空转,IO操作
- 提升性能,多核CPU情况下 可以对任务拆分并发处理
线程池的优点:
- 重用存在的线程,减少线程创建,消亡的开销,提高性能。
- 提高响应速度。当任务到达时,任务可以不需要等到线程创建就能立即执行。
- 提高线程的可管理性,可统一分配、调优和监控。
当单个任务处理时间比较短或者需要处理的任务数量很大时,建议使用线程池。比如网购商品秒杀、云盘文件上传和下载、12306网上购票系统等。
2.线程池的5种状态
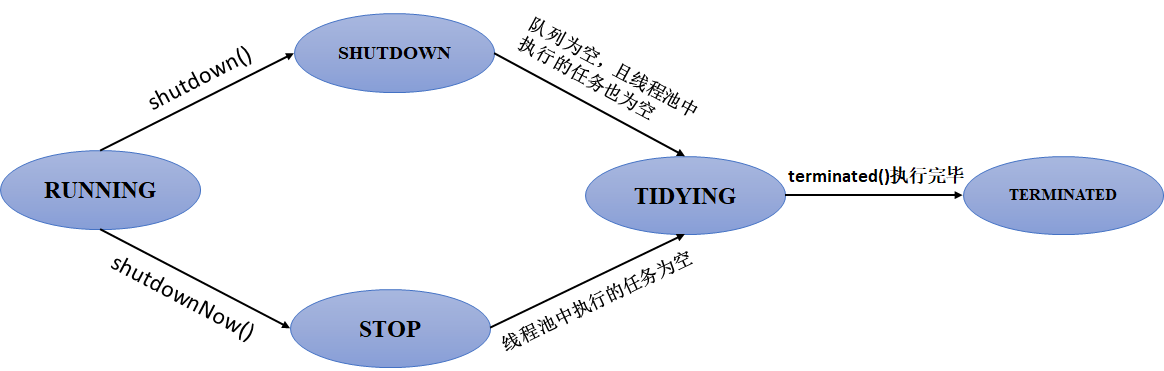
RUNNING
- 该状态的线程池会接收新任务,并处理阻塞队列中的任务;
- 调用线程池的shutdown()方法,可以切换到SHUTDOWN状态;
- 调用线程池的shutdownNow()方法,可以切换到STOP状态;
SHUTDOWN
- 该状态的线程池不会接收新任务,但会处理阻塞队列中的任务;
- 队列为空,并且线程池中执行的任务也为空,进入TIDYING状态;
STOP
- 该状态的线程不会接收新任务,也不会处理阻塞队列中的任务,而且会中断正在运行的任务;
- 线程池中执行的任务为空,进入TIDYING状态;
TIDYING
- 该状态表明所有的任务已经运行终止,记录的任务数量为0。
- terminated()执行完毕,进入TERMINATED状态
TERMINATED
- 该状态表示线程池彻底终止
3.线程池怎么用?
3.1 工作流程
- 提交一个任务,线程池里存活的核心线程数小于线程数corePoolSize时,线程池会创建一个核心线程去处理提交的任务。
- 如果线程池核心线程数已满,即线程数已经等于corePoolSize,一个新提交的任务,会被放进任务队列workQueue排队等待执行。
- 当线程池里面存活的线程数已经等于corePoolSize了,并且任务队列workQueue也满,判断线程数是否达到maximumPoolSize,即最大线程数是否已满,如果没到达,创建一个非核心线程执行提交的任务。
- 如果当前的线程数达到了maximumPoolSize,还有新的任务过来的话,直接采用拒绝策略处理。

补充说明:
阻塞队列:在任意时刻,不管并发有多高,永远只有一个线程能够进行队列的入队或者出队操作,线程安全的队列(有界|无界)
- 队列满,只能进行出队操作,所有入队的操作必须等待,也就是被阻塞。
- 队列空,只能进行入队操作,所有出队的操作必须等待,也就是被阻塞。
3.2 线程池的使用步骤
- 使用Executors工厂类的静态方法,创建线程池对象;
- 编写Runnable或Callable实现类的实例对象;
- 利用ExecutorService的submit方法或SchedudExecutorService的schedule方法提交并执行线程任务;
- 如果有执行结果,则处理异步执行结果(Future);
- 调用shutdown()方法,关闭线程池。
3.3 创建线程池
- ExecutorService: 真正的线程池接口。
- ScheduledExecutorService: 能和Timer/TimerTask类似,解决那些需要任务重复执行的问题。
- ThreadPoolExecutor: ExecutorService的默认实现。
- ScheduledThreadPoolExecutor: 继承ThreadPoolExecutor的ScheduledExecutorService接口实现,周期性任务调度的类实现。
3.3.1 通过构造方法ThreadPoolExecutor创建线程池(默认)
    /**
     * 用给定的初始参数创建一个新的ThreadPoolExecutor。
     */
    public ThreadPoolExecutor(int corePoolSize,
                              int maximumPoolSize,
                              long keepAliveTime,
                              TimeUnit unit,
                              BlockingQueue<Runnable> workQueue,
                              ThreadFactory threadFactory,
                              RejectedExecutionHandler handler) {
        if (corePoolSize < 0 ||
            maximumPoolSize <= 0 ||
            maximumPoolSize < corePoolSize ||
            keepAliveTime < 0)
            throw new IllegalArgumentException();
        if (workQueue == null || threadFactory == null || handler == null)
            throw new NullPointerException();
        this.corePoolSize = corePoolSize;
        this.maximumPoolSize = maximumPoolSize;
        this.workQueue = workQueue;
        this.keepAliveTime = unit.toNanos(keepAliveTime);
        this.threadFactory = threadFactory;
        this.handler = handler;
    }
(1)corePoolSize
需要依据任务的处理时间和每秒产生的任务数量来确定,例如:执行一个任务需要0.1秒,系统百分之80的时间每秒产生100个任务,那么要想在1秒内处理完这100个任务,就需要10个线程,此时corePoolSize=10。当然实际情况不可能这么平均,所以一般按照8020原则,按照百分之80的情况设计核心线程数,剩下的百分之20可以利用最大线程数处理。(根据实际情况最大不超过最大线程数。)
(2)maximumPoolSize
需要参照corePoolSize和每秒产生的最大任务数。假如系统每秒产生最大任务是1000,那么最大线程数=(最大任务数-任务队列长度)*每个任务执行时间:最大线程数=(1000-200)*0.1=80个。
- CPU密集型:CPU的核数
- IO密集型:IO任务的个数
(3)keepAliveTime
临时创建出来的非核心线程当空闲超过设置的时间将被销毁,根据实际需要设定。
(4)unit
有days、hours、minutes、milliseconds、microseconds、nanoseconds。
(5)workQueue
一定要设置长度,具体长度根据业务大概流量计算。核心线程数/单个任务执行时间*2。假如corePoolSize=10,单个任务执行时间为0.1秒,则workQueue=200。
- ArrayBlockingQueue(有界队列):是一个用数组实现的有界阻塞队列,按FIFO排序量。
- LinkedBlockingQueue(可设置容量队列):基于链表结构的阻塞队列,按FIFO排序任务,容量可以选择进行设置,不设置的话,将是一个无边界的阻塞队列,最大长度为Integer.MAX_VALUE,吞吐量通常要高于ArrayBlockingQuene;newFixedThreadPool线程池使用了这个队列
- DelayQueue(延迟队列):是一个任务定时周期的延迟执行的队列。根据指定的执行时间从小到大排序,否则根据插入到队列的先后排序。newScheduledThreadPool线程池使用了这个队列。
- PriorityBlockingQueue(优先级队列):是具有优先级的无界阻塞队列。
- SynchronousQueue(同步队列):一个不存储元素的阻塞队列,每个插入操作必须等到另一个线程调用移除操作,否则插入操作一直处于阻塞状态,吞吐量通常要高于LinkedBlockingQuene,newCachedThreadPool线程池使用了这个队列。
(6)threadFactory
用于设置创建线程的工厂,可以通过线程工厂给每个创建出来的线程设置更有意义的名字。
(7)handler拒绝策略
- ThreadPoolExecutor.AbortPolicy:丢弃任务并抛出RejectedExecutionException异常(默认)。
- ThreadPoolExecutor.DiscardPolicy:也是丢弃任务,但是不抛出异常。
- ThreadPoolExecutor.DiscardOldestPolicy:丢弃队列最前面的任务,然后重新尝试执行任务(重复此过程)。
- ThreadPoolExecutor.CallerRunsPolicy:由调用线程处理该任务。
举例1:综合案例-秒杀商品
功能:某商场上架10部新手机,免费送给客户体验,要求所有参与活动的人员在规定的时间同时参与秒杀争抢,假设有20个人同时参与了该活动,请使用线程池模拟这个场景,保证前10人秒杀成功,后10人秒杀失败。
要求:1.使用线程池创建线程 2.解决线程安全问题
package 线程池.QuickShop;

import java.util.concurrent.LinkedBlockingDeque;
import java.util.concurrent.ThreadPoolExecutor;
import java.util.concurrent.TimeUnit;

/**
 * 功能描述:某商场上架10部新手机,免费送给客户体验,要求所有参与活动的人员在规定的时间同时参与秒杀争抢,假设有20个人同时参与了该活动,请使用线程池模拟这个场景,保证前10人秒杀成功,后10人秒杀失败。
 *
 * 要求:1.使用线程池创建线程
 *      2.解决线程安全问题
 *
 * @since 2020-06-08
 */
class QuickShopping {
    public static void main(String[] args) {
        //1.使用工厂类,获取线程池对象,最多可处理15个任务
        ThreadPoolExecutor pool = new ThreadPoolExecutor(3,5,1,
                TimeUnit.MINUTES,new LinkedBlockingDeque<>(15));
        //2.循环提交任务
        for (int i=0;i<20;i++){
            MyTask myTask = new MyTask("客户"+i);
            pool.submit(myTask); // 向线程池提交任务i
        }
        //3.查看执行结果
        pool.shutdown();
    }
}

class MyTask implements Runnable{
    /**
     * 功能描述:包含了商品数量,客户名称,送手机的行为。
     */

    // goodsNum表示商品的数量
    private static int goodsNum = 10;
    // userName表示客户名
    private String userName;

    public MyTask(String userName){
        this.userName = userName;
    }

    @Override
    public void run() {
        String name = Thread.currentThread().getName();
        System.out.println("线程"+name+"帮助客户"+userName+"进入秒杀");
        try {
            Thread.sleep(200);
        } catch (InterruptedException e) {
            e.printStackTrace();
        }
        synchronized (MyTask.class){
            if (goodsNum > 0){
                System.out.println(userName+"使用"+name+"秒杀:"+goodsNum--+"号商品成功");
            }else{
                System.out.println(userName+"使用"+name+"秒杀失败");
            }
        }
    }
}
|
线程pool-1-thread-2帮助客户客户1进入秒杀 线程pool-1-thread-3帮助客户客户2进入秒杀 线程pool-1-thread-4帮助客户客户18进入秒杀 线程pool-1-thread-5帮助客户客户19进入秒杀 线程pool-1-thread-1帮助客户客户0进入秒杀 客户1使用pool-1-thread-2秒杀:10号商品成功 客户19使用pool-1-thread-5秒杀:9号商品成功 客户18使用pool-1-thread-4秒杀:8号商品成功 线程pool-1-thread-5帮助客户客户3进入秒杀 线程pool-1-thread-4帮助客户客户4进入秒杀 客户0使用pool-1-thread-1秒杀:7号商品成功 线程pool-1-thread-1帮助客户客户6进入秒杀 客户2使用pool-1-thread-3秒杀:6号商品成功 线程pool-1-thread-2帮助客户客户5进入秒杀 线程pool-1-thread-3帮助客户客户7进入秒杀 客户7使用pool-1-thread-3秒杀:5号商品成功 客户6使用pool-1-thread-1秒杀:4号商品成功 线程pool-1-thread-3帮助客户客户8进入秒杀 线程pool-1-thread-1帮助客户客户9进入秒杀 客户3使用pool-1-thread-5秒杀:3号商品成功 客户4使用pool-1-thread-4秒杀:2号商品成功 线程pool-1-thread-5帮助客户客户10进入秒杀 客户5使用pool-1-thread-2秒杀:1号商品成功 线程pool-1-thread-4帮助客户客户11进入秒杀 线程pool-1-thread-2帮助客户客户12进入秒杀 客户8使用pool-1-thread-3秒杀失败 客户9使用pool-1-thread-1秒杀失败 线程pool-1-thread-1帮助客户客户14进入秒杀 线程pool-1-thread-3帮助客户客户13进入秒杀 客户10使用pool-1-thread-5秒杀失败 客户11使用pool-1-thread-4秒杀失败 线程pool-1-thread-5帮助客户客户15进入秒杀 客户12使用pool-1-thread-2秒杀失败 线程pool-1-thread-2帮助客户客户17进入秒杀 线程pool-1-thread-4帮助客户客户16进入秒杀 客户13使用pool-1-thread-3秒杀失败 客户14使用pool-1-thread-1秒杀失败 客户16使用pool-1-thread-4秒杀失败 客户15使用pool-1-thread-5秒杀失败 客户17使用pool-1-thread-2秒杀失败 |
3.3.2 ExecutorService创建线程池
Executors 返回线程池对象的弊端如下:
- FixedThreadPool 和 SingleThreadExecutor : 允许请求的队列长度为 Integer.MAX_VALUE ,可能堆积大量的请求,从而导致OOM。
- CachedThreadPool 和 ScheduledThreadPool : 允许创建的线程数量为 Integer.MAX_VALUE ,可能会创建大量线程,从而导致OOM。
这几种方法内部实际上是调用了ThreadPoolExecutor的构造方法。
(1)newCachedThreadPool
- static ExecutorService newCachedThreadPool():创建一个默认的线程池对象,里面的线程可重用,且在第一次使用时才创建线程池对象;
- static ExecutorService newCachedThreadPool(ThreadFactory threadFactory):允许自定义线程的创建,线程池中的所有线程都使用ThreadFactory来创建,这样的线程无需手动启动,自动执行;
public static ExecutorService newCachedThreadPool(ThreadFactory threadFactory) {
        return new ThreadPoolExecutor(0, Integer.MAX_VALUE,
                                      60L, TimeUnit.SECONDS,
                                      new SynchronousQueue<Runnable>(),
                                      threadFactory);
    }
特点:
- 核心线程数为0
- 最大线程数为Integer.MAX_VALUE
- 阻塞队列是SynchronousQueue
- 非核心线程空闲存活时间为60秒
当提交任务的速度大于处理任务的速度时,每次提交一个任务,就必然会创建一个线程。极端情况下会创建过多的线程,耗尽 CPU 和内存资源。由于空闲 60 秒的线程会被终止,长时间保持空闲的 CachedThreadPool 不会占用任何资源。
原理:
- 提交任务
- 因为没有核心线程,所以任务直接加到SynchronousQueue队列。
- 判断是否有空闲线程,如果有,就去取出任务执行。
- 如果没有空闲线程,就新建一个线程执行。
- 执行完任务的线程,还可以存活60秒,如果在这期间,接到任务,可以继续活下去;否则,被销毁。
使用场景:用于并发执行大量短期的小任务。
(2)newFixedThreadPool
- static ExecutorService newFixedThreadPool(int nThreads):创建一个可重用固定线程数的线程池;
- static ExecutorService newFixedThreadPool(int nThreads,ThreadFactory threadFactory):创建一个可重用固定线程数的线程池且线程池中的所有线程都使用ThreadFactory来创建;
public static ExecutorService newFixedThreadPool(int nThreads, ThreadFactory threadFactory) {
        return new ThreadPoolExecutor(nThreads, nThreads,
                                      0L, TimeUnit.MILLISECONDS,
                                      new LinkedBlockingQueue<Runnable>(),
                                      threadFactory);
    }
特点:
- 核心线程数和最大线程数大小一样
- 没有所谓的非空闲时间,即keepAliveTime为0
- 阻塞队列为无界队列LinkedBlockingQueue
原理:
- 提交任务
- 如果线程数少于核心线程,创建核心线程执行任务
- 如果线程数等于核心线程,把任务添加到LinkedBlockingQueue阻塞队列
- 如果线程执行完任务,去阻塞队列取任务,继续执行。
缺点:
- 使用无界队列的线程池会导致内存飙升:newFixedThreadPool使用了无界的阻塞队列LinkedBlockingQueue,如果线程获取一个任务后,任务的执行时间比较长,会导致队列的任务越积越多,导致机器内存使用不停飙升, 最终导致OOM。
使用场景:FixedThreadPool 适用于处理CPU密集型的任务,确保CPU在长期被工作线程使用的情况下,尽可能的少的分配线程,即适用执行长期的任务。
(3)newSingleThreadExecutor
- static ExecutorService newSingleThreadExecutor():创建一个使用单个worker线程的Executor,以无界队列方式来运行该线程;
- static ExecutorService newSingleThreadExecutor(ThreadFactory threadFactory):创建一个使用单个worker线程的Executor,且线程池中的所有线程都使用ThreadFactory来创建。
public static ExecutorService newSingleThreadExecutor(ThreadFactory threadFactory) {
        return new FinalizableDelegatedExecutorService
            (new ThreadPoolExecutor(1, 1,
                                    0L, TimeUnit.MILLISECONDS,
                                    new LinkedBlockingQueue<Runnable>(),
                                    threadFactory));
    }
特点:
- 核心线程数为1
- 最大线程数也为1
- 阻塞队列是LinkedBlockingQueue
- keepAliveTime为0
原理:
- 提交任务
- 线程池是否有一条线程在,如果没有,新建线程执行任务
- 如果有,讲任务加到阻塞队列
- 当前的唯一线程,从队列取任务,执行完一个,再继续取,一个人(一条线程)夜以继日地干活。
使用场景:适用于串行执行任务的场景,一个任务一个任务地执行。
(4)提交任务方法
- <T>Future<T>submit(Callable<T> task):停止所有正在执行的任务,返回一个Future对象。
- Future<?>submit(Runnable task):执行Runnable任务,并返回一个表示该任务的Future。
- <T>Future<T>submit(Runnable task,T result):执行Runnable任务,并返回一个表示该任务的Future。
举例1:对比6种创建线程池的方法
| newCachedThreadPool:线程数量不限制,任务优先模式,前提是服务器性能支持。 | 1.创建默认的线程池对象 |
import java.util.concurrent.ExecutorService;
import java.util.concurrent.Executors;
import java.util.concurrent.ThreadFactory;

/**
 * 功能描述:练习Executors获取ExecutorService,然后调用方法,提交任务
 */
public class MyTest {
    public static void main(String[] args) {
        test1();
    }

    public static void test1() {
        //1.使用工厂类,获取线程池对象
        ExecutorService es = Executors.newCachedThreadPool();
        //2.提交任务
        for(int i=1;i<=10;i++){
            es.submit(new MyRunnable(i));
        }
    }
}

/**
 * 任务类,包含一个任务编号,在任务中,打印出是哪一个线程正在执行任务。
 */
class MyRunnable implements Runnable{
    private int id;
    public MyRunnable(int id){
        this.id = id;
    }
    public void run(){
        //获取线程的名称,打印一句话
        String name = Thread.currentThread().getName();
        System.out.println(name+"执行了任务"+id);
    }
}
|
pool-1-thread-4执行了任务4 pool-1-thread-3执行了任务3 pool-1-thread-1执行了任务1 pool-1-thread-8执行了任务8 pool-1-thread-2执行了任务2 pool-1-thread-7执行了任务7 pool-1-thread-10执行了任务10 pool-1-thread-6执行了任务6 pool-1-thread-5执行了任务5 pool-1-thread-9执行了任务9 |
| 2.创建自定义的线程 |
public class MyTest {
    public static void main(String[] args) {
        test2();
    }

    // 自定义线程
    private static void test2() {
        //1.使用工厂类,获取线程池对象
        ExecutorService es = Executors.newCachedThreadPool(new ThreadFactory() {
            int num = 0;
            @Override
            public Thread newThread(Runnable r) {
                return new Thread(r,"自定义线程"+(num++));
            }
        });
        //2.提交任务
        for(int i=1;i<=10;i++){
            es.submit(new MyRunnable(i));
        }
    }
}
|
自定义线程2执行了任务3 自定义线程3执行了任务4 自定义线程6执行了任务7 自定义线程1执行了任务2 自定义线程0执行了任务1 自定义线程4执行了任务5 自定义线程5执行了任务6 自定义线程7执行了任务8 自定义线程8执行了任务9 自定义线程9执行了任务10 |
|
| newFixedThreadPool:自定义线程数量,适用于服务器硬件一般和对性能要求不高的情况。 | 1.固定线程池中的线程数量 |
public class TestNewFixedThreadPool {
    public static void main(String[] args) {
        test3();
    }

    public static void test3() {
        //1.使用工厂类,获取线程池对象
        ExecutorService es = Executors.newFixedThreadPool(3);
        //2.提交任务
        for(int i=1;i<=10;i++){
            es.submit(new MyRunnable(i));
        }
    }
}
|
pool-1-thread-3执行了任务3 pool-1-thread-1执行了任务1 pool-1-thread-2执行了任务2 pool-1-thread-2执行了任务4 pool-1-thread-1执行了任务5 pool-1-thread-1执行了任务7 pool-1-thread-2执行了任务6 pool-1-thread-1执行了任务8 pool-1-thread-3执行了任务9 pool-1-thread-2执行了任务10 |
| 2.固定线程数量+自定义线程的创建 |
public class TestNewFixedThreadPool {
    public static void main(String[] args) {
        test4();
    }

    // 自定义线程
    private static void test4() {
        //1.使用工厂类,获取线程池对象
        ExecutorService es = Executors.newFixedThreadPool(3,new ThreadFactory() {
            int num = 0;
            @Override
            public Thread newThread(Runnable r) {
                return new Thread(r,"自定义线程"+(num++));
            }
        });
        //2.提交任务
        for(int i=1;i<=10;i++){
            es.submit(new MyRunnable(i));
        }
    }
}
|
自定义线程0执行了任务1 自定义线程1执行了任务2 自定义线程2执行了任务3 自定义线程2执行了任务4 自定义线程2执行了任务6 自定义线程1执行了任务5 自定义线程2执行了任务7 自定义线程0执行了任务9 自定义线程2执行了任务10 自定义线程1执行了任务8 |
|
| newSingleThreadExecutor:单线程线程池,适用于追求绝对的安全(e.g. 银行),不考虑性能。 | 1.单个线程完成所有任务 |
public class TestNewSingleThreadExecutor {
    public static void main(String[] args) {
        test5();
    }

    public static void test5() {
        //1.使用工厂类,获取线程池对象
        ExecutorService es = Executors.newSingleThreadExecutor();
        //2.提交任务
        for(int i=1;i<=10;i++){
            es.submit(new MyRunnable(i));
        }
    }
}
|
pool-1-thread-1执行了任务1 pool-1-thread-1执行了任务2 pool-1-thread-1执行了任务3 pool-1-thread-1执行了任务4 pool-1-thread-1执行了任务5 pool-1-thread-1执行了任务6 pool-1-thread-1执行了任务7 pool-1-thread-1执行了任务8 pool-1-thread-1执行了任务9 pool-1-thread-1执行了任务10 |
| 2.自定义单个线程完成所有任务 |
public class TestNewSingleThreadExecutor {
    public static void main(String[] args) {
        test6();
    }

    // 自定义线程
    private static void test6() {
        //1.使用工厂类,获取线程池对象
        ExecutorService es = Executors.newSingleThreadExecutor(new ThreadFactory() {
            int num = 1;
            @Override
            public Thread newThread(Runnable r) {
                return new Thread(r,"自定义线程"+(num++));
            }
        });
        //2.提交任务
        for(int i=1;i<=10;i++){
            es.submit(new MyRunnable(i));
        }
    }
}
|
自定义线程1执行了任务1 自定义线程1执行了任务2 自定义线程1执行了任务3 自定义线程1执行了任务4 自定义线程1执行了任务5 自定义线程1执行了任务6 自定义线程1执行了任务7 自定义线程1执行了任务8 自定义线程1执行了任务9 自定义线程1执行了任务10 |
举例2:ATM取款
功能:设计一个程序,使用两个线程模拟在两个地点同时从一个账号中取钱,假如卡中一共有1000元,每个线程取800元,要求演示如果一个线程取款成功,剩余200元,另一个线程取款失败,余额不足。
package 线程池.Withdraw;

import java.util.concurrent.ExecutorService;
import java.util.concurrent.Executors;
import java.util.concurrent.ThreadFactory;

/**
 * 功能描述:设计一个程序,使用两个线程模拟在两个地点同时从一个账号中取钱,假如卡中一共有1000元,每个线程取800元,要求演示
 * 如果一个线程取款成功,剩余200元,另一个线程取款失败,余额不足。
 *
 * 要求:1.使用线程池创建线程  2.解决线程安全问题
 *
 * 思路:1.线程池可以利用Executors工厂类的静态方法,创建线程池对象
 * 2.解决线程安全问题可以使用synchronized方法控制取钱的操作
 * 3.在取款前,先判断余额是否足够,且保证余额判断和取钱行为的原子性
 *
 * @since 2020-06-08
 */
class TestWithdraw {
    public static void main(String[] args) {
        //1.使用工厂类,获取线程池对象
        ExecutorService es = Executors.newFixedThreadPool(2, new ThreadFactory() {
            int id = 1;
            @Override
            public Thread newThread(Runnable r) {
                return new Thread(r,"ATM"+id++);
            }
        });
        //2.提交任务
        for (int i=0;i<2;i++){
//            double money = Math.rint(100);
            MyRunnable task = new MyRunnable("客户"+i,800);
            es.submit(task); // 向线程池提交任务i
        }
        //3.关闭线程池
        es.shutdown();
    }
}

class MyRunnable implements Runnable{
    private static int total=1000; // 总金额
    private double money; // 取款金额
    private String userName; // 用户姓名
    public MyRunnable(String userName,double money){
        this.userName = userName;
        this.money = money;
    }
    @Override
    public void run() {
        String threadName = Thread.currentThread().getName();
        System.out.println(userName+"正在准备使用"+threadName+"取款"+money+"元");
        try {
            Thread.sleep(200);
        } catch (InterruptedException e) {
            e.printStackTrace();
        }
        synchronized (MyRunnable.class){
            if(total >= money){
                total -= money;
                System.out.println(userName+"使用"+threadName+"取款"+money+"元成功,余额为"+total+"元");
            }else {
                System.out.println(userName+"使用"+threadName+"取款"+money+"元失败,余额为"+total+"元");
            }
        }
    }
}
|
客户0正在准备使用ATM1取款800.0元 客户1正在准备使用ATM2取款800.0元 客户0使用ATM1取款800.0元成功,余额为200元 客户1使用ATM2取款800.0元失败,余额为200元 |
3.3.3 ScheduledExecutorService创建需要重复执行的线程池
ScheduledExecutorService是ExecutorService的子接口,具备了延迟运行或定期执行任务的能力,和Timer/TimerTask类似,适用于需要重复执行任务的情况。
(1)newScheduledThreadPool
- static ScheduledExecutorService newScheduledThreadPool(int corePoolSize):创建一个可重用固定线程数的线程池且允许延迟运行或定期执行任务;
- static ScheduledExecutorService newScheduledThreadPool(int corePoolSize,ThreadFactory threadFactory):创建一个可重用固定线程数的线程池且线程池中的所有线程都使用ThreadFactory来创建,且允许延迟运行或定期执行任务;
public ScheduledThreadPoolExecutor(int corePoolSize) {
        super(corePoolSize, Integer.MAX_VALUE, 0, NANOSECONDS,
              new DelayedWorkQueue());
    }
特点:
- 最大线程数为Integer.MAX_VALUE
- 阻塞队列是DelayedWorkQueue
- keepAliveTime为0
- scheduleAtFixedRate() :按某种速率周期执行
- scheduleWithFixedDelay():在某个延迟后执行
原理:
- 添加一个任务
- 线程池中的线程从 DelayQueue 中取任务
- 线程从 DelayQueue 中获取 time 大于等于当前时间的task
- 执行完后修改这个 task 的 time 为下次被执行的时间
- 这个 task 放回DelayQueue队列中
使用场景:周期性执行任务的场景,需要限制线程数量的场景
(2)newSingleThreadScheduledExecutor
- static ScheduledExecutorService newSingleThreadScheduledExecutor():创建一个单线程执行程序,它允许在给定延迟后运行命令或者定期地执行。
- static ScheduledExecutorService newSingleThreadScheduledExecutor(ThreadFactory threadFactory):创建一个单线程执行程序,它可安排在给定延迟后运行命令或者定期地执行。
(3)提交任务方法
- <V>ScheduledFuture<V>schedule(Callabel<V>callable,long delay,TimeUnit unit):延迟时间单位是unit,数量是delay的时间后执行callable;
- ScheduledFuture<?>schedule(Runnable command,long delay,TimeUnit unit):延迟时间单位是unit,数量是delay的时间后执行command;
- ScheduledFuture<?>scheduleAtFixedRate(Runnable command,long initialDelay,long period,TimeUnit unit):延迟时间单位是unit,数量是initialDelay的时间后,每间隔period时间重复执行一次command。
- ScheduledFuture<?>scheduleWithFixedDelay(Runnable command,long initialDelay,long period,TimeUnit unit):创建并执行一个在给定初始延迟后首次启用的定期操作,随后,在每一次执行终止和下一次执行开始之间都存在给定的延迟。
举例1:对比几种不同的延迟创建线程池的方法
| 1.newScheduledThreadPool+schedule |
package 线程池.JavaThreadPool;

import java.util.concurrent.Executors;
import java.util.concurrent.ScheduledExecutorService;
import java.util.concurrent.TimeUnit;

/**
 * 功能描述:测试ScheduledExecutorService接口中延迟执行任务和重复执行任务的功能
 * @since 2020-06-05
 */
public class TestScheduledExecutorService {
    public static void main(String[] args) {
        //1.获取一个具备延迟执行任务的线程池对象
        ScheduledExecutorService es = Executors.newScheduledThreadPool(3);
        //2.创建多个任务对象,提交任务,每个任务延迟2s执行
        for(int i=1;i<=10;i++){
            es.schedule(new MyRunnable3(i),2, TimeUnit.SECONDS);
        }
        System.out.println("Over!");
    }
}

class MyRunnable3 implements Runnable{
    private int id;

    public MyRunnable3(int id){
        this.id = id;
    }

    @Override
    public void run() {
        String name = Thread.currentThread().getName();
        System.out.println(name+"执行了任务:"+id);
    }
}
|
Over先输出,2s之后线程开始执行。 Over! pool-1-thread-1执行了任务:1 pool-1-thread-2执行了任务:2 pool-1-thread-3执行了任务:3 pool-1-thread-3执行了任务:4 pool-1-thread-1执行了任务:5 pool-1-thread-3执行了任务:7 pool-1-thread-1执行了任务:8 pool-1-thread-3执行了任务:9 pool-1-thread-1执行了任务:10 pool-1-thread-2执行了任务:6 |
| 2.newScheduledThreadPool+scheduledAtFixedRate |
/*
* Copyright (c) Huawei Technologies Co., Ltd. 2020-2020. All rights reserved.
*/
package 线程池.JavaThreadPool;
import java.util.concurrent.Executors;
import java.util.concurrent.ScheduledExecutorService;
import java.util.concurrent.ThreadFactory;
import java.util.concurrent.TimeUnit;
/**
* 功能描述
*
* @author n00568290
* @since 2020-06-08
*/
public class TestNewScheduledThreadPool {
public static void main(String[] args) {
//1.获取一个具备延迟执行任务的线程池对象
ScheduledExecutorService es = Executors.newScheduledThreadPool(3,new ThreadFactory(){
int n = 1;
public Thread newThread(Runnable r){
return new Thread(r,"自定义线程"+n++);
}
});
//2.创建多个任务对象,提交任务,每个任务延迟2s执行
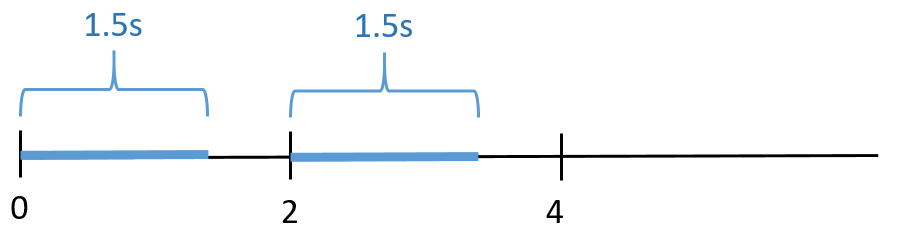
es.scheduleAtFixedRate(new MyRunnable4(1),1,2, TimeUnit.SECONDS);
System.out.println("Over!");
}
}
class MyRunnable4 implements Runnable{
private int id;
public MyRunnable4(int id){
this.id = id;
}
@Override
public void run() {
String name = Thread.currentThread().getName();
try{
Thread.sleep(1500);
}catch(InterruptedException e){
e.printStackTrace();
}
System.out.println(name+"执行了任务"+id);
}
}
|
Over先输出,初始是等待1s开始执行任务,每个任务执行1.5s,每隔2s执行一个任务(这里只设置了1个任务),实际上每间隔2s输出一句“自定义线程X执行了任务1”。 Over! 自定义线程1执行了任务1 自定义线程1执行了任务1 自定义线程2执行了任务1 自定义线程2执行了任务1 自定义线程2执行了任务1 自定义线程2执行了任务1 自定义线程2执行了任务1 自定义线程2执行了任务1 自定义线程2执行了任务1 自定义线程2执行了任务1 自定义线程2执行了任务1 自定义线程2执行了任务1 自定义线程2执行了任务1 自定义线程2执行了任务1 自定义线程2执行了任务1 自定义线程2执行了任务1 自定义线程2执行了任务1 自定义线程2执行了任务1 自定义线程2执行了任务1 自定义线程2执行了任务1 自定义线程2执行了任务1 自定义线程2执行了任务1 自定义线程2执行了任务1 自定义线程2执行了任务1 自定义线程2执行了任务1 自定义线程2执行了任务1 自定义线程2执行了任务1 自定义线程2执行了任务1 自定义线程2执行了任务1 自定义线程2执行了任务1 自定义线程2执行了任务1 自定义线程2执行了任务1 自定义线程2执行了任务1 自定义线程2执行了任务1 自定义线程2执行了任务1 自定义线程2执行了任务1 自定义线程2执行了任务1 自定义线程2执行了任务1 自定义线程2执行了任务1 自定义线程2执行了任务1 自定义线程2执行了任务1 自定义线程2执行了任务1 自定义线程2执行了任务1 自定义线程2执行了任务1 自定义线程3执行了任务1 自定义线程3执行了任务1 自定义线程3执行了任务1 自定义线程3执行了任务1 自定义线程3执行了任务1 自定义线程3执行了任务1 自定义线程3执行了任务1 自定义线程3执行了任务1 自定义线程3执行了任务1 自定义线程3执行了任务1 自定义线程3执行了任务1 自定义线程3执行了任务1 自定义线程3执行了任务1 ...
|
| 3.newSingleScheduledExecutor+scheduledWithFixedDelay |
package 线程池.JavaThreadPool;
import java.util.concurrent.Executors;
import java.util.concurrent.ScheduledExecutorService;
import java.util.concurrent.ThreadFactory;
import java.util.concurrent.TimeUnit;
/**
* 功能描述
*
* @since 2020-06-08
*/
public class TestNewSingleScheduledExecutor {
public static void main(String[] args) {
//1.获取一个具备延迟执行任务的线程池对象
ScheduledExecutorService es = Executors.newSingleThreadScheduledExecutor(new ThreadFactory(){
int n = 1;
public Thread newThread(Runnable r){
return new Thread(r,"自定义线程"+n++);
}
});
//2.创建多个任务对象,提交任务,每个任务延迟2s执行
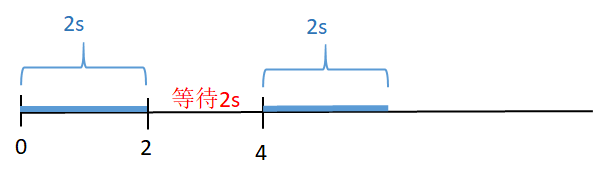
es.scheduleWithFixedDelay(new MyRunnable4(1),1,2, TimeUnit.SECONDS);
System.out.println("Over!");
}
}
|
首先输出Over,每个任务执行2s,间隔2s,实际上每隔4s输出“自定义线程1执行了任务1”。
Over!
自定义线程1执行了任务1
自定义线程1执行了任务1
自定义线程1执行了任务1
自定义线程1执行了任务1
自定义线程1执行了任务1
自定义线程1执行了任务1
自定义线程1执行了任务1
自定义线程1执行了任务1
自定义线程1执行了任务1
自定义线程1执行了任务1
自定义线程1执行了任务1
自定义线程1执行了任务1
|
3.3.4 异步计算Future
通过Future对象获取线程计算的结果。
常用方法:
- boolean cancel(boolean mayInterruptRunning):试图取消对此任务的执行(只能取消尚未完成的任务),返回值表示任务是否取消成功,取消成功返回true。
- V get()如有必要,等待计算完成,然后获取其结果。
- V get(long timeout,TimeUnit unit):如有必要,最多等待为使计算完成所给定的时间之后,获取其结果。
- boolean isCancelled():如果在任务正常完成前将其取消,则返回true。
- boolean isDone():如果任务已完成,则返回true。
| 正常执行任务 | 取消任务 |
package 线程池.JavaThreadPool;

import java.util.concurrent.Callable;
import java.util.concurrent.ExecutionException;
import java.util.concurrent.Executor;
import java.util.concurrent.ExecutorService;
import java.util.concurrent.Executors;
import java.util.concurrent.Future;

/**
 * 功能描述
 * @since 2020-06-08
 */
class TestFuture {
    public static void main(String[] args) {
        //1.获取线程池对象
        ExecutorService es = Executors.newCachedThreadPool();
        //2.创建Callable类型的任务对象
        Future<Integer> f = es.submit(new MyCall(1,1));
        //3.判断任务是否已经完成
        System.out.println("第1次判断任务是否完成"+f.isDone());
        System.out.println("第1次判断任务是否取消"+f.isCancelled());
        int result = f.get();
        System.out.println("任务结果"+result);
        System.out.println("第2次判断任务是否完成"+f.isDone());
        System.out.println("第2次判断任务是否取消"+f.isCancelled());
    }
}

class MyCall implements Callable<Integer>{
    private int a;
    private int b;

    // 通过构造方法传递两个元素
    public MyCall(int a,int b) {
        this.a = a;
        this.b = b;
    }

    @Override
    public Integer call() throws Exception {
        String name = Thread.currentThread().getName();
        System.out.println(name+"开始计算");
        Thread.sleep(2000);
        System.out.println(name+"计算结束");
        return a + b;
    }
}
|
package 线程池.JavaThreadPool;

import java.util.concurrent.Callable;
import java.util.concurrent.ExecutionException;
import java.util.concurrent.Executor;
import java.util.concurrent.ExecutorService;
import java.util.concurrent.Executors;
import java.util.concurrent.Future;
import java.util.concurrent.TimeUnit;
import java.util.concurrent.TimeoutException;

/**
 * 功能描述
 *
 * @since 2020-06-08
 */
class TestFuture {
    public static void main(String[] args) throws InterruptedException, ExecutionException, TimeoutException {
        //1.获取线程池对象
        ExecutorService es = Executors.newCachedThreadPool();
        //2.创建Callable类型的任务对象
        Future<Integer> f = es.submit(new MyCall(1,1));
        //3.判断任务是否已经完成
//        boolean b = f.cancel(true);
//        System.out.println("取消任务执行的结果"+b); // true
//        Integer v = f.get(1, TimeUnit.SECONDS); //由于等待时间过短,任务来不及执行完成,会报异常
//        System.out.println("任务执行的结果是:"+v);

    }

    private static void test1(Future<Integer> f) throws ExecutionException, InterruptedException {
        //3.判断任务是否已经完成
        System.out.println("第1次判断任务是否完成"+f.isDone());
        System.out.println("第1次判断任务是否取消"+f.isCancelled());
        int result = f.get();
        System.out.println("任务结果"+result);
        System.out.println("第2次判断任务是否完成"+f.isDone());
        System.out.println("第2次判断任务是否取消"+f.isCancelled());
    }
}

class MyCall implements Callable<Integer>{
    private int a;
    private int b;

    // 通过构造方法传递两个元素
    public MyCall(int a,int b) {
        this.a = a;
        this.b = b;
    }

    @Override
    public Integer call() throws Exception {
        String name = Thread.currentThread().getName();
        System.out.println(name+"开始计算");
        Thread.sleep(2000);
        System.out.println(name+"计算结束");
        return a + b;
    }
}
|
pool-1-thread-1开始计算 第1次判断任务是否完成false 第1次判断任务是否取消false pool-1-thread-1计算结束 任务结果2 第2次判断任务是否完成true 第2次判断任务是否取消false |
pool-1-thread-1开始计算 Exception in thread "main" java.util.concurrent.TimeoutException at java.base/java.util.concurrent.FutureTask.get(FutureTask.java:204) at 线程池.JavaThreadPool.TestFuture.main(TestFuture.java:31) pool-1-thread-1计算结束 |
3.4 关闭线程池
通过调用线程池的shutdown或shutdownNow方法来关闭线程池。它们的原理是遍历线程池中的工作线程,然后逐个调用线程的interrupt方法来终端线程,所以无法响应中断的任务可能永远无法终止。
- void shutdown():启动一次顺序关闭,执行以前提交的任务,但不接受新任务。
- List<Runnable> shutdownNow():停止所有正在执行的任务,暂停处理正在等待的任务,并返回等待执行的任务列表。
举例1:对比shutdownNow和shutdown
| 1.shutdownNow |
public class TestShutDownThreadPool {
    public static void main(String[] args) {
        test7();
        test8();
    }

    public static void test7() {
        //1.使用工厂类,获取线程池对象
        ExecutorService es = Executors.newSingleThreadExecutor();
        //2.提交任务
        for(int i=1;i<=10;i++){
            es.submit(new MyRunnable2(i));
        }
        //3.立刻关闭线程池,如果线程池中还有缓存的任务没有执行,则取消执行,并返回这些任务。
        List<Runnable> list = es.shutdownNow();
        System.out.println(list);
    }
}

class MyRunnable2 implements Runnable{
    private int id;
    public MyRunnable2(int id){
        this.id = id;
    }
    public void run(){
        //获取线程的名称,打印一句话
        String name = Thread.currentThread().getName();
        System.out.println(name+"执行了任务"+id);
    }

    @Override
    public String toString() {
        return "MyRunnable2{" +
                "id=" + id +
                '}';
    }
}
|
[java.util.concurrent.FutureTask@65b3120a[Not completed, task = java.util.concurrent.Executors$RunnableAdapter@3d494fbf[Wrapped task = MyRunnable2{id=2}]], java.util.concurrent.FutureTask@79fc0f2f[Not completed, task = java.util.concurrent.Executors$RunnableAdapter@6f539caf[Wrapped task = MyRunnable2{id=3}]], java.util.concurrent.FutureTask@2dda6444[Not completed, task = java.util.concurrent.Executors$RunnableAdapter@50040f0c[Wrapped task = MyRunnable2{id=4}]], java.util.concurrent.FutureTask@4783da3f[Not completed, task = java.util.concurrent.Executors$RunnableAdapter@5e9f23b4[Wrapped task = MyRunnable2{id=5}]], java.util.concurrent.FutureTask@49097b5d[Not completed, task = java.util.concurrent.Executors$RunnableAdapter@378fd1ac[Wrapped task = MyRunnable2{id=6}]], java.util.concurrent.FutureTask@37a71e93[Not completed, task = java.util.concurrent.Executors$RunnableAdapter@6e2c634b[Wrapped task = MyRunnable2{id=7}]], java.util.concurrent.FutureTask@7c3df479[Not completed, task = java.util.concurrent.Executors$RunnableAdapter@7e6cbb7a[Wrapped task = MyRunnable2{id=8}]], java.util.concurrent.FutureTask@7eda2dbb[Not completed, task = java.util.concurrent.Executors$RunnableAdapter@7106e68e[Wrapped task = MyRunnable2{id=9}]], java.util.concurrent.FutureTask@76fb509a[Not completed, task = java.util.concurrent.Executors$RunnableAdapter@6576fe71[Wrapped task = MyRunnable2{id=10}]]]

pool-1-thread-1执行了任务1
线程1在shutdownNow命令发起后,需要停下所有正在执行和等待的任务。 |
| 2.shutdown |
public class TestShutDownThreadPool {
    public static void main(String[] args) {
        test8();
    }

    // 自定义线程
    private static void test8() {
        //1.使用工厂类,获取线程池对象
        ExecutorService es = Executors.newSingleThreadExecutor(new ThreadFactory() {
            int num = 1;
            @Override
            public Thread newThread(Runnable r) {
                return new Thread(r,"自定义线程"+(num++));
            }
        });
        //2.提交任务
        for(int i=1;i<=10;i++){
            es.submit(new MyRunnable2(i));
        }
        //3.关闭线程池,如果线程池中还有缓存的任务没有执行,则继续执行。
        es.shutdown();
    }
}
|
自定义线程1执行了任务1
自定义线程1执行了任务2
自定义线程1执行了任务3
自定义线程1执行了任务4
自定义线程1执行了任务5
自定义线程1执行了任务6
自定义线程1执行了任务7
自定义线程1执行了任务8
自定义线程1执行了任务9
自定义线程1执行了任务10
线程1在shutdown命令发起后已经缓存了所有的任务,需要继续执行。 |
3.5 线程池异常处理
在使用线程池处理任务的时候,任务代码可能抛出RuntimeException,抛出异常后,线程池可能捕获它,也可能创建一个新的线程来代替异常的线程,我们可能无法感知任务出现了异常,因此我们需要考虑线程池异常情况。
3.5.1 try-catch捕获异常
import java.util.concurrent.ExecutorService;
import java.util.concurrent.Executors;

/**
 * 功能描述:用try-catch捕获线程池的异常
 *
 * 在使用线程池处理任务的时候,任务代码可能抛出RuntimeException,抛出异常后,线程池可能捕获它,
 * 也可能创建一个新的线程来代替异常的线程,我们可能无法感知任务出现了异常,因此我们需要考虑线程池异常情况。
 *
 * @author nxf
 * @since 2020-06-10
 */
class TryCatchThreadPool {
    public static void main(String[] args) {
        //1.使用工厂类,获取线程池对象
        ExecutorService threadPool = Executors.newFixedThreadPool(5);
        //2.提交任务
        for(int i=1;i<=10;i++){
            threadPool.submit(() -> {
                System.out.println("current thread name" + Thread.currentThread().getName());
                try{
                    Object object = null;
                    System.out.print("result## "+object.toString());
                }catch(Exception e){
                    System.out.println("出现异常!");
                }
            });
        }
    }
}
|
出现异常! 出现异常! 出现异常! 出现异常! 出现异常! current thread namepool-1-thread-2 current thread namepool-1-thread-3 current thread namepool-1-thread-4 current thread namepool-1-thread-1 出现异常! 出现异常! current thread namepool-1-thread-5 出现异常! 出现异常! 出现异常! |
3.5.2 submit执行,Future.get接受异常
import java.util.concurrent.ExecutorService;
import java.util.concurrent.Executors;
import java.util.concurrent.Future;

/**
 * 功能描述:用Future的get方法捕获线程池创建的异常
 *
 * @author n00568290
 * @since 2020-06-10
 */
class FutureGetThreadPool {
    public static void main(String[] args) {
        //1.使用工厂类,获取线程池对象
        ExecutorService threadPool = Executors.newFixedThreadPool(5);
        //2.提交任务,用Future对象的get方法处理异常
        for (int i=0; i<5; i++){
            Future future = threadPool.submit(()->{
                System.out.println("current thread name" + Thread.currentThread().getName());
                Object object = null;
                System.out.println("result #" + object.toString());
            });
            try{
                future.get();
            }catch (Exception e){
                System.out.println("出现异常!!!");
            }
        }
    }
}
|
current thread namepool-1-thread-1 出现异常!!! current thread namepool-1-thread-2 出现异常!!! current thread namepool-1-thread-3 出现异常!!! current thread namepool-1-thread-4 出现异常!!! current thread namepool-1-thread-5 出现异常!!! |
3.5.3 重写ThreadPoolExecutor.afterExecute方法,处理传递的异常应用
jdk的demo
class ExtendedExecutor extends ThreadPoolExecutor {
    // 这可是jdk文档里面给的例子。。
    protected void afterExecute(Runnable r, Throwable t) {
        super.afterExecute(r, t);
        if (t == null && r instanceof Future<?>) {
            try {
                Object result = ((Future<?>) r).get();
            } catch (CancellationException ce) {
                t = ce;
            } catch (ExecutionException ee) {
                t = ee.getCause();
            } catch (InterruptedException ie) {
                Thread.currentThread().interrupt(); // ignore/reset
            }
        }
        if (t != null)
            System.out.println(t);
    }
}}
3.5.4 实例化时传入ThreadFactory,设置Thread.UncaughtExceptionHandler处理未检测的异常。
为工作者线程设置UncaughtExceptionHandler,在uncaughtException方法中处理异常。
class UncaughtExceptionHandlerThreadPool {
    public static void main(String[] args) {
        ExecutorService threadPool = Executors.newFixedThreadPool(1, r -> {
            Thread t = new Thread(r);
            t.setUncaughtExceptionHandler(
                    (t1, e) -> {
                        System.out.println(t1.getName() + "线程抛出的异常"+e);
                    });
            return t;
        });
        threadPool.execute(()->{
            Object object = null;
            System.out.print("result## " + object.toString());
        });
    }
}
|
Thread-0线程抛出的异常java.lang.NullPointerException |
三、一些疑问
1.实现Runnable接口和Callable接口的区别
Runnable自Java 1.0以来一直存在,但Callable仅在Java 1.5中引入,目的就是为了来处理Runnable不支持的用例。Runnable 接口不会返回结果或抛出检查异常,但是Callable 接口可以。所以,如果任务不需要返回结果或抛出异常推荐使用 Runnable 接口,这样代码看起来会更加简洁。
工具类 Executors 可以实现 Runnable 对象和 Callable 对象之间的相互转换。
Executors.callable(Runnable task)
或
Executors.callable(Runnable task,Object resule))
Runnable.java
@FunctionalInterface
public interface Runnable {
   /**
    * 被线程执行,没有返回值也无法抛出异常
    */
    public abstract void run();
}
Callable.java
@FunctionalInterface
public interface Callable<V> {
    /**
     * 计算结果,或在无法这样做时抛出异常。
     * @return 计算得出的结果
     * @throws 如果无法计算结果,则抛出异常
     */
    V call() throws Exception;
}
2.执行execute()方法和submit()方法的区别
- execute()方法用于提交不需要返回值的任务,所以无法判断任务是否被线程池执行成功与否;
- submit()方法用于提交需要返回值的任务。线程池会返回一个 Future 类型的对象,通过这个 Future 对象可以判断任务是否执行成功,并且可以通过 Future 的 get()方法来获取返回值,get()方法会阻塞当前线程直到任务完成,而使用 get(long timeout,TimeUnit unit)方法则会阻塞当前线程一段时间后立即返回,这时候有可能任务没有执行完。
以AbstractExecutorService接口中的一个 submit 方法为例子来看看源代码:
public Future<?> submit(Runnable task) {
        if (task == null) throw new NullPointerException();
        RunnableFuture<Void> ftask = newTaskFor(task, null);
        execute(ftask);
        return ftask;
}
上面方法调用的 newTaskFor 方法返回了一个 FutureTask 对象。
protected <T> RunnableFuture<T> newTaskFor(Runnable runnable, T value) {
       return new FutureTask<T>(runnable, value);
}
execute()方法:
public void execute(Runnable command) {
      ...
}
参考文献:
【1】ThreadPoolExecutor_Java API中文文档 - itmyhome(http://itmyhome.com)
【3】Java线程池深入浅出
【4】JavaGuide/java线程池学习总结.md at master · Snailclimb/JavaGuide