本节引言:
上节中我们对Android涉及的网络编程进行了了解,也学习了下Http的基本概念,而本节我们 要学习的是Http的请求头与响应头,当然,可以把也可以把这节看作文档,用到的时候来查查 即可!
1.HTTP请求之消息头:
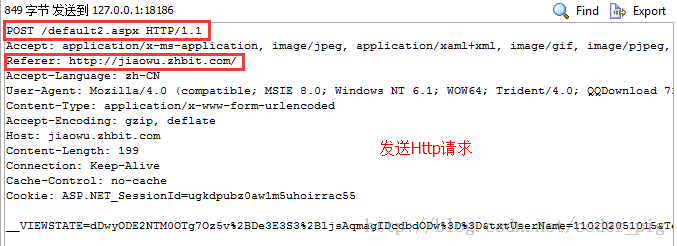
根据下面给出的表,大家自己感受一下相关相关请求头的作用吧:PS:第一行是请求行:请求方式+资源名称 + HTTP协议版本号,另外请求只是给服务端的一个信息而已或者说一个简单的,至于怎么处理还是由服务端来决定的!

HTTP Request Header请求头信息对照表:
|
Header | 解释 | 示例 |
|---|---|---|
| Accept | 指定客户端能够接收的内容类型 | Accept: text/plain, text/html |
| Accept-Charset | 浏览器可以接受的字符编码集。 | Accept-Charset: iso-8859-5 |
| Accept-Encoding | 指定浏览器可以支持的web服务器返回内容压缩编码类型。 | Accept-Encoding: compress, gzip |
| Accept-Language | 浏览器可接受的语言 | Accept-Language: en,zh |
| Accept-Ranges | 可以请求网页实体的一个或者多个子范围字段 | Accept-Ranges: bytes |
| Authorization | HTTP授权的授权证书 | Authorization: Basic QWxhZGRpbjpvcGVuIHNlc2FtZQ== |
| Cache-Control | 指定请求和响应遵循的缓存机制 | Cache-Control: no-cache |
| Connection | 表示是否需要持久连接。(HTTP 1.1默认进行持久连接) | Connection: close |
| Cookie | HTTP请求发送时,会把保存在该请求域名下的所有cookie值一起发送给web服务器。 | Cookie: $Version=1; Skin=new; |
| Content-Length | 请求的内容长度 | Content-Length: 348 |
| Content-Type | 请求的与实体对应的MIME信息 | Content-Type: application/x-www-form-urlencoded |
| Date | 请求发送的日期和时间 | Date: Tue, 15 Nov 2010 08:12:31 GMT |
| Expect | 请求的特定的服务器行为 | Expect: 100-continue |
| From | 发出请求的用户的Email | From: user@email.com |
| Host | 指定请求的服务器的域名和端口号 | Host: www.zcmhi.com |
| If-Match | 只有请求内容与实体相匹配才有效 | If-Match: "737060cd8c284d8af7ad3082f209582d" |
| If-Modified-Since | 如果请求的部分在指定时间之后被修改则请求成功,未被修改则返回304代码 | If-Modified-Since: Sat, 29 Oct 2010 19:43:31 GMT |
| If-None-Match | 如果内容未改变返回304代码,参数为服务器先前发送的Etag,与服务器回应的Etag比较判断是否改变 | If-None-Match: "737060cd8c284d8af7ad3082f209582d" |
| If-Range | 如果实体未改变,服务器发送客户端丢失的部分,否则发送整个实体。参数也为Etag | If-Range: "737060cd8c284d8af7ad3082f209582d" |
| If-Unmodified-Since | 只在实体在指定时间之后未被修改才请求成功 | If-Unmodified-Since: Sat, 29 Oct 2010 19:43:31 GMT |
| Max-Forwards | 限制信息通过代理和网关传送的时间 | Max-Forwards: 10 |
| Pragma | 用来包含实现特定的指令 | Pragma: no-cache |
| Proxy-Authorization | 连接到代理的授权证书 | Proxy-Authorization: Basic QWxhZGRpbjpvcGVuIHNlc2FtZQ== |
| Range | 只请求实体的一部分,指定范围 | Range: bytes=500-999 |
| Referer | 先前网页的地址,当前请求网页紧随其后,即来路 | Referer: http://blog.csdn.net/coder_pig |
| TE | 客户端愿意接受的传输编码,并通知服务器接受接受尾加头信息 | TE: trailers,deflate;q=0.5 |
| Upgrade | 向服务器指定某种传输协议以便服务器进行转换(如果支持) | Upgrade: HTTP/2.0, SHTTP/1.3, IRC/6.9, RTA/x11 |
| User-Agent | User-Agent的内容包含发出请求的用户信息 | User-Agent: Mozilla/5.0 (Linux; X11) |
| Via | 通知中间网关或代理服务器地址,通信协议 | Via: 1.0 fred, 1.1 nowhere.com (Apache/1.1) |
| Warning | 关于消息实体的警告信息 | Warn: 199 Miscellaneous warning |
2.HTTP响应之响应头:
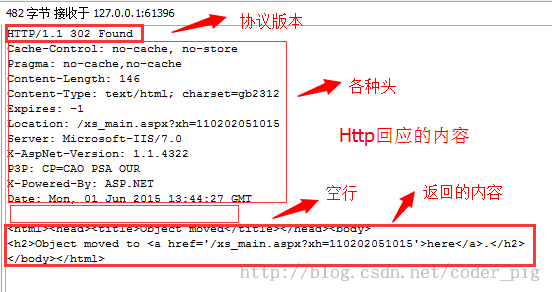
如下图:PS:第一行依次是:协议版本号 状态码 302表示这里没有,但是另外一个地方有,通过Location页面重定向了

HTTP Responses Header 响应头信息对照表:
| Header | 解释 | 示例 |
|---|---|---|
|
Accept-Ranges |
表明服务器是否支持指定范围请求及哪种类型的分段请求 | Accept-Ranges: bytes |
| Age | 从原始服务器到代理缓存形成的估算时间(以秒计,非负) | Age: 12 |
| Allow | 对某网络资源的有效的请求行为,不允许则返回405 | Allow: GET, HEAD |
| Cache-Control | 告诉所有的缓存机制是否可以缓存及哪种类型 | Cache-Control: no-cache |
| Content-Encoding | web服务器支持的返回内容压缩编码类型 | Content-Encoding: gzip |
| Content-Language | 响应体的语言 | Content-Language: en,zh |
| Content-Length | 响应体的长度 | Content-Length: 348 |
| Content-Location | 请求资源可替代的备用的另一地址 | Content-Location: /index.htm |
| Content-MD5 | 返回资源的MD5校验值 | Content-MD5: Q2hlY2sgSW50ZWdyaXR5IQ== |
| Content-Range | 在整个返回体中本部分的字节位置 | Content-Range: bytes 21010-47021/47022 |
| Content-Type | 返回内容的MIME类型 | Content-Type: text/html; charset=utf-8 |
| Date | 原始服务器消息发出的时间 | Date: Tue, 15 Nov 2010 08:12:31 GMT |
| ETag | 请求变量的实体标签的当前值 | ETag: "737060cd8c284d8af7ad3082f209582d" |
| Expires | 响应过期的日期和时间 | Expires: Thu, 01 Dec 2010 16:00:00 GMT |
| Last-Modified | 请求资源的最后修改时间 | Last-Modified: Tue, 15 Nov 2010 12:45:26 GMT |
| Location | 用来重定向接收方到非请求URL的位置来完成请求或标识新的资源 | Location: http://blog.csdn.net/coder_pig |
| Pragma | 包括实现特定的指令,它可应用到响应链上的任何接收方 | Pragma: no-cache |
| Proxy-Authenticate | 它指出认证方案和可应用到代理的该URL上的参数 | Proxy-Authenticate: Basic |
3.代码验证响应头的作用:
好了,看了那么多的概念,不动动手怎么行呢,是吧,那我们就写一些简单的代码来验证一些 常用的响应头的作用吧,以便加深我们的了解,这里的话服务端就用最简单的Servlet来实现,如果不会 Java Web的朋友只需将代码拷一拷,配置下web.xml,把Servlet的类名扣上,比如:
<servlet>
    <servlet-name>FirstServlet</servlet-name>
    <servlet-class>com.jay.server.FirstServlet</servlet-class>
</servlet>
<servlet-mapping>
    <servlet-name>FirstServlet</servlet-name>
    <url-pattern>/FirstServlet</url-pattern>
</servlet-mapping>


改成对应的类名即可
1)通过Location实现页面重定向
实现代码:
package com.jay.http.test;

import java.io.IOException;
import javax.servlet.ServletException;
import javax.servlet.http.HttpServlet;
import javax.servlet.http.HttpServletRequest;
import javax.servlet.http.HttpServletResponse;

public class ServletOne extends HttpServlet {
    @Override
    protected void doGet(HttpServletRequest req, HttpServletResponse resp)
            throws ServletException, IOException {
        //告诉浏览器响应码,以及重定向页面
        resp.setStatus(302);
        resp.setHeader("Location", "http://www.baidu.com");
    }
    @Override
    protected void doPost(HttpServletRequest req, HttpServletResponse resp)
            throws ServletException, IOException {
        this.doGet(req, resp);
    }
}
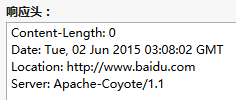
运行结果:当我们去访问:http://localhost:8080/HttpTest/ServletOne的时候,我们会发现页面跳转到了百度, 接着我们用FireFox的开发者工具:可以看到我们发出的HTTP的内容:

2)通过Content-Encoding告诉浏览器数据的压缩格式
实现代码:
package com.jay.http.test;

import java.io.ByteArrayOutputStream;
import java.io.IOException;
import java.util.zip.GZIPOutputStream;
import javax.servlet.ServletException;
import javax.servlet.http.HttpServlet;
import javax.servlet.http.HttpServletRequest;
import javax.servlet.http.HttpServletResponse;

public class ServletTwo extends HttpServlet {
    @Override
    protected void doGet(HttpServletRequest req, HttpServletResponse resp)
            throws ServletException, IOException {
        String data = "Fresh air and sunshine can have an amazing effect on our feelings. "
                + "Sometimes when we are feeling down, all that we need to do is simply to go "
                + "outside and breathe. Movement and exercise is also a fantastic way to feel better. "
                + "Positive emotions can be generated by motion. So if we start to feel down,"
                + " take some deep breathes, go outside, feel the fresh air, "
                + "let the sun hit our face, go for a hike, a walk, a bike ride, "
                + "a swim, a run, whatever. We will feel better if we do this.";
        System.out.println("原始数据长度:" + data.getBytes().length);
        // 对数据进行压缩:
        ByteArrayOutputStream bout = new ByteArrayOutputStream();
        GZIPOutputStream gout = new GZIPOutputStream(bout);
        gout.write(data.getBytes());
        gout.close();
        // 得到压缩后的数据
        byte gdata[] = bout.toByteArray();
        resp.setHeader("Content-Encoding", "gzip");
        resp.setHeader("Content-Length", gdata.length + "");
        resp.getOutputStream().write(gdata);

    }
    protected void doPost(HttpServletRequest req, HttpServletResponse resp)
            throws ServletException, IOException {
        doGet(req, resp);
    };
}
运行结果:
控制台输出:

浏览器输出:
再看看我们的HTTP内容:


这个gzip压缩字符串对于简单的字符串压缩,效率不高,比如小猪本来写的是一个一首静夜诗的字符串, 后来发现压缩过后的大小,竟然比原先的还要大=-=...
3)通过content-type,设置返回的数据类型
服务端返回的有时可能是一个text/html,有时也可能是一个image/jpeg,又或者是一段视频video/avi 浏览器可以根据这个对应的数据类型,然后以不同的方式将数据显示出来!好吧,这里我们弄一个读PDF的
实现代码:
package com.jay.http.test;

import java.io.IOException;
import java.io.InputStream;
import java.io.OutputStream;

import javax.servlet.ServletException;
import javax.servlet.http.HttpServlet;
import javax.servlet.http.HttpServletRequest;
import javax.servlet.http.HttpServletResponse;

public class ServletThree extends HttpServlet {
    @Override
    protected void doGet(HttpServletRequest req, HttpServletResponse resp)
            throws ServletException, IOException {
        resp.setHeader("content-type", "application/pdf");
        InputStream in = this.getServletContext().getResourceAsStream("/file/android编码规范.pdf");
        byte buffer[] = new byte[1024];
        int len = 0;
        OutputStream out = resp.getOutputStream();
        while((len = in.read(buffer)) > 0)
        {
            out.write(buffer,0,len);
        }
    }

    protected void doPost(HttpServletRequest req, HttpServletResponse resp) throws
       ServletException ,IOException
    {
        doGet(req, resp);
    };
}
运行结果:
在浏览器上输入:http://localhost:8080/HttpTest/ServletThree
好哒,果然可以读到PDF了,对了,这个PDF我已经丢在webroot的file目录下,不然会报空指针哦~:
当然,你也可以试着去播放一段音乐或者视频,只需修改下content-type这个参数而已
下面顺便给出个HTTP Content-type的对照表吧: HTTP Content-type的对照表
Android代码的规范
4)通过refresh响应头,让浏览器隔几秒后跳转至别的页面
一般我们可能有这样的需求,比如每隔几秒刷新一次页面,又或者加载某个页面几秒后 又跳转至另一个页面,那么refresh可以满足你的需要~
实现代码:
package com.jay.http.test;

import java.io.IOException;

import javax.servlet.ServletException;
import javax.servlet.http.HttpServlet;
import javax.servlet.http.HttpServletRequest;
import javax.servlet.http.HttpServletResponse;

public class ServletFour extends HttpServlet {
    public int second = 0;
    @Override
    protected void doGet(HttpServletRequest req, HttpServletResponse resp)
            throws ServletException, IOException {
        //1.浏览器每隔2秒定时刷新页面
//        resp.setHeader("refresh", "2");
//        resp.getWriter().write(++second + "");
//        System.out.println("doGet方法被调用~");

        //2.进入页面5s后,然页跳到百度~
        resp.setHeader("refresh", "5;url='http://www.baidu.com'");
        resp.getWriter().write("HE HE DA~");
    }

    protected void doPost(HttpServletRequest req, HttpServletResponse resp) throws ServletException ,IOException
    {
        doGet(req, resp);
    };
}
运行的结果:
1的话每隔2秒刷新一次页面,我们可以看到显示的数字是递增的,另外doGet方法也一直被调用, 说明页面真的是刷新的!
2的话进入页面后5s,就自己跳转到百度了~
5)通过content-dispostion响应头,让浏览器下载文件
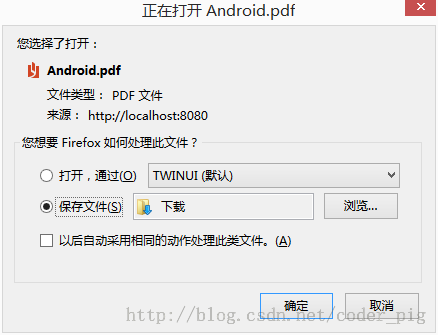
这个很简单,我们只需把③中设置Content-type的一行去掉,然后加上: resp.setHeader("content-disposition", "attachment;filename=Android.pdf");
实现代码:
package com.jay.http.test;

import java.io.IOException;
import java.io.InputStream;
import java.io.OutputStream;

import javax.servlet.ServletException;
import javax.servlet.http.HttpServlet;
import javax.servlet.http.HttpServletRequest;
import javax.servlet.http.HttpServletResponse;

public class ServletFive extends HttpServlet {

    @Override
    protected void doGet(HttpServletRequest req, HttpServletResponse resp)
            throws ServletException, IOException {
        resp.setHeader("content-disposition", "attachment;filename=Android.pdf");
        InputStream in = this.getServletContext().getResourceAsStream("/file/android编码规范.pdf");
        byte buffer[] = new byte[1024];
        int len = 0;
        OutputStream out = resp.getOutputStream();
        while((len = in.read(buffer)) > 0)
        {
            out.write(buffer,0,len);
        }
    }

    @Override
    protected void doPost(HttpServletRequest req, HttpServletResponse resp)
            throws ServletException, IOException {
        doGet(req, resp);
    }
}
运行结果:

本节小结:
本节给大家介绍了Http中的请求头和响应头,也写了几个关于响应头调浏览器的一些示例, 相信经过本章,大家对于Http协议更加了解了,下节我们来学习Android给我们提供的Http 请求方式:HttpURLConnection!好的,本节就到这里,谢谢~ 对了,本节demo下载:下载 HttpTest.zip