Smarty模板引擎技术
内建函数
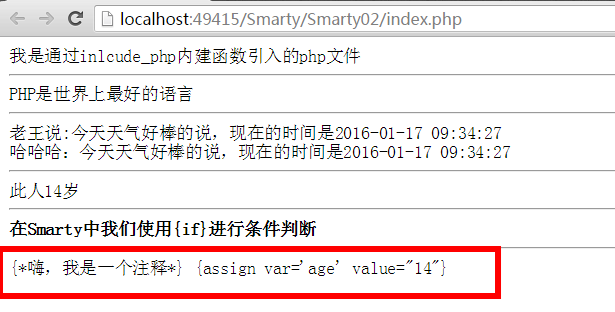
include_php内建函数
作用:载入一个php文件,将载入的文件的内容赋值给一个变量
注意:该内建函数只能在2.0中使用,如果使用的话,必须得实例化SmartyBC.class.php
示例代码:
Index.php
include 'Smarty/SmartyBC.class.php';
//实例化Smarty类
$Smarty = new SmartyBC();
$Smarty->assign('name','小明');
$Smarty->display('index.tpl');
index.tpl
{*include_php内建函数*}
{include_php file="date.php" assign="date"}
{$date}
insert内建函数
作用:当Smarty内置的功能不够使用时,可以通过insert内建函数拓展功能。
基本语法:index.php文件中创建一个
insert_自定义函数名($arg){
echo $arg[模板中定义的变量]
}
Index.tpl文件
{insert name=自定义函数名称 自定义参数… }
示例代码:
Index.php
function insert_func($arg){
echo $arg['title'];
}
function insert_date($arg){
echo $arg['say']."今天天气好棒的说,现在的时间是".date('Y-m-d H:i:s',time());
echo '<br>';
echo $arg['zhangsan']."今天天气好棒的说,现在的时间是".date('Y-m-d H:i:s',time());
}
index.tpl模板
{insert name="func" title='PHP是世界上最好的语言'}
<hr>
{insert name="date" say='老王说:' zhangsan='哈哈哈:'}
if elseif else内建函数
示例代码:
{if $age >= 18}
此人非未成年
{elseif $age == '14'}
此人14岁
{else}
此人是未成年
{/if}
ldelim或rdelim内建函数
示例代码:
<b>在Smarty中我们使用{ldelim}if{rdelim}进行条件判断</b>
literal内建函数
作用:在该标签中的任何内容都不会受Smarty模板引擎解析
示例代码:
{literal}
{*嗨,我是一个注释*}
{assign var='age' value="14"}
{/literal}
运行效果:
php内建函数
作用:在该标签中可以使用原生的PHP代码。
示例代码:
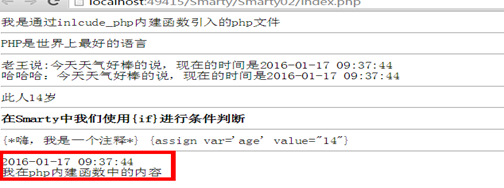
{*PHP内建函数*}
{php}
echo date('Y-m-d h:i:s',time());
echo '<br>';
echo "我在php内建函数中的内容";
{/php}
运行效果:
7、strip内建函数
作用:去除空格符和换行符
示例代码:
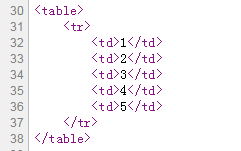
{strip}
<table>
<tr>
<td>1</td>
<td>2</td>
<td>3</td>
<td>4</td>
<td>5</td>
</tr>
</table>
{/strip}
使用前:
使用后:

8、section、sectionelse内建函数(二维数组,)
作用:遍历数组
基本用法:
{section loop=$arr name="index"}
{$arr[index]}
<br>
{/section}
参数详解:loop 要遍历数组
Name 当前循环的索引
拓展使用1:使用start step max
{section loop=$arr1 name="index" start="0" step="1" max="5"}
{$arr1[index]}
<br>
{/section}
- 参数详解:start 循环的起始索引
Step 每次循环增加的数量
Max 最大的循环次数
拓展使用2:sectionelse
作用:判断循环的数组是否为空,如果为空的话,则执行后面的内容。
实例代码:
{*section内建函数*}
{section loop=$arr1 name="index" start="0" step="1" max="5"}
{$arr1[index]}
<br>
{sectionelse}
<b>):没有数组或者数组为空</b>
{/section}
- 遍历二维数组
实例代码:
Index.php
$arr3 = array(array('name'=>'小明','age'=>25,'sex'=>'未知'),
array('name'=>'老王','age'=>26,'sex'=>'男'),
array('name'=>'老李','age'=>27,'sex'=>'你猜')
);
Index.tpl
{section loop=$arr3 name="index" }
{$arr3[index]['name']} |
{$arr3[index]['age']} |
{$arr3[index]['sex']} |
<hr/>
{/section}
运行效果:
 拓展内容:
拓展内容:
当前索引: {$smarty.section.index.index} ->>
当前索引的前一个:{$smarty.section.index.index_prev}->>
当前索引的下一个:{$smarty.section.index.index_next}->>
当前所循环的次数
								{$smarty.section.index.iteration}->>
判断当前是否第一次: {$smarty.section.index.first}->>
判断当前是否最后一次:{$smarty.section.index.last}->>
循环的总次数:{$smarty.section.index.total}->>
运行效果: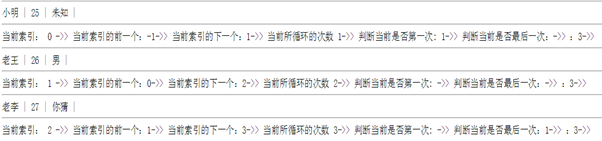
自定义函数
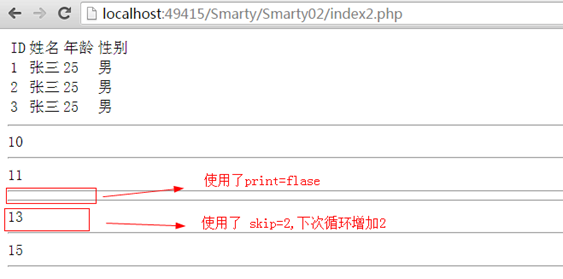
counter计数器
示例代码:
{counter start='10' }
<hr>
{counter}
<hr>
{counter print=false}
<hr>
{counter skip=2}
<hr>
{counter}
<hr>
运行效果:
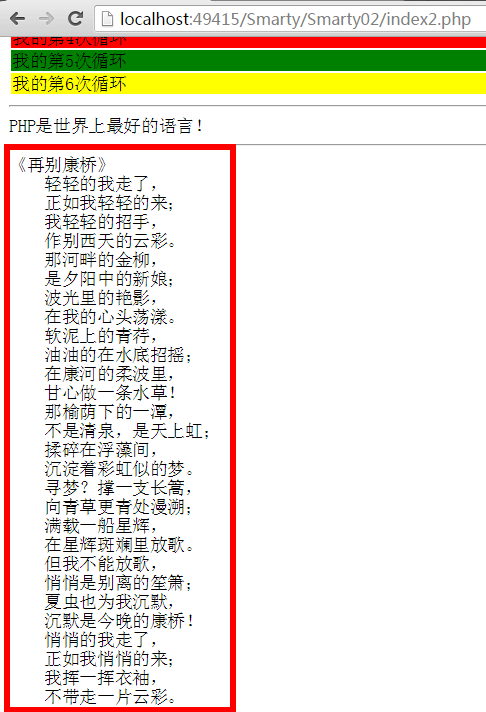
cycle轮换函数
基本语法:{cycle values=参数1,参数2,参数3}
示例代码:
{*cycle实现各行换色*}
<hr>
<table width="100%">
<tr style="background-color: {cycle values="red,green,yellow"}">
<td>我的第{counter start='1' skip='1'}次循环</td>
</tr>
<tr style="background-color: {cycle values="red,green,yellow"}">
<td>我的第{counter}次循环</td>
</tr>
<tr style="background-color: {cycle values="red,green,yellow"}">
<td>我的第{counter}次循环</td>
</tr>
<tr style="background-color: {cycle values="red,green,yellow"}">
<td>我的第{counter}次循环</td>
</tr>
<tr style="background-color: {cycle values="red,green,yellow"}">
<td>我的第{counter}次循环</td>
</tr>
<tr style="background-color: {cycle values="red,green,yellow"}">
<td>我的第{counter}次循环</td>
</tr>
</table>
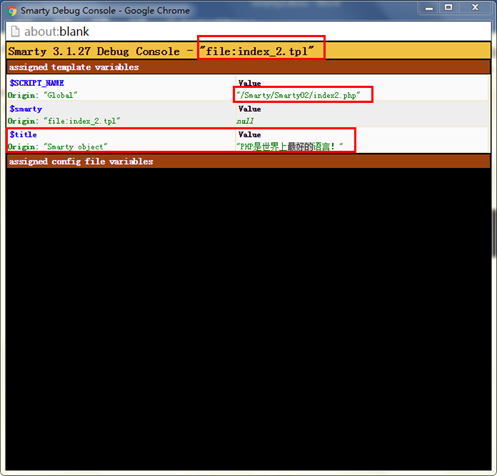
debug调试函数
{debug}
运行效果:
fetch函数
作用:捕获一个文件的内容,然后赋值给一个变量
示例代码:
{fetch file="shi.txt" assign="text"}
{fetch file="date.php" assign="php"}
{*变量调节器
{$text|变量调节器名称:参数1:参数2}
*}
{$php}
<hr>
{$text|nl2br}
运行效果:
html_image自定义函数
{html_image file="1.jpg"}
参数:file 图片资源的路径
运行效果:

html_table自定义函数
作用:生成一个表格,将数据遍历进去
示例代码:
{html_table loop=$arr cols="3"}
参数说明:loop 要循环遍历的数组
Cols 指定表格列数
html_checkboxes自定义函数
作用:生成一组多选框
示例代码:
{html_checkboxes name = 'job'
values = $arr
checked = $arr2
output = $arr3
separator = "|"
}
参数说明: name 对应多选框中的name属性
Values 对应多选框中你的value属性
Checked 选中指定的多选框
Output 控制文本内容
Separator 连接符
运行效果:
{待补充}
html_options自定义函数
示例代码:
<select style=" 100%;">

														{html_options values    =   $arr
                  selected  =   'GO'

																				output    =   $arr3
    }
</select>
参数说明:values 下拉框选项的值
Selected 指定被选中的下拉选项,注意:必须和value的值对应
Output 输出的文本
9、html_radios自定义函数
示例代码:
{html_radios values     =   $arr
             checked    =   'nodejs'

											output     =   $arr3
             separator  =   "|"
}
参数说明:values 单选框的值
Checked 指定默认被选中的单选框
Output 输出的文本
Separator 连接符
运行效果:
{待补充}
综合应用
实例代码:
{section loop=$arr4 name="index" }
{html_image file="./img/{$arr4[index]}.jpg"}
<hr>
{/section}
程序篇
常量
SMARTY_DIR
变量
- $template_dir 模板目录 默认是:templates
- $compile_dir 编译目录 默认是:templates_c
- $config_dir 配置目录 默认:configs
- $cache_dir 缓存目录 默认:cache
- $left_delimiter 左定界符 默认:{
- $right_delimiter 右定界符 默认:}
以上变量都有默认行为。
- $caching 是否开启缓存
- $cache_lifetime 缓存的生命周期:默认3600s
- $debugging 开启调试模板
- $php_handling 是否允许在模板中引入php
3、常用方法
- assign 向模板中传递变量
- assignByRef 分配变量到模板文件(按引用传递)
- append 追加变量
$Smarty->append('var1','小明');
$Smarty->append('var1','25');
$Smarty->append('var1','男');
- appendByRef追加不同的数据到模板的数组变量中(按引用传递)
- clearAllAssign 清除模板中所有变量
$Smarty->clearAllAssign(); //清除所有模板变量
- clearAssign 清除指定的变量
$Smarty->clearAssign('title');
- clearCache 清除缓存
- configLoad 配置加载
$Smarty->configLoad('config.conf','class2');
- clearConfig 清除配置内容
$Smarty->clearConfig('name');
- display 指定渲染模板
$Smarty->display('index_3.tpl');
加载模板文件
渲染模板
显示模板
- fetch 捕获模板但是不输出
加载模板文件
渲染(将标签替换为php代码)模板文件
我们可以通过fetch实现静态技术。
Index_3.php文件
/*
* 如果有静态文件则加载静态文件,如果没有静态生成一个静态文件。
* */
if(!is_file('./html/index_3.html')){
$html = $Smarty->fetch('index_3.tpl');
file_put_contents('./html/index_3.html',$html);
echo '这里是没有静态文件';
include "./html/index_3.html";
}else{
echo '这里是有静态文件';
include "./html/index_3.html";
}
[待补充]
- templateExists 判断模板文件是否存在
if($Smarty->templateExists('index_4.tpl')){
$Smarty->display('index_3.tpl');
}else{
echo '矮油,模板文件不在哦~';
}
补充:如何在smarty模板中读取数组,对象。
- 在模板中获取数组内容:
{*多维数组*}
{$var[0]['name']}
{*一位数组*}
{$var['name']}
- 在模板中获取对象内容
{*获取对象属性*}
{$std->name}
<hr>
{*获取对方法*}
{$person->speak()}
Index3.php文件
$std
= new StdClass();
class person{
function __construct(){}
function speak(){
echo '你猜猜我谁?';
}
}
$person = new person();
$std->name = '张二明';
Smarty模板中的缓存技术
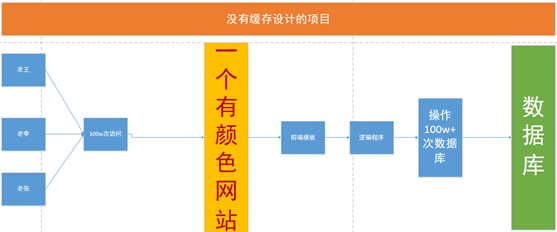
什么是缓存技术
概念:一般在我们项目中,有一部分数据并不是实时更新的,但是,有又必须实时访问。如果不使用缓存技术的话,每访问一次,得查询一次或者多次数据库,那么会给数据造成很高的I/O开销。会增加服务器的压力。
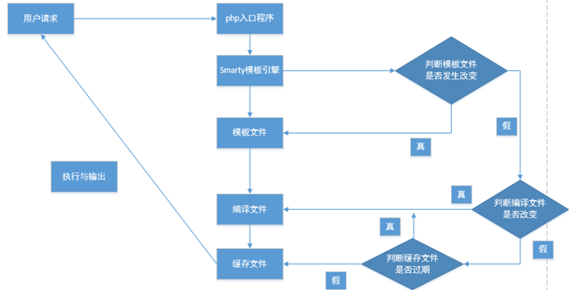
Smarty缓存原理图
用户端缓存原理:
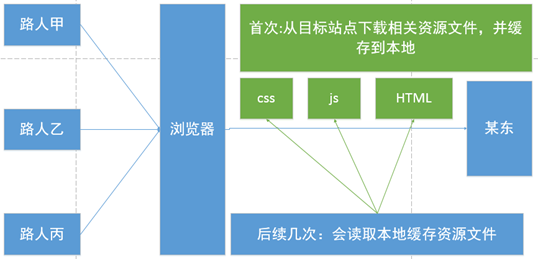
服务器缓存原理:
缓存的开启
//开启缓存
$Smarty->caching = true;
//设置缓存文件的生命周期
$Smarty->cache_lifetime = '7200';
缓存文件从何而来?
缓存文件由编译文件而来。
缓存文件何时变化?
编译文的内容何时变化?
- 当模板文件被修改时会发生变化
- 当缓存不在声明周期内会发生变化(重新生成新缓存文件)
思路:设置一个生命周期只有30秒的缓存文件,定义一个变量,在模板中使用该变量。然后打开index.php.
然后修改该变量的值。等待。。。30
Smarty执行原理图(缓存版)
Smarty缓存相关细节
缓存检测
$Smarty->isCached('index_4.tpl')
- 基本语法:isCached(templatesName); 检测模板文件的缓村文件是否存在
- 参数说明:模板文件名称
清除缓存
//清除所有缓存
$Smarty->clearAllCache();
//清楚某模板缓存文件
$Smarty->clearCache('index_4.tpl');
局部缓存
在Smarty的缓村是全局缓存,如果开启缓存,访问整个页面的数据都会被缓存,如果页面中有一些动态数据需要修改,如何处理?
如何处理页面中动态显示的数据部分呢?
- 通过给assign(模板变量名称,值,设置不缓存)设置不缓存
$Smarty->assign('shige','《再别康桥》',true);
- 在模板文件中通过{nocache}{/nocache}方式设置变量不被缓存
{nocache}
    {$title}
{/nocache}
单页面多缓存
如何解决一个模板文件,动态显示不同的内容。
实际场景:譬如一个电商网站的商品详细页,会动态的根据URL上的参数,改变该页面的内容。
那么这种情况如何实现缓存呢?
http://localhost:63354/Smarty/Smarty02/index5.php?goods_id=1
http://localhost:63354/Smarty/Smarty02/index5.php?goods_id=2
http://localhost:63354/Smarty/Smarty02/index5.php?goods_id=3
http://localhost:63354/Smarty/Smarty02/index5.php?goods_id=250
在Smarty中,我们通过设置display()第二个参数,来实现,单页面,多缓存。
11、缓存集合
http://localhost:63354/Smarty/Smarty02/index5.php?goods_id=1&cate_id=15
http://localhost:63354/Smarty/Smarty02/index5.php?goods_id=1&cate_id=15
http://localhost:63354/Smarty/Smarty02/index5.php?goods_id=1&cate_id=15
http://localhost:63354/Smarty/Smarty02/index5.php?goods_id=1&cate_id=15
我们通过给display()方法设置第二个参数实现缓存集合(通过|分割)
$Smarty->display('index_5.tpl',$_GET['goods_id'].'|'.$_GET['cate_id']);
五、过滤器
示例代码:
//定义一个函数用于字符串替换
function check($tpl_output, $smarty){

													$tpl_output = str_replace('苍井空','张某某',$tpl_output);

											return $tpl_output;
}
//通过注册过滤器,实现模板中的字符串过滤
$Smarty->registerFilter("output","check");
模板继承
通过模板继承实现页面精细化拆分
示例代码:
Parent.tpl文件
{extends file="parent.tpl"}
{block name='content'}

														偶哈呦,哈哈哈哈

							<hr>
{/block}
Child.tpl文件
{extends file="parent.tpl"}
{block name='content'}

														偶哈呦,哈哈哈哈

							<hr>
{/block}