由于 Azure 平台部署的 Linux 虚拟机默认根文件系统容量比较小,客户在使用过程中,经常会出现根文件系统用满,导致虚拟机不可用的情况,需要进行手动对根文件系统进行扩容。
对于使用托管磁盘的虚拟机准备操作:
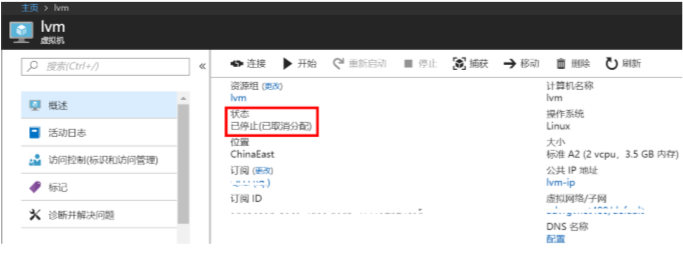
1.首先,关闭虚拟机。请确认虚拟机处于停止分配状态。
2.点击 “磁盘边栏”,选择 OS 磁盘,进入磁盘配置页面。
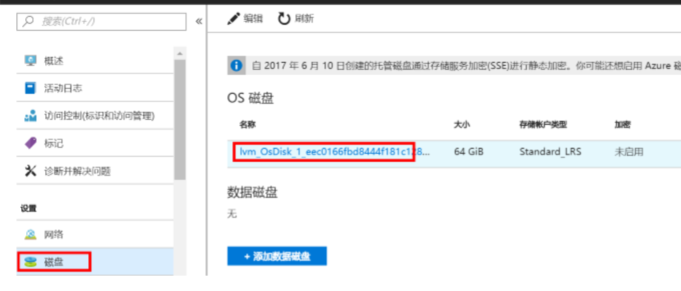
3.更改大小,并点击 “保存”。 Azure 不支持缩减磁盘,您需要输入一个大于当前值的数字。最大值 4096,即 4TB。

更改成功后,回到虚拟机概述页面,点击 “开始” 启动虚拟机。然后通过 SSH 登陆虚拟机进行系统内部的 配置。
对于普通磁盘的前期扩展操作:
1.通过 Azure portal 关闭虚拟机
2.执行一下Powershell 命令,对系统盘进行扩展:
Get-AzureVM -ServiceName "vfldev" -Name "vfldev" | get-AzureOSDisk

## 使用正确的 ServiceName 和 VM Name 取代上述参数。

Update-AzureDisk –DiskName "vfldev-vfldev-0-201503091934500547" -Label "ResiZedOS" -ResizedSizeInGB 100

## 用步骤一获取的 OSdisk 的名字取代上述的 DiskName,并输入想要扩容的磁盘大小
3.通过 Azure portal 启动虚拟机。
4.登陆虚拟机,切换成 root 用户,查看当前的虚拟机的根文件系统容量
在 CentOS 7.x 中,默认根分区是 /dev/sda2,仅需要扩展 /dev/sda2 分区,sda1是boot分区不用操作。
[root@centos-disk-con ~]# df -h
Filesystem      Size  		Used 		Avail 		Use% 	Mounted on
/dev/sda2       100G  		1.3G   		99G   		2% 	/
devtmpfs        2.0G     	0  		2.0G   		0% 	/dev
tmpfs           2.0G     	0  		2.0G   		0% 	/dev/shm
tmpfs           2.0G   		17M  		2.0G   		1% 	/run
tmpfs           2.0G     	0  		2.0G   		0% 	/sys/fs/cgroup
/dev/sda1       497M   		81M  		417M  		17%   /boot
/dev/sdb1        20G   		45M   		19G   		1% 	/mnt/resource
tmpfs           394M     	0  		394M   		0% 	/run/user/1000
5.打开分区表
[root@resizeSDA chpaadmin]# fdisk /dev/sda
Welcome to fdisk (util-linux 2.23.2).

Changes will remain in memory only, until you decide to write them.
Be careful before using the write command.

Command (m for help): p
Disk /dev/sda: 107.4 GB, 107374182400 bytes, 209715200 sectors
Units = sectors of 1 * 512 = 512 bytes
Sector size (logical/physical): 512 bytes / 512 bytes
I/O size (minimum/optimal): 512 bytes / 512 bytes
Disk label type: dos
Disk identifier: 0x000b9d1d

Device Boot Start End Blocks Id System
/dev/sda1 * 2048 1026047 512000 83 Linux
/dev/sda2 1026048 209715199 104344576 83 Linux

## 请记录分区信息
   Device Boot      Start         End      Blocks   Id  System
/dev/sda1   *        2048    62914559    31456256   83  Linux

## 切换为以 sector 作为计算单元
Command (m for help): u
Changing display/entry units to sectors.

## 如果显示为上述内容,则继续下一步,如果显示为:
Command (m for help): u
Changing display/entry units to cylinders (DEPRECATED!).

## 则继续执行 u,切换为sector。

## 删除分区
Command (m for help): d
Selected partition 1
Partition 1 is deleted

## 新建分区
Command (m for help): n
Partition type:
   p   primary (0 primary, 0 extended, 4 free)
   e   extended
Select (default p): p
Partition number (1-4, default 1):
First sector (2048-209715199, default 2048):
Using default value 2048
Last sector, +sectors or +size{K,M,G} (2048-209715199, default 209715199):
Using default value 209715199
Partition 1 of type Linux and of size 100 GiB is set

## 此时修改分区结束,打印分区信息,确认信息无误
Command (m for help): p

Disk /dev/sda: 107.4 GB, 107374182400 bytes, 209715200 sectors
Units = sectors of 1 * 512 = 512 bytes
Sector size (logical/physical): 512 bytes / 512 bytes
I/O size (minimum/optimal): 512 bytes / 512 bytes
Disk label type: dos
Disk identifier: 0x00093e4e

## 注意,这里的 start 的值,必须和此前的分区表里的信息一致
   Device Boot      Start         End      Blocks   Id  System
/dev/sda1            2048   209715199   104856576   83  Linux

## 激活分区
Command (m for help): a
Selected partition 1

## 再次打印分区,确认已激活
Command (m for help): p

Disk /dev/sda: 107.4 GB, 107374182400 bytes, 209715200 sectors
Units = sectors of 1 * 512 = 512 bytes
Sector size (logical/physical): 512 bytes / 512 bytes
I/O size (minimum/optimal): 512 bytes / 512 bytes
Disk label type: dos
Disk identifier: 0x00093e4e

   Device Boot      Start         End      Blocks   Id  System
/dev/sda1   *        2048   209715199   104856576   83  Linux

## 如果信息有误,或者不确定,请及时联系我们,如果信息确认无误,写入分区表
Command (m for help): wr
The partition table has been altered!

Calling ioctl() to re-read partition table.

WARNING: Re-reading the partition table failed with error 16: Device or resource busy.
The kernel still uses the old table. The new table will be used at
the next reboot or after you run partprobe(8) or kpartx(8)
Syncing disks.