Linux软件包管理
- rpm命令管理 https://blog.csdn.net/jiduochou963/article/details/86619233
- yum在线命令 https://blog.csdn.net/jiduochou963/article/details/86653645
- 源码包管理 https://blog.csdn.net/jiduochou963/article/details/86653703
- 脚本安装包 https://blog.csdn.net/jiduochou963/article/details/86655625
四、 脚本安装包
以Nginx为例讲解所谓的脚本安装包。
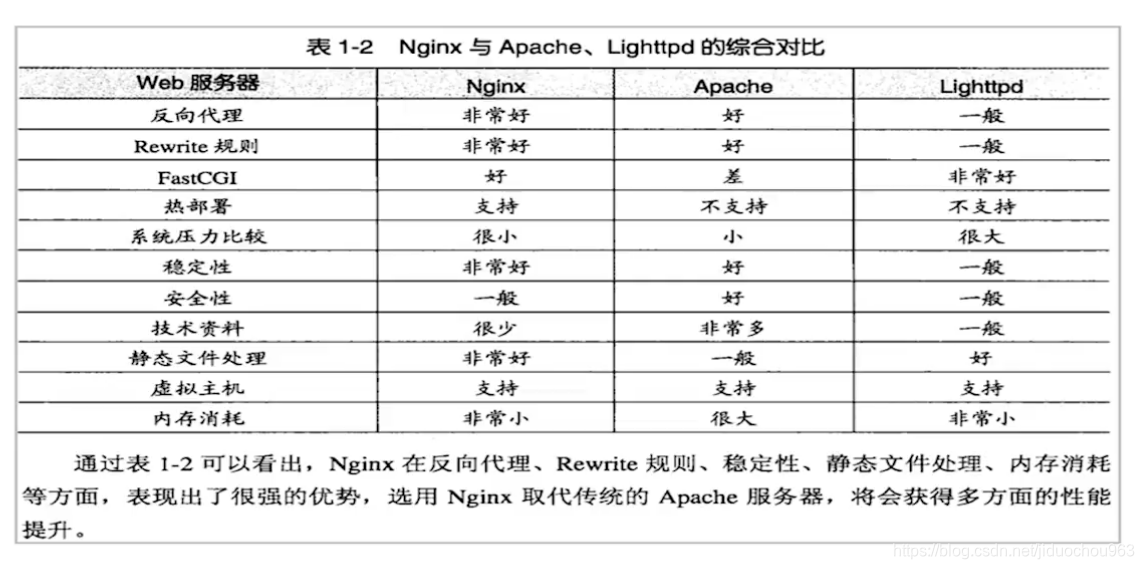
Nginx是一款轻量级的Web服务器/方向代理服务器及电子邮件(IMAP/POP3)代理服务器,由俄国公司在2004年发布。
准备工作
- 关闭RPM包安装的httpd和MySQL
- 保证yum源正常使用
- 关闭SELinux和防火墙(前面测试源码包安装httpd的时候已经关闭了)
[root@localhost ~]# ps aux
USER        PID %CPU %MEM    VSZ   RSS TTY      STAT START   TIME COMMAND
root          1  0.0  0.3 136508  5768 ?        Ss   1月25   0:53 /usr/lib/systemd/systemd --switched-root --system --deserialize 22
root          2  0.0  0.0      0     0 ?        S    1月25   0:00 [kthreadd]
root          3  0.0  0.0      0     0 ?        S    1月25   0:04 [ksoftirqd/0]
...
root      36828  0.0  0.0      0     0 ?        S    20:23   0:00 [kworker/u256:2]
root      50998  0.0  0.0  31700  1768 ?        Ss   21:31   0:00 /usr/local/apache2/bin/httpd -k start
daemon    50999  0.0  0.0  33784  1444 ?        S    21:31   0:00 /usr/local/apache2/bin/httpd -k start
daemon    51000  0.0  0.1  33912  1928 ?        S    21:31   0:00 /usr/local/apache2/bin/httpd -k start
daemon    51001  0.0  0.0  33784  1444 ?        S    21:31   0:00 /usr/local/apache2/bin/httpd -k start
daemon    51002  0.0  0.1  33912  1868 ?        S    21:31   0:00 /usr/local/apache2/bin/httpd -k start
daemon    51003  0.0  0.1  33912  1984 ?        S    21:31   0:00 /usr/local/apache2/bin/httpd -k start
root      51985  0.0  0.0      0     0 ?        S    21:46   0:00 [kworker/u256:1]
daemon    53877  0.0  0.0  33784  1444 ?        S    22:15   0:00 /usr/local/apache2/bin/httpd -k start
daemon    53878  0.0  0.1  33916  1956 ?        S    22:15   0:00 /usr/local/apache2/bin/httpd -k start
daemon    53888  0.0  0.1  33916  1896 ?        S    22:15   0:00 /usr/local/apache2/bin/httpd -k start
daemon    53889  0.0  0.0  33784  1444 ?        S    22:15   0:00 /usr/local/apache2/bin/httpd -k start
daemon    53891  0.0  0.1  33916  1892 ?        S    22:15   0:00 /usr/local/apache2/bin/httpd -k start
root      54764  0.0  0.2 107380  5456 ?        S    22:28   0:00 /sbin/dhclient -d -q -sf /usr/libexec/nm-dhcp-helper -pf /var/run/dhclient-ens33.pid -lf /var/li
root      54838  0.0  0.3 160888  5616 ?        Ss   22:29   0:00 sshd: root@pts/1
root      54843  0.0  0.1 116224  2824 pts/1    Ss   22:29   0:00 -bash
root      56757  0.0  0.0      0     0 ?        R    23:00   0:00 [kworker/0:0]
root      56952  0.0  0.0      0     0 ?        S    23:03   0:00 [kworker/0:2]
root      57239  0.0  0.0      0     0 ?        S    23:08   0:00 [kworker/0:1]
root      57445  0.0  0.0      0     0 ?        S    23:11   0:00 [kworker/0:3]
root      57634  0.0  0.0 107948   352 ?        S    23:14   0:00 sleep 60
root      57658  0.0  0.1 155324  1872 pts/1    R+   23:15   0:00 ps aux
[root@localhost ~]#
#...可以看到,源码包的httpd被启动
#...停止源码包安装的Apache
[root@localhost ~]# /usr/local/apache2/bin/apachectl stop
httpd: Could not reliably determine the server's fully qualified domain name, using localhost.localdomain for ServerName
#...删除Apache
[root@localhost ~]# rm -rf /usr/local/apache2/
#...停止RPM包的httpd
[root@localhost ~]# service httpd stop
Redirecting to /bin/systemctl stop httpd.service
[root@localhost ~]# /bin/systemctl stop httpd.service
#...停止mysqld,其实我并没有安装mysql
[root@localhost ~]# service mysqld stop
Redirecting to /bin/systemctl stop mysqld.service
Failed to stop mysqld.service: Unit mysqld.service not loaded.
[root@localhost ~]# /bin/systemctl stop mysqld.service
Failed to stop mysqld.service: Unit mysqld.service not loaded.
[root@localhost ~]#
#...yum list命令正常执行这说明yum源正常
[root@localhost ~]# yum list
...
#...永久关闭SELinux
#...将SELINUX=enforcing改为SELINUX=disabled
#...保存成功之后要重启计算机
[root@localhost ~]# vi /etc/selinux/config

# This file controls the state of SELinux on the system.
# SELINUX= can take one of these three values:
#     enforcing - SELinux security policy is enforced.
#     permissive - SELinux prints warnings instead of enforcing.
#     disabled - No SELinux policy is loaded.
SELINUX=disabled
# SELINUXTYPE= can take one of three two values:
#     targeted - Targeted processes are protected,
#     minimum - Modification of targeted policy. Only selected processes are protected.
#     mls - Multi Level Security protection.
SELINUXTYPE=targeted

:wq
[root@localhost ~]#
#...重启计算机
[root@localhost ~]# init 0
重启之后:
#...接着上面
[root@localhost ~]# cat /etc/selinux/con
cat: /etc/selinux/con: 没有那个文件或目录
[root@localhost ~]# cat /etc/selinux/config

# This file controls the state of SELinux on the system.
# SELINUX= can take one of these three values:
#     enforcing - SELinux security policy is enforced.
#     permissive - SELinux prints warnings instead of enforcing.
#     disabled - No SELinux policy is loaded.
SELINUX=disabled
# SELINUXTYPE= can take one of three two values:
#     targeted - Targeted processes are protected,
#     minimum - Modification of targeted policy. Only selected processes are protected.
#     mls - Multi Level Security protection.
SELINUXTYPE=targeted


[root@localhost ~]#
脚本一键安装包
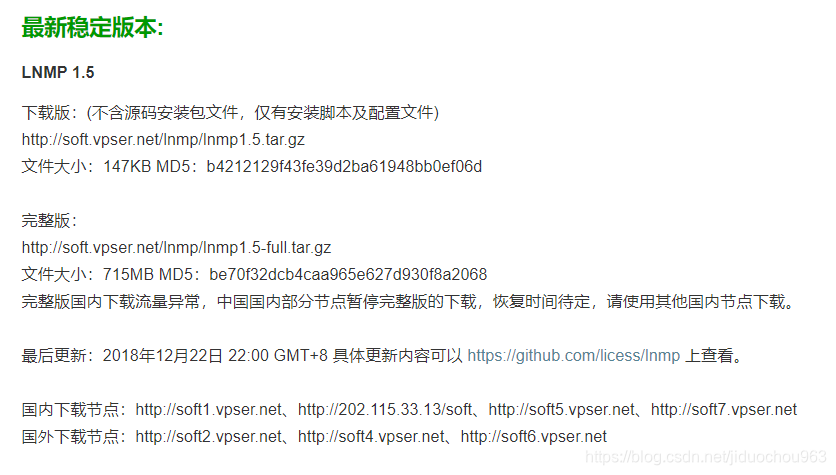
下载一键安装包:https://lnmp.org/download.html
避免国内网速慢需等待好长时间,选择完整版
[root@localhost ~]# cd /usr/local/src/
[root@localhost src]# ls -al
总用量 737908
drwxr-xr-x.  3 root root         80 1月  26 23:40 .
drwxr-xr-x. 12 root root        131 1月  26 23:19 ..
drwxr-xr-x. 12  501 games      4096 1月  25 22:56 httpd-2.2.10
-rwxrw-rw-.  1 root root    6580772 1月  25 21:26 httpd-2.2.10.tar.gz
-rw-r--r--   1 root root  749029788 1月  26 23:41 lnmp1.5-full.tar.gz
[root@localhost src]#
官方安装说明(详细安装过程:https://lnmp.org/install.html):wget http://soft.vpser.net/lnmp/lnmp1.5.tar.gz -cO lnmp1.5.tar.gz && tar zxf lnmp1.5.tar.gz && cd lnmp1.5 && ./install.sh
- 下载:
wget http://soft.vpser.net/lnmp/lnmp1.5.tar.gz -cO lnmp1.5.tar.gz - 解压缩:
tar zxf lnmp1.5.tar.gz - 进入并执行安装:
cd lnmp1.5、./install.sh
install.sh脚本分析
[root@localhost ~]# cd /usr/local/src/lnmp1.5-full/
[root@localhost lnmp1.5-full]# ls -al
总用量 100
drwxr-xr-x  7 root root   251 11月 13 10:05 .
drwxr-xr-x. 4 root root   100 1月  26 23:49 ..
-rwxr-xr-x  1 root root  9154 11月 13 10:04 addons.sh
-rw-r--r--  1 root root 13298 5月   9 2018 ChangeLog
drwxr-xr-x  3 root root  4096 8月  11 20:47 conf
drwxr-xr-x  2 root root  4096 11月 13 10:10 include
drwxr-xr-x  2 root root   161 5月  29 2017 init.d
-rwxr-xr-x  1 root root  5154 4月  22 2018 install.sh
-rw-r--r--  1 root root   209 7月   3 2016 License
-rwxr-xr-x  1 root root   359 1月   3 2018 lnmp.conf
-rwxr-xr-x  1 root root  4922 4月  22 2018 pureftpd.sh
-rw-r--r--  1 root root  7143 3月  14 2018 README
drwxr-xr-x  3 root root  4096 11月 13 10:10 src
drwxr-xr-x  2 root root   247 12月 22 19:27 tools
-rwxr-xr-x  1 root root  7075 3月  15 2018 uninstall.sh
-rwxr-xr-x  1 root root 13535 3月  15 2018 upgrade1.x-1.5.sh
-rwxr-xr-x  1 root root  2777 6月   1 2017 upgrade.sh
[root@localhost lnmp1.5-full]#
[root@localhost lnmp1.5-full]# cat install.sh
#!/bin/bash
PATH=/bin:/sbin:/usr/bin:/usr/sbin:/usr/local/bin:/usr/local/sbin:~/bin
export PATH

# Check if user is root
if [ $(id -u) != "0" ]; then
    echo "Error: You must be root to run this script, please use root to install lnmp"
    exit 1
fi

cur_dir=$(pwd)
Stack=$1
if [ "${Stack}" = "" ]; then
    Stack="lnmp"
else
    Stack=$1
fi

LNMP_Ver='1.5'
. lnmp.conf
. include/main.sh
. include/init.sh
. include/mysql.sh
. include/mariadb.sh
. include/php.sh
. include/nginx.sh
. include/apache.sh
. include/end.sh
. include/only.sh
. include/multiplephp.sh

Get_Dist_Name

if [ "${DISTRO}" = "unknow" ]; then
    Echo_Red "Unable to get Linux distribution name, or do NOT support the current distribution."
    exit 1
fi

if [[ "${Stack}" = "lnmp" || "${Stack}" = "lnmpa" || "${Stack}" = "lamp" ]]; then
    if [ -f /bin/lnmp ]; then
        Echo_Red "You have installed LNMP!"
        echo -e "If you want to reinstall LNMP, please BACKUP your data.
and run uninstall script: ./uninstall.sh before you install."
        exit 1
    fi
fi

Check_LNMPConf

clear
echo "+------------------------------------------------------------------------+"
echo "|          LNMP V${LNMP_Ver} for ${DISTRO} Linux Server, Written by Licess          |"
echo "+------------------------------------------------------------------------+"
echo "|        A tool to auto-compile & install LNMP/LNMPA/LAMP on Linux       |"
echo "+------------------------------------------------------------------------+"
echo "|           For more information please visit https://lnmp.org           |"
echo "+------------------------------------------------------------------------+"

Init_Install()
{
    Press_Install
    Print_APP_Ver
    Get_Dist_Version
    Print_Sys_Info
    Check_Hosts
    Check_Mirror
    if [ "${DISTRO}" = "RHEL" ]; then
        RHEL_Modify_Source
    fi
    if [ "${DISTRO}" = "Ubuntu" ]; then
        Ubuntu_Modify_Source
    fi
    Set_Timezone
    if [ "$PM" = "yum" ]; then
        CentOS_InstallNTP
        CentOS_RemoveAMP
        CentOS_Dependent
    elif [ "$PM" = "apt" ]; then
        Deb_InstallNTP
        Xen_Hwcap_Setting
        Deb_RemoveAMP
        Deb_Dependent
    fi
    Disable_Selinux
    Check_Download
    Install_Libiconv
    Install_Libmcrypt
    Install_Mhash
    Install_Mcrypt
    Install_Freetype
    Install_Pcre
    Install_Icu4c
    if [ "${SelectMalloc}" = "2" ]; then
        Install_Jemalloc
    elif [ "${SelectMalloc}" = "3" ]; then
        Install_TCMalloc
    fi
    if [ "$PM" = "yum" ]; then
        CentOS_Lib_Opt
    elif [ "$PM" = "apt" ]; then
        Deb_Lib_Opt
        Deb_Check_MySQL
    fi
    if [ "${DBSelect}" = "1" ]; then
        Install_MySQL_51
    elif [ "${DBSelect}" = "2" ]; then
        Install_MySQL_55
    elif [ "${DBSelect}" = "3" ]; then
        Install_MySQL_56
    elif [ "${DBSelect}" = "4" ]; then
        Install_MySQL_57
    elif [ "${DBSelect}" = "5" ]; then
        Install_MySQL_80
    elif [ "${DBSelect}" = "6" ]; then
        Install_MariaDB_5
    elif [ "${DBSelect}" = "7" ]; then
        Install_MariaDB_10
    elif [ "${DBSelect}" = "8" ]; then
        Install_MariaDB_101
    elif [ "${DBSelect}" = "9" ]; then
        Install_MariaDB_102
    fi
    TempMycnf_Clean
    Check_PHP_Option
}

Install_PHP()
{
    if [ "${PHPSelect}" = "1" ]; then
        Install_PHP_52
    elif [ "${PHPSelect}" = "2" ]; then
        Install_PHP_53
    elif [ "${PHPSelect}" = "3" ]; then
        Install_PHP_54
    elif [ "${PHPSelect}" = "4" ]; then
        Install_PHP_55
    elif [ "${PHPSelect}" = "5" ]; then
        Install_PHP_56
    elif [ "${PHPSelect}" = "6" ]; then
        Install_PHP_7
    elif [ "${PHPSelect}" = "7" ]; then
        Install_PHP_71
    elif [ "${PHPSelect}" = "8" ]; then
        Install_PHP_72
    fi
}

LNMP_Stack()
{
    Init_Install
    Install_PHP
    LNMP_PHP_Opt
    Install_Nginx
    Creat_PHP_Tools
    Add_Iptables_Rules
    Add_LNMP_Startup
    Check_LNMP_Install
}

LNMPA_Stack()
{
    Apache_Selection
    Init_Install
    if [ "${ApacheSelect}" = "1" ]; then
        Install_Apache_22
    else
        Install_Apache_24
    fi
    Install_PHP
    Install_Nginx
    Creat_PHP_Tools
    Add_Iptables_Rules
    Add_LNMPA_Startup
    Check_LNMPA_Install
}

LAMP_Stack()
{
    Apache_Selection
    Init_Install
    if [ "${ApacheSelect}" = "1" ]; then
        Install_Apache_22
    else
        Install_Apache_24
    fi
    Install_PHP
    Creat_PHP_Tools
    Add_Iptables_Rules
    Add_LAMP_Startup
    Check_LAMP_Install
}

case "${Stack}" in
    lnmp)
        Dispaly_Selection
        LNMP_Stack 2>&1 | tee /root/lnmp-install.log
        ;;
    lnmpa)
        Dispaly_Selection
        LNMPA_Stack 2>&1 | tee /root/lnmp-install.log
        ;;
    lamp)
        Dispaly_Selection
        LAMP_Stack 2>&1 | tee /root/lnmp-install.log
        ;;
    nginx)
        Install_Only_Nginx 2>&1 | tee /root/nginx-install.log
        ;;
    db)
        Install_Only_Database
        ;;
    mphp)
        Install_Multiplephp
        ;;
    *)
        Echo_Red "Usage: $0 {lnmp|lnmpa|lamp}"
        Echo_Red "Usage: $0 {nginx|db|mphp}"
        ;;
esac

exit
[root@localhost lnmp1.5-full]#
所谓的一键安装包,实际上还是安装的源码包与RPM包,只是把安装过程写成了脚本,便于初学者安装。
- 优点:简单、快速、方便
- 缺点:
- 不能定义安软软件的版本——尽管它会给你几个可以选择的版本,但那都不是你想要的。
- 不能定义所需要的软件功能——完全由写脚本的作者决定。
- 源码包的优势丧失——安装位置、方式等等全部与你无关,你说的不算(前面已经介绍过)
注意,重启之后要重新挂载光盘以保证本地yum源正常使用:
[root@localhost lnmp1.5-full]# ls -al /mnt/cdrom/
总用量 0
drwxr-xr-x. 2 root root  6 1月  23 20:50 .
drwxr-xr-x. 3 root root 19 1月  23 20:50 ..
[root@localhost lnmp1.5-full]# mount /dev/sr0 /mnt/cdrom/
mount: /dev/sr0 写保护,将以只读方式挂载
[root@localhost lnmp1.5-full]# ls -al /mnt/cdrom/
总用量 1643
drwxr-xr-x  8 root root    2048 5月   4 2018 .
drwxr-xr-x. 3 root root      19 1月  23 20:50 ..
-rw-rw-r--  1 root root      14 5月   2 2018 CentOS_BuildTag
-rw-r--r--  1 root root      29 5月   4 2018 .discinfo
drwxr-xr-x  3 root root    2048 5月   4 2018 EFI
-rw-rw-r--  1 root root     227 8月  30 2017 EULA
-rw-rw-r--  1 root root   18009 12月 10 2015 GPL
drwxr-xr-x  3 root root    2048 5月   4 2018 images
drwxr-xr-x  2 root root    2048 5月   4 2018 isolinux
drwxr-xr-x  2 root root    2048 5月   4 2018 LiveOS
drwxrwxr-x  2 root root 1640448 5月   3 2018 Packages
drwxrwxr-x  2 root root    4096 5月   7 2018 repodata
-rw-rw-r--  1 root root    1690 12月 10 2015 RPM-GPG-KEY-CentOS-7
-rw-rw-r--  1 root root    1690 12月 10 2015 RPM-GPG-KEY-CentOS-Testing-7
-r--r--r--  1 root root    2883 5月   7 2018 TRANS.TBL
-rw-r--r--  1 root root     354 5月   4 2018 .treeinfo
[root@localhost lnmp1.5-full]#
接着安装:
#...接着上面
[root@localhost src]# tar -zxvf lnmp1.5-full.tar.gz
...
[root@localhost src]# cd lnmp1.5-full/
[root@localhost lnmp1.5-full]# ./install.sh
+------------------------------------------------------------------------+
|          LNMP V1.5 for CentOS Linux Server, Written by Licess          |
+------------------------------------------------------------------------+
|        A tool to auto-compile & install LNMP/LNMPA/LAMP on Linux       |
+------------------------------------------------------------------------+
|           For more information please visit https://lnmp.org           |
+------------------------------------------------------------------------+
You have 10 options for your DataBase install.
1: Install MySQL 5.1.73
2: Install MySQL 5.5.60 (Default)
3: Install MySQL 5.6.40
4: Install MySQL 5.7.22
5: Install MySQL 8.0.11
6: Install MariaDB 5.5.60
7: Install MariaDB 10.0.35
8: Install MariaDB 10.1.33
9: Install MariaDB 10.2.14
0: DO NOT Install MySQL/MariaDB
Enter your choice (1, 2, 3, 4, 5, 6, 7, 8, 9 or 0):
No input,You will install MySQL 5.5.60
===========================
Please setup root password of MySQL.
Please enter: 123456
MySQL root password: 123456
===========================
Do you want to enable or disable the InnoDB Storage Engine?
Default enable,Enter your choice [Y/n]: n
You will disable the InnoDB Storage Engine!
===========================
You have 8 options for your PHP install.
1: Install PHP 5.2.17
2: Install PHP 5.3.29
3: Install PHP 5.4.45
4: Install PHP 5.5.38
5: Install PHP 5.6.36 (Default)
6: Install PHP 7.0.30
7: Install PHP 7.1.18
8: Install PHP 7.2.6
Enter your choice (1, 2, 3, 4, 5, 6, 7 or 8):
No input,You will install PHP 5.6.36
===========================
You have 3 options for your Memory Allocator install.
1: Don't install Memory Allocator. (Default)
2: Install Jemalloc
3: Install TCMalloc
Enter your choice (1, 2 or 3):
No input,You will not install Memory Allocator.

Press any key to install...or Press Ctrl+c to cancel
#...省略安装过程
============================Install PHPMyAdmin=================================
============================phpMyAdmin install completed=======================
The service command supports only basic LSB actions (start, stop, restart, try-restart, reload, force-reload, status). For other actions, please try to use systemctl.
Add Startup and Starting LNMP...
Add nginx service at system startup...
Starting nginx...  done
Add mysql service at system startup...
Starting MySQL. SUCCESS!
Add php-fpm service at system startup...
Starting php-fpm  done
============================== Check install ==============================
Checking ...
Nginx: OK
MySQL: OK
PHP: OK
PHP-FPM: OK
Clean src directory...
+------------------------------------------------------------------------+
|          LNMP V1.5 for CentOS Linux Server, Written by Licess          |
+------------------------------------------------------------------------+
|           For more information please visit https://lnmp.org           |
+------------------------------------------------------------------------+
|    lnmp status manage: lnmp {start|stop|reload|restart|kill|status}    |
+------------------------------------------------------------------------+
|  phpMyAdmin: http://IP/phpmyadmin/                                     |
|  phpinfo: http://IP/phpinfo.php                                        |
|  Prober:  http://IP/p.php                                              |
+------------------------------------------------------------------------+
|  Add VirtualHost: lnmp vhost add                                       |
+------------------------------------------------------------------------+
|  Default directory: /home/wwwroot/default                              |
+------------------------------------------------------------------------+
|  MySQL/MariaDB root password: 963123                          |
+------------------------------------------------------------------------+
+-------------------------------------------+
|    Manager for LNMP, Written by Licess    |
+-------------------------------------------+
|              https://lnmp.org             |
+-------------------------------------------+
nginx (pid 4410 4408) is running...
php-fpm is runing!
 SUCCESS! MySQL running (4862)
Active Internet connections (only servers)
Proto Recv-Q Send-Q Local Address           Foreign Address         State
tcp        0      0 0.0.0.0:3306            0.0.0.0:*               LISTEN
tcp        0      0 0.0.0.0:111             0.0.0.0:*               LISTEN
tcp        0      0 0.0.0.0:80              0.0.0.0:*               LISTEN
tcp        0      0 192.168.122.1:53        0.0.0.0:*               LISTEN
tcp        0      0 0.0.0.0:22              0.0.0.0:*               LISTEN
tcp        0      0 127.0.0.1:631           0.0.0.0:*               LISTEN
tcp6       0      0 :::111                  :::*                    LISTEN
tcp6       0      0 :::22                   :::*                    LISTEN
tcp6       0      0 ::1:631                 :::*                    LISTEN
Install lnmp takes 32 minutes.
Install lnmp V1.5 completed! enjoy it.
验证:
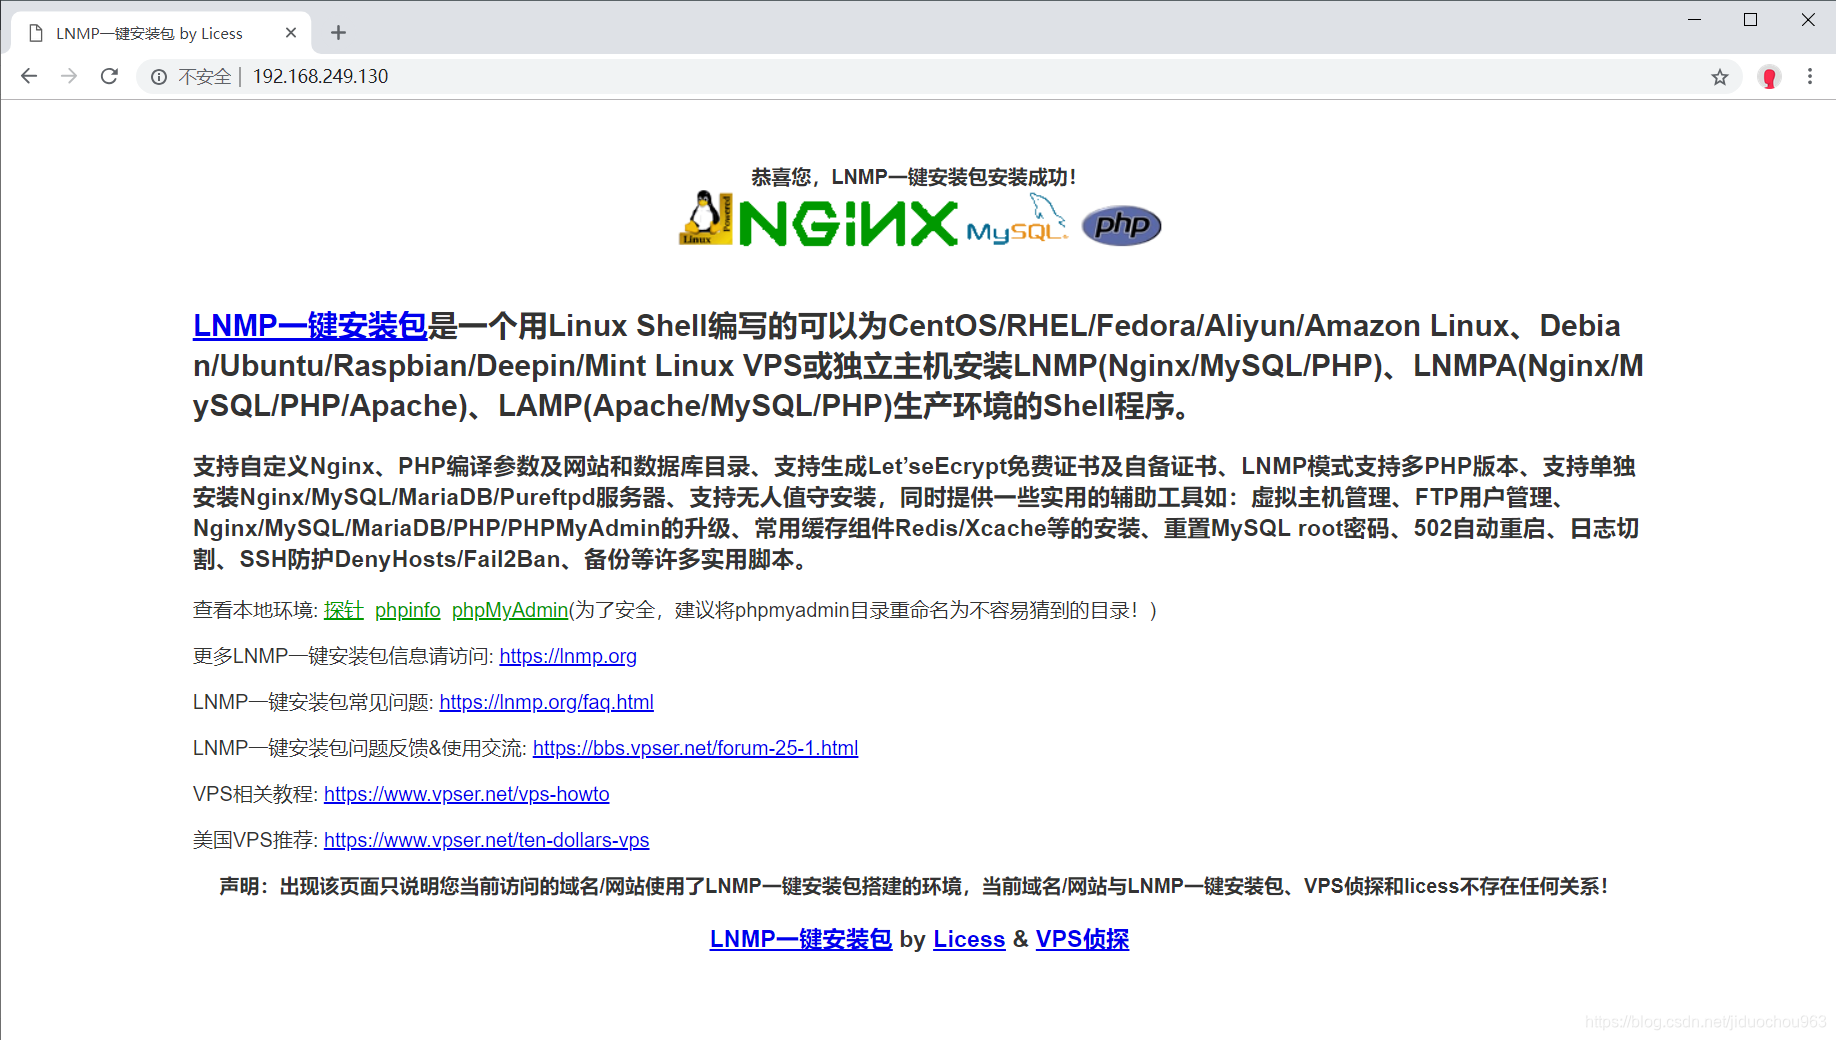
安装成功。
Linux软件包管理完结。