【原创】其实对于Struts 2.0的HelloWorld程序到处都是,所以也算不上是原创了。自己在学习的过程中,把动手实践的过程与结果记录下来,以便今后的复习。温故而知新吧。
1、初始化工程
我使用的是MyEclipse 5.5,Tomcat 5.5,JDK 1.6.0。
打开MyEclipse之后,新建一个叫做“HelloWorld”的Web Project。
(1)导入Struts 2.0 的相关jar 文件
commons-fileupload-1.2.1.jar

commons-io-1.3.2.jar

commons-logging-1.1.jar

freemarker-2.3.13.jar

ognl-2.6.11.jar

struts2-core-2.1.6.jar

xwork-2.1.2.jar
这些jar文件一般去哪里下载呢?
我们可以在struts的官方网站上下载struts相应的版本。本人下载的是2.1.6的版本。解压之后,在apps的路径下面可以看到多个后缀名为war的文件。我们可以把这些文件用加压缩软件直接打开或者解压。本人解压struts2-blank-2.1.6.war后,在struts2-blank-2.1.6\WEB-INF\lib这个目录下面看到9个jar文件,其中junit-3.8.1.jar和spring-test-2.5.6.jar并不是必须的。我们把剩下的7个jar文件拷贝到HelloWorld工程目录的WebRoot\WEB-INF\lib目录下面。
(2)添加struts.xml配置文件
同样,我们可以在struts的apps中找到struts.xml的模板。在struts2-blank-2.1.6\WEB-INF\classes目录下面,找到struts.xml,拷贝到HelloWorld工程的src文件夹下面。
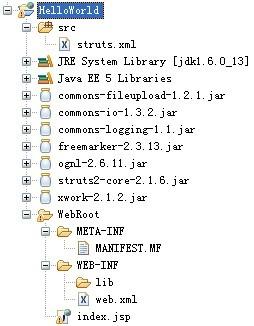
通过上面的初始化,得到的工程如下图所示:

2、配置
(1)在WebRoot下新建一个hello.jsp
<%@ page language="java" import="java.util.*" pageEncoding="ISO-8859-1"%>
<%
String path = request.getContextPath();
String basePath = request.getScheme()+"://"+request.getServerName()+":"+request.getServerPort()+path+"/";
%>

<!DOCTYPE HTML PUBLIC "-//W3C//DTD HTML 4.01 Transitional//EN">
<html>
  <head>
    <base href="<%=basePath%>">

    <title>Hello World</title>
    <meta http-equiv="pragma" content="no-cache">
    <meta http-equiv="cache-control" content="no-cache">
    <meta http-equiv="expires" content="0">
    <meta http-equiv="keywords" content="keyword1,keyword2,keyword3">
    <meta http-equiv="description" content="This is my page">
    <!--
    <link rel="stylesheet" type="text/css" href="styles.css">
    -->
  </head>

  <body>
    Hello World <br>
  </body>
</html>
(2)修改WEB-INF\web.xml
<?xml version="1.0" encoding="UTF-8"?>
<web-app version="2.5"
    xmlns="http://java.sun.com/xml/ns/javaee"
    xmlns:xsi="http://www.w3.org/2001/XMLSchema-instance"
    xsi:schemaLocation="http://java.sun.com/xml/ns/javaee
    http://java.sun.com/xml/ns/javaee/web-app_2_5.xsd">
  <welcome-file-list>
    <welcome-file>index.jsp</welcome-file>
  </welcome-file-list>

  <filter>
        <filter-name>struts2</filter-name>
        <filter-class>org.apache.struts2.dispatcher.ng.filter.StrutsPrepareAndExecuteFilter</filter-class>
    </filter>

    <filter-mapping>
        <filter-name>struts2</filter-name>
        <url-pattern>/*</url-pattern>
    </filter-mapping>
</web-app>
(3) 修改src\struts.xml
<?xml version="1.0" encoding="UTF-8" ?>
<!DOCTYPE struts PUBLIC
    "-//Apache Software Foundation//DTD Struts Configuration 2.0//EN"
    "http://struts.apache.org/dtds/struts-2.0.dtd">

<struts>
    <!--
    <constant name="struts.enable.DynamicMethodInvocation" value="false" />
    <constant name="struts.devMode" value="false" />

    <include file="example.xml"/>

    <package name="default" namespace="/" extends="struts-default">
        <default-action-ref name="index" />
        <action name="index">
            <result type="redirectAction">
                <param name="actionName">HelloWorld</param>
                <param name="namespace">/example</param>
            </result>
        </action>
    </package>
     -->
    <!-- Add packages here -->

    <package name="default" namespace="/" extends="struts-default">
        <action name="hello">
            <result>
                /hello.jsp
            </result>
        </action>
    </package>

</struts>
3、部署和运行
部署HelloWorld之后,在浏览器中输入"http://localhost:8080/HelloWorld/hello" 就可以看到相应的结果。