在上篇文章centos7搭建postfix邮件服务器的搭建中我们没有配置SSL,接下来我们在这篇文章中讲讲centos7邮件服务器SSL配置。
1. 创建SSL证书
[root@www ~]# cd /etc/pki/tls/certs

[root@www certs]# make server.key

umask 77 ;
/usr/bin/openssl genrsa -aes128 2048 > server.key

Generating RSA private key, 2048 bit long modulus
......................................................++++++
.............++++++
e is 61251 (0x10001)
Enter pass phrase:# set passphrase

Verifying - Enter pass phrase:# confirm

# remove passphrase from private key

[root@www certs]# openssl rsa -in server.key -out server.key

Enter pass phrase for server.key:# input passphrase

writing RSA key
[root@www certs]#
[root@www certs]# make server.csr

umask 77 ;
/usr/bin/openssl req -utf8 -new -key server.key -out server.csr

You are about to be asked to enter information that will be incorporated
into your certificate request.
What you are about to enter is what is called a Distinguished Name or a DN.
There are quite a few fields but you can leave some blank
For some fields there will be a default value,
If you enter '.', the field will be left blank.
-----
Country Name (2 letter code) [XX]:JP
# country

State or Province Name (full name) [e]:Hiroshima
  # state

Locality Name (eg, city) [Default City]:Hiroshima
# city

Organization Name (eg, company) [Default Company Ltd]:GTS
  # company

Organizational Unit Name (eg, section) []:Server World
  # department

Common Name (eg, your server's hostname) []:www.srv.world
  # server's FQDN

Email Address []:xxx@srv.world
# email address

Please enter the following 'extra' attributes
to be sent with your certificate request
A challenge password []:# Enter

An optional company name []:# Enter

[root@www certs]#
[root@www certs]# openssl x509 -in server.csr -out server.crt -req -signkey server.key -days 3650

Signature ok
subject=/C=JP/ST=Hiroshima/L=Hiroshima/O=GTS/OU=Server World/CN=www.srv.world/emailAddress=xxx@srv.world Getting Private key
[root@www certs]# chmod 400 server.*
2.配置Postfix和Dovecot
[root@mail ~]# vim /etc/postfix/main.cf
# 添加到最后
smtpd_use_tls = yes
smtpd_tls_cert_file = /etc/pki/tls/certs/server.crt
smtpd_tls_key_file = /etc/pki/tls/certs/server.key
smtp_tls_session_cache_database = btree:${data_directory}/smtp_scache
smtpd_tls_session_cache_database = btree:${data_directory}/smtpd_scache
smtpd_tls_loglevel = 0
smtpd_tls_auth_only = yes

[root@mail ~]# vim /etc/postfix/master.cf
# 17-18行: 取消注释
smtps       inet   n       -       n       -       -       smtpd
  -o smtpd_tls_wrappermode=yes

[root@mail ~]# vim /etc/dovecot/conf.d/10-ssl.conf
# 6行: 取消注释
ssl = yes
# 12,13行: 指定证书
ssl_cert = </etc/pki/tls/certs/server.crt
ssl_key = </etc/pki/tls/certs/server.key

#开放SSL端口(端口的话,SMTP使用的是465, POP3使用995, IMAP使用993)
firewall-cmd --add-port={465/tcp,995/tcp,993/tcp} --permanent
firewall-cmd --reload
# 重启postfix
[root@mail ~]# systemctl restart postfix
Shutting down postfix: [ OK ]
Starting postfix: [ OK ]

# 重启dovecot
[root@mail ~]# systemctl restart dovecot
Stopping Dovecot Imap: [ OK ]
Starting Dovecot Imap: [ OK ]
3. 使用SSL登录
配置好了以后,我们在使用Foxmail等客户端的时候,就可以勾选SSL.
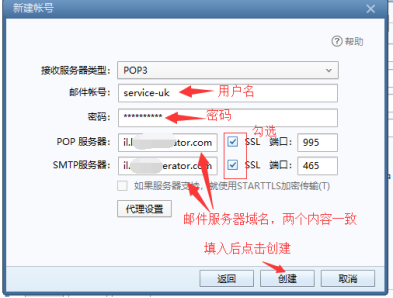
这样我们就配置好了SSL了。