配置android测试环境,实现:动态调试、drozer、frida、界面劫持等
一、测试手机开启开发者模式
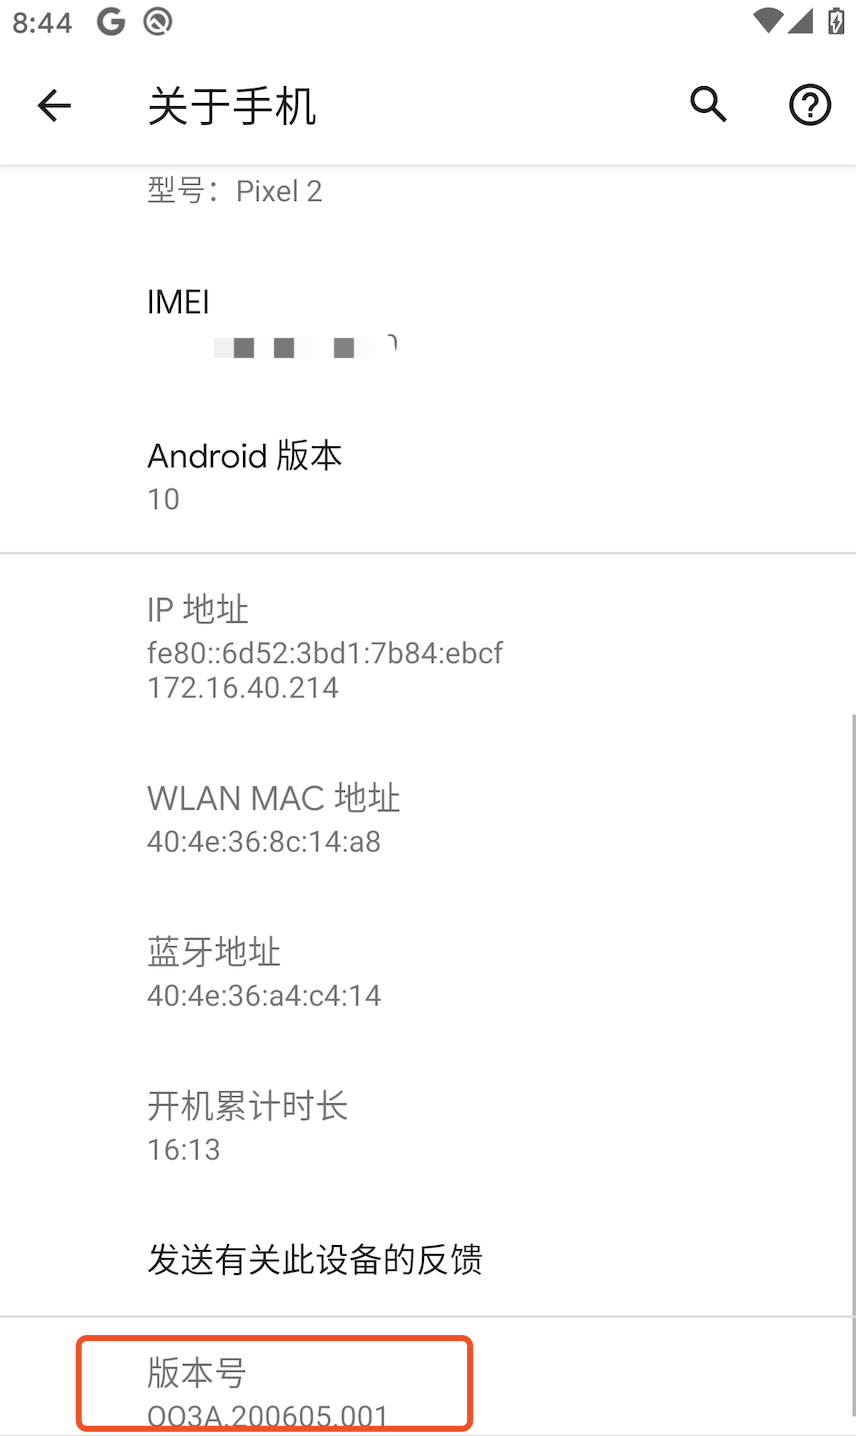
手机型号为pixel2 ,android 10系统,已root。连续点击版本号即可进入开发者选项。然后打开usb调试,使adb可以使用。
二、部署gdb动态调试
1、复制gdbserver到手机/data/data/local/tmp/下
shellydeMacBook-Pro:~ shellyzhang$ adb push /Users/shellyzhang/1_codeing/android-sdk-macosx/ndk-bundle/prebuilt/android-arm/gdbserver/gdbserver /data/local/tmp
/Users/shellyzhang/1_codeing/android-sdk-macosx/ndk-bundle/p.../gdbserver: 1 file pushed. 8.0 MB/s (596448 bytes in 0.071s
shellydeMacBook-Pro:~ shellyzhang$
2、手机开启gdbserver,并连接需要调试的进程
walleye:/data/local/tmp # ps -ef |grep com.android.chrome
u0_a138       8921   786 1 08:39:51 ?     00:00:13 com.android.chrome
u0_a138       8997   786 0 08:39:52 ?     00:00:00 com.android.chrome:privileged_process0
u0_i9003      9277   786 0 08:42:01 ?     00:00:00 com.android.chrome:sandboxed_process2:org.chromium.content.app.SandboxedProcessService2
root         11876 11699 2 09:01:06 pts/1 00:00:00 grep com.android.chrome
walleye:/data/local/tmp #
walleye:/data/local/tmp # ./gdbserver :1234 --attach 8921
Attached; pid = 8921
Listening on port 1234
3、adb转发手机端口到电脑上,电脑使用gdb进行调试
shellydeMacBook-Pro:~ shellyzhang$ adb forward tcp:1234 tcp:1234
shellydeMacBook-Pro:~ shellyzhang$ /Users/shellyzhang/1_codeing/android-sdk-macosx/ndk-bundle/prebuilt/darwin-x86_64/bin/gdb
GNU gdb (GDB) 7.11
Copyright (C) 2016 Free Software Foundation, Inc.
License GPLv3+: GNU GPL version 3 or later <http://gnu.org/licenses/gpl.html>
This is free software: you are free to change and redistribute it.
There is NO WARRANTY, to the extent permitted by law.  Type "show copying"
and "show warranty" for details.
This GDB was configured as "x86_64-apple-darwin14.5.0".
Type "show configuration" for configuration details.
For bug reporting instructions, please see:
<http://www.gnu.org/software/gdb/bugs/>.
Find the GDB manual and other documentation resources online at:
<http://www.gnu.org/software/gdb/documentation/>.
For help, type "help".
Type "apropos word" to search for commands related to "word".
(gdb)  target remote:1234
Remote debugging using :1234
Reading /system/bin/app_process32 from remote target...
(gdb)  info proc
process 8921
cmdline = 'com.android.chrome'
cwd = '/'
exe = '/system/bin/app_process32'
(gdb) info reg
r0             0xfffffffc    4294967292
r1             0xff8b6aa8    4287326888
r2             0x10    16
r3             0xffffffff    4294967295
r4             0x0    0
r5             0x8    8
r6             0xeeb0a260    4004553312
r7             0x15a    346
r8             0xdf43674c    3745736524
r9             0xdf436700    3745736448
r10            0x0    0
r11            0xffffffff    4294967295
r12            0xff8b6a58    4287326808
sp             0xff8b6a48    0xff8b6a48
lr             0xeeabcbb5    -290731083
pc             0xeeae9fa4    0xeeae9fa4 <__epoll_pwait+20>
cpsr           0x20010010    536936464
(gdb)  p*(int*)0xff8b6aa8
$1 = 0
(gdb)
二、部署drozer
1、官网下载最新的apk包(https://labs.f-secure.com/tools/drozer/),并安装到手机
目前drozer可能在androd10上无法使用
三、部署frida与objection
1、下载合适版本的frida(https://github.com/frida/frida/releases)到手机/data/data/local/tmp/下
walleye:/data/local/tmp # uname -a
Linux localhost 4.4.210-gae6d0ab37d61 #1 SMP PREEMPT Fri Apr 10 23:00:09 UTC 2020 aarch64
walleye:/data/local/tmp # chmod 777 frida-server-12.11.6-android-arm64
walleye:/data/local/tmp #
walleye:/data/local/tmp # ./frida-server-12.11.6-android-arm64
2、电脑上安装objection(https://github.com/sensepost/objection)
3、adb端口转发使用的端口
shellydeMacBook-Pro:1_app shellyzhang$ adb forward tcp:27042 tcp:27042
shellydeMacBook-Pro:1_app shellyzhang$ adb forward tcp:27043 tcp:27043
4、查看手机上进程,并使用objection连接
shellydeMacBook-Pro:Downloads shellyzhang$ frida-ps -R |grep chr
  999  chre
16408  com.android.chrome
16503  com.android.chrome:privileged_process0
16455  com.android.chrome:sandboxed_process0:org.chromium.content.app.SandboxedProcessService0
shellydeMacBook-Pro:Downloads shellyzhang$ objection --gadget 'com.android.chrome' explore
Using USB device `Pixel 2`
Agent injected and responds ok!

     _   _         _   _
 ___| |_|_|___ ___| |_|_|___ ___
| . | . | | -_|  _|  _| | . |   |
|___|___| |___|___|_| |_|___|_|_|
      |___|(object)inject(ion) v1.9.5

     Runtime Mobile Exploration
        by: @leonjza from @sensepost

[tab] for command suggestions
com.android.chrome on (google: 10) [usb] #
5、查看一些基本信息
com.android.chrome on (google: 10) [usb] # ls
Type       Last Modified            Read    Write    Hidden    Size     Name
---------  -----------------------  ------  -------  --------  -------  ------
Directory  2020-08-03 09:42:32 GMT  True    True     False     4.0 KiB  images

Readable: True  Writable: True
com.android.chrome on (google: 10) [usb] # env

Name                    Path
----------------------  ---------------------------------------------------------
cacheDirectory          /data/user/0/com.android.chrome/cache
codeCacheDirectory      /data/user/0/com.android.chrome/code_cache
externalCacheDirectory  /storage/emulated/0/Android/data/com.android.chrome/cache
filesDirectory          /data/user/0/com.android.chrome/files
obbDir                  /storage/emulated/0/Android/obb/com.android.chrome
packageCodePath         /system/product/app/Chrome/Chrome.apk
6、关闭sslpinning
com.android.chrome on (google: 10) [usb] # android sslpinning disable
(agent) Custom TrustManager ready, overriding SSLContext.init()
(agent) Found com.android.org.conscrypt.TrustManagerImpl, overriding TrustManagerImpl.verifyChain()
(agent) Found com.android.org.conscrypt.TrustManagerImpl, overriding TrustManagerImpl.checkTrustedRecursive()
(agent) Registering job w9kke27rti9. Type: android-sslpinning-disable
com.android.chrome on (google: 10) [usb] #
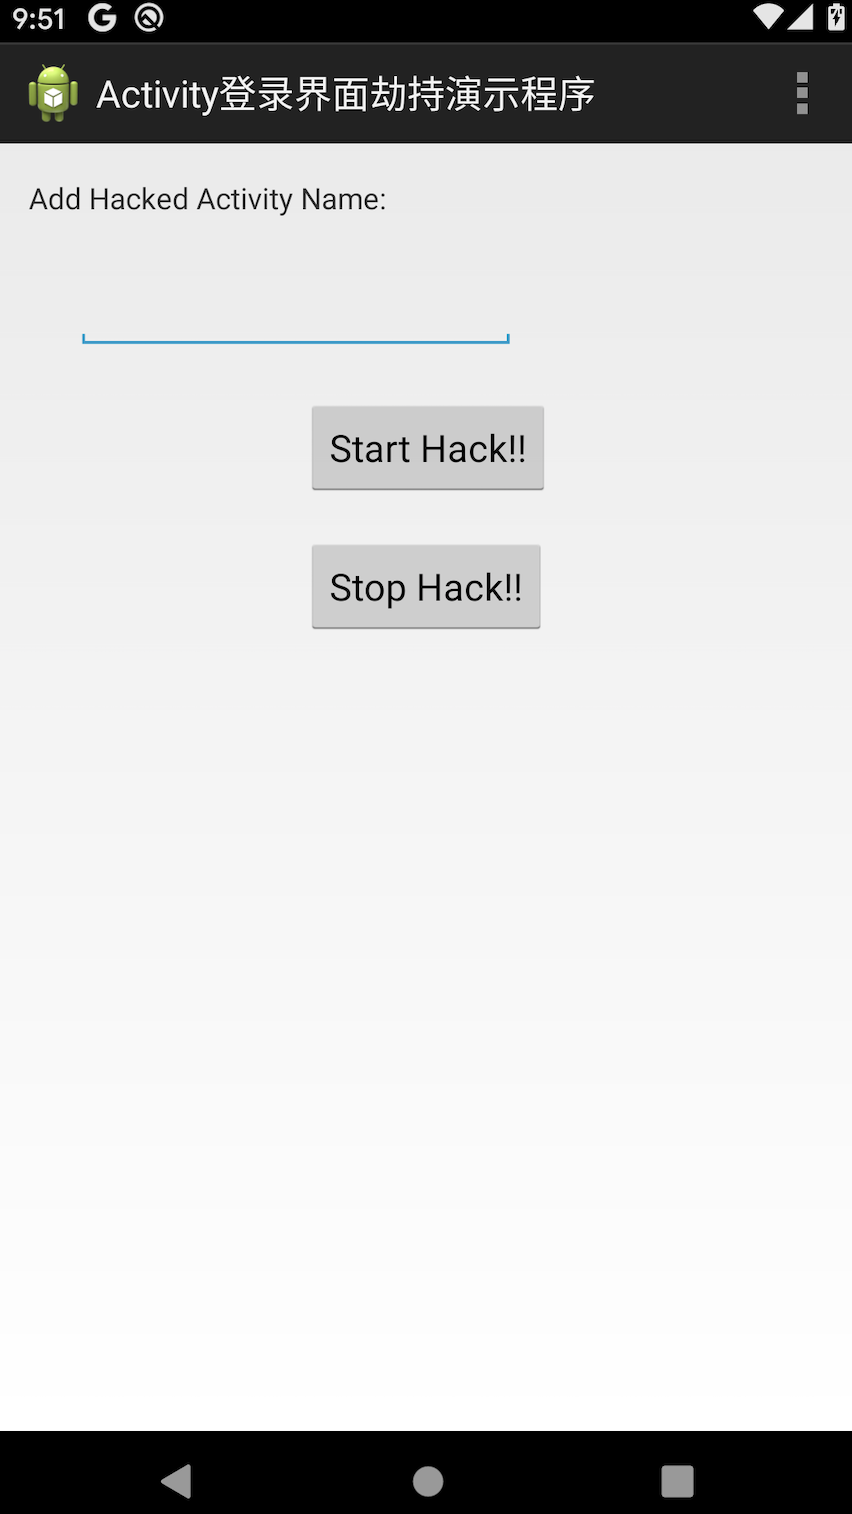
四、安装界面劫持工具
1、安装app
shellydeMacBook-Pro:1_app shellyzhang$ adb install BankActivityHijack.apk
Success
2、输入要劫持的app界面activity名称,然后打开该app即可
五、安装so注入工具
1、复制hijack到手机/data/data/local/tmp/下
shellydeMacBook-Pro:so shellyzhang$ adb push libstrmon.so /data/local/tmp
libstrmon.so: 1 file pushed. 2.2 MB/s (25720 bytes in 0.011s)
shellydeMacBook-Pro:so shellyzhang$ adb push hijack /data/local/tmp
hijack: 1 file pushed. 2.4 MB/s (22164 bytes in 0.009s)
2、注入so文件到进程中,并查看日志文件中是否有记录数据
walleye:/data/local/tmp # ps -ef |grep com.android.chrome
u0_a138      13269   786 1 09:32:24 ?     00:00:07 com.android.chrome
u0_a138      13345   786 0 09:32:24 ?     00:00:00 com.android.chrome:privileged_process0
u0_i9010     14106   786 8 09:45:56 ?     00:00:01 com.android.chrome:sandboxed_process5:org.chromium.content.app.SandboxedProcessService5
root         14146 13874 3 09:46:09 pts/4 00:00:00 grep com.android.chrome
walleye:/data/local/tmp # >/data/local/tmp/strmon.log
walleye:/data/local/tmp # chmod 777 strmon.log
walleye:/data/local/tmp # ./hijack -d -p 13269 -l libstrmon.so
mprotect: 0xeeaead4c
dlopen: 0xf1c13009
pc=eeae9fa4 lr=eeabcbb5 sp=ff8b6a48 fp=ffffffff
r0=fffffffc r1=ff8b6aa8
r2=10 r3=ffffffff
stack: 0xff0ba000-0xff8b9000 leng = 8384512
executing injection code at 0xff8b69f8
calling mprotect
library injection completed!
walleye:/data/local/tmp # cat strmon.log