一、树
1、介绍
树(Tree)是n(n>=0)个结点的有限集。当n = 0时成为空树。
2、树的储存结构
双亲表示法、孩子表示法、孩子兄弟表示法(未列举)。
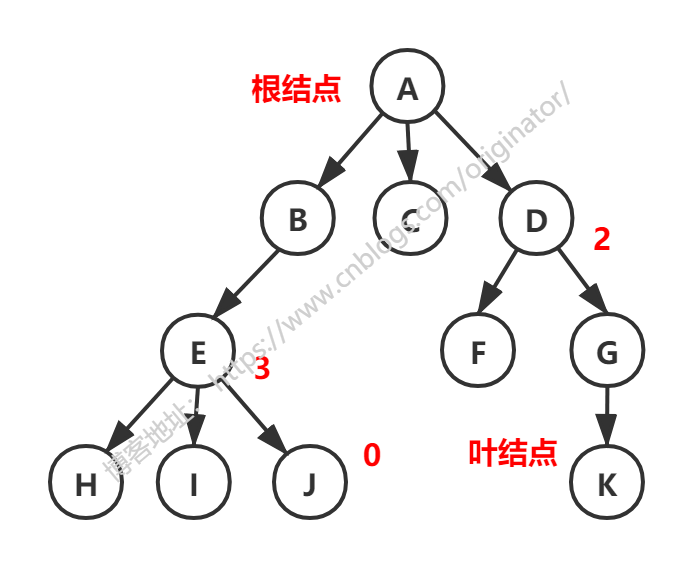
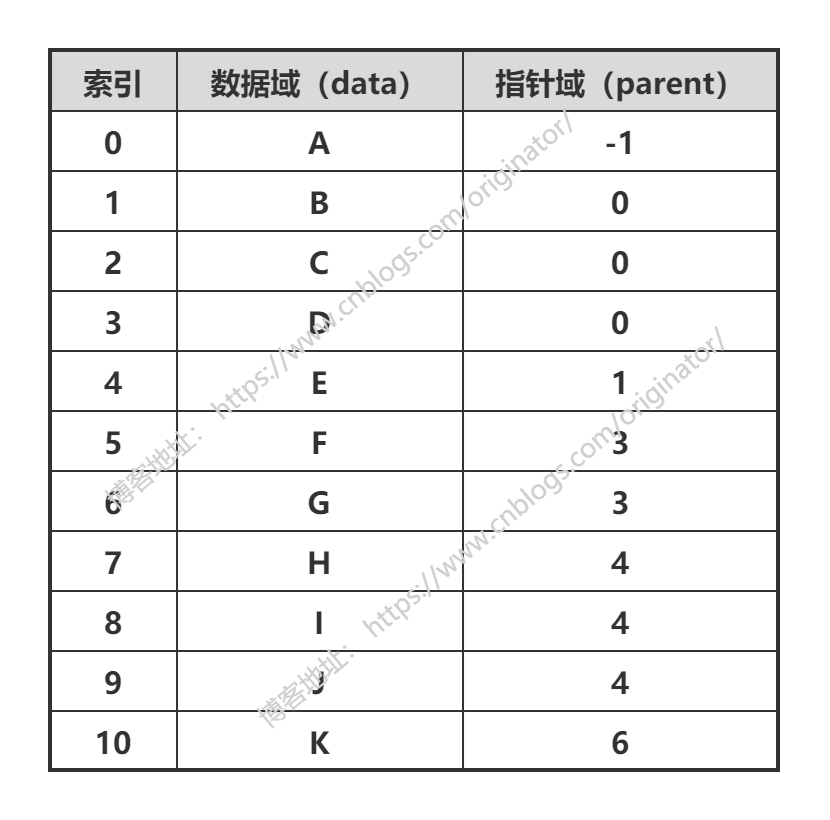
双亲表示法:以双亲作为索引的关键词的一种存储方式。
我们可以根据某结点的parent指针找到它的双亲结点,所用的时间复杂度是o(1),索引到parent的值为-1时,表示找到了树结点的根。
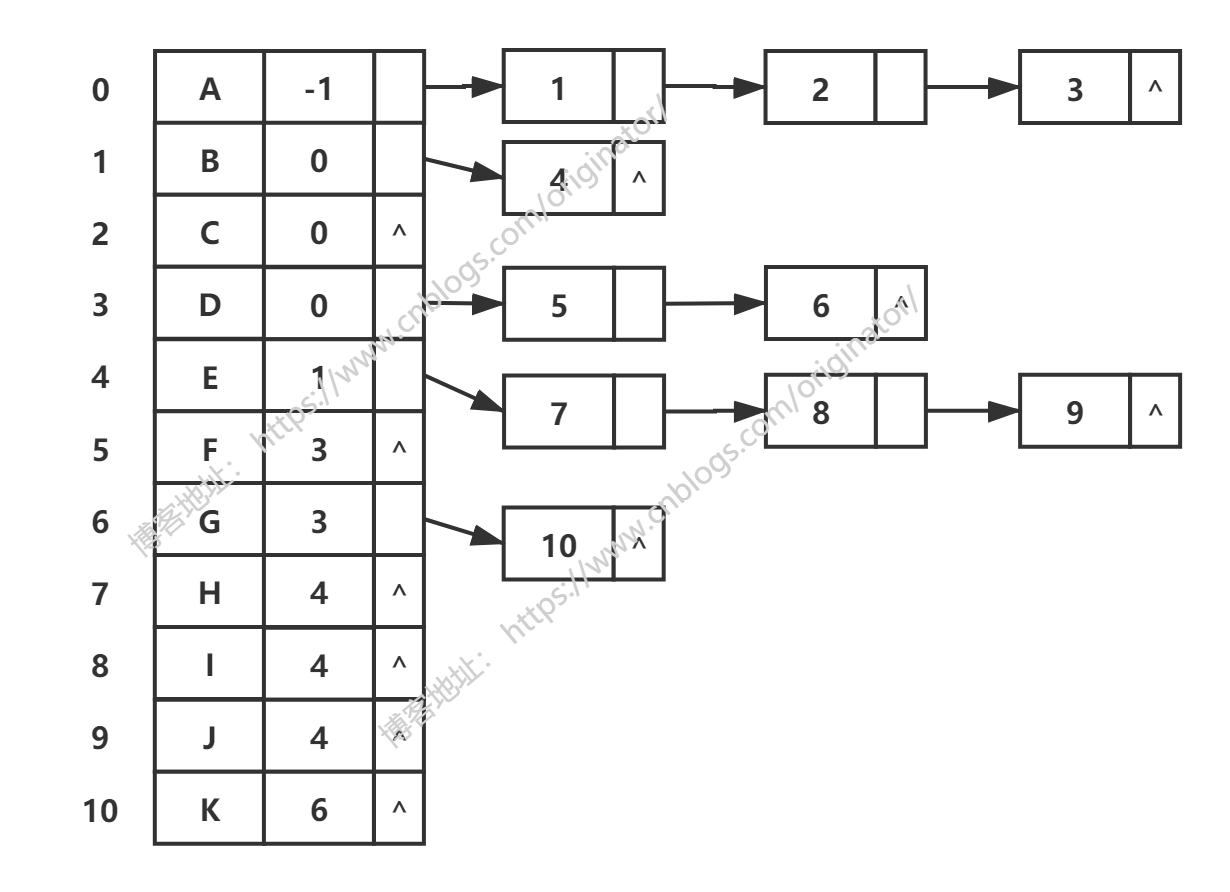
孩子表示法:

双亲孩子表示法:
二、二叉树
1、介绍
二叉树(Binary Tree)是n(n>=0)个结点的有限集合,该集合或者为空集(空二叉树),或者由一个根结点和两颗互不相交的,分别称为根结点的左子树和右子树组成。
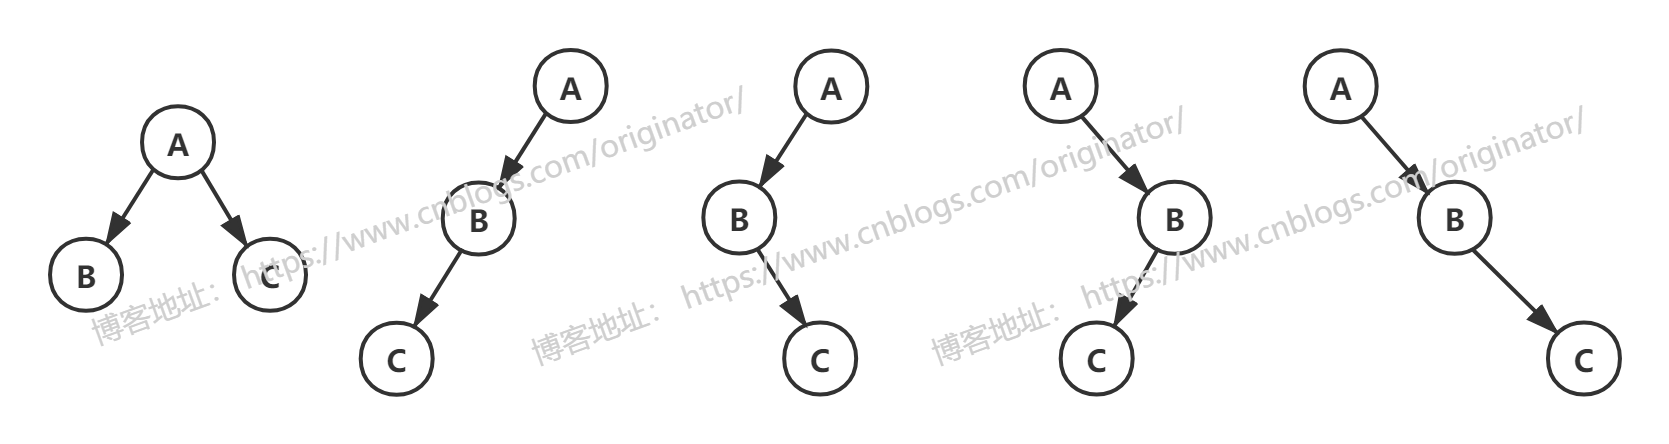
二叉树的五种基本形态:
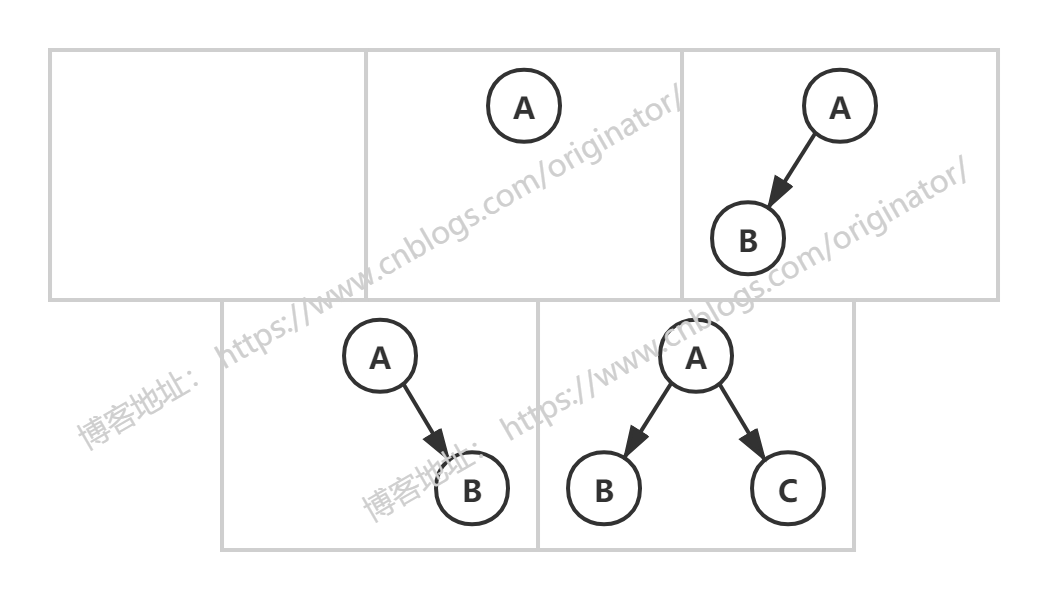
三个结点的二叉树有五种形态:
2、二叉树的性质
在二叉树的第 i 层上至多有 2^(i - 1) 个结点。
对于任何一颗二叉树T,如果其叶子结点数为n0,度为2的结点数为n2,则n0 = n2 + 1。
3、满二叉树
性质:
每一层的结点都是满的。
同样深度的二叉树,满二叉树的结点个数最多,叶子也是最多。
深度为 k 的满二叉树,结点数为 2^k - 1。

4、完全二叉树
性质:
若结点度为1,则该结点只有左孩子。
同样结点数的二叉树,完全二叉树的深度最小。
具有 n 个结点的完全二叉树的深度为 ⌊log2(n)⌋ + 1。
具有 n 个结点的完全二叉树结点按层序编号,则对任意结点 i ,有:(重要!在堆排序中会用到!)
i = 0,则 i 是根;i > 1,则双亲是 (i - 1)/ 2
2i + 1 >= n,则 i 无左孩子。否则其左孩子是 2i + 1
2i + 2 >= n,则 i 无右孩子。否则其右孩子是 2i + 2

满二叉树一定是完全二叉树,但完全二叉树不一定是满二叉树。
5、二叉树的存储结构及遍历
遍历方式:
前序遍历:ABC
中序遍历:BAC
后序遍历:BCA
层序遍历:ABC
树存储方式的分析:能提高数据存储,读取的效率,比如利用二叉排序树(Binary Sort Tree),既可以保证数据的检索速度,同时也可以保证数据的插入,删除,修改的速度。
顺序存储结构:
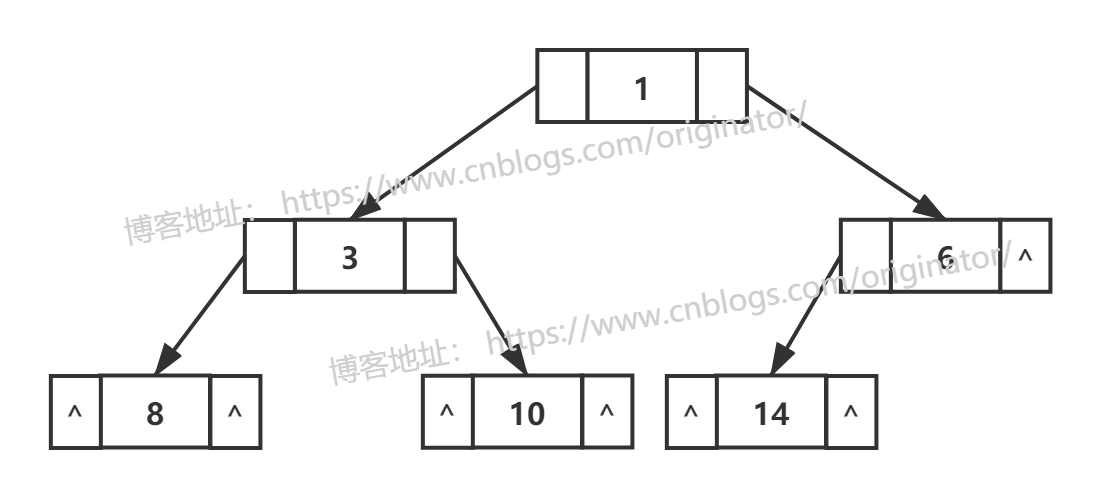
通常而言,顺序存储二叉树只考虑完全二叉树。即只有完全二叉树,我们用顺序存储结构来表示。可以用数组来表示,示例:

代码示例:顺序存储二叉树,前序,中序,后序遍历


 1 public class MyArrBinaryTree {
 2
 3     private final int[] arr;
 4
 5     public MyArrBinaryTree(int[] arr) {
 6         this.arr = arr;
 7     }
 8
 9     // 前序遍历
10     public void preOrder() {
11         this.preOrder(0);
12     }
13
14     // 中序遍历
15     public void infixOrder() {
16         this.infixOrder(0);
17     }
18
19     // 后序遍历
20     public void postOrder() {
21         this.postOrder(0);
22     }
23
24     private void preOrder(int index) {
25         if (arr == null || arr.length == 0) {
26             return;
27         }
28
29         System.out.print("->" + arr[index]);
30
31         int left = 2 * index + 1;
32         if (left < arr.length) {
33             this.preOrder(left);
34         }
35
36         int right = 2 * index + 2;
37         if (right < arr.length) {
38             this.preOrder(right);
39         }
40     }
41
42     private void infixOrder(int index) {
43         if (arr == null || arr.length == 0) {
44             return;
45         }
46
47         int left = 2 * index + 1;
48         if (left < arr.length) {
49             this.infixOrder(left);
50         }
51
52         System.out.print("->" + arr[index]);
53
54         int right = 2 * index + 2;
55         if (right < arr.length) {
56             this.infixOrder(right);
57         }
58     }
59
60     private void postOrder(int index) {
61         if (arr == null || arr.length == 0) {
62             return;
63         }
64
65         int left = 2 * index + 1;
66         if (left < arr.length) {
67             this.postOrder(left);
68         }
69
70         int right = 2 * index + 2;
71         if (right < arr.length) {
72             this.postOrder(right);
73         }
74
75         System.out.print("->" + arr[index]);
76     }
77 }
代码示例:测试类
 1 public class Main {
 2     public static void main(String[] args) {
 3         int[] arr = {1, 3, 6, 8, 10, 14};
 4
 5         MyArrBinaryTree tree = new MyArrBinaryTree(arr);
 6         System.out.println("前");
 7         tree.preOrder();
 8
 9         System.out.println("
中");
10         tree.infixOrder();
11
12         System.out.println("
后");
13         tree.postOrder();
14     }
15 }
16
17 // 结果
18 前
19 ->1->3->8->10->6->14
20 中
21 ->8->3->10->1->14->6
22 后
23 ->8->10->3->14->6->1
链式存储结构:

代码示例:二叉链表结构
1 class TreeNode {
2     public int val;
3     public TreeNode left;
4     public TreeNode right;
5
6     public TreeNode(int val) {
7         this.val = val;
8     }
9 }
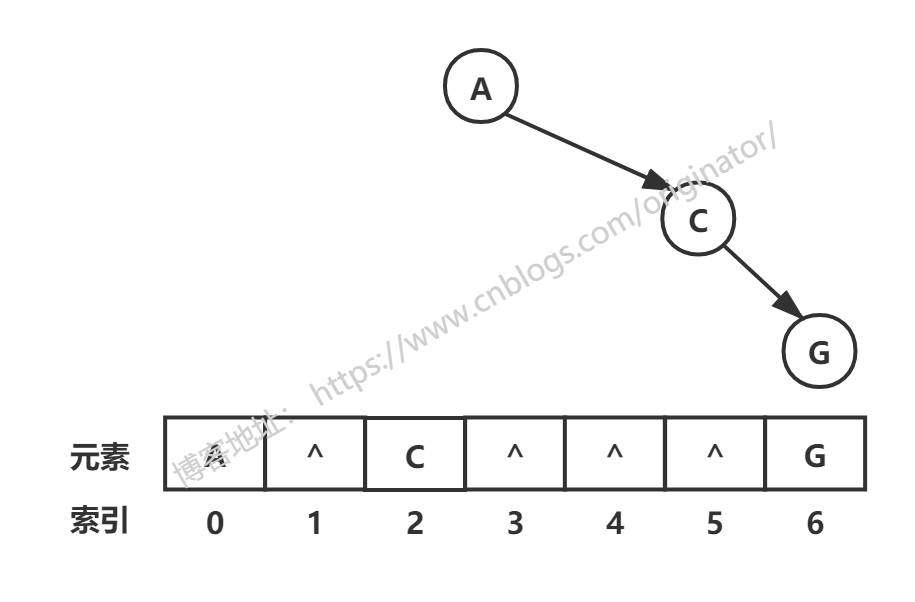
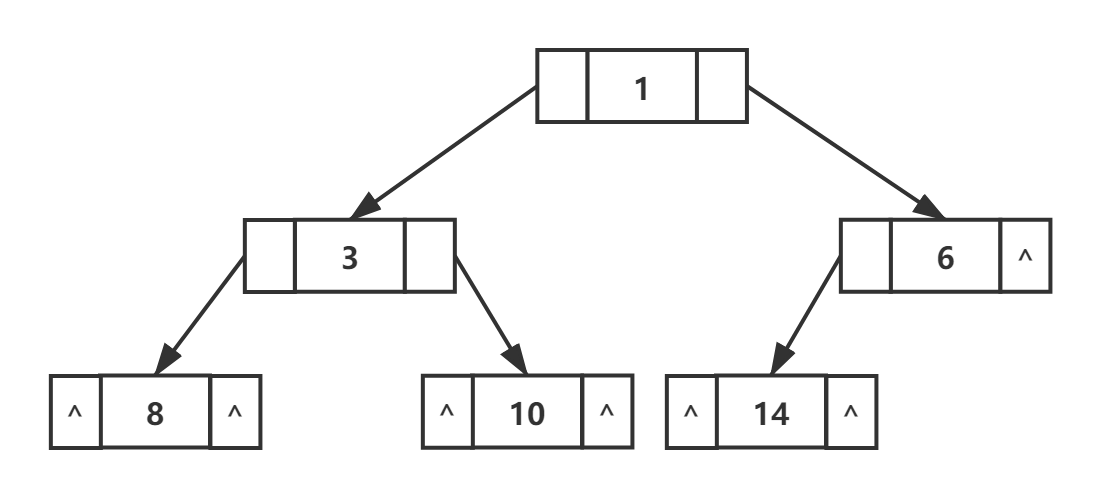
对示例图做遍历,如图:
代码示例:链表二叉树,前序,中序,后序遍历,查找,删除
  1 public class MyBinaryTree {
  2
  3     // 根结点
  4     private TreeNode root;
  5
  6     public MyBinaryTree(TreeNode root) {
  7         this.root = root;
  8     }
  9
 10     // 前序遍历
 11     public void preOrder() {
 12         this.preOrder(root);
 13     }
 14
 15     // 中序遍历
 16     public void infixOrder() {
 17         this.infixOrder(root);
 18     }
 19
 20     // 后序遍历
 21     public void postOrder() {
 22         this.postOrder(root);
 23     }
 24
 25     // 前序遍历查找 5
 26     public TreeNode preOrderSearch(int val) {
 27         return this.preOrderSearch(root, val);
 28     }
 29
 30     // 中序遍历查找
 31     public TreeNode infixOrderSearch(int val) {
 32         return this.infixOrderSearch(root, val);
 33     }
 34
 35     // 后序遍历查找
 36     public TreeNode postOrderSearch(int val) {
 37         return this.postOrderSearch(root, val);
 38     }
 39
 40     // 删除结点
 41     public void delTreeNode(int val) {
 42         if (root != null) {
 43             if (root.val == val) {
 44                 root = null;
 45             } else {
 46                 this.delTreeNode(root, val);
 47             }
 48         }
 49     }
 50
 51     private void delTreeNode(TreeNode root, int val) {
 52         // 判断左孩子
 53         if (root.left != null && root.left.val == val) {
 54             root.left = null;
 55             return;
 56         }
 57         // 判断右孩子
 58         if (root.right != null && root.right.val == val) {
 59             root.right = null;
 60             return;
 61         }
 62
 63         if (root.left != null) {
 64             this.delTreeNode(root.left, val);
 65         }
 66         if (root.right != null) {
 67             this.delTreeNode(root.right, val);
 68         }
 69
 70     }
 71
 72     // 前序遍历查找 5
 73     private TreeNode preOrderSearch(TreeNode root, int val) {
 74         if (root != null) {
 75             // 前序遍历查找次数 4
 76             System.out.println("进入前序遍历查找");
 77             if (root.val == val) {
 78                 return root;
 79             }
 80
 81             final TreeNode node = this.preOrderSearch(root.left, val);
 82             if (node != null) {
 83                 return node;
 84             }
 85
 86             return this.preOrderSearch(root.right, val);
 87         }
 88
 89         return null;
 90     }
 91
 92     // 中序遍历查找
 93     private TreeNode infixOrderSearch(TreeNode root, int val) {
 94         if (root != null) {
 95             final TreeNode node = this.infixOrderSearch(root.left, val);
 96             if (node != null) {
 97                 return node;
 98             }
 99
100             // 中序遍历查找次数 3
101             System.out.println("进入中序遍历查找");
102             if (root.val == val) {
103                 return root;
104             }
105
106             return this.infixOrderSearch(root.right, val);
107         }
108
109         return null;
110     }
111
112     // 后序遍历查找
113     private TreeNode postOrderSearch(TreeNode root, int val) {
114         if (root != null) {
115             TreeNode node = this.postOrderSearch(root.left, val);
116             if (node != null) {
117                 return node;
118             }
119
120             node = this.postOrderSearch(root.right, val);
121             if (node != null) {
122                 return node;
123             }
124
125             // 后序遍历查找次数 2
126             System.out.println("进入后序遍历查找");
127             if (root.val == val) {
128                 return root;
129             }
130         }
131
132         return null;
133     }
134
135     // 前序遍历
136     private void preOrder(TreeNode root) {
137         if (root != null) {
138             System.out.print(root.val + "->");
139             this.preOrder(root.left);
140             this.preOrder(root.right);
141         }
142     }
143
144     // 中序遍历
145     private void infixOrder(TreeNode root) {
146         if (root != null) {
147             this.infixOrder(root.left);
148             System.out.print(root.val + "->");
149             this.infixOrder(root.right);
150         }
151     }
152
153     // 后序遍历
154     private void postOrder(TreeNode root) {
155         if (root != null) {
156             this.postOrder(root.left);
157             this.postOrder(root.right);
158             System.out.print(root.val + "->");
159         }
160     }
161 }
162
163 class TreeNode {
164     public int val;
165     public TreeNode left;
166     public TreeNode right;
167
168     public TreeNode(int val) {
169         this.val = val;
170     }
171 }
代码示例:测试类
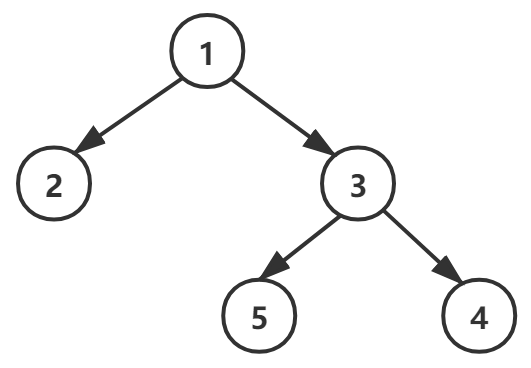
 1 public class Main {
 2     public static void main(String[] args) {
 3         final TreeNode root = new TreeNode(1);
 4
 5         final TreeNode node2 = new TreeNode(2);
 6         final TreeNode node3 = new TreeNode(3);
 7         final TreeNode node4 = new TreeNode(4);
 8         final TreeNode node5 = new TreeNode(5);
 9
10         root.left = node2;
11         root.right = node3;
12         node3.left = node5;
13         node3.right = node4;
14
15         MyBinaryTree tree = new MyBinaryTree(root);
16
17         System.out.println("前序遍历");
18         tree.preOrder(); // 1->2->3->5->4->
19
20         System.out.println("
中序遍历");
21         tree.infixOrder(); // 2->1->5->3->4->
22
23         System.out.println("
后序遍历");
24         tree.postOrder(); // 2->5->4->3->1->
25
26         System.out.println("
");
27         tree.infixOrderSearch(5);
28
29         tree.delTreeNode(5);
30         System.out.println("
删除 5 后,前序遍历");
31         tree.preOrder(); // 1->2->3->4->
32     }
33 }
34
35 // 结果
36 前序遍历
37 1->2->3->5->4->
38 中序遍历
39 2->1->5->3->4->
40 后序遍历
41 2->5->4->3->1->
42
43 进入中序遍历查找
44 进入中序遍历查找
45 进入中序遍历查找
46
47 删除 5 后,前序遍历
48 1->2->3->4->
三、线索二叉树
1、介绍
n个结点的二叉树中含有 n+1 个空指针域。利用空指针域,存放该结点在某种遍历次序下的前驱和后继,这种附加的指针称为"线索"。
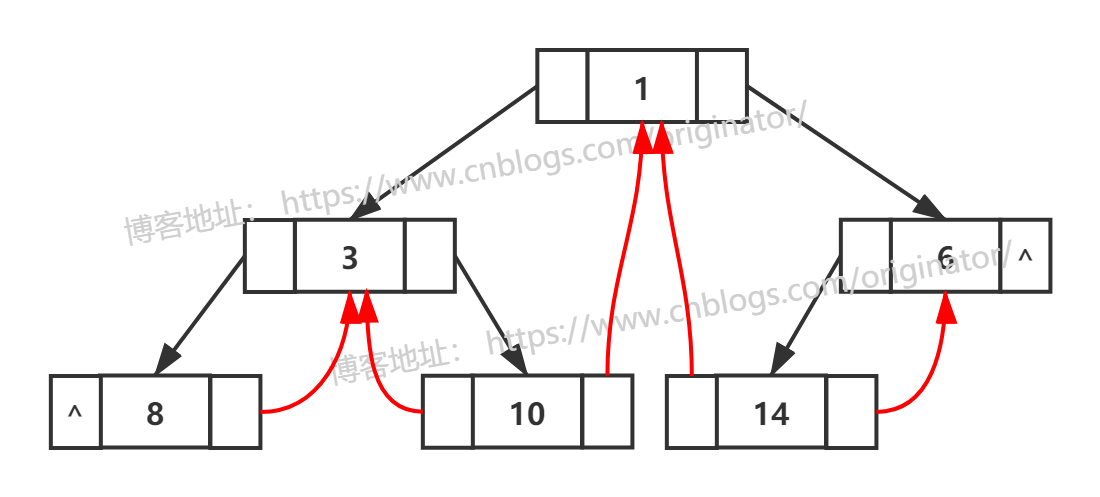
三种遍历结果
前序:1 3 8 10 6 14
中序:8 3 10 1 14 6
后序:8 10 3 14 6 1
我们发现,只有中序遍历可以很好的利用红色结点的 "^" 来存放前驱和后继的指针。下面给出中序线索二叉树:
2、如何区分孩子还是线索
结点:

ltag == 0,left 指向左孩子;ltag == 1,left 指向前驱。
rtag == 0,right 指向右孩子;rtag == 1,right 指向后继。
代码示例:线索二叉链表结构
 1 class ThreadedTreeNode {
 2     public int val;
 3     public ThreadedTreeNode left;
 4     public ThreadedTreeNode right;
 5
 6     public int ltag;
 7     public int rtag;
 8
 9     public ThreadedTreeNode(int val) {
10         this.val = val;
11     }
12
13     @Override
14     public String toString() {
15         return "ThreadedTreeNode{" +
16                 "val=" + val +
17                 '}';
18     }
19 }
3、中序线索化及遍历
代码示例:中序线索化二叉树
  1 public class MyThreadedBinaryTree {
  2     private final ThreadedTreeNode root;
  3     private ThreadedTreeNode pre;
  4
  5     public MyThreadedBinaryTree(ThreadedTreeNode root) {
  6         this.root = root;
  7     }
  8
  9     // 树的线索化
 10     public void threaded() {
 11         this.threaded(root);
 12     }
 13
 14     // 线索化:处理结点的顺序就是一个 中序遍历的 递归形式
 15     private void threaded(ThreadedTreeNode root) {
 16         if (root == null) {
 17             return;
 18         }
 19
 20         // 递归左孩子
 21         this.threaded(root.left);
 22
 23         if (root.left == null) {
 24             root.left = pre;
 25             root.ltag = 1;
 26         }
 27
 28         if (pre != null && pre.right == null) {
 29             pre.right = root;
 30             pre.rtag = 1;
 31         }
 32
 33         pre = root;
 34
 35         // 递归右孩子
 36         this.threaded(root.right);
 37     }
 38
 39     // 中序线索遍历
 40     public void threadedOrder() {
 41         this.threadedOrder(root);
 42     }
 43
 44     private void threadedOrder(ThreadedTreeNode root) {
 45         // 为了不改变 root 指针.
 46         ThreadedTreeNode temp = root;
 47
 48         while (temp != null) {
 49             // 找到最左边的孩子结点,也就是中序遍历的第一个结点
 50             while (temp.ltag == 0) {
 51                 temp = temp.left;
 52             }
 53
 54             System.out.print("->" + temp.val);
 55
 56             // 右边是线索,即 有后继指针
 57             while (temp.rtag == 1) {
 58                 temp = temp.right;
 59                 System.out.print("->" + temp.val);
 60             }
 61
 62             temp = temp.right;
 63         }
 64     }
 65
 66     // 中序遍历
 67     public void infixOrder() {
 68         this.infixOrder(root);
 69     }
 70
 71     private void infixOrder(ThreadedTreeNode root) {
 72         if (root == null) {
 73             return;
 74         }
 75
 76         if (root.left != null && root.ltag == 0) {
 77             this.infixOrder(root.left);
 78         }
 79
 80         System.out.print("->" + root.val);
 81
 82         if (root.right != null && root.rtag == 0) {
 83             this.infixOrder(root.right);
 84         }
 85     }
 86 }
 87
 88 class ThreadedTreeNode {
 89     public int val;
 90     public ThreadedTreeNode left;
 91     public ThreadedTreeNode right;
 92
 93     public int ltag;
 94     public int rtag;
 95
 96     public ThreadedTreeNode(int val) {
 97         this.val = val;
 98     }
 99
100     @Override
101     public String toString() {
102         return "ThreadedTreeNode{" +
103                 "val=" + val +
104                 '}';
105     }
106 }
代码示例:测试类
 1 public class Main {
 2     public static void main(String[] args) {
 3         ThreadedTreeNode root = new ThreadedTreeNode(1);
 4
 5         ThreadedTreeNode node3 = new ThreadedTreeNode(3);
 6         ThreadedTreeNode node6 = new ThreadedTreeNode(6);
 7         ThreadedTreeNode node8 = new ThreadedTreeNode(8);
 8         ThreadedTreeNode node10 = new ThreadedTreeNode(10);
 9         ThreadedTreeNode node14 = new ThreadedTreeNode(14);
10
11         root.left = node3;
12         root.right = node6;
13         node3.left = node8;
14         node3.right = node10;
15         node6.left = node14;
16
17         MyThreadedBinaryTree tree = new MyThreadedBinaryTree(root);
18         tree.threaded();
19
20         // 测试.以10号结点测试
21         System.out.println("10号的前驱是=" + node10.left);
22         System.out.println("10号的后继是=" + node10.right);
23
24         System.out.println("使用中序线索遍历方式");
25         tree.threadedOrder();
26     }
27 }
28
29 // 结果
30 10号的前驱是=ThreadedTreeNode{val=3}
31 10号的后继是=ThreadedTreeNode{val=1}
32 使用中序线索遍历方式
33 ->8->3->10->1->14->6
四、哈夫曼树(最优二叉树)
1、介绍
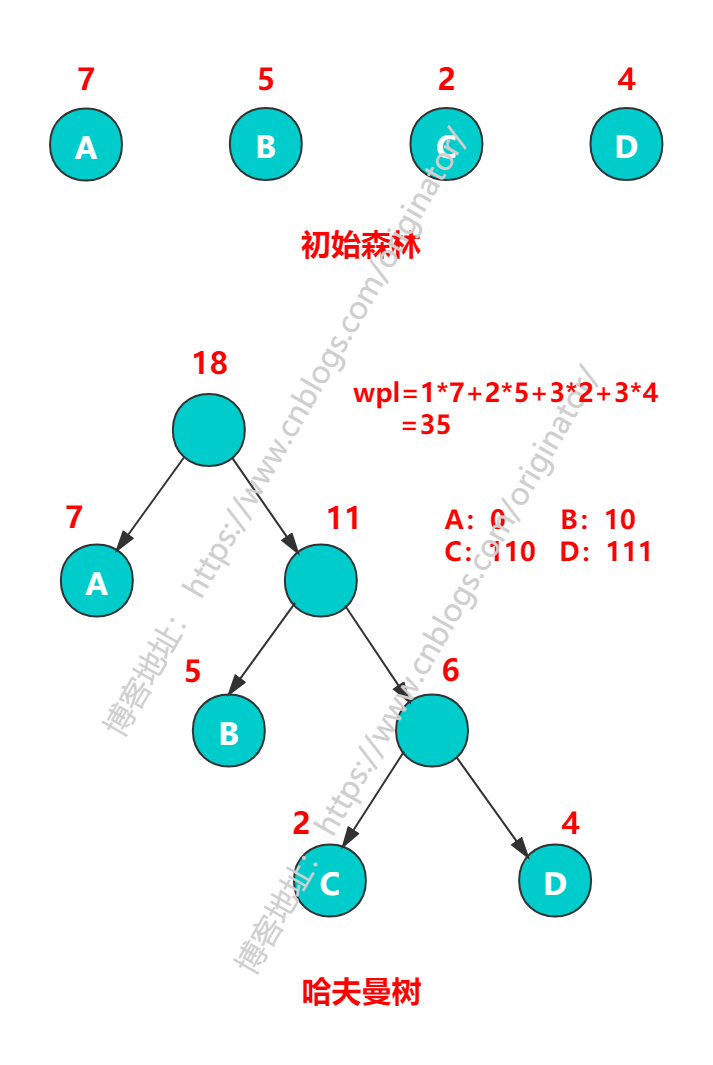
哈夫曼树是带权路径长度(WPL)最短的树。有 n 个叶子结点的哈夫曼树中,总结点数是 2n - 1。
代码示例:创建哈夫曼树
  1 // 哈夫曼树
  2 public class HuffmanTree<T> {
  3
  4     private TreeNode<T> root;
  5     private int wpl = 0;
  6     private Map<T, String> huffmanCodes;
  7
  8     /**
  9      * 构建哈夫曼树的数组
 10      *
 11      * @param arr
 12      */
 13     public HuffmanTree(int[] arr) {
 14         if (arr == null || arr.length == 0) {
 15             return;
 16         }
 17
 18         if (arr.length == 1) {
 19             root = new TreeNode<>(null, arr[0]);
 20             return;
 21         }
 22
 23         List<TreeNode<T>> treeNodes = new ArrayList<>();
 24         for (int i : arr) {
 25             treeNodes.add(new TreeNode<>(null, i));
 26         }
 27
 28         this.createHuffmanTree(treeNodes);
 29     }
 30
 31     public HuffmanTree(List<TreeNode<T>> treeNodes) {
 32         if (treeNodes == null || treeNodes.size() == 0) {
 33             return;
 34         }
 35
 36         this.createHuffmanTree(treeNodes);
 37     }
 38
 39     private void createHuffmanTree(List<TreeNode<T>> treeNodes) {
 40         // arr = 2 4
 41         while (treeNodes.size() > 1) {
 42             Collections.sort(treeNodes);
 43
 44             final TreeNode<T> left = treeNodes.get(0);
 45             final TreeNode<T> right = treeNodes.get(1);
 46
 47             final TreeNode<T> parent = new TreeNode<>(null, left.val + right.val);
 48             parent.left = left;
 49             parent.right = right;
 50
 51             // 2 4 6
 52             treeNodes.add(parent);
 53
 54             treeNodes.remove(0);
 55             treeNodes.remove(0);
 56         }
 57
 58         // 6
 59         root = treeNodes.get(0);
 60     }
 61
 62     /**
 63      * 计算带权路径长度 wpl
 64      *
 65      * @return
 66      */
 67     public int wpl() {
 68         if (wpl == 0) {
 69             this.calWpl(root, 0);
 70         }
 71         return wpl;
 72     }
 73
 74     private void calWpl(TreeNode<T> root, int deep) {
 75         if (root != null) {
 76             // 叶子结点
 77             if (root.left == null && root.right == null) {
 78                 wpl = wpl + root.val * deep;
 79             }
 80
 81             this.calWpl(root.left, deep + 1);
 82             this.calWpl(root.right, deep + 1);
 83         }
 84     }
 85
 86     /**
 87      * 获取元素的哈夫曼编码。左 0 右 1
 88      *
 89      * @return
 90      */
 91     public Map<T, String> getHuffmanCodes() {
 92         if (huffmanCodes == null) {
 93             huffmanCodes = new HashMap<>();
 94             this.getHuffmanCodes(root, "", new StringBuilder());
 95         }
 96         return huffmanCodes;
 97     }
 98
 99     private void getHuffmanCodes(TreeNode<T> root, String code, StringBuilder builder) {
100         if (root == null) {
101             return;
102         }
103
104         StringBuilder temp = new StringBuilder(builder);
105         temp.append(code);
106
107         // 叶子结点
108         if (root.left == null && root.right == null) {
109             huffmanCodes.put(root.data, temp.toString());
110         } else {
111             // 递归左孩子
112             this.getHuffmanCodes(root.left, "0", temp);
113
114             // 递归右孩子
115             this.getHuffmanCodes(root.right, "1", temp);
116         }
117     }
118
119 }
120
121 class TreeNode<T> implements Comparable<TreeNode<T>> {
122
123     public T data;
124
125     /**
126      * 结点的值;出现的频次;权重weight
127      */
128     public int val;
129
130     public TreeNode<T> left;
131     public TreeNode<T> right;
132
133     public TreeNode(T data, int val) {
134         this.data = data;
135         this.val = val;
136     }
137
138     @Override
139     public int compareTo(TreeNode<T> o) {
140         return this.val - o.val;
141     }
142
143     @Override
144     public String toString() {
145         return "TreeNode{" +
146                 "data=" + data +
147                 ", val=" + val +
148                 '}';
149     }
150 }
代码示例:测试类
 1 // 测试类
 2 public class Main {
 3
 4     public static void main(String[] args) {
 5 //        int[] arr = new int[]{2, 4, 5, 7};
 6 //
 7 //        final HuffmanTree<Byte> huffmanTree = new HuffmanTree<>(arr);
 8 //        final int wpl = huffmanTree.wpl();
 9 //        System.out.println(wpl);
10 //
11 //        final Map<Byte, String> huffmanCodes = huffmanTree.getHuffmanCodes();
12 //        System.out.println(huffmanCodes);
13
14         List<TreeNode<Character>> treeNodes = new ArrayList<>();
15         TreeNode<Character> node1 = new TreeNode<>('A', 7);
16         TreeNode<Character> node2 = new TreeNode<>('B', 5);
17         TreeNode<Character> node3 = new TreeNode<>('C', 2);
18         TreeNode<Character> node4 = new TreeNode<>('D', 4);
19         treeNodes.add(node1);
20         treeNodes.add(node2);
21         treeNodes.add(node3);
22         treeNodes.add(node4);
23
24         final HuffmanTree<Character> tree = new HuffmanTree<>(treeNodes);
25         final int wpl = tree.wpl();
26         System.out.println(wpl);
27
28         final Map<Character, String> huffmanCodes = tree.getHuffmanCodes();
29         System.out.println(huffmanCodes);
30     }
31 }
32
33 // 结果
34 35
35 {A=0, B=10, C=110, D=111}
2、哈夫曼编码
哈夫曼编码是哈夫曼树在电讯通信中的经典应用之一。哈夫曼编码广泛应用于数据文件压缩,其压缩率通常在20%~90%之间,具体压缩率依赖于数据的特性。
定长编码:像ASCII编码,都是8位表示一个字符。
变长编码:单个编码的长度不一致,可以根据整体出现频率来调节。
哈夫曼编码:是可变字长编码(VLC)的一种,Huffman于1952年提出一种编码方法,称之为最佳编码。哈夫曼编码是一种前缀编码。
前缀码:就是没有任何码字是其他码字的前缀,不会造成匹配的多义性。
定长编码:
// 待编码的字符串,共 40 个字符(包括空格)
i like like like java do you like a java// 对应Ascii码,40个
105 32 108 105 107 101 32 108 105 107 101 32 108 105 107 101 32 106 97 118 97 32
100 111 32 121 111 117 32 108 105 107 101 32 97 32 106 97 118 97// 对应的二进制
01101001 00100000 01101100 01101001 01101011 01100101 00100000 01101100
01101001 01101011 01100101 00100000 01101100 01101001 01101011 01100101
00100000 01101010 01100001 01110110 01100001 00100000 01100100 01101111
00100000 01111001 01101111 01110101 00100000 01101100 01101001 01101011
01100101 00100000 01100001 00100000 01101010 01100001 01110110 01100001
// 按照二进制来传递信息,总的长度是 359 (包括空格)
变长编码:
// 各个字符对应的个数
d:1 y:1 u:1 j:2 v:2 o:2 l:4 k:4 e:4 i:5 a:5 :9// 说明:按照各个字符出现的次数进行编码,原则是出现次数越多的,则编码越小
0= ,1=a,10=i,11=e,100=k,101=l,110=o,111=v,1000=j,1001=u,1010=y,1011=d// 按这种编码方式,传输数据时,编码就是:
10010110100...// 字符的编码都不能是其他字符编码的前缀,符合此要求的编码叫做前缀编码。
// 这种编码方式有二义性。
哈夫曼编码:统计每个字符出现的次数,以此构建一颗哈夫曼树,按路径左 0 右 1 进行编码。
// 编码
o:1000 u:10010 d:100110 y:100111
i:101 a:110 k:1110 e:1111
j:0000 v:0001 l:001 :01// 对应编码后的串
1010100110111101111010011011110111101001101111011110100001100001110011001111000011001111000100100100110111101111011100100001100001110// 压缩率
长度为 133。原来长度 359。压缩率为:(359-133) / 359 = 62.9%
3、数据压缩、解压
正数:原码,反码,补码都一样;负数:

代码示例:创建哈夫曼树
  1 public class HuffmanCode {
  2
  3     /**
  4      * 哈夫曼编码表.A=0 B=10 C=110 D=111
  5      */
  6     private static Map<Byte, String> huffmanCodes;
  7
  8     /**
  9      * 数据压缩,哈夫曼编码
 10      *
 11      * @param content 待压缩的文本
 12      * @return 压缩后的字节数组 [1, 85, 109, -1, 7]
 13      */
 14     public static byte[] huffmanZip(String content) {
 15         if (content == null || content.length() == 0) {
 16             return new byte[0];
 17         }
 18
 19         // 原始的文本 字节数组
 20         final byte[] bytes = content.getBytes();
 21
 22         // 1.统计字节数组中 每个字符出现的次数
 23         Map<Byte, Integer> map = new HashMap<>();
 24         for (byte b : bytes) {
 25             final Integer integer = map.get(b);
 26             if (integer == null) {
 27                 map.put(b, 1);
 28             } else {
 29                 map.put(b, integer + 1);
 30             }
 31         }
 32
 33         // 2.构建哈夫曼树
 34         List<TreeNode<Byte>> treeNodes = new ArrayList<>();
 35         for (Map.Entry<Byte, Integer> entry : map.entrySet()) {
 36             treeNodes.add(new TreeNode<>(entry.getKey(), entry.getValue()));
 37         }
 38
 39         final HuffmanTree<Byte> tree = new HuffmanTree<>(treeNodes);
 40         huffmanCodes = tree.getHuffmanCodes();
 41
 42         // 3.得到二进制的编码串 00000001010101010110110111111111111
 43         StringBuilder builder = new StringBuilder();
 44         for (byte b : bytes) {
 45             builder.append(huffmanCodes.get(b));
 46         }
 47
 48         return ByteUtil.encode(builder.toString());
 49     }
 50
 51     /**
 52      * 数据解压,哈夫曼解码
 53      *
 54      * @param bytes 压缩后的字节数组 [1, 85, 109, -1, 7]
 55      * @return 解压后的文本
 56      */
 57     public static String huffmanUnZip(byte[] bytes) {
 58         if (huffmanCodes == null) {
 59             System.out.println("没有哈夫曼编码表~");
 60             return null;
 61         }
 62
 63         // 1.得到二进制的字符串 "00000001010..."
 64         final String binStr = ByteUtil.decode(bytes);
 65
 66         // 2.111-->D
 67         Map<String, Byte> map = new HashMap<>();
 68         for (Map.Entry<Byte, String> entry : huffmanCodes.entrySet()) {
 69             map.put(entry.getValue(), entry.getKey());
 70         }
 71
 72         // 3.解码
 73         List<Byte> list = new ArrayList<>();
 74         for (int i = 0; i < binStr.length(); ) {
 75             int count = 1;
 76             Byte temp = null;
 77
 78             // 循环匹配二进制串
 79             while ((temp = map.get(binStr.substring(i, i + count))) == null) {
 80                 count++;
 81             }
 82
 83             list.add(temp);
 84
 85             i += count;
 86         }
 87
 88         byte[] result = new byte[list.size()];
 89         for (int i = 0; i < result.length; i++) {
 90             result[i] = list.get(i);
 91         }
 92
 93         return new String(result);
 94     }
 95 }
 96
 97 // 工具类
 98 public class ByteUtil {
 99
100     /**
101      * 编码.每8位一个字节 装入到byte[]
102      *
103      * @param binaryStr 二进制串."00000001010..."
104      * @return 字节数组 byte[]
105      */
106     public static byte[] encode(String binaryStr) {
107         if (binaryStr == null || binaryStr.length() == 0) {
108             return new byte[0];
109         }
110
111         final int len = (binaryStr.length() + 7) / 8;
112         byte[] bytes = new byte[len];
113         int index = 0;
114
115         for (int i = 0; i < binaryStr.length(); i += 8) {
116             // s = 00000001(补码)
117             final String s = i + 8 > binaryStr.length() ? binaryStr.substring(i) : binaryStr.substring(i, i + 8);
118
119             bytes[index] = (byte) Integer.parseInt(s, 2);
120             index++;
121         }
122
123         return bytes;
124     }
125
126     /**
127      * 解码.将字节数组解码为二进制串
128      *
129      * @param bytes 字节数组
130      * @return 二进制串."00000001010..."
131      */
132     public static String decode(byte[] bytes) {
133         StringBuilder builder = new StringBuilder();
134
135         for (int i = 0; i < bytes.length; i++) {
136             int temp = bytes[i];
137
138             // 最后一个,且是正数
139             if (i == bytes.length - 1 && temp > 0) {
140                 // 不存在补位
141                 builder.append(Integer.toBinaryString(temp));
142             } else {
143                 // 不是最后一个,必然是8位.正数的话需要补位
144                 temp |= 256; // 按位或 [256 = 1 0000 0000] | [1 = 0000 0001] --> [257 = 1 0000 0001]
145                 final String str = Integer.toBinaryString(temp); // 返回的是temp对应的二进制的补码
146
147                 builder.append(str.substring(str.length() - 8));
148             }
149
150         }
151
152         return builder.toString();
153     }
154
155     public static void main(String[] args) {
156         String binaryStr = "00000001010101010110110111111111111";
157         final byte[] encode = encode(binaryStr);
158
159         // [1, 85, 109, -1, 7]
160         System.out.println(Arrays.toString(encode));
161
162         final String decode = decode(encode);
163         System.out.println(decode);
164     }
165
166 }
代码示例:测试类
 1 // 测试类
 2 public class Main {
 3     public static void main(String[] args) {
 4         String content = "AAAAAAABBBBBCCDDDD";
 5         // 1.压缩
 6         final byte[] bytes = HuffmanCode.huffmanZip(content);
 7         System.out.println(Arrays.toString(bytes));
 8
 9         // 2.解压
10         final String s = HuffmanCode.huffmanUnZip(bytes);
11         System.out.println(s);
12     }
13 }
14
15 // 结果
16 [1, 85, 109, -1, 7]
17 AAAAAAABBBBBCCDDDD
4、文件压缩、解压
代码示例:哈夫曼文件压缩、解压。注:下面方法对文件内容有换行,空格等可能有bug。请读者自行修正。
 1 public class FileUtil {
 2
 3     /**
 4      * 文件解压
 5      *
 6      * @param zipFile 源文件,压缩文件
 7      * @param dstFile 目的文件,路径
 8      * @throws Exception 失败抛出异常
 9      */
10     public static void unZipFile(String zipFile, String dstFile) throws Exception {
11         try (InputStream is = new FileInputStream(zipFile);
12              ObjectInputStream ois = new ObjectInputStream(is);
13              OutputStream os = new FileOutputStream(dstFile);) {
14
15             // 1.读取压缩文件
16             byte[] huffmanBytes = (byte[]) ois.readObject();
17             final Map<Byte, String> huffmanCodes = (Map<Byte, String>) ois.readObject();
18
19             // 2.哈夫曼解压
20             final String s = HuffmanCode.huffmanUnZip(huffmanBytes, huffmanCodes);
21
22             os.write(s.getBytes());
23         }
24     }
25
26     /**
27      * 文件压缩
28      *
29      * @param srcFile 源文件,全路径
30      * @param dstFile 目的文件
31      * @throws Exception 失败抛出异常
32      */
33     public static void zipFile(String srcFile, String dstFile) throws Exception {
34         try (OutputStream os = new FileOutputStream(dstFile);
35              ObjectOutputStream oos = new ObjectOutputStream(os);
36              FileInputStream is = new FileInputStream(srcFile);) {
37
38             // 1.通过哈夫曼压缩得到 字节数组,哈夫曼编码表
39             byte[] b = new byte[is.available()];
40             is.read(b);
41
42             final byte[] bytes = HuffmanCode.huffmanZip(new String(b));
43             final Map<Byte, String> huffmanCodes = HuffmanCode.huffmanCodes;
44
45             // 2.写入压缩文件
46             oos.writeObject(bytes);
47             oos.writeObject(huffmanCodes);
48         }
49     }
50 }
代码示例:测试类
 1 // 测试类
 2 public class Main {
 3
 4     public static void main(String[] args) throws Exception {
 5         //测试压缩文件
 6         String srcFile = "d://huffman_test.xml";
 7         String dstFile = "d://huffman_test.zip";
 8
 9         FileUtil.zipFile(srcFile, dstFile);
10         System.out.println("压缩文件ok~~");
11
12         // 测试解压文件
13         String zipFile = "d://huffman_test.zip";
14         String dstFile1 = "d://src.xml";
15
16         FileUtil.unZipFile(zipFile, dstFile1);
17         System.out.println("解压成功!");
18     }
19 }