本次实现了openmv4圆形、矩形、直线的形状识别
圆形识别:
代码如下:x_margin保持不变,更改threshold的阈值
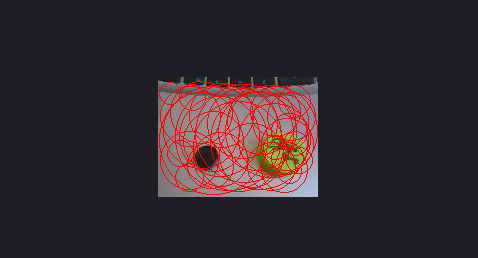
1、threshold=500,x_margin=10
import sensor, image, time

sensor.reset()                      #复位摄像头
sensor.set_pixformat(sensor.RGB565) # grayscale is faster
sensor.set_framesize(sensor.QQVGA)  #160*120
sensor.skip_frames(time = 2000)
clock = time.clock()

while(True):
    clock.tick()                    #捕获帧率
    img = sensor.snapshot().lens_corr(1.8)      #畸变矫正,但是会影响帧率

# Circle对象有四个值: x, y, r (半径), 和 magnitude。
    # magnitude是检测圆的强度。越高越好

    # roi 是一个用以复制的矩形的感兴趣区域(x, y, w, h)。x和y是以左下角为圆心的(0,0)
    # ROI 即图像矩形。操作范围仅限于roi区域内的像素。

    # x_stride 是霍夫变换时需要跳过的x像素的数量。若已知圆较大,可增加
    # x_stride 。简述为有效两点之间的距离跨度

    # y_stride 是霍夫变换时需要跳过的y像素的数量。若已知直线较大,可增加
    # y_stride 。

    # threshold 控制从霍夫变换中监测到的圆。只返回大于或等于阈值的圆。
    # 应用程序的阈值正确值取决于图像。注意:一条圆的大小是组成圆所有
    # 索贝尔滤波像素大小的总和。

    # x_margin 控制所检测的圆的合并。 圆像素为 x_margin 、 y_margin 和
    # r_margin的部分合并。

    #以设定的x_margin为边界,大于它的合并为一个圆,小于它则消失

    # y_margin 控制所检测的圆的合并。 圆像素为 x_margin 、 y_margin 和
    # r_margin 的部分合并。

    # r_margin 控制所检测的圆的合并。 圆像素为 x_margin 、 y_margin 和
    # r_margin 的部分合并。

    # r_min,r_max和r_step控制测试圆的半径。
    # threshold = 3500比较合适。如果视野中检测到的圆过多,请增大阈值;
    # 相反,如果视野中检测到的圆过少,请减少阈值。

    #注意:物体阈值大于设定的threshold,或物体的像素大于x—_margin才能被框中(y_margin和r_margin理论上也行,但是实现不了)

    for c in img.find_circles(threshold = 2000, x_margin = 10, y_margin = 10, r_margin = 10,
            r_min = 10, r_max = 100, r_step = 2):
        img.draw_circle(c.x(), c.y(), c.r(), color = (255, 0, 0))
        print(c)

    #image.find_circles[roi,x_stride=2,y_stride=1,threshold=2000,x_margin=10,y_margin=10,r_margin=10,r_min=2,r_max,r_step=2)
    #返回圆的x位置。返回圆的y位置。返回圆的半径。返回圆的模(magnitude)。----对应于c

    print("FPS %f" % clock.fps())
运行结果:密密麻麻的圆
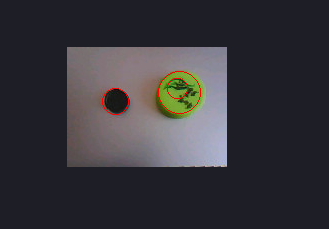
2、threshold=2000,x_margin=10
运行结果:识别了两个圆
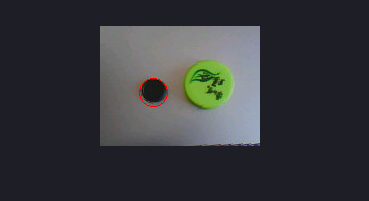
3、threshold=3000,x_margin=10
运行结果:只识别了一个圆
threshold的阈值,更改x_margin:
1、x_margin=10,threshold=2000
运行结果:识别了两个圆

2、x_margin=1000,threshold=2000
运行结果:只识别了一个圆
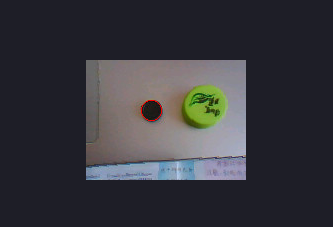
修改threshold或x_margin都能改变识别的范围
矩形识别:
代码如下:
import sensor, image, time

sensor.reset()
sensor.set_pixformat(sensor.RGB565) # 灰度更快(160x120 max on OpenMV-M7)
sensor.set_framesize(sensor.QQVGA)
sensor.skip_frames(time = 2000)
clock = time.clock()

while(True):
    clock.tick()
    img = sensor.snapshot()

    # 下面的`threshold`应设置为足够高的值,以滤除在图像中检测到的具有
    # 低边缘幅度的噪声矩形。最适用与背景形成鲜明对比的矩形。

    for r in img.find_rects(threshold = 10000):
        img.draw_rectangle(r.rect(), color = (255, 0, 0))
        for p in r.corners(): img.draw_circle(p[0], p[1], 5, color = (0, 255, 0))
        print(r)

    print("FPS %f" % clock.fps())
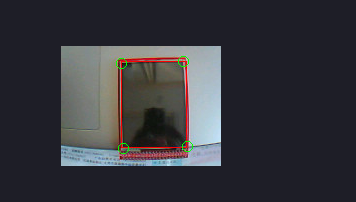
运行结果:将矩形和它的 四个角分别框起来
线段识别:
代码如下:
enable_lens_corr = False # turn on for straighter lines...打开以获得更直的线条…
import sensor, image, time

sensor.reset()
sensor.set_pixformat(sensor.RGB565) #灰度更快
sensor.set_framesize(sensor.QQVGA)
sensor.skip_frames(time = 2000)
clock = time.clock()

# 所有的线对象都有一个`theta()`方法来获取它们的旋转角度。
# 您可以根据旋转角度来过滤线条。

min_degree = 0
max_degree = 179

# 所有线段都有 `x1()`, `y1()`, `x2()`, and `y2()` 方法来获得他们的终点
# 一个 `line()` 方法来获得所有上述的四个元组值,可用于 `draw_line()`.

while(True):
    clock.tick()
    img = sensor.snapshot()
    if enable_lens_corr: img.lens_corr(1.8) # for 2.8mm lens...

    # `threshold` controls how many lines in the image are found. Only lines with
    # edge difference magnitude sums greater than `threshold` are detected...

    # `threshold`控制从霍夫变换中监测到的直线。只返回大于或等于阈值的
    # 直线。应用程序的阈值正确值取决于图像。注意:一条直线的大小是组成
    # 直线所有索贝尔滤波像素大小的总和。

    # `theta_margin`和`rho_margin`控件合并相似的直线。如果两直线的
    # theta和ρ值差异小于边际,则它们合并。

    for l in img.find_lines(threshold = 1000, theta_margin = 25, rho_margin = 25):
        if (min_degree <= l.theta()) and (l.theta() <= max_degree):
            img.draw_line(l.line(), color = (255, 0, 0))
            # print(l)

    print("FPS %f" % clock.fps())
运行结果:通过theta_margin和rho_margin控件合并相似的直线
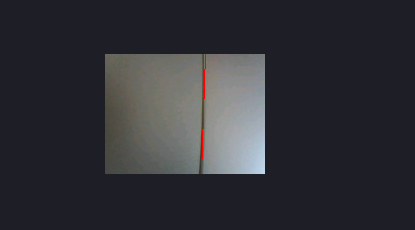
注意:通过theta_margin和rho_margin控件合并相似的直线,这样可以防止直线太散乱
正是步行者,一步步登峰!