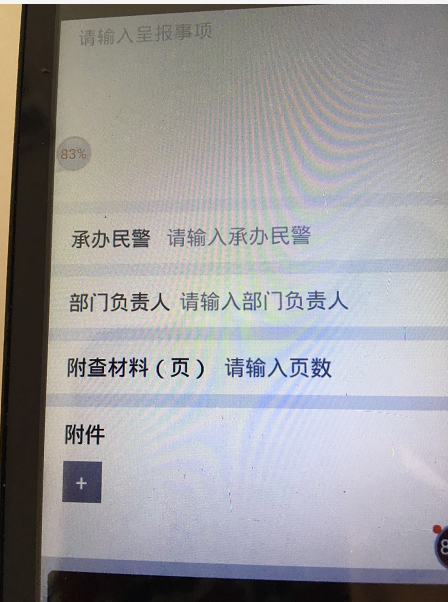
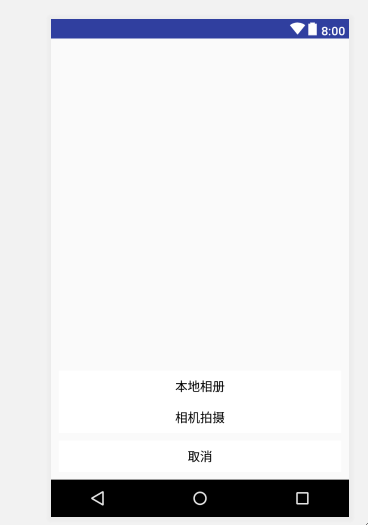
1,点击添加附件按钮后的弹框:画面
<?xml version="1.0" encoding="utf-8"?>
<RelativeLayout xmlns:android="http://schemas.android.com/apk/res/android"
    android:layout_width="match_parent"
    android:layout_height="wrap_content"
    >
    <LinearLayout
        android:layout_margin="10dp"
        android:paddingBottom="10dp"
        android:layout_width="match_parent"
        android:layout_height="wrap_content"
        android:layout_alignParentBottom="true"
        android:orientation="vertical" >

        <Button
            android:id="@+id/btn_pop_album"
            android:layout_width="match_parent"
            android:layout_height="@dimen/annex_btn_height"
            android:text="本地相册"
            android:background="#ffff"
            android:textSize="@dimen/text_size" />

        <Button
            android:id="@+id/btn_pop_camera"
            android:layout_width="match_parent"
            android:layout_height="@dimen/annex_btn_height"
            android:text="相机拍摄"
            android:background="#ffff"
            android:textSize="@dimen/text_size" />

        <Button
            android:id="@+id/btn_pop_cancel"
            android:layout_width="match_parent"
            android:layout_height="@dimen/annex_btn_height"
            android:layout_marginTop="@dimen/margin_top"
            android:background="#ffff"
            android:text="取消"
            android:textSize="@dimen/text_size" />
    </LinearLayout>


</RelativeLayout>
2,后台调用弹框的按钮事件
 //弹出框
    private void showPopueWindow() {

        View popView = View.inflate(this, R.layout.annex_layout, null);
        Button bt_album = (Button) popView.findViewById(R.id.btn_pop_album);
        Button bt_camera = (Button) popView.findViewById(R.id.btn_pop_camera);
        Button bt_cancle = (Button) popView.findViewById(R.id.btn_pop_cancel);
        //获取屏幕宽高
        int weight = getResources().getDisplayMetrics().widthPixels;
        int height = getResources().getDisplayMetrics().heightPixels * 1 / 3;

        final PopupWindow popupWindow = new PopupWindow(popView, weight, height);

        popupWindow.setFocusable(true);
        //点击外部popueWindow消失
        popupWindow.setOutsideTouchable(true);

        bt_album.setOnClickListener(new View.OnClickListener() {
            @Override
            public void onClick(View v) {
                openAlbum();//打开相册
                popupWindow.dismiss();

            }
        });
        bt_camera.setOnClickListener(new View.OnClickListener() {
            @Override
            public void onClick(View v) {
//                openCamra();
                //查看运行时权限
                checkCameraPermission();
                popupWindow.dismiss();

            }
        });
        bt_cancle.setOnClickListener(new View.OnClickListener() {
            @Override
            public void onClick(View v) {
                popupWindow.dismiss();

            }
        });
        //popupWindow消失屏幕变为不透明
        popupWindow.setOnDismissListener(new PopupWindow.OnDismissListener() {
            @Override
            public void onDismiss() {
                WindowManager.LayoutParams lp = getWindow().getAttributes();
                lp.alpha = 1.0f;
                getWindow().setAttributes(lp);
            }
        });
        //popupWindow出现屏幕变为半透明
        WindowManager.LayoutParams lp = getWindow().getAttributes();
        lp.alpha = 0.5f;
        getWindow().setAttributes(lp);
        popupWindow.showAtLocation(popView, Gravity.BOTTOM, 0, 0);

    }
3,打开相册
 /**
     * 打开系统相册
     */
    private void openAlbum() {

        //只打开相册
        Intent intent = new Intent(Intent.ACTION_PICK,
                android.provider.MediaStore.Images.Media.EXTERNAL_CONTENT_URI);
        startActivityForResult(intent, 1004);
    }
4,打开相机
/**
 * 调用系统相机
 */
private void openCamra() {

    Intent intent = new Intent(MediaStore.ACTION_IMAGE_CAPTURE);

    //创建图片保存路径
    File file = Utils.creatImageFile();
    if (file == null) {
        Toast.makeText(getApplicationContext(), "文件创建不成功", Toast.LENGTH_SHORT).show();
        return;
    }
    if (Build.VERSION.SDK_INT >= Build.VERSION_CODES.N){//大于24时需要使用FileProvider  1,在res下建一个XML文件夹,创建一个photofile.xml的文件,2,在AndroidManifest.xml里注册Provider
mOutPutFileUri = FileProvider.getUriForFile(this, "com.liveyc.jwbzgl.fileprovider", file);//第二个参数为包名+fileprovider
    }else {
        mOutPutFileUri = Uri.fromFile(file);
    }
    intent.putExtra(MediaStore.EXTRA_OUTPUT, mOutPutFileUri);
    startActivityForResult(intent, 1003);

}
5.其他方法
//选择相册或相机,选中某张图后调用的方法
 protected void onActivityResult(int requestCode, int resultCode, Intent data) {
        super.onActivityResult(requestCode, resultCode, data);
        if (resultCode == RESULT_OK) {
            ContentResolver cr = this.getContentResolver();
            String ImgPath = "";
            String fileName = "";
            Bitmap curBitmap = null;
            switch (requestCode) {
                case 1003:
                    if (mOutPutFileUri != null) {
                        try {
                            curBitmap = BitmapFactory.decodeStream(cr.openInputStream(mOutPutFileUri));
                            //图片路径
                            ImgPath =  mOutPutFileUri.getPath();
                            //图片名字
                            fileName =Utils.pathToFileName(ImgPath);
                        } catch (FileNotFoundException e) {
                            Log.e("Exception", e.getMessage(), e);
                        }
                    }
                    break;
                case 1004: {
                    if (data != null) {
                        Uri uri = data.getData();
                        try {
                            //显示图片
                            curBitmap = BitmapFactory.decodeStream(cr.openInputStream(uri));
                            //获取图片路径
                            ImgPath = getRealFilePath(uri);
                            //获取文件名
                            fileName = Utils.pathToFileName(ImgPath);
//                            cursor.close();
                        } catch (FileNotFoundException e) {
                            Log.e("Exception", e.getMessage(), e);
                        }
                    }
                    break;
                }
            }
            //做处理
            //保存数据
            int viewTag = detailList.size();
            AttachmentModel model = new AttachmentModel();
            model.setId("" +viewTag);
            model.setName(fileName);
            model.setRealName(ImgPath);
            detailList.add(model);
            //添加控件
            addSubView(curBitmap, viewTag);
            if (detailList.size()  == maxNum){
                btnUpload.setVisibility(View.INVISIBLE);
            }
        }
    }
public  String getRealFilePath( final Uri uri ) {
    if ( null == uri ) return null;
    final String scheme = uri.getScheme();
    String data = null;
    if ( scheme == null )
        data = uri.getPath();
    else if ( ContentResolver.SCHEME_FILE.equals( scheme ) ) {
        data = uri.getPath();
    } else if ( ContentResolver.SCHEME_CONTENT.equals( scheme ) ) {
        Cursor cursor = getContentResolver().query( uri, new String[] { MediaStore.Images.ImageColumns.DATA }, null, null, null );
        if ( null != cursor ) {
            if ( cursor.moveToFirst() ) {
                int index = cursor.getColumnIndex( MediaStore.Images.ImageColumns.DATA );
                if ( index > -1 ) {
                    data = cursor.getString( index );
                }
            }
            cursor.close();
        }
    }
    return data;
}
   //获取运行时权限
    private void checkCameraPermission(){
        if (Build.VERSION.SDK_INT>=Build.VERSION_CODES.M){
            if( (ActivityCompat.checkSelfPermission(this, Manifest.permission.CAMERA)!= PackageManager.PERMISSION_GRANTED)&& (ActivityCompat.checkSelfPermission(this, Manifest.permission.WRITE_EXTERNAL_STORAGE)!= PackageManager.PERMISSION_GRANTED)){
                ActivityCompat.requestPermissions(this,new String[]{Manifest.permission.CAMERA,Manifest.permission.WRITE_EXTERNAL_STORAGE},1006);
            }else {
                openCamra();
            }
        }else {
            openCamra();
    }
    }


    @Override
    public void onRequestPermissionsResult(int requestCode, @NonNull String[] permissions, @NonNull int[] grantResults) {
       if (requestCode == 1006){      //checkCameraPermission
           if ((grantResults[0] == PackageManager.PERMISSION_GRANTED) && (grantResults[1] == PackageManager.PERMISSION_GRANTED)){
               openCamra();
           }
       }else {
           super.onRequestPermissionsResult(requestCode, permissions, grantResults);

       }
    }
//添加图片控件
private void addSubView(Bitmap curBitmap, int viewTag) {
    View imageLayout = View.inflate(this, R.layout.image_layout, null);
    imageLayout.setTag(viewTag);
    ImageView image = (ImageView) imageLayout.findViewById(R.id.image);
    Button delete = (Button) imageLayout.findViewById(R.id.delete);
    delete.setOnClickListener(uploadListener);
    image.setImageBitmap(curBitmap);
    uploadLinearLayout.addView(imageLayout);
}
6.FileProvider相关
photofile.xml:
<?xml version="1.0" encoding="utf-8"?>
<resources>
    <paths>
        <root-path name="my_image" path=""/>
    </paths>
</resources>
在AndroidManifest.xml里注册Provider:
<provider
    android:authorities="com.liveyc.jwbzgl.fileprovider"
    android:name="android.support.v4.content.FileProvider"
    android:exported="false"
    android:grantUriPermissions="true">
    <meta-data
        android:name="android.support.FILE_PROVIDER_PATHS"
        android:resource="@xml/photofile"/>
</provider>
image_layout:
<?xml version="1.0" encoding="utf-8"?>
<LinearLayout xmlns:android="http://schemas.android.com/apk/res/android"
    android:layout_width="85dp"
    android:layout_height="70dp"
    android:gravity="left"
    android:orientation="vertical"
    android:tag="1">

    <Button
        android:id="@+id/delete"
        android:layout_width="20dp"
        android:layout_height="20dp"
        android:background="@mipmap/delete"
        android:textSize="@dimen/text_size" />

    <ImageView
        android:id="@+id/image"
        android:layout_width="50dp"
        android:layout_height="50dp"
        android:scaleType="fitXY"
        android:layout_marginLeft="@dimen/margin_left" />

</LinearLayout>
7,实现效果: