1 spring in action中介绍
bean在Spring容器中从创建到销毁经历了若干阶段,每一阶段都可以针对Spring如何管理bean进行个性化定制。
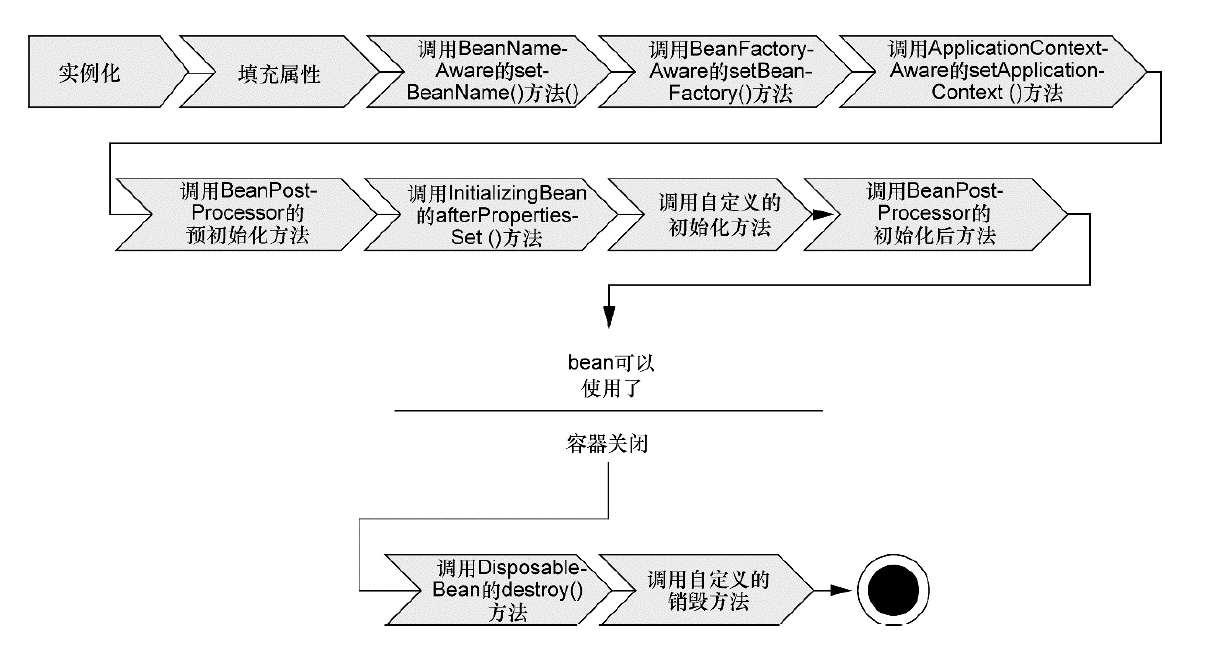
下面是一个典型的生命周期过程:
我们对上图进行详细描述:
- Spring对bean进行实例化;
- Spring将值和bean的引用注入到bean对应的属性中;
- 如果bean实现了BeanNameAware接口,Spring将bean的ID传递给setBean-Name()方法;
- 如果bean实现了BeanFactoryAware接口,Spring将调用setBeanFactory()方法,将BeanFactory容器实例传入;
- 如果bean实现了ApplicationContextAware接口,Spring将调用setApplicationContext()方法,将bean所在的应用上下文的引用传入进来;
- 如果bean实现了BeanPostProcessor接口,Spring将调用它们的post-ProcessBeforeInitialization()方法;
- 如果bean实现了InitializingBean接口,Spring将调用它们的after-PropertiesSet()方法。类似地,如果bean使用initmethod声明了初始化方法,该方法也会被调用;
- 如果bean实现了BeanPostProcessor接口,Spring将调用它们的post-ProcessAfterInitialization()方法;
- 此时,bean已经准备就绪,可以被应用程序使用了,它们将一直驻留在应用上下文中,直到该应用上下文被销毁;
- 如果bean实现了DisposableBean接口,Spring将调用它的destroy()接口方法。同样,如果bean使用destroy-method声明了销毁方法,该方法也会被调用。
2 上代码
我们看到bean生命周期3-5过程都有以Aware结尾的接口,那么这些接口有什么用?
Aware翻译为“意识到的,知道的,已感知的”。从字面意思理解,BeanNameAware的作用就是感知BeanName,实现该接口的类可以感知自己在容器中的BeanName(对应在xml中配置的bean的id),现实确实就是这个作用,BeanNameAware该接口通过一个setBeanName的方法来实现这个操作。同理,BeanFactoryAware以及ApplicationContextAware也是如此。
下面上代码,理解bean生命周期以及生命周期这些aware是怎么工作的。

上面框住的是下面示例需要的类。
(1)HelloWord类
HelloWorld的职责是接收和打印消息。
public class HelloWorld {
    private String message;

    public void setMessage(String message) {
        this.message = message;
    }

    public void getMessage() {
        System.out.println("Your Message : " + message);
    }
}
(2)TestAware
实现了BeanNameAware和ApplicationContextAware接口,定义了初始化方法init(回看生命周期7,init会在后面的xml里面配置)
public class TestAware implements ApplicationContextAware ,BeanNameAware{

    @Override
    public void setApplicationContext(ApplicationContext applicationContext) throws BeansException {
        // TODO Auto-generated method stub
        HelloWorld hd = (HelloWorld) applicationContext.getBean("helloWorld");
        hd.getMessage();


    }

    @Override
    public void setBeanName(String name) {
        // TODO Auto-generated method stub
        System.out.println("beanName:"+name);

    }

    public void init() {
        System.out.println("testAware init!");
    }

}
(3)MyBeanPostProcessor类
实现了BeanPostProcessor接口(生命周期6),并实现了接口的postProcessBeforeInitialization方法和postProcessAfterInitialization方法。spring容器中的所有方法在初始化前会调用postProcessBeforeInitialization,初始化后调用postProcessAfterInitialization。这里加了一个判断语句,只有在testAware初始化时才会打印。
public class MyBeanPostProcessor implements BeanPostProcessor {

    @Override
    public Object postProcessBeforeInitialization(Object bean, String beanName) throws BeansException {
        // TODO Auto-generated method stub
        if(beanName.equals("testAware")) {
            System.out.println(beanName+":before init");
        }

        return BeanPostProcessor.super.postProcessBeforeInitialization(bean, beanName);
    }

    @Override
    public Object postProcessAfterInitialization(Object bean, String beanName) throws BeansException {
        // TODO Auto-generated method stub

        if(beanName.equals("testAware")) {
            System.out.println(beanName+":after init");
        }
        return BeanPostProcessor.super.postProcessAfterInitialization(bean, beanName);
    }
}
(4)awareBeans.xml
<?xml version="1.0" encoding="UTF-8"?>

<beans xmlns="http://www.springframework.org/schema/beans"
    xmlns:xsi="http://www.w3.org/2001/XMLSchema-instance"
    xsi:schemaLocation="http://www.springframework.org/schema/beans
    http://www.springframework.org/schema/beans/spring-beans-3.0.xsd">

   <bean id="helloWorld" class="com.ouym.test.HelloWorld" >
       <property name="message" value="Hello World!"/>
   </bean>
   <bean id="testAware" class="aware.test.TestAware" init-method="init"/>
   <bean id="myBeanPostProcessor" class="aware.test.MyBeanPostProcessor"/>

</beans>
注意,这里配置testAware的bean时,指定了init方法,也就是生命周期7中所说的初始化方法(和实现InitializingBean接口的作用一样)。
(5)测试
测试类如下:
public class MainApp {

    public static void main(String[] args) {

        AbstractApplicationContext context = new ClassPathXmlApplicationContext("aware/test/awareBeans.xml");

    }
}
打印结果如下:
1 beanName:testAware
2 Your Message : Hello World!
3 testAware:before init
4 testAware init!
5 testAware:after init
测试类的作用是启动spring容器,然后spring将配置文件awareBean.xml里面配置的所有bean加载到容器中。
(6)最后我们对应xml文件来模拟整个生命周期过程。
helloWorld对象的生命周期过程:
(1)实例化:实例化helloWorld对象。
(2)填充属性(DI):将message=“Hello world!”注入到helloWorld对象。
(3)由于HelloWorld类没有实现相关Aware接口,所以生命周期3-5过程跳过;HelloWorld没有配置init方法,并且我们前面在MyBeanPostProcessor的方法中加了判断,所以这里生命周期6-8过程也不会打印任何东西,此时helloWorld对象已经准备就绪,我们可以在程序中直接拿来使用。怎么拿?contex.getBean(beanName)或者注解@Autowired都可以。它会驻留在应用上下文中,直到应用上下文被销毁,如果配置了destroy方法,那么helloWorld对象在销毁前会调用该方法(这里没有)。
在整个helloWorld对象的生命周期中,没有打印任何东西。
testAware对象的生命周期过程:
(1)实例化:实例化testAware对象。
(2)填充属性(DI):testAware对象没有属性需要填充。
(3)生命周期3:TestAware实现了BeanNameAware接口,spring会调用setBeanName(String name)方法,该方法打印"beanName:"+name,自己的name也就是xml中的id(testAware),所以输出结果第一行打印:beanName:testAware。
(4)生命周期4:TestAware没有实现BeanFactoryAware接口,pass。
(5)生命周期5:TestAware实现了ApplicationContextAware接口,Spring将调用setApplicationContext(ApplicationContext applicationContext)方法,该方法传入了spring的上下文applicationContext,我们利用上下文得到了helloWorld对象,然后调用getMessage方法打印了Your Message : Hello World!,所以输出第二行没毛病。
(6)生命周期6:init方法调用前会调用BeanPostProcessor的postProcessBeforeInitialization,该方法打印了输出的第3行testAware:before init。
(7)生命周期7:我们在xml里面配置了testAware的init方法,这里会调用该方法打印了输出的第4行testAware init!。
(8)生命周期8:init方法被调用后,紧接着调用postProcessAfterInitialization方法,打印了输出的第5行testAware:after init。
(9)到此testAware对象在spring容器中,准备就绪了。后面的周期过程与helloWorld一样。
----------------------完----------------------