转: SPRING BOOT : HELLO WORLD WITH MAVEN - 2020
_____________________________________________________
By default, Spring Boot 1.3.2.RELEASE requires Java 7 and Spring Framework 4.1.5 or above. Spring Boot can be used with "classic" Java development tools or installed as a command line tool. Regardless, we will need Java SDK v1.6 or higher
$ java -version
java version "1.7.0_79"
OpenJDK Runtime Environment (IcedTea 2.5.6) (7u79-2.5.6-0ubuntu1.14.04.1)
OpenJDK 64-Bit Server VM (build 24.79-b02, mixed mode)
We also need Maven:
$ sudo apt-get install maven

$ mvn -v
Apache Maven 3.2.5
Maven home: /home/k/java/apache-maven-3.2.5
Java version: 1.7.0_79, vendor: Oracle Corporation
Java home: /usr/lib/jvm/java-7-openjdk-amd64/jre
Default locale: en_US, platform encoding: UTF-8
OS name: "linux", version: "3.13.0-40-generic", arch: "amd64", family: "unix"
POM and dependencies
First we want to set up a basic build script.
Though we can use any build system we like when building apps with Spring, in this section we'll use Maven following Developing your first Spring Boot application.
We need to start by creating a Maven pom.xml file. The pom.xml is the recipe that will be used to build our project.
pom.xml:
<?xml version="1.0" encoding="UTF-8"?>
<project xmlns="http://maven.apache.org/POM/4.0.0" xmlns:xsi="http://www.w3.org/2001/XMLSchema-instance"
    xsi:schemaLocation="http://maven.apache.org/POM/4.0.0 http://maven.apache.org/xsd/maven-4.0.0.xsd">
    <modelVersion>4.0.0</modelVersion>

    <groupId>com.example</groupId>
    <artifactId>myproject</artifactId>
    <version>0.0.1-SNAPSHOT</version>

    <parent>
        <groupId>org.springframework.boot</groupId>
        <artifactId>spring-boot-starter-parent</artifactId>
        <version>1.3.2.RELEASE</version>
    </parent>

    <!-- Additional lines to be added here... -->

</project>
This should give us a working build, we can test it out by running mvn package:
$ mvn package

$ tree
.
|-- pom.xml
|-- target
    |-- maven-archiver
    |   |-- pom.properties
    |-- myproject-0.0.1-SNAPSHOT.jar
Spring Boot provides a number of "Starter POMs" that make easy to add jars to our classpath. Our sample application has already used spring-boot-starter-parent in the parent section of the POM. The spring-boot-starter-parent is a special starter that provides useful Maven defaults. It also provides a dependency-management section so that we can omit version tags for dependencies.
Let's look at what dependency we currently have:
$ mvn dependency:tree
...
[INFO] com.example:myproject:jar:0.0.1-SNAPSHOT
..
Note that spring-boot-starter-parent provides NO dependencies by itself.
Other "Starter POMs" simply provide dependencies that we are likely to need when developing a specific type of application. Since we are developing a web application, we will add a spring-boot-starter-web dependency. Here is our updated pom.xml:
<?xml version="1.0" encoding="UTF-8"?>
<project xmlns="http://maven.apache.org/POM/4.0.0" xmlns:xsi="http://www.w3.org/2001/XMLSchema-instance"
    xsi:schemaLocation="http://maven.apache.org/POM/4.0.0 http://maven.apache.org/xsd/maven-4.0.0.xsd">
    <modelVersion>4.0.0</modelVersion>

    <groupId>com.example</groupId>
    <artifactId>myproject</artifactId>
    <version>0.0.1-SNAPSHOT</version>

    <parent>
        <groupId>org.springframework.boot</groupId>
        <artifactId>spring-boot-starter-parent</artifactId>
        <version>1.3.2.RELEASE</version>
    </parent>

    <dependencies>
        <dependency>
            <groupId>org.springframework.boot</groupId>
            <artifactId>spring-boot-starter-web</artifactId>
        </dependency>
    </dependencies>

</project>
Now let's run mvn dependency:tree again:
$ mvn dependency:tree
...
[INFO]
[INFO] --- maven-dependency-plugin:2.10:tree (default-cli) @ myproject ---
[INFO] com.example:myproject:jar:0.0.1-SNAPSHOT
[INFO] - org.springframework.boot:spring-boot-starter-web:jar:1.3.2.RELEASE:compile
[INFO]    +- org.springframework.boot:spring-boot-starter-tomcat:jar:1.3.2.RELEASE:compile
[INFO]    |  +- org.apache.tomcat.embed:tomcat-embed-core:jar:8.0.30:compile
[INFO]    |  +- org.apache.tomcat.embed:tomcat-embed-el:jar:8.0.30:compile
[INFO]    |  +- org.apache.tomcat.embed:tomcat-embed-logging-juli:jar:8.0.30:compile
[INFO]    |  - org.apache.tomcat.embed:tomcat-embed-websocket:jar:8.0.30:compile
[INFO]    +- org.springframework.boot:spring-boot-starter-validation:jar:1.3.2.RELEASE:compile
[INFO]    |  - org.hibernate:hibernate-validator:jar:5.2.2.Final:compile
[INFO]    |     +- javax.validation:validation-api:jar:1.1.0.Final:compile
[INFO]    |     +- org.jboss.logging:jboss-logging:jar:3.3.0.Final:compile
[INFO]    |     - com.fasterxml:classmate:jar:1.1.0:compile
[INFO]    +- com.fasterxml.jackson.core:jackson-databind:jar:2.6.5:compile
[INFO]    |  +- com.fasterxml.jackson.core:jackson-annotations:jar:2.6.5:compile
[INFO]    |  - com.fasterxml.jackson.core:jackson-core:jar:2.6.5:compile
[INFO]    +- org.springframework:spring-web:jar:4.2.4.RELEASE:compile
[INFO]    |  +- org.springframework:spring-aop:jar:4.2.4.RELEASE:compile
[INFO]    |  |  - aopalliance:aopalliance:jar:1.0:compile
[INFO]    |  +- org.springframework:spring-beans:jar:4.2.4.RELEASE:compile
[INFO]    |  - org.springframework:spring-context:jar:4.2.4.RELEASE:compile
[INFO]    - org.springframework:spring-webmvc:jar:4.2.4.RELEASE:compile
[INFO]       - org.springframework:spring-expression:jar:4.2.4.RELEASE:compile
We can see that there are now a number of additional dependencies, including the Tomcat web server and Spring Boot itself.
To finish our application we need to create a single Java file.
Maven will compile sources from src/main/java by default so we need to create that folder structure, then add a file named src/main/java/Example.java:
import org.springframework.boot.*;
import org.springframework.boot.autoconfigure.*;
import org.springframework.stereotype.*;
import org.springframework.web.bind.annotation.*;

@RestController
@EnableAutoConfiguration
public class Example {

    @RequestMapping("/")
    String home() {
        return "Hello World!";
    }

    public static void main(String[] args) throws Exception {
        SpringApplication.run(Example.class, args);
    }

}
Here is our new file structure:
.
|-- pom.xml
|-- src
|   |-- main
|       |-- java
|           |--Example.java
|-- target
    |-- maven-archiver
    |   |-- pom.properties
    |-- myproject-0.0.1-SNAPSHOT.jar
The @RestController and @RequestMapping annotations are Spring MVC annotations, and they are not specific to Spring Boot.
The first annotation on our Example class is @RestController.
This is known as a stereotype annotation. It provides hints for people reading the code, and for Spring, that the class plays a specific role. In this case, our class is a web @Controller so Spring will consider it when handling incoming web requests.
The @RequestMapping annotation provides "routing" information.
It is telling Spring that any HTTP request with the path "/" should be mapped to the home method. The @RestController annotation tells Spring to render the resulting string directly back to the caller.
The second class-level annotation is @EnableAutoConfiguration.
This annotation tells Spring Boot to "guess" how we will want to configure Spring, based on the jar dependencies that we have added.
Since spring-boot-starter-web added Tomcat and Spring MVC, the auto-configuration will assume that we are developing a web application and setup Spring accordingly.
The final part of our application is the main method.
This is just a standard method that follows the Java convention for an application entry point. Our main method delegates to Spring Boot's SpringApplication class by calling run.
SpringApplication will bootstrap our application, starting Spring which will in turn start the auto-configured Tomcat web server.
We need to pass Example.class as an argument to the run method to tell SpringApplication which is the primary Spring component. The args array is also passed through to expose any command-line arguments.
At this point our application should work.
Since we have used the spring-boot-starter-parent POM we have a useful run goal that we can use to start the application. From the root project directory to start the application using mvn spring-boot:run:
$ mvn spring-boot:run

[INFO] --- spring-boot-maven-plugin:1.3.2.RELEASE:run (default-cli) @ myproject ---

  .   ____          _            __ _ _
 /\ / ___'_ __ _ _(_)_ __  __ _
( ( )\___ | '_ | '_| | '_ / _` |
 \/  ___)| |_)| | | | | || (_| |  ) ) ) )
  '  |____| .__|_| |_|_| |_\__, | / / / /
 =========|_|==============|___/=/_/_/_/
 :: Spring Boot ::        (v1.3.2.RELEASE)
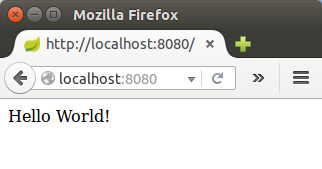
Note: During the run, we may get "Tomcat connector in failed". That's because the port 8080 is in use, and in my case, the app using 8080 was Jenkins.
.
|-- pom.xml
|-- src
|   |-- main
|       |-- java
|           |--Example.java
|-- target
    |-- classes
    |   |-- Example.class
    |-- generated-sources
    |   |-- annotations
    |-- maven-archiver
    |   |-- pom.properties
    |-- maven-status
    |   |-- maven-compiler-plugin
    |       |-- compile
    |           |-- default-compile
    |               |-- createdFiles.lst
    |               |-- inputFiles.lst
    |-- myproject-0.0.1-SNAPSHOT.jar
Lets create a completely self-contained executable jar file that we could run in production.
Executable jars (sometimes called "fat jars") are archives containing our compiled classes along with all of the jar dependencies that our code needs to run.
To create an executable jar we may want to add the spring-boot-maven-plugin to our pom.xml:
<?xml version="1.0" encoding="UTF-8"?>
<project xmlns="http://maven.apache.org/POM/4.0.0" xmlns:xsi="http://www.w3.org/2001/XMLSchema-instance"
    xsi:schemaLocation="http://maven.apache.org/POM/4.0.0 http://maven.apache.org/xsd/maven-4.0.0.xsd">
    <modelVersion>4.0.0</modelVersion>

    <groupId>com.example</groupId>
    <artifactId>myproject</artifactId>
    <version>0.0.1-SNAPSHOT</version>

    <parent>
        <groupId>org.springframework.boot</groupId>
        <artifactId>spring-boot-starter-parent</artifactId>
        <version>1.3.2.RELEASE</version>
    </parent>

    <dependencies>
        <dependency>
            <groupId>org.springframework.boot</groupId>
            <artifactId>spring-boot-starter-web</artifactId>
        </dependency>
    </dependencies>

    <build>
        <plugins>
            <plugin>
                <groupId>org.springframework.boot</groupId>
                <artifactId>spring-boot-maven-plugin</artifactId>
            </plugin>
        </plugins>
    </build>

</project>
Now we want to run the package goal instead of distributing or working with .class files directly:
$ mvn package
.
|-- pom.xml
|-- src
| |-- main
| |-- java
| |--Example.java
|-- target
|-- classes
| |-- Example.class
|-- generated-sources
| |-- annotations
|-- maven-archiver
| |-- pom.properties
|-- maven-status
| |-- maven-compiler-plugin
| |-- compile
| |-- default-compile
| |-- createdFiles.lst
| |-- inputFiles.lst
|-- myproject-0.0.1-SNAPSHOT.jar
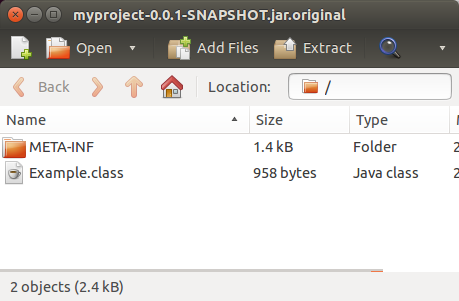
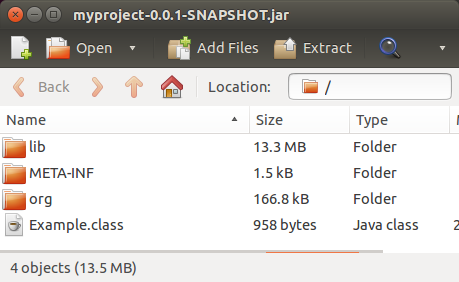
|-- myproject-0.0.1-SNAPSHOT.jar.original
If we look in the target directory we should see myproject-0.0.1-SNAPSHOT.jar.
To peek inside, we can use jar tvf:
$ jar tvf target/myproject-0.0.1-SNAPSHOT.jar
As we can see we have more files in myproject-0.0.1-SNAPSHOT.jar than the original:
To run that application, use the java -jar command:
$ java -jar target/myproject-0.0.1-SNAPSHOT.jar

  .   ____          _            __ _ _
 /\ / ___'_ __ _ _(_)_ __  __ _
( ( )\___ | '_ | '_| | '_ / _` |
 \/  ___)| |_)| | | | | || (_| |  ) ) ) )
  '  |____| .__|_| |_|_| |_\__, | / / / /
 =========|_|==============|___/=/_/_/_/
 :: Spring Boot ::        (v1.3.2.RELEASE)
We'll get the same result as we did with mvn spring-boot:run