简介
此项目使用Spring+SpringMVC+MyBatis框架整合,用于企业后台权限管理。数据库使用MySQL,前端页面使用Jsp基于AdminLTE模板进行改写。
功能介绍
- 商品查询
- 基于SSM整合基础上完成商品查询,实现主页页面main.jsp以及商品显示页面product-list.jsp页面的创建。
- 商品添加
- 进一步巩固SSM整合,并完成商品添加功能。实现页面product-add.jsp的创建。
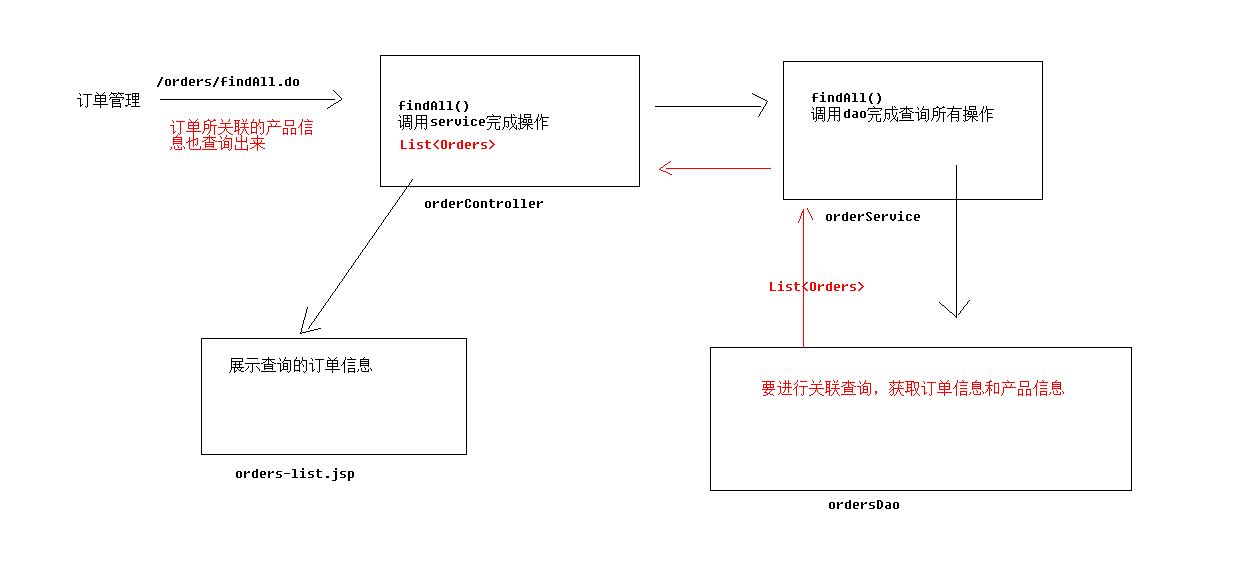
- 订单查询
- 订单的查询操作,它主要完成简单的多表查询操作,查询订单时,需要查询出与订单关联的其它表中信息。
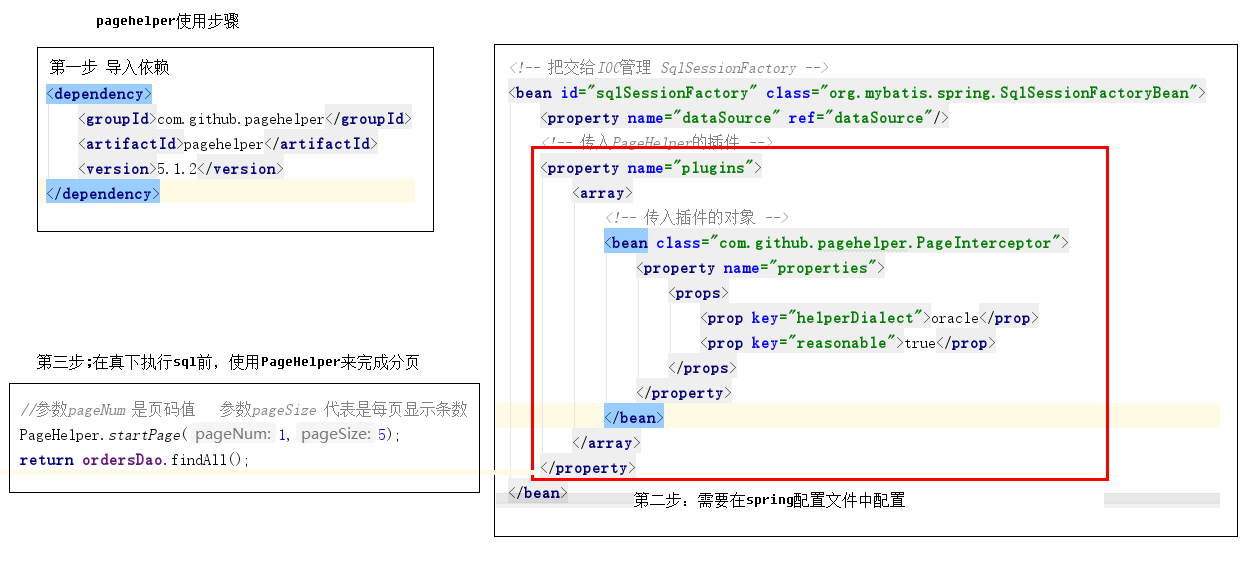
- 订单分页查询
- 订单分页查询,这里使用的是mybatis分页插件PageHelper。
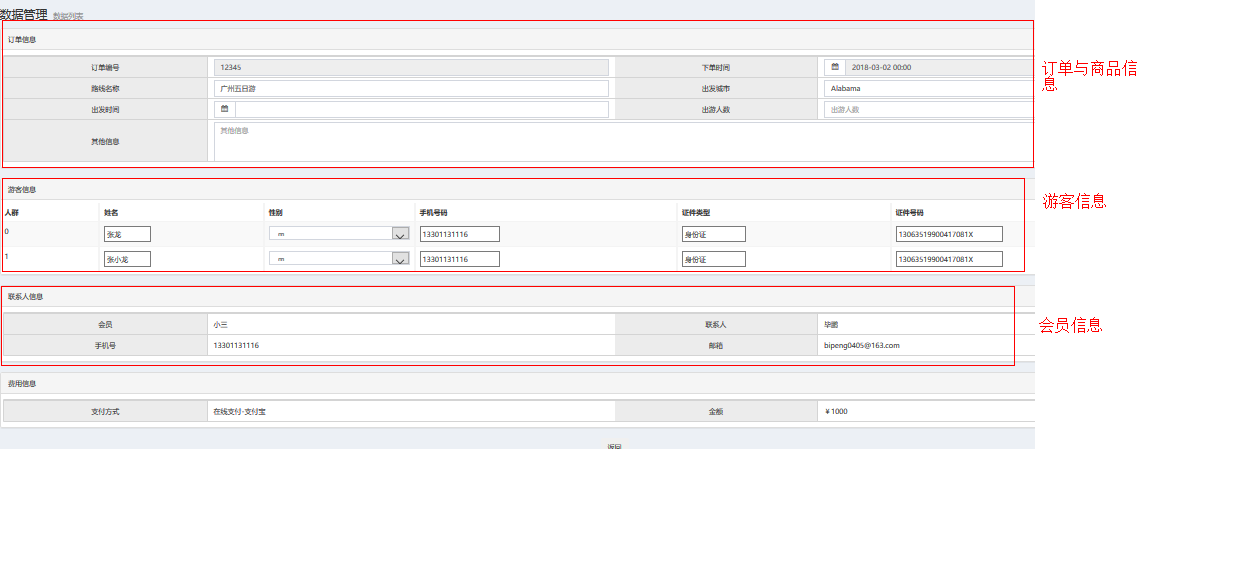
- 订单详情查询
- 订单详情是用于查询某一个订单的详细信息,主要涉及复杂的多表查询操作。
- Spring Security
- Spring Security是 Spring 项目组中用来提供安全认证服务的框架。此项目中只涉及Spring Security框架的配置及基本的认证与授权操作。
- 用户管理
- 用户管理中实现了基于Spring Security的用户登录、退出操作,以及用户查询、添加、详情等操作,和订单模块类似。
- 角色管理
- 角色管理主要完成角色查询、角色添加。角色拥有对应的权限。
- 资源权限管理
- 资源权限管理主要完成查询、添加操作,它的操作与角色管理类似,角色管理以及资源权限管理都是对权限管理的
补充。
- 资源权限管理主要完成查询、添加操作,它的操作与角色管理类似,角色管理以及资源权限管理都是对权限管理的
- 权限关联与控制
- 完成用户角色关联、角色权限关联,这两个操作是为了后续完成授权操作的基础。
- AOP日志处理
- 使用Spring AOP切面来完成系统级别的日志收集。
数据库介绍
数据库使用MySQL
- 产品表
- 订单表

- 会员表
- 旅客表
- 订单旅客表

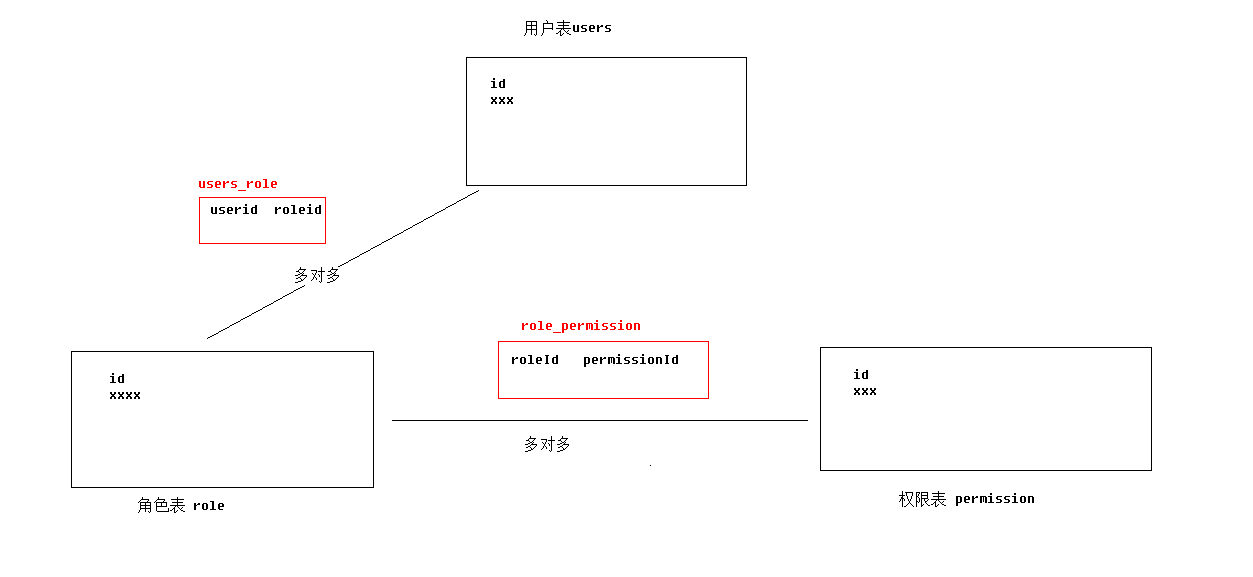
- 用户表
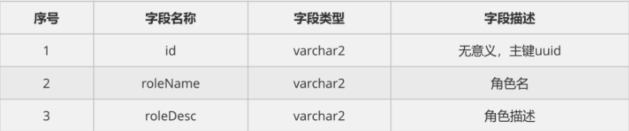
- 角色表
- 用户角色表
由 userId 和 roleId 构成,分别为users表 以及 role表的外键,用来关联用户与角色的多对多关系
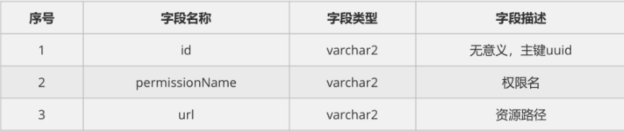
- 资源权限表
- 权限角色表
由 perimissionId 和 roleId 构成,分别为permission表 以及 role表的外键,用来关联资源权限与角色的多对多关系。
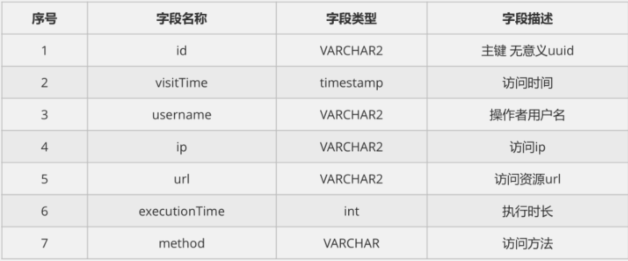
- 日志表
SSM整合
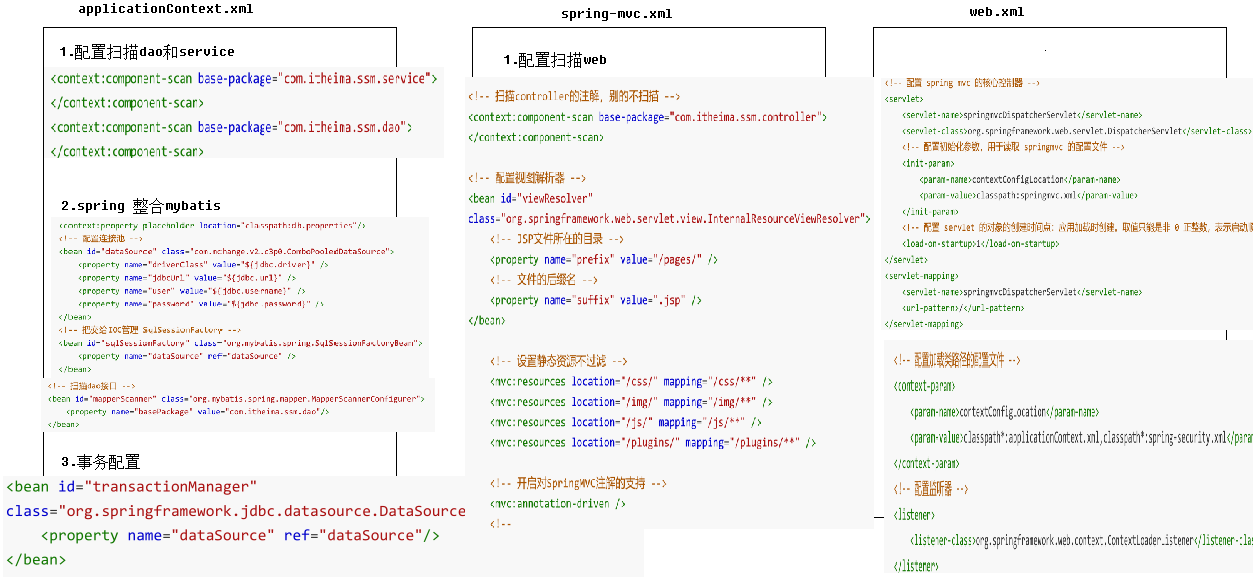
Spring环境搭建
- 编写Spring配置文件applicationContext.xml
- 配置spring创建容器时要扫描的包,开启注解扫描,管理service和dao。
- 使用注解配置业务层
Spring MVC环境搭建
- web.xml配置Spring MVC核心控制器
配置初始化参数,用于读取springmvc的配置文件 配置 servlet 的对象的创建时间点:应用加载时创建。取值只能是非 0 正整数,表示启动顺序 - 配置SpringMVC编码过滤器等
- 配置Spring MVC配置文件springmvc.xml
- 配置扫描controller的注解
- 配置视图解析器
- 设置静态资源不过滤
- 开启对SpringMVC注解的支持
- 编写Controller
Spring 与 Spring MVC 整合
在 web.xml 中
- 配置加载类路径的配置文件,加载 applicationContext.xml 以及 用于权限认证的 spring-security.xml
- 配置监听器
Spring 与 MyBatis 整合
整合思路:将mybatis配置文件(mybatis.xml)中内容配置到spring配置文件中。
- Spring接管mybatis的Session工厂
-
创建 db.properties 存放数据库连接属性
jdbc.driver=com.mysql.jdbc.Driver jdbc.url=jdbc:mysql://localhost:3306/ssm?useUnicode=true&characterEncoding=utf8 jdbc.username=root jdbc.password=root -
在 applicationContext.xml 中配置连接池
-
将 SqlSessionFactory 交给IOC管理
-
自动扫描所有Mapper接口和文件
- 扫描dao接口
-
配置Spring事务
配置Spring的声明式事务管理
SSM产品操作
主要包括查询所有产品以及添加产品两个功能,下面是两个功能的流程图。


商品的状态属性数据库存放的为int数据 productStatus,0代表关闭1代表开启,实体类中多添加了一个String类型的变量为productStatusStr,在该变量的getter中对productStatus进行判断并处理成对应属性以放到页面中展示。
出发时间的属性通过 @DateTimeFormat(pattern="yyyy-MM-dd HH:mm") 注解来转换格式,并编写了一个工具类data2String,将时间类转换成字符串用于页面展示。
springmvc参数类型转换三种方式
-
实体类中加日期格式化注解
@DateTimeFormat(pattern="yyyy-MM-dd hh:MM") private Date creationTime; -
属性编辑器
spring3.1之前 在Controller类中通过@InitBinder完成
	/**
     * 在controller层中加入一段数据绑定代码
     * @param webDataBinder
     */
    @InitBinder
    public void initBinder(WebDataBinder webDataBinder) throws Exception{
        SimpleDateFormat simpleDateFormat = new SimpleDateFormat("yyyy-MM-dd hh:mm");
        simpleDateFormat.setLenient(false);
        webDataBinder.registerCustomEditor(Date.class , new CustomDateEditor(simpleDateFormat , true));
    }
**备注:自定义类型转换器必须实现PropertyEditor接口或者继承PropertyEditorSupport类 **
写一个类 extends propertyEditorSupport(implements PropertyEditor){ public void setAsText(String text){ SimpleDateFormat simpleDateFormat = new SimpleDateFormat("yyyy -MM-dd hh:mm"); Date date = simpleDateFormat.parse(text); this.setValue(date); } public String getAsTest(){ Date date = (Date)this.getValue(); return this.dateFormat.format(date); } } -
类型转换器Converter
(spring 3.0以前使用正常,以后的版本需要使用< mvc:annotation-driven/>注册使用)使用xml配置实现类型转换(系统全局转换器)
(1)注册conversionservice
<!-- 注册ConversionService-->
<bean id="conversionService" class="org.springframework.format.support.FormattingConversionServiceFactoryBean">
    <property name="converters">
        <set>
            <bean class="com.ezubo.global.portal.util.StringToDateConverter">
                        <constructor-arg index="0" value="yyyy-MM-dd hh:mm"/>
            </bean>
        </set>
    </property>
</bean>
StringToDateConverter.java的实现
public class StringToDateConverter implements Converter<String,Date> {

    private static final Logger logger = LoggerFactory.getLogger(StringToDateConverter.class);

    private String pattern;

    public StringToDateConverter(String pattern){
        this.pattern = pattern;
    }

    public Date convert(String s) {

        if(StringUtils.isBlank(s)){
            return null;
        }

        SimpleDateFormat simpleDateFormat = new SimpleDateFormat(pattern);
        simpleDateFormat.setLenient(false);
        try{
            return simpleDateFormat.parse(s);
        }catch(ParseException e){
            logger.error("转换日期异常:"+e.getMessage() , e);
            throw new IllegalArgumentException("转换日期异常:"+e.getMessage() , e);
        }
    }
}
(2)使用 ConfigurableWebBindingInitializer 注册conversionService
<!--使用 ConfigurableWebBindingInitializer 注册conversionService-->
<bean id="webBindingInitializer" class="org.springframework.web.bind.support.ConfigurableWebBindingInitializer">
	<property name="conversionService" ref="conversionService"/>
</bean>
(3)注册ConfigurableWebBindingInitializer到RequestMappingHandlerAdapter
<!-- 注册ConfigurableWebBindingInitializer 到RequestMappingHandlerAdapter-->
<bean class="org.springframework.web.servlet.mvc.method.annotation.RequestMappingHandlerAdapter">
	<property name="webBindingInitializer" ref="webBindingInitializer"/>
	<!-- 线程安全的访问session-->
	<property name="synchronizeOnSession" value="true"/>
</bean>
(spring 3.2以后使用正常)使用<mvc:annotation-driven/>注册conversionService
(1)注册ConversionService
<!-- 注册ConversionService-->
<bean id="conversionService" class="org.springframework.format.support.FormattingConversionServiceFactoryBean">
	<property name="converters">
		<set>
			<bean class="com.ezubo.global.portal.util.StringToDateConverter">
				<constructor-arg index="0" value="yyyy-MM-dd hh:mm"/>
			</bean>
		</set>
	</property>
</bean>
(2)需要修改springmvc.xml配置文件中的annotation-driven,增加属性conversion-service指向新增的 conversionService。
<mvc:annotation-driven conversion-service="conversionService">
	<mvc:message-converters register-defaults="true">
		<bean class="com.alibaba.fastjson.support.spring.FastJsonHttpMessageConverter">
			<property name="supportedMediaTypes" value="text/html;charset=UTF-8"/>
			<!--转换时设置特性-->
			<property name="features">
				<array>
                    <!--避免默认的循环引用替换-->
                    <ref bean="DisableCircularReferenceDetect"/>
                    <ref bean="WriteMapNullValue"/>
                    <ref bean="WriteNullStringAsEmpty"/>
                    <ref bean="WriteNullNumberAsZero"/>
                </array>
            </property>
        </bean>
    </mvc:message-converters>
</mvc:annotation-driven>
在此项目中使用的是第一种,比较简便。
SSM订单操作
订单操作的相关功能介绍:

订单的查询操作,它主要完成简单的多表查询操作,查询订单时,需要查询出与订单关联的其它表中信息。下图为订单表及其关联表关系。

下图为查询所有订单流程:
下图为查询订单详情流程:

PageHelper
使用PageHelper进行分页查询,PageHelper是国内非常优秀的一款开源的mybatis分页插件,它支持基本主流与常用的数据库,例如mysql、oracle、mariaDB、DB2、SQLite、Hsqldb等。
PageHelper使用起来非常简单,只需要导入依赖然后在spring配置文件中配置后即可使用。
分页插件参数介绍:
helperDialect:分页插件会自动检测当前的数据库链接,自动选择合适的分页方式。 你可以配置
helperDialect 属性来指定分页插件使用哪种方言。配置时,可以使用下面的缩写值:
oracle , mysql , mariadb , sqlite , hsqldb , postgresql , db2 , sqlserver , informix , h2 , sqlserver201
2 , derby
特别注意 :使用 SqlServer2012 数据库时,需要手动指定为 sqlserver2012 ,否则会使用 SqlServer2005 的
方式进行分页。
你也可以实现 AbstractHelperDialect ,然后配置该属性为实现类的全限定名称即可使用自定义的实现方
法。offsetAsPageNum:默认值为 false ,该参数对使用 RowBounds 作为分页参数时有效。 当该参数设置为
true 时,会将 RowBounds 中的 offset 参数当成 pageNum 使用,可以用页码和页面大小两个参数进行分
页。rowBoundsWithCount:默认值为 false ,该参数对使用 RowBounds 作为分页参数时有效。 当该参数设置
为 true 时,使用 RowBounds 分页会进行 count 查询。pageSizeZero:默认值为 false ,当该参数设置为 true 时,如果 pageSize=0 或者 RowBounds.limit =
0 就会查询出全部的结果(相当于没有执行分页查询,但是返回结果仍然是 Page 类型)。reasonable:分页合理化参数,默认值为 false 。当该参数设置为 true 时, pageNum<=0 时会查询第一
页, pageNum>pages (超过总数时),会查询最后一页。默认 false 时,直接根据参数进行查询。params:为了支持 startPage(Object params) 方法,增加了该参数来配置参数映射,用于从对象中根据属
性名取值, 可以配置 pageNum,pageSize,count,pageSizeZero,reasonable ,不配置映射的用默认值, 默认
值为pageNum=pageNum;pageSize=pageSize;count=countSql;reasonable=reasonable;pageSizeZero=pageSizeZero
。supportMethodsArguments:支持通过 Mapper 接口参数来传递分页参数,默认值 false ,分页插件会从查
询方法的参数值中,自动根据上面 params 配置的字段中取值,查找到合适的值时就会自动分页。 使用方法
可以参考测试代码中的 com.github.pagehelper.test.basic 包下的 ArgumentsMapTest 和
ArgumentsObjTest 。autoRuntimeDialect:默认值为 false 。设置为 true 时,允许在运行时根据多数据源自动识别对应方言
的分页 (不支持自动选择 sqlserver2012 ,只能使用 sqlserver ),用法和注意事项参考下面的场景五。closeConn:默认值为 true 。当使用运行时动态数据源或没有设置 helperDialect 属性自动获取数据库类
型时,会自动获取一个数据库连接, 通过该属性来设置是否关闭获取的这个连接,默认 true 关闭,设置为
false 后,不会关闭获取的连接,这个参数的设置要根据自己选择的数据源来决定。
基本使用有6种方式,最常用的有两种:
- RowBounds方式的调用
List<Country> list = sqlSession.selectList("x.y.selectIf", null, new RowBounds(1, 10));
使用这种调用方式时,可以使用RowBounds参数进行分页,这种方式侵入性最小,通过RowBounds方式调用只是使用这个参数并没有增加其他任何内容。分页插件检测到使用了RowBounds参数时,就会对该查询进行物理分页。
关于这种方式的调用,有两个特殊的参数是针对 RowBounds 的,具体参考上面的分页插件参数介绍。
注:不只有命名空间方式可以用RowBounds,使用接口的时候也可以增加RowBounds参数,例如:
//这种情况下也会进行物理分页查询
List<Country> selectAll(RowBounds rowBounds);
注意: 由于默认情况下的
RowBounds无法获取查询总数,分页插件提供了一个继承自RowBounds的
PageRowBounds,这个对象中增加了total属性,执行分页查询后,可以从该属性得到查询总数。
- PageHelper.startPage静态方法调用
这种方式在你需要进行分页的 MyBatis 查询方法前调用 PageHelper.startPage 静态方法即可,紧
跟在这个方法后的第一个MyBatis 查询方法会被进行分页。
例如:
//获取第1页,10条内容,默认查询总数count
PageHelper.startPage(1, 10);
//紧跟着的第一个select方法会被分页
List<Country> list = countryMapper.selectIf(1);
使用步骤总结如下:
SSM权限操作
主要涉及用户、角色、资源权限三个模块的功能,下图为三表的关系。
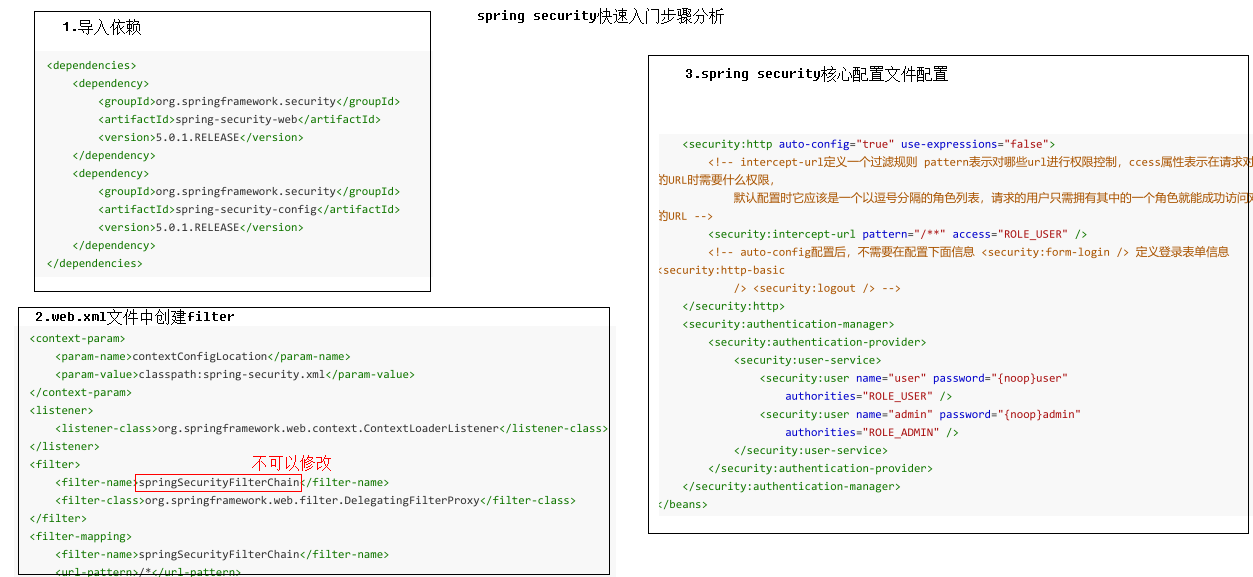
Spring Security
Spring Security 的前身是 Acegi Security ,是 Spring 项目组中用来提供安全认证服务的框架。
Spring Security 为基于J2EE企业应用软件提供了全面安全服务。包括两个主要操作:
- “认证”,是为用户建立一个他所声明的主体。主体一般式指用户,设备或可以在你系统中执行动作的其他系
统。 - “授权”指的是一个用户能否在你的应用中执行某个操作,在到达授权判断之前,身份的主题已经由身份验证
过程建立了。
快速入门步骤如下:
用户管理
用户登录
使用数据库完成springSecurity用户登录流程:
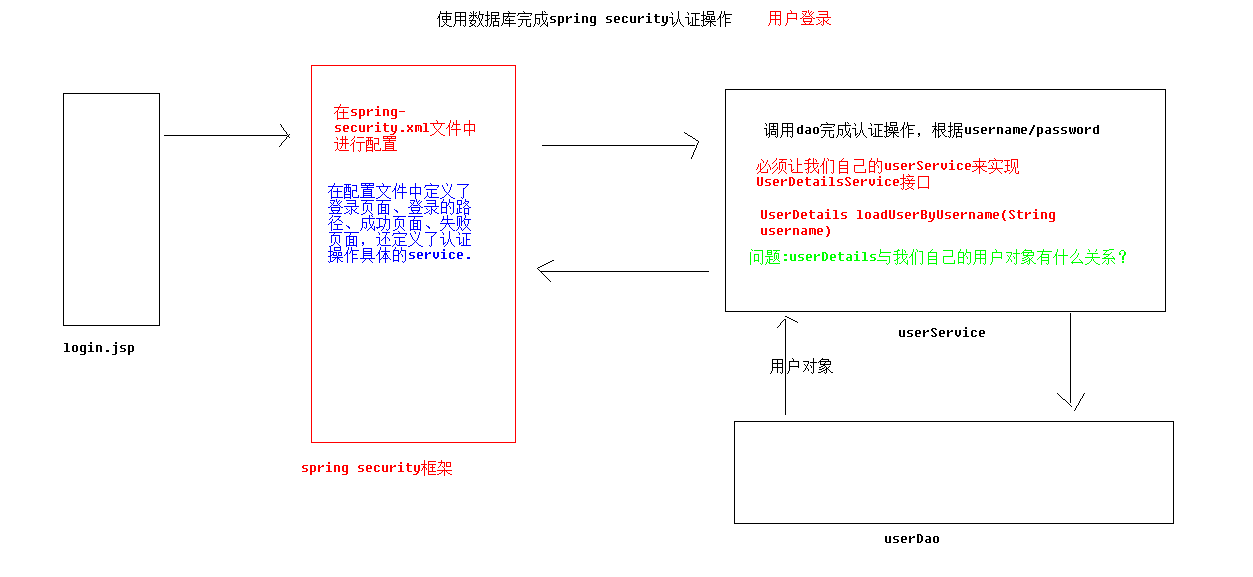
spring security的配置
<security:authentication-manager>
	<security:authentication-provider user-service-ref="userService">
		<!-- 配置加密的方式
		<security:password-encoder ref="passwordEncoder"/>
		-->
	</security:authentication-provider>
</security:authentication-manager>
Service
@Service("userService")
@Transactional
public class UserServiceImpl implements IUserService {

	@Autowired
	private IUserDao userDao;
	@Override
	public UserDetails loadUserByUsername(String username) throws UsernameNotFoundException {
		UserInfo userInfo = userDao.findByUsername(username);
        List<Role> roles = userInfo.getRoles();
        List<SimpleGrantedAuthority> authoritys = getAuthority(roles);
        User user = new User(userInfo.getUsername(), "{noop}" + userInfo.getPassword(),
        userInfo.getStatus() == 0 ? false : true, true, true, true, authoritys);
        return user;
    }
    private List<SimpleGrantedAuthority> getAuthority(List<Role> roles) {
        List<SimpleGrantedAuthority> authoritys = new ArrayList();
        for (Role role : roles) {
        	authoritys.add(new SimpleGrantedAuthority(role.getRoleName()));
        }
        return authoritys;
    }
}
这里从userInfo中 getPassword 前面需要加上"{noop}"是因为数据库中的密码还未进行加密,后续在添加用户中进行加密处理后即可删除。
Dao
public interface IUserDao {
    @Select("select * from user where id=#{id}")
    public UserInfo findById(Long id) throws Exception;

    @Select("select * from user where username=#{username}")
    @Results({
        @Result(id = true, property = "id", column = "id"),
        @Result(column = "username", property = "username"),
        @Result(column = "email", property = "email"),
        @Result(column = "password", property = "password"),
        @Result(column = "phoneNum", property = "phoneNum"),
        @Result(column = "status", property = "status"),
        @Result(column = "id", property = "roles", javaType = List.class, many =
    		@Many(select = "com.itheima.ssm.dao.IRoleDao.findRoleByUserId")) })
    public UserInfo findByUsername(String username);
}
用户退出
使用spring security完成用户退出,非常简单
- 配置
<security:logout invalidate-session="true" logout-url="/logout.do" logout-success-
url="/login.jsp" />
- 页面中
<a href="${pageContext.request.contextPath}/logout.do"
		class="btn btn-default btn-flat">注销</a>
用户查询

用户添加
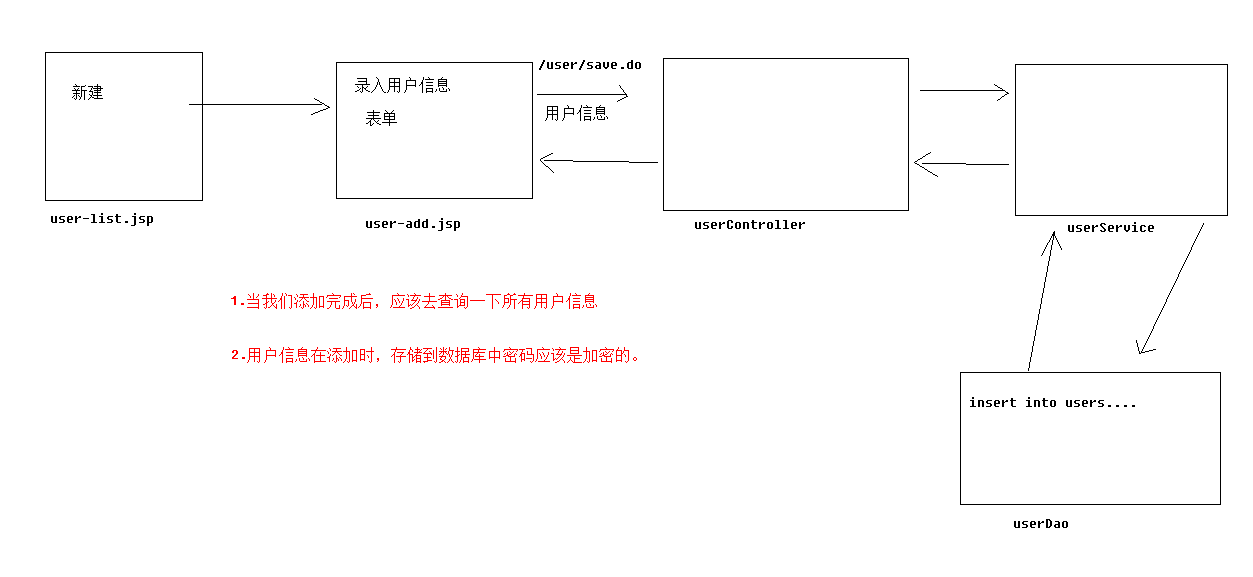
- 添加完成后通过redirect 重定向跳转到查询所有用户。
- 前期数据库存的用户密码没有加密,现在添加用户时,我们需要对用户密码进行加密。
<!-- 配置加密类 -->
<bean id="passwordEncoder"
class="org.springframework.security.crypto.bcrypt.BCryptPasswordEncoder"/>
用户详情
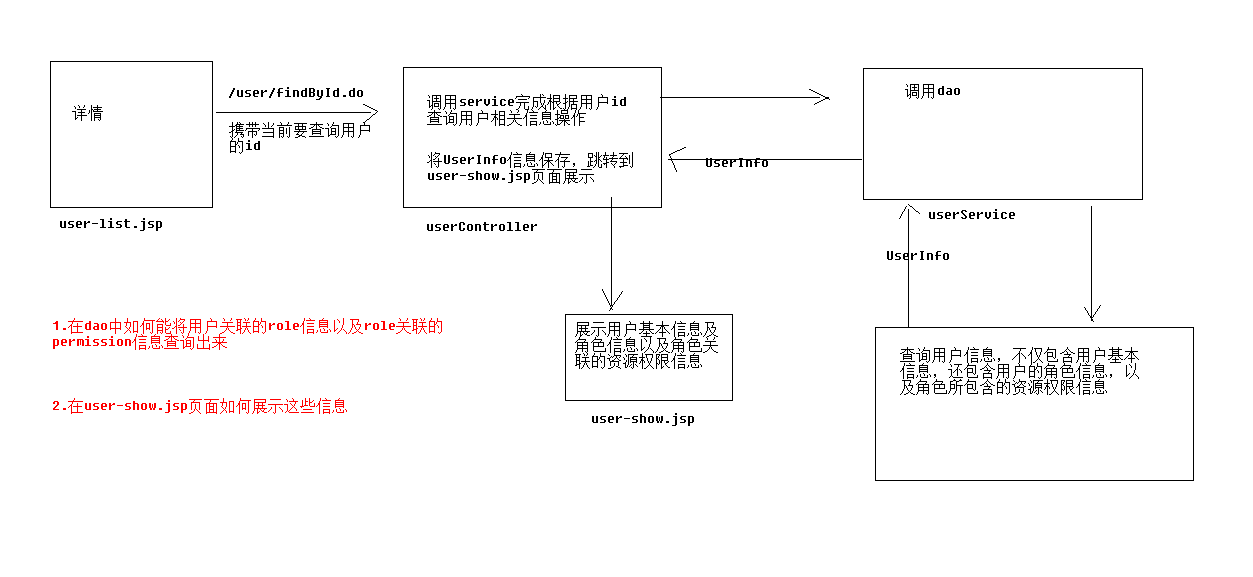
Dao
@Select("select * from user where id=#{id}")
@Results({ @Result(id = true, property = "id", column = "id"), @Result(column = "username",
property = "username"),
		@Result(column = "email", property = "email"), @Result(column ="password", property = "password"),
		@Result(column = "phoneNum", property = "phoneNum"), @Result(column ="status", property = "status"),
		@Result(column = "id", property = "roles", javaType = List.class, many =
@Many(select = "com.itheima.ssm.dao.IRoleDao.findRoleByUserId")) })
public UserInfo findById(Long id) throws Exception;

@Select("select * from role where id in( select roleId from user_role where userId=#{userId})")
@Results(
			{
				@Result(id=true,column="id",property="id"),
                @Result(column="roleName",property="roleName"),
                @Result(column="roleDesc",property="roleDesc"),					@Result(column="id",property="permissions",javaType=List.class,many=@Many(select="com.itheima.ssm
                .dao.IPermissionDao.findByRoleId"))
})
public List<Role> findRoleByUserId(Long userId);
我们需要将用户的所有角色及权限查询出来所以需要调用IRoleDao中的findRoleByUserId,而在IRoleDao中需要调用IPermissionDao的findByRoleId
@Select("select * from permission where id in (select permissionId from role_permission where
roleId=#{roleId})")
public List<Permission> findByRoleId(Long roleId);
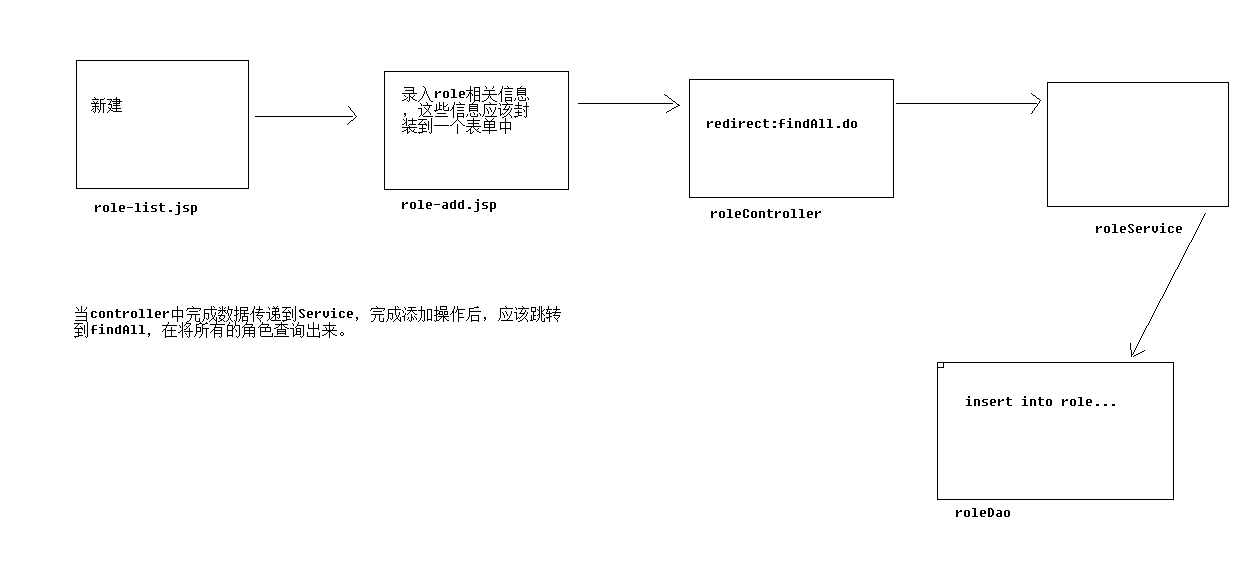
角色管理
角色查询
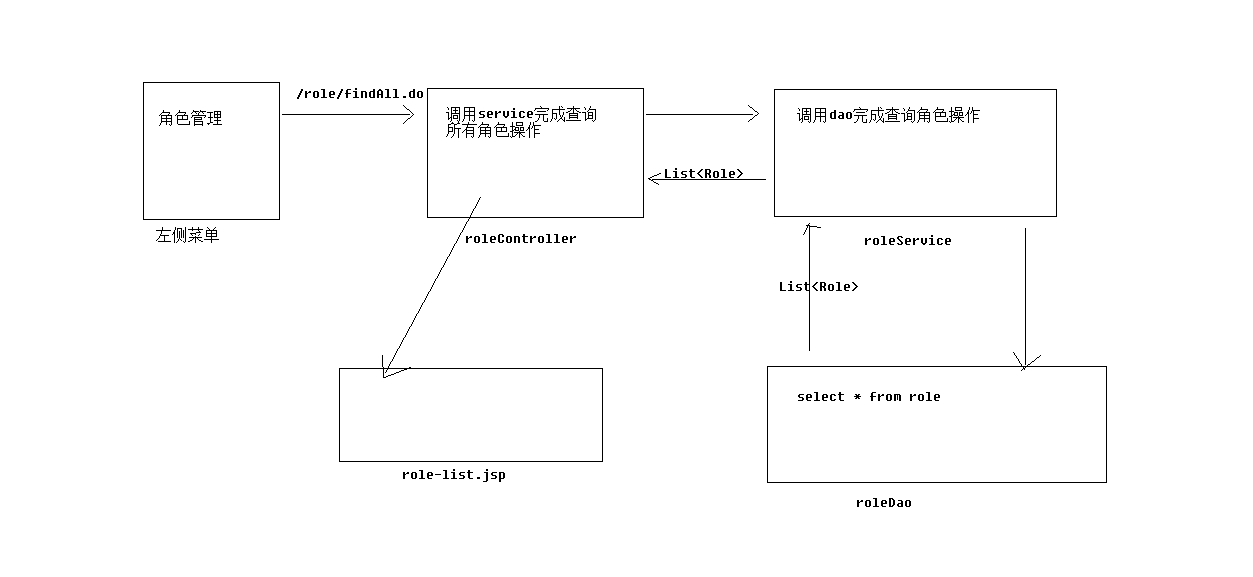
角色添加
资源权限管理
资源权限查询以及添加的流程和角色管理模块的一样(参考上图),只是针对的表不同。
权限的关联与控制
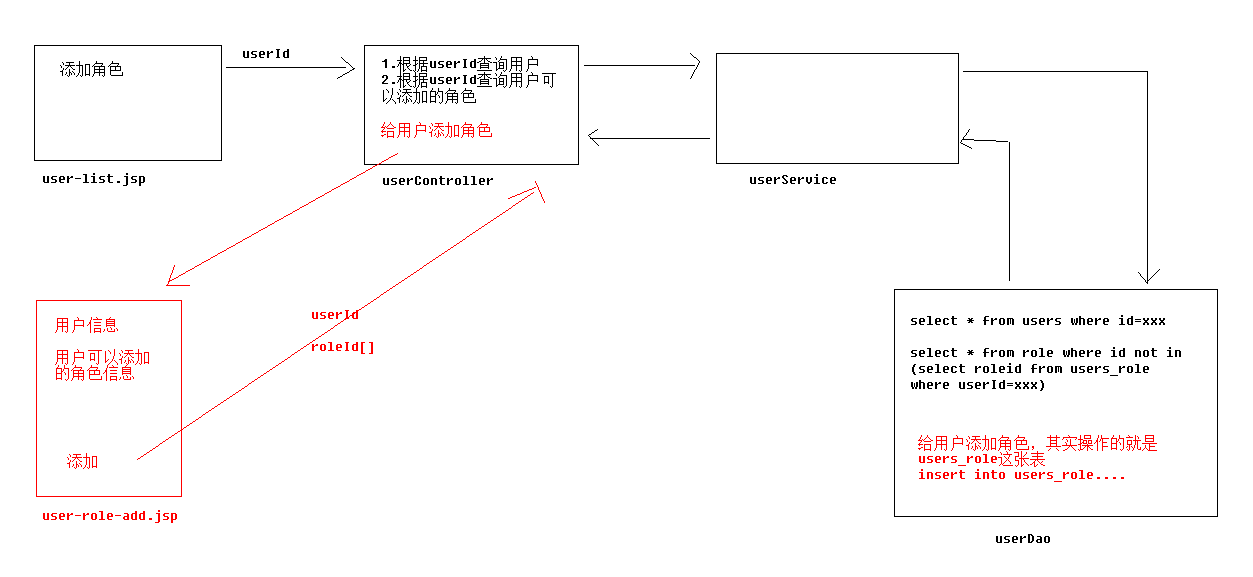
用户角色关联
用户与角色之间是多对多关系,我们要建立它们之间的关系,只需要在中间表user_role插入数据即可。
流程如下:
角色权限关联
角色与权限之间是多对多关系,我们要建立它们之间的关系,只需要在中间表role_permission插入数据即可。
流程和用户角色关联相同,参考上图。
服务器端方法级权限控制
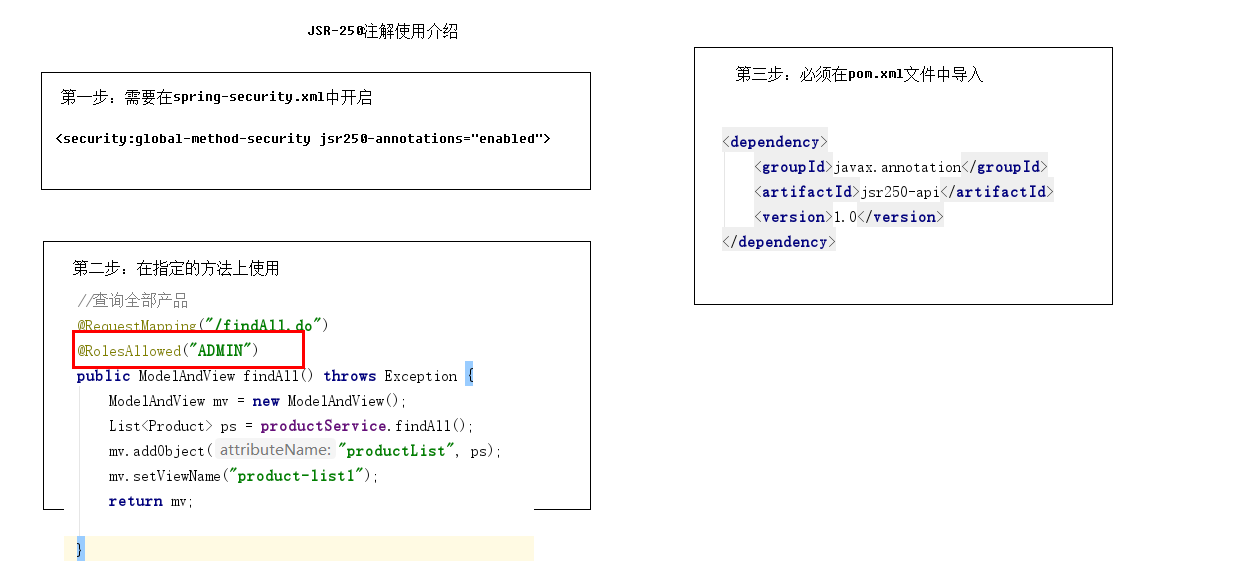
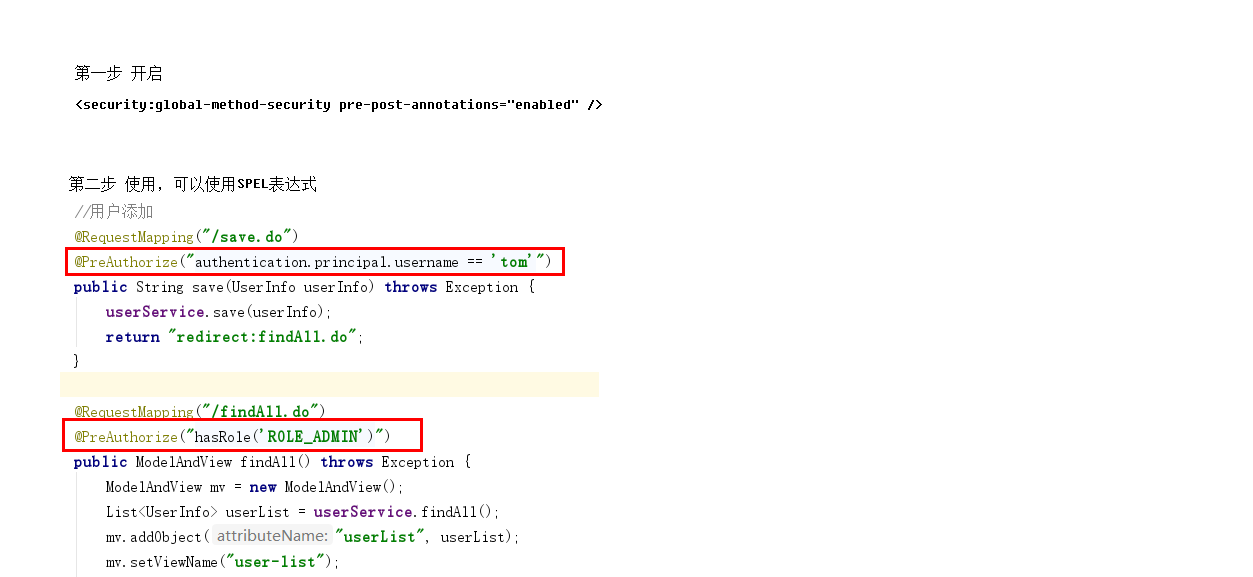
在服务器端我们可以通过Spring security提供的注解对方法来进行权限控制。Spring Security在方法的权限控制上支持三种类型的注解,JSR-250注解、@Secured注解和支持表达式的注解,这三种注解默认都是没有启用的,需要单独通过global-method-security元素的对应属性进行启用。
开启注解使用
- 配置文件
<security:global-method-security jsr250-annotations="enabled"/>
<security:global-method-security secured-annotations="enabled"/>
<security:global-method-security pre-post-annotations="disabled"/> - 注解开启
@EnableGlobalMethodSecurity :Spring Security默认是禁用注解的,要想开启注解,需要在继承WebSecurityConfigurerAdapter的类上加@EnableGlobalMethodSecurity注解,并在该类中将AuthenticationManager定义为Bean。
JSR-250注解
- @RolesAllowed表示访问对应方法时所应该具有的角色
示例:
@RolesAllowed({"USER", "ADMIN"}) 该方法只要具有"USER", "ADMIN"任意一种权限就可以访问。这里可以省略前缀ROLE_,实际的权限可能是ROLE_ADMIN
- @PermitAll表示允许所有的角色进行访问,也就是说不进行权限控制
- @DenyAll是和PermitAll相反的,表示无论什么角色都不能访问
支持表达式的注解
- @PreAuthorize 在方法调用之前,基于表达式的计算结果来限制对方法的访问
示例:
@PreAuthorize("#userId == authentication.principal.userId or hasAuthority(‘ADMIN’)")
void changePassword(@P("userId") long userId ){ }
这里表示在changePassword方法执行之前,判断方法参数userId的值是否等于principal中保存的当前用户的userId,或者当前用户是否具有ROLE_ADMIN权限,两种符合其一,就可以访问该方法。
- @PostAuthorize 允许方法调用,但是如果表达式计算结果为false,将抛出一个安全性异常
示例:
@PostAuthorize
User getUser("returnObject.userId == authentication.principal.userId or
hasPermission(returnObject, 'ADMIN')");
- @PostFilter 允许方法调用,但必须按照表达式来过滤方法的结果
- @PreFilter 允许方法调用,但必须在进入方法之前过滤输入值
@Secured注解
- @Secured注解标注的方法进行权限控制的支持,其值默认为disabled。
示例:
@Secured("IS_AUTHENTICATED_ANONYMOUSLY")
public Account readAccount(Long id);
@Secured("ROLE_TELLER")

页面端标签控制权限
在jsp页面中我们可以使用spring security提供的权限标签来进行权限控制
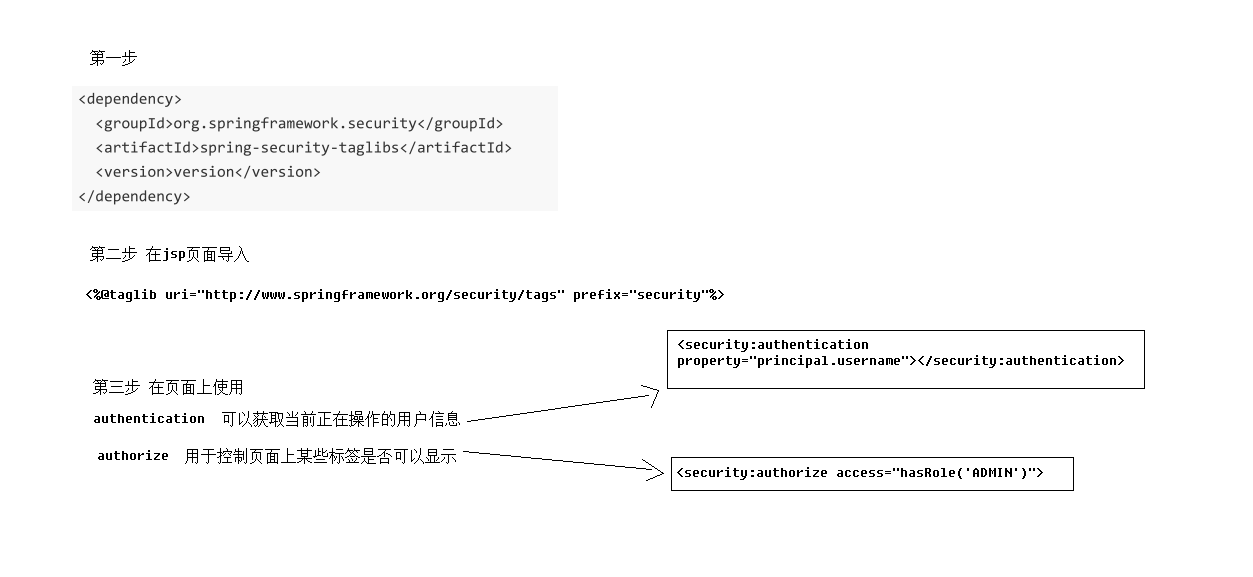
导入:
- maven导入
<dependency>
    <groupId>org.springframework.security</groupId>
    <artifactId>spring-security-taglibs</artifactId>
    <version>version</version>
</dependency>
- 页面导入
<%@taglib uri="http://www.springframework.org/security/tags" prefix="security"%>
常用标签
在jsp中我们可以使用以下三种标签,其中authentication代表的是当前认证对象,可以获取当前认证对象信息,例如用户名。其它两个标签我们可以用于权限控制
authentication
<security:authentication property="" htmlEscape="" scope="" var=""/>
- property: 只允许指定Authentication所拥有的属性,可以进行属性的级联获取,如“principle.username”,不允许直接通过方法进行调用
- htmlEscape:表示是否需要将html进行转义。默认为true
- scope:与var属性一起使用,用于指定存放获取的结果的属性名的作用范围,默认我pageContext。Jsp中拥有的作用范围都进行进行指定
- var: 用于指定一个属性名,这样当获取到了authentication的相关信息后会将其以var指定的属性名进行存放,默认是存放在pageConext中
authorize
authorize是用来判断普通权限的,通过判断用户是否具有对应的权限而控制其所包含内容的显示
<security:authorize access="" method="" url="" var=""></security:authorize>
- access: 需要使用表达式来判断权限,当表达式的返回结果为true时表示拥有对应的权限
- method:method属性是配合url属性一起使用的,表示用户应当具有指定url指定method访问的权限,method的默认值为GET,可选值为http请求的7种方法
- url:url表示如果用户拥有访问指定url的权限即表示可以显示authorize标签包含的内容
- var:用于指定将权限鉴定的结果存放在pageContext的哪个属性中
accesscontrollist
accesscontrollist标签是用于鉴定ACL权限的。其一共定义了三个属性:hasPermission、domainObject和var,
其中前两个是必须指定的
<security:accesscontrollist hasPermission="" domainObject="" var=""></security:accesscontrollist>
- hasPermission:hasPermission属性用于指定以逗号分隔的权限列表
- domainObject:domainObject用于指定对应的域对象
- var:var则是用以将鉴定的结果以指定的属性名存入pageContext中,以供同一页面的其它地方使用
SSMAOP日志
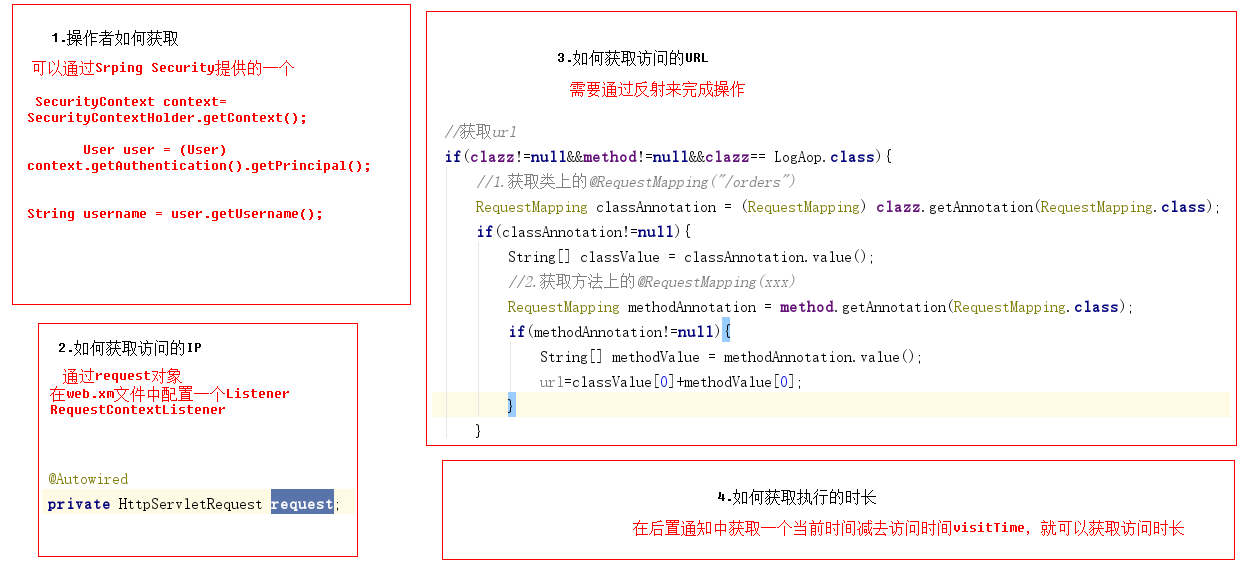
基于AOP来获取每一次操作的访问时间、操作者用户名、访问ip、访问资源url、执行市场以及访问方法存入到数据库日志表sysLog中,并展示到页面中。
流程如下:
创建切面类处理日志
@Component
@Aspect
public class LogAop {
    @Autowired
    private HttpServletRequest request;
    @Autowired
    private ISysLogService sysLogService;

    private Date startTime; // 访问时间
    private Class executionClass;// 访问的类
    private Method executionMethod; // 访问的方法
    // 主要获取访问时间、访问的类、访问的方法

    @Before("execution(* com.itheima.ssm.controller.*.*(..))")
    public void doBefore(JoinPoint jp) throws NoSuchMethodException, SecurityException {
        startTime = new Date(); // 访问时间
        // 获取访问的类
        executionClass = jp.getTarget().getClass();
        // 获取访问的方法
        String methodName = jp.getSignature().getName();// 获取访问的方法的名称
        Object[] args = jp.getArgs();// 获取访问的方法的参数
        if (args == null || args.length == 0) {// 无参数
        	executionMethod = executionClass.getMethod(methodName); // 只能获取无参数方法
        } else {
        	// 有参数,就将args中所有元素遍历,获取对应的Class,装入到一个Class[]
        	Class[] classArgs = new Class[args.length];
            for (int i = 0; i < args.length; i++) {
				classArgs[i] = args[i].getClass();
			}
			executionMethod = executionClass.getMethod(methodName, classArgs);// 获取有参数方法
		}
	}
    // 主要获取日志中其它信息,时长、ip、url...
    @After("execution(* com.itheima.ssm.controller.*.*(..))")
    public void doAfter(JoinPoint jp) throws Exception {
        // 获取类上的@RequestMapping对象
        if (executionClass != SysLogController.class) {
        	RequestMapping classAnnotation = (RequestMapping)executionClass.getAnnotation(RequestMapping.class);
            if (classAnnotation != null) {
                // 获取方法上的@RequestMapping对象
                RequestMapping methodAnnotation = executionMethod.getAnnotation(RequestMapping.class);
                if (methodAnnotation != null) {
                    String url = ""; // 它的值应该是类上的@RequestMapping的value+方法上的@RequestMapping的value
                    url = classAnnotation.value()[0] + methodAnnotation.value()[0];
                    SysLog sysLog = new SysLog();
                    // 获取访问时长
                    Long executionTime = new Date().getTime() - startTime.getTime();
                    // 将sysLog对象属性封装
                    sysLog.setExecutionTime(executionTime);
                    sysLog.setUrl(url);
                    // 获取ip
                    String ip = request.getRemoteAddr();
                    sysLog.setIp(ip);
                    // 可以通过securityContext获取,也可以从request.getSession中获取
                    SecurityContext context = SecurityContextHolder.getContext(); //request.getSession().getAttribute("SPRING_SECURITY_CONTEXT")
                    String username = ((User)
                    (context.getAuthentication().getPrincipal())).getUsername();
                    sysLog.setUsername(username);
                    sysLog.setMethod("[类名]" + executionClass.getName() + "[方法名]" +
                    executionMethod.getName());
                    sysLog.setVisitTime(startTime);
                    // 调用Service,调用dao将sysLog insert数据库
                    sysLogService.save(sysLog);
                }
            }
        }
    }
}
在切面类中我们需要获取登录用户的username,还需要获取ip地址,我们怎么处理?
-
username获取
SecurityContextHolder获取
-
ip地址获取
ip地址的获取我们可以通过request.getRemoteAddr()方法获取到。
在Spring中可以通过RequestContextListener来获取request或session对象。
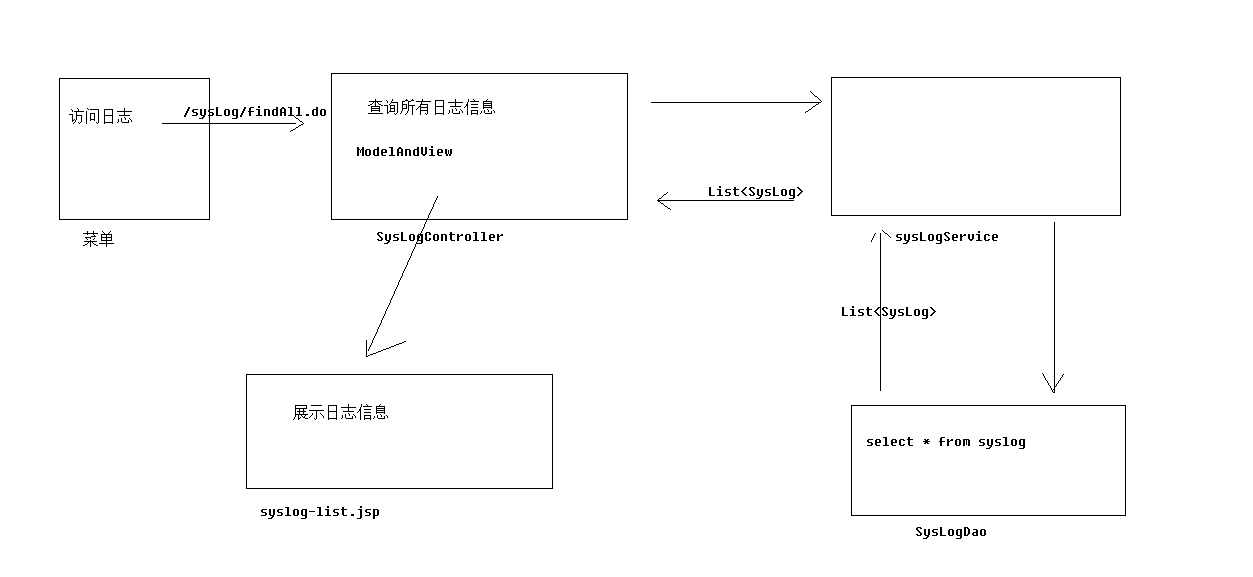
SysLogController
@RequestMapping("/sysLog")
@Controller
public class SysLogController {
    @Autowired
    private ISysLogService sysLogService;
    @RequestMapping("/findAll.do")
    public ModelAndView findAll() throws Exception {
        ModelAndView mv = new ModelAndView();
        List<SysLog> sysLogs = sysLogService.findAll();
        mv.addObject("sysLogs", sysLogs);
        mv.setViewName("syslog-list");
        return mv;
	}
}
Service
@Service
@Transactional
public class SysLogServiceImpl implements ISysLogService {
    @Autowired
    private ISysLogDao sysLogDao;
    @Override
    public void save(SysLog log) throws Exception {
    	sysLogDao.save(log);
    }
    @Override
    public List<SysLog> findAll() throws Exception {
    	return sysLogDao.findAll();
    }
}
Dao
public interface ISysLogDao {
    @Select("select * from syslog")
    @Results({
        @Result(id=true,column="id",property="id"),
        @Result(column="visitTime",property="visitTime"),
        @Result(column="ip",property="ip"),
        @Result(column="url",property="url"),
        @Result(column="executionTime",property="executionTime"),
        @Result(column="method",property="method"),
        @Result(column="username",property="username")
    })
	public List<SysLog> findAll() throws Exception;
	@Insert("insert into syslog(visitTime,username,ip,url,executionTime,method) values(#{visitTime},#{username},#{ip},#{url},#{executionTime},#{method})")
	public void save(SysLog log) throws Exception;
}