拖拽
在GUI里,拖放是指用户点击一个虚拟的对象,拖动,然后放置到另外一个对象上面的动作。一般情况下,需要调用很多动作和方法,创建很多变量。
拖放能让用户很直观的操作很复杂的逻辑。
一般情况下,我们可以拖放两种东西:数据和图形界面。把一个图像从一个应用拖放到另外一个应用上的实质是操作二进制数据。把一个表格从Firefox上拖放到另外一个位置 的实质是操作一个图形组。
简单的拖放
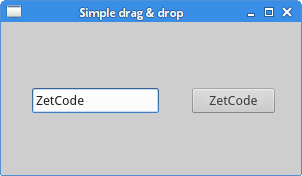
本例使用了QLineEdit和QPushButton。把一个文本从编辑框里拖到按钮上,更新按钮上的标签(文字)。
#!/usr/bin/python3
# -*- coding: utf-8 -*-

"""
ZetCode PyQt5 tutorial

This is a simple drag and
drop example.

Author: Jan Bodnar
Website: zetcode.com
Last edited: August 2017
"""

from PyQt5.QtWidgets import (QPushButton, QWidget,
    QLineEdit, QApplication)
import sys

class Button(QPushButton):

    def __init__(self, title, parent):
        super().__init__(title, parent)

        self.setAcceptDrops(True)


    def dragEnterEvent(self, e):

        if e.mimeData().hasFormat('text/plain'):
            e.accept()
        else:
            e.ignore()

    def dropEvent(self, e):

        self.setText(e.mimeData().text())


class Example(QWidget):

    def __init__(self):
        super().__init__()

        self.initUI()


    def initUI(self):

        edit = QLineEdit('', self)
        edit.setDragEnabled(True)
        edit.move(30, 65)

        button = Button("Button", self)
        button.move(190, 65)

        self.setWindowTitle('Simple drag and drop')
        self.setGeometry(300, 300, 300, 150)


if __name__ == '__main__':

    app = QApplication(sys.argv)
    ex = Example()
    ex.show()
    app.exec_()
class Button(QPushButton):

    def __init__(self, title, parent):
        super().__init__(title, parent)

        self.setAcceptDrops(True)
为了完成预定目标,我们要重构一些方法。首先用QPushButton上构造一个按钮实例。
self.setAcceptDrops(True)
激活组件的拖拽事件。
def dragEnterEvent(self, e):

    if e.mimeData().hasFormat('text/plain'):
        e.accept()
    else:
        e.ignore()
首先,我们重构了dragEnterEvent()方法。设定好接受拖拽的数据类型(plain text)。
def dropEvent(self, e):

    self.setText(e.mimeData().text())
然后重构dropEvent()方法,更改按钮接受鼠标的释放事件的默认行为。
edit = QLineEdit('', self)
edit.setDragEnabled(True)
QLineEdit默认支持拖拽操作,所以我们只要调用setDragEnabled()方法使用就行了。
程序展示:

拖放按钮组件
这个例子展示怎么拖放一个button组件。
#!/usr/bin/python3
# -*- coding: utf-8 -*-

"""
ZetCode PyQt5 tutorial

In this program, we can press on a button with a left mouse
click or drag and drop the button with  the right mouse click.

Author: Jan Bodnar
Website: zetcode.com
Last edited: August 2017
"""

from PyQt5.QtWidgets import QPushButton, QWidget, QApplication
from PyQt5.QtCore import Qt, QMimeData
from PyQt5.QtGui import QDrag
import sys

class Button(QPushButton):

    def __init__(self, title, parent):
        super().__init__(title, parent)


    def mouseMoveEvent(self, e):

        if e.buttons() != Qt.RightButton:
            return

        mimeData = QMimeData()

        drag = QDrag(self)
        drag.setMimeData(mimeData)
        drag.setHotSpot(e.pos() - self.rect().topLeft())

        dropAction = drag.exec_(Qt.MoveAction)


    def mousePressEvent(self, e):

        super().mousePressEvent(e)

        if e.button() == Qt.LeftButton:
            print('press')


class Example(QWidget):

    def __init__(self):
        super().__init__()

        self.initUI()


    def initUI(self):

        self.setAcceptDrops(True)

        self.button = Button('Button', self)
        self.button.move(100, 65)

        self.setWindowTitle('Click or Move')
        self.setGeometry(300, 300, 280, 150)


    def dragEnterEvent(self, e):

        e.accept()


    def dropEvent(self, e):

        position = e.pos()
        self.button.move(position)

        e.setDropAction(Qt.MoveAction)
        e.accept()


if __name__ == '__main__':

    app = QApplication(sys.argv)
    ex = Example()
    ex.show()
    app.exec_()
上面的例子中,窗口上有一个QPushButton组件。左键点击按钮,控制台就会输出press。右键可以点击然后拖动按钮。
class Button(QPushButton):

    def __init__(self, title, parent):
        super().__init__(title, parent)
从QPushButton继承一个Button类,然后重构QPushButton的两个方法:mouseMoveEvent()和mousePressEvent().mouseMoveEvent()是拖拽开始的事件。
if e.buttons() != Qt.RightButton:
    return
我们只劫持按钮的右键事件,左键的操作还是默认行为。
mimeData = QMimeData()

drag = QDrag(self)
drag.setMimeData(mimeData)
drag.setHotSpot(e.pos() - self.rect().topLeft())
创建一个QDrag对象,用来传输MIME-based数据。
dropAction = drag.exec_(Qt.MoveAction)
拖放事件开始时,用到的处理函数式start().
def mousePressEvent(self, e):

    QPushButton.mousePressEvent(self, e)

    if e.button() == Qt.LeftButton:
        print('press')
左键点击按钮,会在控制台输出“press”。注意,我们在父级上也调用了mousePressEvent()方法,不然的话,我们是看不到按钮按下的效果的。
position = e.pos()
self.button.move(position)
在dropEvent()方法里,我们定义了按钮按下后和释放后的行为,获得鼠标移动的位置,然后把按钮放到这个地方。
e.setDropAction(Qt.MoveAction)
e.accept()
指定放下的动作类型为moveAction。
程序展示:
这个就一个按钮,没啥可展示的,弄GIF太麻烦了。