简单的数学运算
整数相加,得到整数:
2 + 2
4
浮点数相加,得到浮点数:
2.0 + 2.5
4.5
整数和浮点数相加,得到浮点数:
2 + 2.5
4.5
变量赋值
Python使用<变量名>=<表达式>的方式对变量进行赋值
a = 0.2
字符串 String
字符串的生成,单引号与双引号是等价的:
s = "hello world"
s
'hello world'
s = 'hello world'
s
'hello world'
三引号用来输入包含多行文字的字符串:
s = """hello
world"""
print s
hello
world
s = '''hello
world'''
print s
hello
world
字符串的加法:
s = "hello" + " world"
s
'hello world'
字符串索引:
s[0]
'h'
s[-1]
'd'
s[0:5]
'hello'
字符串的分割:
s = "hello world"
s.split()
['hello', 'world']
查看字符串的长度:
len(s)
11
列表 List
Python用[]来生成列表
a = [1, 2.0, 'hello', 5 + 1.0]
a
[1, 2.0, 'hello', 6.0]
列表加法:
a + a
[1, 2.0, 'hello', 6.0, 1, 2.0, 'hello', 6.0]
列表索引:
a[1]
2.0
列表长度:
len(a)
4
向列表中添加元素:
a.append("world")
a
[1, 2.0, 'hello', 6.0, 'world']
集合 Set
Python用{}来生成集合,集合中不含有相同元素。
s = {2, 3, 4, 2}
s
{2, 3, 4}
集合的长度:
len(s)
3
向集合中添加元素:
s.add(1)
s
{1, 2, 3, 4}
集合的交:
a = {1, 2, 3, 4}
b = {2, 3, 4, 5}
a & b
{2, 3, 4}
并:
a | b
{1, 2, 3, 4, 5}
差:
a - b
{1}
对称差:
a ^ b
{1, 5}
字典 Dictionary
Python用{key:value}来生成Dictionary。
d = {'dogs':5, 'cats':4}
d
{'cats': 4, 'dogs': 5}
字典的大小
len(d)
2
查看字典某个键对应的值:
d["dogs"]
5
修改键值:
d["dogs"] = 2
d
{'cats': 4, 'dogs': 2}
插入键值:
d["pigs"] = 7
d
{'cats': 4, 'dogs': 2, 'pigs': 7}
所有的键:
d.keys()
['cats', 'dogs', 'pigs']
所有的值:
d.values()
[4, 2, 7]
所有的键值对:
d.items()
[('cats', 4), ('dogs', 2), ('pigs', 7)]
数组 Numpy Arrays
需要先导入需要的包,Numpy数组可以进行很多列表不能进行的运算。
from numpy import array
a = array([1, 2, 3, 4])
a
array([1, 2, 3, 4])
加法:
a + 2
array([3, 4, 5, 6])
a + a
array([2, 4, 6, 8])
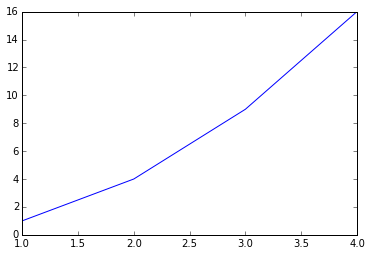
画图 Plot
Python提供了一个很像MATLAB的绘图接口。
%matplotlib inline
from matplotlib.pyplot import plot
plot(a, a**2)
循环 Loop
line = '1 2 3 4 5'
fields = line.split()
fields
['1', '2', '3', '4', '5']
total = 0
for field in fields:
    total += int(field)
total
15
Python中有一种叫做列表推导式(List comprehension)的用法:
numbers = [int(field) for field in fields]
numbers
[1, 2, 3, 4, 5]
sum(numbers)
15
写在一行:
sum([int(field) for field in line.split()])
15
文件操作 File IO
cd ~
d:Userslijin
写文件:
f = open('data.txt', 'w')
f.write('1 2 3 4
')
f.write('2 3 4 5
')
f.close()
读文件:
f = open('data.txt')
data = []
for line in f:
    data.append([int(field) for field in line.split()])
f.close()
data
[[1, 2, 3, 4], [2, 3, 4, 5]]
for row in data:
    print row
[1, 2, 3, 4]
[2, 3, 4, 5]
删除文件:
import os
os.remove('data.txt')
函数 Function
Python用关键词def来定义函数。
def poly(x, a, b, c):
    y = a * x ** 2 + b * x + c
    return y

x = 1
poly(x, 1, 2, 3)
6
用Numpy数组做参数x:
x = array([1, 2, 3])
poly(x, 1, 2, 3)
array([ 6, 11, 18])
可以在定义时指定参数的默认值:
from numpy import arange

def poly(x, a = 1, b = 2, c = 3):
    y = a*x**2 + b*x + c
    return y

x = arange(10)
x
array([0, 1, 2, 3, 4, 5, 6, 7, 8, 9])
array([0, 1, 2, 3, 4, 5, 6, 7, 8, 9])
poly(x)
array([ 3, 6, 11, 18, 27, 38, 51, 66, 83, 102])
poly(x, b = 1)
array([ 3, 5, 9, 15, 23, 33, 45, 59, 75, 93])
模块 Module
Python中使用import关键词来导入模块。
import os
当前进程号:
os.getpid()
4400
系统分隔符:
os.sep
'\'
- 类 Class
用class来定义一个类。
Person(object)表示继承自object类;
__init__函数用来初始化对象;
self表示对象自身,类似于C Java里面this。
class Person(object):
    def __init__(self, first, last, age):
        self.first = first
        self.last = last
        self.age = age
    def full_name(self):
        return self.first + ' ' + self.last
构建新对象:
person = Person('Mertle', 'Sedgewick', 52)
调用对象的属性:
person.first
'Mertle'
调用对象的方法:
person.full_name()
'Mertle Sedgewick'
修改对象的属性:
person.last = 'Smith'
添加新属性,d是之前定义的字典:
person.critters = d
person.critters
{'cats': 4, 'dogs': 2, 'pigs': 7}
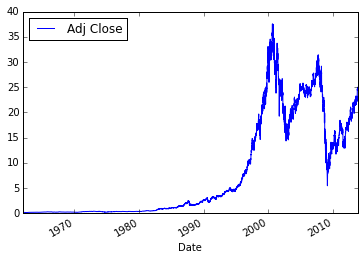
网络数据 Data from Web
url = 'http://ichart.finance.yahoo.com/table.csv?s=GE&d=10&e=5&f=2013&g=d&a=0&b=2&c=1962&ignore=.csv'
处理后就相当于一个可读文件:
import urllib2
ge_csv = urllib2.urlopen(url)
data = []
for line in ge_csv:
    data.append(line.split(','))
data[:4]
[['Date', 'Open', 'High', 'Low', 'Close', 'Volume', 'Adj Close
'],
 ['2013-11-05', '26.32', '26.52', '26.26', '26.42', '24897500', '24.872115
'],
 ['2013-11-04',
  '26.59',
  '26.59',
  '26.309999',
  '26.43',
  '28166100',
  '24.88153
'],
 ['2013-11-01',
  '26.049999',
  '26.639999',
  '26.030001',
  '26.540001',
  '55634500',
  '24.985086
']]
使用pandas处理数据:
ge_csv = urllib2.urlopen(url)
import pandas
ge = pandas.read_csv(ge_csv, index_col=0, parse_dates=True)
ge.plot(y='Adj Close')
<matplotlib.axes._subplots.AxesSubplot at 0xc2e3198>