之前项目中都是使用shiro作为安全框架,但是很多资料推荐spring security作为spring项目的安全框架。既然用着spring,那spring security自然还是要了解下的。
但是在实际接触中发现,比shori的学习成本高点。还有就是大部分都停留在将前端代码放在后端路径下,页面的跳转,重定向都由后端代码实现。这在当下的前后端分离开发中还是不合适的,所以经过我这几天的各种捣鼓,终于实现了speing security的前后端分离开发,后端主要处理接口数据,页面全部由前端处理,传输使用JSON格式。
一、代码结构
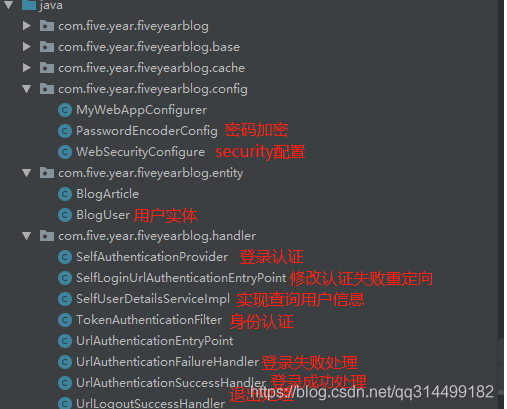
二、实现过程
spring security底层实现就是一串过滤器,因此我们需要重写里面的一些方法,返回JSON格式。前端根据JSON数据进而实现用户的登录与身份验证等操作。具体代码如下
一、创建实体,实现 UserDetails接口,记得实现方法将boolean返回值改为true
@Setter
@Getter
public class BlogUser extends BaseEntity implements UserDetails {

    public BlogUser() {
    }

    public BlogUser(String userName, String userPassword) {
        this.userName = userName;
        this.userPassword = userPassword;
    }

    private static final Short ENABLE_FALSE = 0;

    /**
     * 用户名
     */
    private String userName;

    /**
     * 密码
     */
    private String userPassword;

    /**
     * 用户的角色
     * @return 角色组
     */
    @Override
    public Collection<? extends GrantedAuthority> getAuthorities() {
        return null;
    }

    @Override
    public String getPassword() {
        return this.userPassword;
    }

    @Override
    public String getUsername() {
        return this.userName;
    }

    @Override
    public boolean isAccountNonExpired() {
        return true;
    }

    @Override
    public boolean isAccountNonLocked() {
        return true;
    }

    @Override
    public boolean isCredentialsNonExpired() {
        return true;
    }

    @Override
    public boolean isEnabled() {
        return !this.enable.equals(ENABLE_FALSE);
    }
二、编写DAO层代码,实现UserDetailsService,重写loadUserByUsername方法
@Component
public class SelfUserDetailsServiceImpl implements UserDetailsService {

@Autowired
private BlogUserMapper mapper;

@Override
public UserDetails loadUserByUsername(String username) throws UsernameNotFoundException {
BlogUser blogUser = mapper.loadUserByUsername(username);
if(ObjectUtils.isEmpty(blogUser)){
throw new UsernameNotFoundException("根据用户名未找到用户信息");
}
return blogUser;
}
}
到此为止,security框架需要你做的事情已经完了。它会有一个默认登录页面(很丑,一看就是后端写的)。封装的还是很强大的。同时还支持前后端分离配置,不得不佩服spring的强大,下面看具体实现。
三、首先先看下security的配置类
@EnableWebSecurity
@Configuration
public class WebSecurityConfigure extends WebSecurityConfigurerAdapter {

/**
* 自定义登录认证
*/
@Autowired
private SelfAuthenticationProvider authenticationProvider;

/**
* 自定义登录成功处理器
*/
@Autowired
private UrlAuthenticationSuccessHandler authenticationSuccessHandler;

/**
* 自定义登录失败处理器
*/
@Autowired
private UrlAuthenticationFailureHandler authenticationFailureHandler;

/**
* 自定义注销处理器
*/
@Autowired
private UrlLogoutSuccessHandler logoutSuccessHandler;


/**
* 登录认证
* @param auth 登陆管理器
*/
@Override
protected void configure(AuthenticationManagerBuilder auth) {
//添加自定义登陆认证
auth.authenticationProvider(authenticationProvider);
}

/**
* 具体配置登陆细节
* @param http 登陆访问对象
* @throws Exception 登陆异常
*/
@Override
protected void configure(HttpSecurity http) throws Exception {
//关闭csrf
http.csrf().disable()
//关闭Session
.sessionManagement().sessionCreationPolicy(SessionCreationPolicy.STATELESS)
.and()
//开放api路径
.authorizeRequests().antMatchers("/api/**","/five-service/blog-article/search/**","/five-service/blog-article/point","/five-service/blog-user/login").
permitAll()
.anyRequest().authenticated()
//开启自动配置的登陆功能
.and()
//自定义登录请求路径(post请求)
.formLogin().usernameParameter("userName").passwordParameter("userPassword")
.loginProcessingUrl("/five-service/login")
//验证成功处理器
.successHandler(authenticationSuccessHandler)
//验证失败处理器
.failureHandler(authenticationFailureHandler).permitAll()
.and()
//关闭拦截未登录自动跳转,改为返回json信息
.exceptionHandling().authenticationEntryPoint(selfLoginUrlAuthenticationEntryPoint())
//开启自动配置的注销功能
.and()
.logout()
.logoutUrl("/five-service/logout")
//注销成功处理器
.logoutSuccessHandler(logoutSuccessHandler).permitAll()
.and()
//添加token过滤器
.addFilter(new TokenAuthenticationFilter(authenticationManagerBean()));
}

/**
* 身份认证失败处理类
* @return AuthenticationEntryPoint
*/
@Bean
public AuthenticationEntryPoint selfLoginUrlAuthenticationEntryPoint() {
return new SelfLoginUrlAuthenticationEntryPoint("/");
}

/**
* 重写方法,是上下文可以获取本地缓存对象
* @return AuthenticationManager 本地缓存对象
* @throws Exception 异常
*/
@Bean
@Override
public AuthenticationManager authenticationManagerBean() throws Exception {
return super.authenticationManagerBean();
}

}
首先是自定义登录处理 SelfAuthenticationProvider
@Component
public class SelfAuthenticationProvider implements AuthenticationProvider {

//DAO查询用户
@Autowired
private SelfUserDetailsServiceImpl userDetailsService;

//密码加密解密
@Autowired
private BCryptPasswordEncoder bCryptPasswordEncoder;

@Override
public Authentication authenticate(Authentication authentication) throws AuthenticationException {
//表单输入的用户名
String username = (String) authentication.getPrincipal();
//表单输入的密码
String password = (String) authentication.getCredentials();
UserDetails userDetails = userDetailsService.loadUserByUsername(username);
//对加密密码进行验证
if(bCryptPasswordEncoder.matches(password,userDetails.getPassword())){
return new UsernamePasswordAuthenticationToken(username,password,null);
}else {
throw new BadCredentialsException("密码错误");
}
}

@Override
public boolean supports(Class<?> aClass) {
return true;
}
然后是登陆成功处理类 UrlAuthenticationSuccessHandler
@Component
public class UrlAuthenticationSuccessHandler implements AuthenticationSuccessHandler {

@Override
public void onAuthenticationSuccess(HttpServletRequest httpServletRequest, HttpServletResponse httpServletResponse, Authentication authentication) throws IOException {
//security在分布式环境token使用,下一章会写道
Cookie token = TokenUtils.createToken(httpServletRequest);
httpServletResponse.addCookie(token);
httpServletResponse.setHeader("Content-Type", "application/json;charset=utf-8");
httpServletResponse.setStatus(200);
PrintWriter writer = httpServletResponse.getWriter();
writer.write(HttpResult.getJsonResult(200,"登陆成功"));
writer.flush();
writer.close();
}
}
然后是登录失败处理类 UrlAuthenticationFailureHandler
@Component
public class UrlAuthenticationFailureHandler implements AuthenticationFailureHandler {

@Override
public void onAuthenticationFailure(HttpServletRequest httpServletRequest, HttpServletResponse httpServletResponse, AuthenticationException e) throws IOException {
httpServletResponse.setCharacterEncoding("UTF-8");
httpServletResponse.setStatus(401);
PrintWriter writer = httpServletResponse.getWriter();
writer.write(HttpResult.getJsonResult(401,"登陆失败"));
writer.flush();
writer.close();
}
}
最后是注销成功处理类
@Component
public class UrlLogoutSuccessHandler implements LogoutSuccessHandler {

@Override
public void onLogoutSuccess(HttpServletRequest httpServletRequest, HttpServletResponse httpServletResponse, Authentication authentication) throws IOException {
httpServletResponse.setCharacterEncoding("UTF-8");
httpServletResponse.setStatus(200);
PrintWriter writer = httpServletResponse.getWriter();
writer.write(HttpResult.getJsonResult(100,"注销成功"));
writer.flush();
writer.close();
}
}
至此后端代码就全部完成,前端根据JSON解析来完成登录及身份验证的全部动作。在配置类中可以看到我开启禁用session配置,目的是将用户信息存入redis,实现分布式身份验证需求。在单机环境下,可以开启session(默认开启),同时在过滤链中将自定义的TokenAuthenticationFilter去掉即可。
原文链接:https://blog.csdn.net/qq314499182/article/details/87913202