Getting Started(开始)
To create the Mac app in this tutorial, you need Xcode 4.4 or later. Xcode is Apple’s integrated development environment (or IDE) for both OS X and iOS development.
本教程要求Xcode4.4或以上版本。Xcode 是 苹果公司的集成开发环境(IDE),用来开发OS X 和 iOS。
Create and Test a New Project
创建 和 测试 一个新项目
To get started developing your app, you create a new Xcode project.
创建一个新的Xcode项目,开始开发你的应用。
-
Launch Xcode (located in the
Applicationsfolder).打开 Xcode (在 Applications 文件夹)
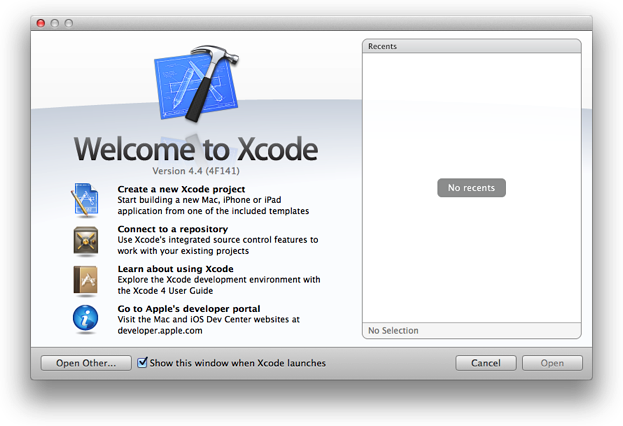
If you’ve never created or opened a project in Xcode before, you should see a Welcome to Xcode window similar to this:
如果你从来没有在Xcode里 创建 或 打开 过项目, 你应该能看到一个像这样的欢迎页面:
If you’ve created or opened a project in Xcode before, you might see a project window instead of the Welcome to Xcode window.
如果你已经在Xcode里创建或打开过项目,你可能看到一个项目窗口而不是Welcome to Xcode 窗口。
-
In the Welcome to Xcode window, click “Create a new Xcode project” (or choose File > New > Project).
点击“Create a new Xcode project" (或者 File > New > Project)。
-
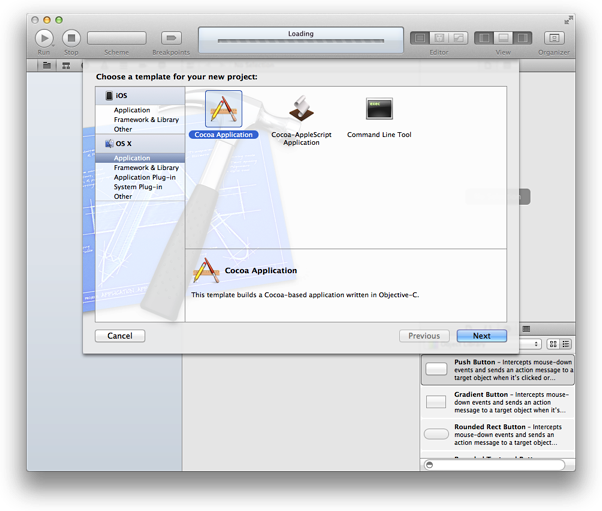
In the OS X section to the left of the dialog, select Application.
在对话框左边的 OS X 选区内选择"Application"。
-
In the main area of the dialog, select Cocoa Application and click Next.
在对话框的主选区内,选择”Cocoa Application" 点击 "Next"。
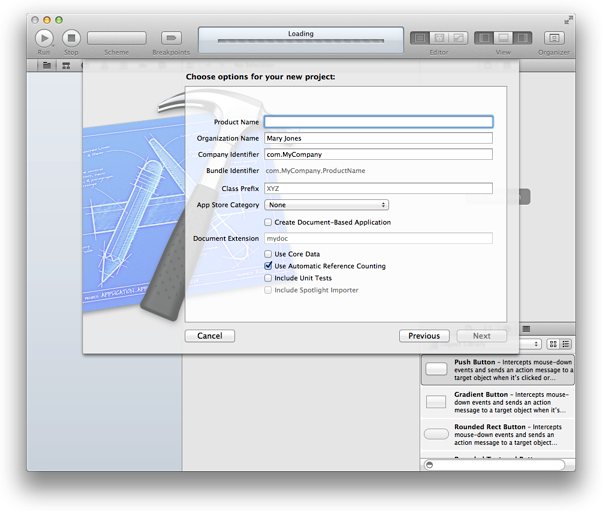
A new dialog appears that prompts you to name your app and choose additional options for your project.
出现一个新对话框,要求填入应用名称 和 选择 应用的附加选项。
-
Choose the following options:
选择以下选项:
-
In the Product Name field, type
TrackMix.Product Name(产品名称)项,填 TrackMix
-
In the Company Identifier field, type the identifier for your company, or
com.MyCompany.Company Identifier(公司标识)项,填入 你公司的标识 或者 com.MyCompany
-
In the App Store Category pop-up, choose None.
App Store Category(应用商店类别)项,选择 None
Note: Xcode uses the product name you entered to name your project and the app. To keep things simple, this tutorial assumes that you named your product
TrackMixand did not specify a class prefix value. (The prefix is used to create unique class names for your app that won’t conflict with classes in other frameworks.) The organization name property that appears in this dialog is not used in this tutorial.注意:Xcode 用你输入的 产品名称 命名你的项目和应用程序。 为了简单,本教程假设你以 TrackMix 命名,并且没有指定一个类前缀值(class prefix value)。(前缀是用来给应用生成一个唯一的类名,以避免跟别的框架里的类名发生冲突。) 对话框里的 organization name(组织名称) 属性在本教程里没有使用。
-
-
Make sure that the Use Automatic Reference Counting option is selected and that the Create Document-Based Application (appears above Document Extension), Use Core Data, and Include Unit Tests options are unselected.
请确认“Use Automatic Reference Counting” 选项已被勾选,而“Create Document-Based Application”(Document Extension上面),“Use Core Data” 和 ”Include Unit Tests"选项没被勾选。
-
Click Next.
Another dialog appears that allows you to specify where to save your project.
点击“Next”。出现另一个对话框让你指定项目的存储位置。
-
Specify a location for your project (make sure that the Source Control option is unselected) and then click Create.
给项目指定一个地址(确保“Source Control” 选项没被勾选),然后点击“Create”。
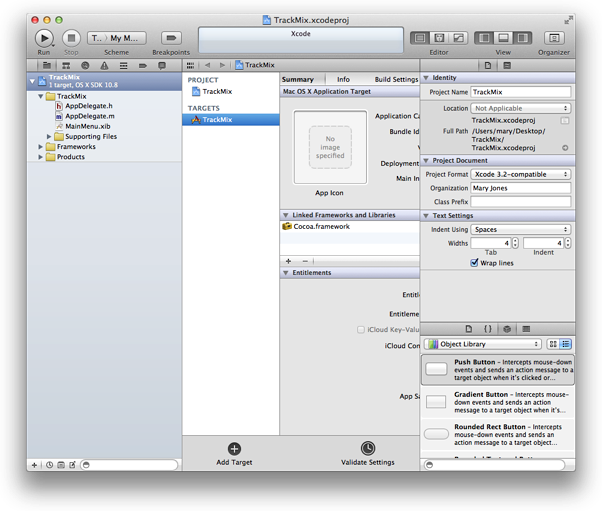
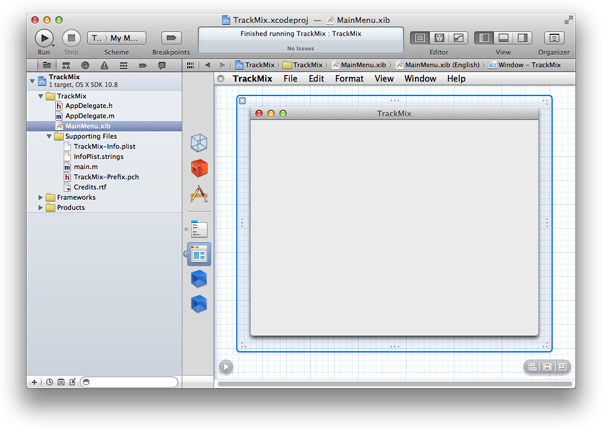
Take a few moments to familiarize yourself with the workspace window that Xcode opens for you. You’ll use the buttons and areas identified in the window below throughout the rest of this tutorial.
花几分钟熟悉一下Xcode打开的工作窗口。 你将在剩下的教程里用到下面的按钮和标识区域:
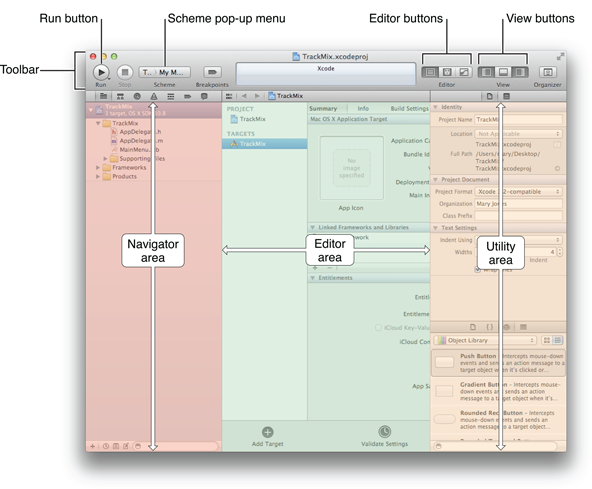
If the utilities area in your workspace window is already open (as it is in the window shown above), you can close it for now because you won’t need it until later in the tutorial. The rightmost View button controls the utilities area. When the utilities area is visible, the button looks like this: ![]()
如果utilities area(实用区)已经被打开(就像上图),现在你可以把它关闭因为你暂时用不到。最后边的视图按钮(View button)控制着实用区。当实用区被打开时,按钮是这样的:![]()
If necessary, click the rightmost View button to close the utilities area.
如果需要,点击最右边的视图按钮关闭实用区。
Even though you haven’t yet written any code, you can build and run your app in Xcode.
尽管你没写任何代码,你可以在 Xcode里 build and run(构建和运行) 你的应用。
-
Click the Run button in the Xcode toolbar (or choose Product > Run).
点击Xcode 工具栏上的 “Run"按钮(或 Produce > Run)。
If a dialog appears asking whether Xcode should enable developer mode on this Mac, click Disable.
如果出现对话框询问Xcode是否在Mac上开启开发者模式(enable developer mode),点”Disable"。
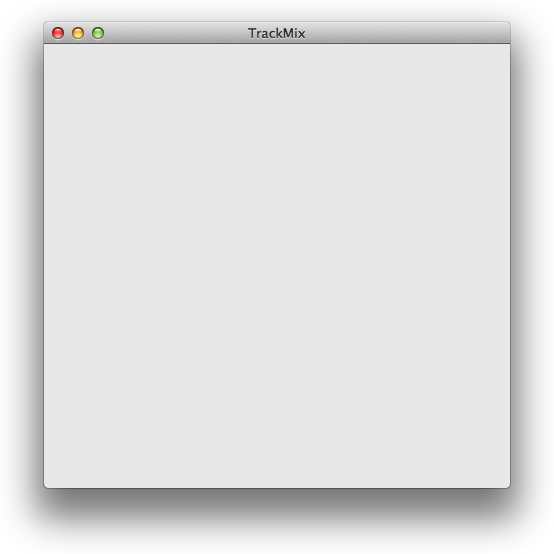
Xcode should build your project and launch the app. When your app starts up, it should have a standard menu bar and display a single window.
Xcode 会构建你的项目并启动该应用。 当你的应用启动后,它有一个标准菜单栏(standard menu bar),并显示一个窗口。
-
Test the app.
测试应用
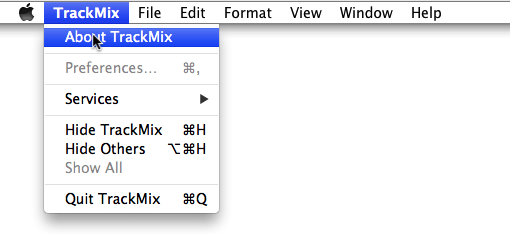
You can move and resize the window. However, if you close the window, there is no way to get it back. You should also find that menus display when you click them, and if you choose TrackMix > About TrackMix, an About window is displayed.
你可以移动窗口 和 调整窗口尺寸。然而,如果你关闭了该窗口,就没法恢复了。当你点击它们时,也应该能找到菜单显示,如果你选择了 TrackMix > About TrackMix, 一个跳出About窗口。
-
Quit the app by choosing TrackMix > Quit TrackMix.
选择 TrackMix > Quit TrackMix 退出应用。
Don’t mistakenly choose the Quit command in Xcode, or you’ll quit Xcode. You can also click the Stop button in Xcode.
别误选了Xcode 的 退出(Quit)命令,否则你将退出Xcode。你也可以点Xcode里的 “Stop” 按钮。
Right now, your app is not very interesting: it simply displays a blank window. To understand where the blank window comes from, you need to learn about the objects in your code and how they work together to start the app.
目前为止:你的应用一点也不有趣:它只显示了一个空白窗口。 为了理解该空白窗口是从哪来的,你应该学习在你代码中的对象(Objects) ,了解它们是如何一起工作启动这个应用的。
Find Out How an App Launches
了解应用程序的启动
Because you based your project on an Xcode template, much of the basic app environment is automatically set up when you run the app. For example, Xcode creates an app object which, among a few other things, establishes the run loop. (A run loop registers input sources and enables the delivery of input events to your app.) Most of this work is done by the NSApplicationMain function, which is supplied for you by the AppKit framework and is automatically called in your project’s main.m source file.
因为你在一个Xcode模板的基础上构建你的项目,很多基础应用环境是在你运行该应用的时候自动建立的。比如:Xcode在一些其它东西上创建一个应用程序对象(app object),建立了运行循环(run loop)。(一个运行循环(run loop)注册输入源,并让输入事件(input events)能够交付给应用程序) 这大部分工作是由 NSApplicationMain 函数完成的,该函数由 AppKit 框架(AppKit framework)框架提供,并由项目中的 main.m 资源文件自动调用。
Note: The AppKit framework provides all the classes that an app needs to construct and manage its user interface. The AppKit framework is just one of many object-oriented frameworks provided by Cocoa, which is the app environment for all Mac apps.
注意:AppKit 框架提供了项目构造和管理(construct and manage)它的用户界面所需的所有类。 该框架仅仅是Cocoa 提供的多个面向对象框架中的一个。Cocoa 是所有Mac 应用程序(Mac apps)的应用程序环境(app environment)。
-
Make sure the project navigator is open in the navigator area.
确定项目导航已被打开
The project navigator displays all the files in your project. If the project navigator is not open, click the leftmost button in the navigator selector bar:
项目导航显示了项目的所有文件。 如果项目导航没有打开,点击 导航选择器(navigator selector)上 最左边的按钮:

-
Open the Supporting Files folder in the project navigator by clicking the disclosure triangle next to it.
打开项目导航里的 "Supporting Files"文件夹
-
Select
main.m.Xcode opens the source file in the editor area of the window, which should look similar to this:
选中main.m, Xcode 打开资源文件如下:
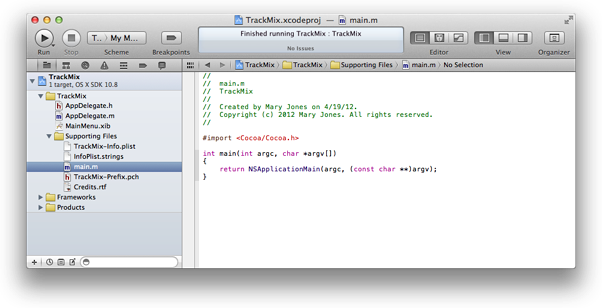
The call to the NSApplicationMain function creates an instance of the NSApplication class and an instance of the AppDelegate class, which is provided for you by the Cocoa Application template. In this tutorial, the singleton instance of this class is referred to as the app delegate. The main job of the app delegate is to provide a window you can access through its window property. The window object provides a container for the app’s visible content and helps deliver events to other app objects. The app delegate can also perform some app configuration tasks before the app is displayed. You add your custom behavior and logic to the AppDelegateclass and any other classes you create.
函数 NSApplicationMain 的调用 创建了一个 NSApplication 类的实例 和 一个AppDelegate 类(由Cocoa Application template提供)的实例。
The instance of the NSApplication class, called the app object, loads the main nib file when the app launches. Nib files are an archive of UI elements and other objects. The main nib file, MainMenu.xib, usually contains the parts of your user interface, such as the menu bar and window, that are visible the entire time your app is running. When a nib file is loaded, the objects it contains are instantiated.
NSApplication类的实例,叫做 app object(应用程序对象),应用启动时加载主要的nib文件。 Nib files 是 UI elements(用户界面元素) 和 其他对象的集合。主要nib文件,MainMenu.xib, 常常包含用户界面的组件,比如菜单栏和窗口,这些组件在应用程序运行期间都是可见的。当一个nib 文件加载时,它包含的对象就被实例化了。
-
Click
MainMenu.xibunder the TrackMix group in the project navigator.点击项目导航上TrackMix组下面的MainMenu.xib文件
The file has the extension
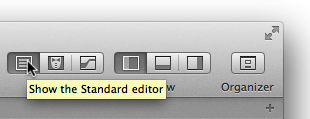
.xibbut by convention it is referred to as a nib file. Xcode displays the file on a canvas in the editor area.If an outline view appears instead of the standard editor, click the Standard editor in the Editor toolbar.
文件扩展名是.xib,但是它其实是一个nib文件。Xcode在编辑区 在画布上显示nib文件。如果出现一个大纲视图(outline view)而不是标准标准编辑器(standard editor),可以在编辑栏(Editor toolbar)上点击标准编辑器(Standard editor)。
-
To display the window, click the window icon in the sidebar.
要显示窗口,点击在侧边栏(sidebar)的窗口图标。
The sidebar contains several items split into two groups by a dividing line. Above the line are placeholders—objects that are not created as part of the nib file itself, but exist externally. Below the line are objects created as part of the nib file:
侧边栏(sidebar)包含了好几项内容,它们被一个分界线分为2组。分界线上面是占位符(placeholders)---创建的对象不属于nib文件的一部分,但是在外部存在。分界线下面则是被创建的属于nib文件一部分的对象。
-
A menu object(菜单对象)
This object is the app’s main menu displayed in the menu bar.
该对象是应用程序的主菜单,在菜单栏上(menu bar)显示。
-
A window object(窗口对象)
This object is the window with a plain gray background that you see when the app launches.
该对象是一个有灰色背景的窗口,在应用程序启动时能看到。
-
An instance of
AppDelegate(a dark blue cube), set to be the app object’s delegate一个AppDelegate实例(深蓝色立方体),被设置为应用程序对象的代理(delegate)
When the app object has completed its setup, it sends its delegate an
applicationDidFinishLaunching:message. This message gives the delegate an opportunity to configure the user interface and perform other tasks before the app is displayed.当应用程序对象完全启动后,它会给它的代理(delegate)发送一个 applicationDidFinishLaunching 消息。这个消息在应用程序显示之前 给delegate设置用户界面 和 完成其他任务 提供了机会。
-
An instance of
NSFontManager(a dark blue cube)一个NSFontManager实例(深蓝色立方体)
This object manages the app’s font menu, but you won’t use it in this example.
该对象管理应用程序字体菜单(font menu), 但是在本例你将不会使用
Recap(概括)
In this chapter you used Xcode to create a new project based on the Cocoa Application template and you built and ran the default app that the template defines. Then you looked at some of the basic pieces of the project, such as the main.m source file, and the nib file, and learned what objects are created and loaded from the nib file when the app launches.
在这章你用Xcode创建了一个基于Cocoa 应用模板(Cocoa Application template)的项目,之后你构建并运行了由模板定义的默认应用程序。然后你查看了一些基本项目片段, 比如 main.m 资源文件,和nib 文件,最后学习了当应用启动时,哪些对象是在nib文件上创建和载入的。
In the next chapter, you’ll learn how to lay out and configure the user interface without writing any code.
下一章,你将学习不写任何代码对用户界面进行设置和布局。