一、Ajax简介
#1、Ajax是什么
    异步Javascript和XML,即使用Javascript语言与服务器进行异步交互,传输的数据为XML(当然,传输的数据不只是XML,现在更多使用json数据)。
  django使用时别忘了在static中放一个jquery

    #同步交互:客户端发出一个请求后,需要等待服务器响应结束后,才能发出第二个请求;
    #异步交互:客户端发出一个请求后,无需等待服务器响应结束,就可以发出第二个请求

#2、Ajax的特点
    #异步
    #页面的局部刷新
#3、AJAX常见应用情景
    整个过程中页面没有刷新,只是刷新页面中的局部位置而已!
    当请求发出后,浏览器还可以进行其他操作,无需等待服务器的响应!
最基本的用法


#使用get请求往后台提交数据

<head>
    <meta charset="UTF-8">
    <script src="/static/jquery-3.3.1.js"></script>   #需要jquery
    <title>Title</title>
</head>
<body>
<button class="btn">点击</button>  #绑定时间
</body>

<script>
    $('.btn').click(function(){
        $.ajax({
            url:'index/?name=pdun',
            type:'get'            #多了一种往后台提交数据的方式,再路由后拼问号
        })

    })
</script>

</html>

----------------------------------------

#视图函数
from django.shortcuts import render,HttpResponse

# Create your views here.
def index(request):
    if request.method=='GET':
        print(request.body)
        print(request.GET)
        print(request.POST)
        return render(request,'index.html')
    else:
        print(request.body)
        print(request.GET)
        print(request.POST)
        return HttpResponse('ok')


-----------------------------
#点击一次后端打印一次结果
<QueryDict: {'name': ['pdun']}>
<QueryDict: {}>
加深ajax异步理解
#ajax任务提交后,不等结果,继续执行下面的代码,
#下面的代码就是,先alert(123),等post请求sleep3秒后,alert(ok)

<body>
<button class="btn">点击</button>    #点击按钮
</body>

<script>
    $('.btn').click(function(){
        {#alert(1)#}
        $.ajax({
            url:'/index/',
            type:'post',
            data:{'name':'pdun','age':1},

            success:function (res) {
                alert(res)    #res是后端return的数据
            }
        })
    })
    alert(123)  #先弹出123,点击3秒后弹出后台return的ok
</script>


from django.shortcuts import render,HttpResponse
import time

# Create your views here.
def index(request):
    if request.method=='GET':
        print(request.body)
        print(request.GET)
        print(request.POST)
        return render(request,'index.html')
    else:
        time.sleep(3)
        print(request.body)       #b'name=pdun&age=1'
        print(request.GET)        #<QueryDict: {}>
        print(request.POST)      #<QueryDict: {'name': ['pdun'], 'age': ['1']}>
        return HttpResponse('ok')
#设置一个alert弹框,点击提交按钮,弹出alert框,5秒后再弹出alert框

<!DOCTYPE html>
<html lang="en">
<head>
    <meta charset="UTF-8">
    <script src="/static/jquery-3.3.1.js"></script>
    <title>Title</title>
</head>
<body>
<button class="btn">点我超后台发数据</button>
</body>

<script>
    $(".btn").click(function () {

        $.ajax({

            url:'/index/',
            type:'post',
            data:{"name":"pdun","age":1},
            success:function (data) {
                alert(data)

            }
        })
        alert('123')      #直接弹出,
    })
</script>
</html>


-------------------------------------------------

def index(request):
    if request.method == 'GET':

        print(request.body)
        print(request.GET)
        print(request.POST)
        return render(request,'index.html')
    else:
        import time
        time.sleep(5)

        print(request.body)
        print(request.GET)
        print(request.POST)
        return HttpResponse('ok')
最基本的jQuery发送AJAX请求示例:
<!DOCTYPE html>
<html lang="en">
<head>
    <meta charset="UTF-8">
    <title>Title</title>
    <meta name="viewport" content="width=device-width, initial-scale=1">

    <style>
        .hide {
            display: none;
        }
    </style>
</head>
<body>
<p><input type="text" class="user"><span class="hide" style="color: red">用户名已存在</span></p>

<script src="/static/jquery-3.3.1.min.js"></script>
{#下面这一项是基于jQuery的基础上自动给我们的每一个ajax绑定一个请求头信息,类似于form表单提交post数据必须要有的csrf_token一样#}
{#否则我的Django中间件里面的校验csrf_token那一项会认为你这个请求不是合法的,阻止你的请求#}
<script src="/static/setup_Ajax.js"></script>
<script>
    //给input框绑定一个失去焦点的事件
    $('.user').blur(function () {
        //$.ajax为固定用法,表示启用ajax
        $.ajax({
            //url后面跟的是你这个ajax提交数据的路径,向谁提交,不写就是向当前路径提交
            url:'',
            //type为标定你这个ajax请求的方法
            type:'POST',
            //data后面跟的就是你提交给后端的数据
            data:{'username':$(this).val()},
            //success为回调函数,参数data即后端给你返回的数据
            success:function (data) {
                ret=JSON.parse(data);
                if (ret['flag']){
                    $('p>span').removeClass('hide');
                }
            }
        })
    });
</script>
</body>
</html>
二、文件上传
1、了解请求头ContentType
#这应该是最常见的 POST 提交数据的方式了。浏览器的原生 <form> 表单,如果不设置 enctype 属性,那么最终就会以 application/x-www-form-urlencoded 方式提交数据。请求类似于下面这样(无关的请求头在本文中都省略掉了):


POST http://www.example.com HTTP/1.1
Content-Type: application/x-www-form-urlencoded;charset=utf-8

user=lqz&age=22
#这又是一个常见的 POST 数据提交的方式。我们使用表单上传文件时,必须让 <form> 表单的 enctype 等于 multipart/form-data。直接来看一个请求示例:


POST http://www.example.com HTTP/1.1
Content-Type:multipart/form-data; boundary=----WebKitFormBoundaryrGKCBY7qhFd3TrwA

------WebKitFormBoundaryrGKCBY7qhFd3TrwA
Content-Disposition: form-data; name="user"

yuan
------WebKitFormBoundaryrGKCBY7qhFd3TrwA
Content-Disposition: form-data; name="file"; filename="chrome.png"
Content-Type: image/png

PNG ... content of chrome.png ...
------WebKitFormBoundaryrGKCBY7qhFd3TrwA--


这个例子稍微复杂点。首先生成了一个 boundary 用于分割不同的字段,为了避免与正文内容重复,boundary 很长很复杂。然后 Content-Type 里指明了数据是以 multipart/form-data 来编码,本次请求的 boundary 是什么内容。消息主体里按照字段个数又分为多个结构类似的部分,每部分都是以 --boundary 开始,紧接着是内容描述信息,然后是回车,最后是字段具体内容(文本或二进制)。如果传输的是文件,还要包含文件名和文件类型信息。消息主体最后以 --boundary-- 标示结束。关于 multipart/form-data 的详细定义,请前往 rfc1867 查看。

这种方式一般用来上传文件,各大服务端语言对它也有着良好的支持。

上面提到的这两种 POST 数据的方式,都是浏览器原生支持的,而且现阶段标准中原生 <form> 表单也只支持这两种方式(通过 <form> 元素的 enctype 属性指定,默认为 application/x-www-form-urlencoded。其实 enctype 还支持 text/plain,不过用得非常少)。

随着越来越多的 Web 站点,尤其是 WebApp,全部使用 Ajax 进行数据交互之后,我们完全可以定义新的数据提交方式,给开发带来更多便利。
application/json 这个 Content-Type 作为响应头大家肯定不陌生。实际上,现在越来越多的人把它作为请求头,用来告诉服务端消息主体是序列化后的 JSON 字符串。由于 JSON 规范的流行,除了低版本 IE 之外的各大浏览器都原生支持 JSON.stringify,服务端语言也都有处理 JSON 的函数,使用 JSON 不会遇上什么麻烦。

JSON 格式支持比键值对复杂得多的结构化数据,这一点也很有用。记得我几年前做一个项目时,需要提交的数据层次非常深,我就是把数据 JSON 序列化之后来提交的。不过当时我是把 JSON 字符串作为 val,仍然放在键值对里,以 x-www-form-urlencoded 方式提交。
2、基于Form表单上传数据
<form action="/file_put/" method="post" enctype="multipart/form-data">
    用户名:<input type="text" name="name">
    头像:<input type="file" name="avatar" id="avatar1">
<input type="submit" value="提交">
</form>

#必须指定编码 enctype="multipart/form-data"
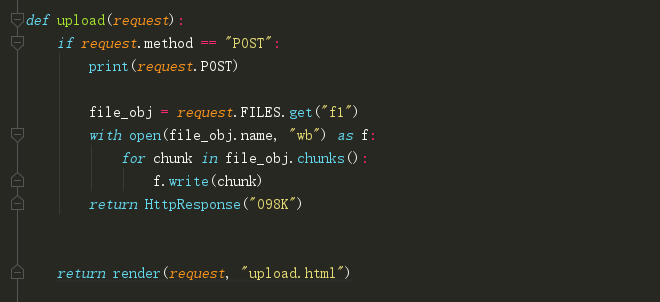
def file_put(request):
    if request.method=='GET':
        return render(request,'file_put.html')
    else:
        # print(request.POST)
        # print(request.POST)
        print(request.body)  # 原始的请求体数据
        print(request.GET)  # GET请求数据
        print(request.POST)  # POST请求数据
        print(request.FILES)  # 上传的文件数据
        # print(request.body.decode('utf-8'))
        print(request.body.decode('utf-8'))

        print(request.FILES)
        file_obj=request.FILES.get('avatar')
        print(type(file_obj))
        with open(file_obj.name,'wb') as f:
            for line in file_obj:
                f.write(line)
        return HttpResponse('ok')
3、 基于ajax上传文件
<button id="btn">ajax提交文件</button>

</body>
<script>
    $("#btn").click(function () {

        //上传文件,必须用FormData
        var formdata=new FormData();
        formdata.append('name',$("#name").val());

        //取出文件$("#myfile")[0].files拿到的是文件列表,取第0个把具体的文件取出来
        formdata.append('myfile',$("#myfile")[0].files[0]);

        $.ajax({
            url:'/files_ajax/',
            type:'post',

            //不预处理数据,(默认是这种name=lqz&age=18)
            processData:false,

            //指定往后台传数据的编码格式(urlencoded,formdata,json)
            //现在用formdata对象处理了,就不需要指定编码格式了,不要给我编码了
            contentType:false,
            data:formdata,
            success:function (data) {
                alert(data)

            }
        })

    })

</script>
三、Ajax提交json格式数据
结合上边ContentType,Ajax只支持前两种编码方式,第三种json格式需要手动解码
#这个过程无非就是
#前端获取页面上输入的信息,例如是个对象(字典),把它转成字符串,

#后端接收到字符串,转成对应的格式

#把后端处理的数据结果(例如字典类型)转换成字符串,传给前端,前端再转换成对用格式的数据类型
<!DOCTYPE html>
<html lang="en">
<head>
    <meta charset="UTF-8">
    <script src="/static/jquery-3.3.1.js"></script>
    <title>Title</title>
</head>
<body>
<form  >
    <p>用户名:<input type="text" name="name" id="name"></p>

    <p>密码:<input type="password" name="pwd" id="pwd"></p>

</form>

<button id="btn">ajax提交json格式</button>
</body>

<script>
    $('#btn').click(function () {
        var post_data={'name':$("#name").val(),'pwd':$("#pwd").val()};
        console.log(typeof post_data);

        // 如何把post_data这个字典,转成json格式字符串
        //JSON.stringify相当于python中json.dumpus(post_data)
        //pos是个字符串,json格式字符串

        var pos=JSON.stringify(post_data);
        console.log(typeof pos);
        $.ajax({
            url:'/json/',
            type:'post',
            data:pos,
            contentType:'application/json',
            dataType:'json',
            success:function (data) {

                //如果data是json格式字符串,如何转成对象(字典)?
                //data=JSON.parse(data)

                console.log(typeof data)                  //注意这里不是type
                console.log(data.status)
                /*
                console.log(data)
                var ret=JSON.parse(data)
                console.log(typeof ret)
                console.log(ret.status)
                */

                //alert(data)

            }
        })

    })
</script>
</html>
def js(request):
    if request.method=='GET':
        return render(request,'file.html')
    print(request.POST,'这是POST')
    print(request.GET,'这是GET')
    print(request.body,'这是body')
    #把前台传的字符串转换成其它格式
    import json
    res = request.body.decode('utf-8')
    print(type(res))     #<class 'str'>
    res1 = json.loads(res)
    print(type(res1))   #<class 'dict'>

    #把这个对字典装换成字符串传给前端
    dic = {'status':'100','msg':'登陆成功'}
    # 第一种方式
    return HttpResponse(json.dumps(dic))
    #第二种方式
    # return JsonResponse(dic)
AJAX请求如何设置csrf_token
不论是ajax还是谁,只要是向我Django提交post请求的数据,都必须校验csrf_token来防伪跨站请求,那么如何在我的ajax中弄这个csrf_token呢,我又不像form表单那样可以在表单内部通过一句{% csrf_token %}就搞定了......
方式1
通过获取隐藏的input标签中的csrfmiddlewaretoken值,放置在data中发送。
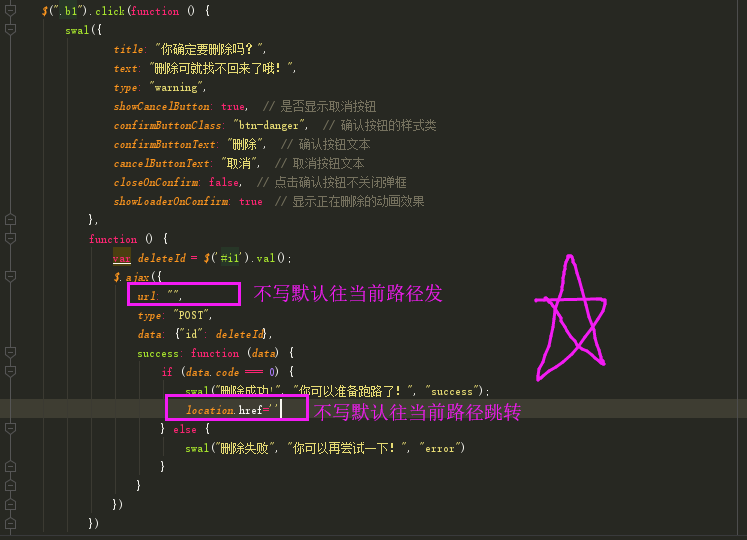
$.ajax({
  url: "/cookie_ajax/",
  type: "POST",
  data: {
    "username": "Tonny",
    "password": 123456,
    "csrfmiddlewaretoken": $("[name = 'csrfmiddlewaretoken']").val()  // 使用JQuery取出csrfmiddlewaretoken的值,拼接到data中
  },
  success: function (data) {
    console.log(data);
  }
})
方式2
通过获取返回的cookie中的字符串 放置在请求头中发送。
注意:需要引入一个jquery.cookie.js插件。
View Code方式3
或者用自己写一个getCookie方法:
View Code每一次都这么写太麻烦了,可以使用$.ajaxSetup()方法为ajax请求统一设置。
function csrfSafeMethod(method) {
  // these HTTP methods do not require CSRF protection
  return (/^(GET|HEAD|OPTIONS|TRACE)$/.test(method));
}

$.ajaxSetup({
  beforeSend: function (xhr, settings) {
    if (!csrfSafeMethod(settings.type) && !this.crossDomain) {
      xhr.setRequestHeader("X-CSRFToken", csrftoken);
    }
  }
});
将下面的文件配置到你的Django项目的静态文件中,在html页面上通过导入该文件即可自动帮我们解决ajax提交post数据时校验csrf_token的问题,(导入该配置文件之前,需要先导入jQuery,因为这个配置文件内的内容是基于jQuery来实现的)

如下: