SwaggerUi就是自动生成接口文档的这么一个类似于插件的工具,可以直接访问接口。
首先打开pom文件,将插件引进来,然后增加一个属性<properties>,用来设置版本号的,然后直接用${}引用。
<?xml version="1.0" encoding="UTF-8"?>
<project xmlns="http://maven.apache.org/POM/4.0.0"
         xmlns:xsi="http://www.w3.org/2001/XMLSchema-instance"
         xsi:schemaLocation="http://maven.apache.org/POM/4.0.0 http://maven.apache.org/xsd/maven-4.0.0.xsd">
    <parent>
        <artifactId>JavaInterfaceTest</artifactId>
        <groupId>com.peixm.code</groupId>
        <version>1.0-SNAPSHOT</version>
    </parent>
    <modelVersion>4.0.0</modelVersion>

    <artifactId>Chapter10</artifactId>

    <properties>
        <swagger.version>2.6.1</swagger.version>
    </properties>

    <dependencies>
        <dependency>
            <groupId>org.springframework.boot</groupId>
            <artifactId>spring-boot-starter-web</artifactId>
        </dependency>


        <dependency>
            <groupId>io.springfox</groupId>
            <artifactId>springfox-swagger2</artifactId>
            <version>${swagger.version}</version>
        </dependency>

        <dependency>
            <groupId>io.springfox</groupId>
            <artifactId>springfox-swagger-ui</artifactId>
            <version>${swagger.version}</version>
        </dependency>

        <dependency>
            <groupId>org.projectlombok</groupId>
            <artifactId>lombok</artifactId>
            <version>1.16.14</version>
        </dependency>
    </dependencies>

</project>
然后创建一个config包,在创建一个类SwaggerConfig.java,用来配置swager
package com.course.config;

import org.springframework.context.annotation.Bean;
import org.springframework.context.annotation.Configuration;
import springfox.documentation.builders.ApiInfoBuilder;
import springfox.documentation.builders.PathSelectors;
import springfox.documentation.service.ApiInfo;
import springfox.documentation.service.Contact;
import springfox.documentation.spi.DocumentationType;
import springfox.documentation.spring.web.plugins.Docket;
import springfox.documentation.swagger2.annotations.EnableSwagger2;

@Configuration  //在springboot里面专门为了加载配置文件的标签
@EnableSwagger2   //自动加载配置文件
public class SwaggerConfig {
    @Bean
    public Docket api(){
        return new Docket(DocumentationType.SWAGGER_2)
                .apiInfo(apiInfo())
                .pathMapping("/")
                .select()
                .paths(PathSelectors.regex("/.*"))   //匹配那些访问的方法
                .build();
    }

    private ApiInfo apiInfo() {
        //http://localhost:8888/swagger-ui.html
        return new ApiInfoBuilder().title("我的接口文档")
                .contact(new Contact("xiaomin","","553238711@qq.com"))
                .description("这是我的swaggerui生成的接口文档")
                .version("1.0.0.0")
                .build();
    }

}
然后在想要在swagger看到的接口类的类名上添加注解:@Api(value = "/",description = "这是我全部的get方法"),在每个方法上面添加 @ApiOperation(value = "通过这个方法可以获取到cookies的值",httpMethod ="GET"),(或者post)value就是一个描述,描述这个方法是做什么的。
package com.course.server;

import io.swagger.annotations.Api;
import io.swagger.annotations.ApiOperation;
import org.springframework.web.bind.annotation.*;

import javax.servlet.http.Cookie;
import javax.servlet.http.HttpServletRequest;
import javax.servlet.http.HttpServletResponse;
import java.util.HashMap;
import java.util.Map;
import java.util.Objects;

@RestController    //被告诉我是你需要扫描的类
@Api(value = "/",description = "这是我全部的get方法")
public class MyGetMethod {

    @RequestMapping(value = "/getCookies",method = RequestMethod.GET)    //访问的路径是什么
    @ApiOperation(value = "通过这个方法可以获取到cookies的值",httpMethod ="GET")
    public String getCookies(HttpServletResponse response){
        //HttpServerletRequest    装请求信息
        //HttpServerletResponse   装响应信息
        Cookie cookie = new Cookie("login","ture");
        response.addCookie(cookie);

        return "恭喜你获得cookies信息成功";
    }

    /**
     * 要求客户端携带cookies访问
     * */

    @RequestMapping(value = "/get/with/cookies",method = RequestMethod.GET)
    @ApiOperation(value = "要求客户端携带cookies访问",httpMethod = "GET")
    public String getWithCookies(HttpServletRequest request){
        Cookie[] cookies = request.getCookies();
        if(Objects.isNull(cookies)){
            return "你必须携带cookies信息来";
        }

        for(Cookie cookie : cookies){
            if(cookie.getName().equals("login") && cookie.getName().equals("true")){
                return "恭喜你访问成功";
            }
        }
        return "你必须携带cookies信息来";
    }

    /**
    * 开发一个需要携带参数才能访问的get请求
    * 第一种实现方式是 url: ip:port/get/with/param?key=value&key=value
    * 模拟获取商品列表  开始页数,结束的页数,一页20条数据
    * */

    //第一种需要携带参数访问的get请求
    @RequestMapping(value = "/get/with/param",method = RequestMethod.GET)
    @ApiOperation(value = "携带参数才能访问的get请求",httpMethod = "GET")
    public Map<String,Integer> getList(@RequestParam Integer start,
                                       @RequestParam Integer end){
        Map<String,Integer> myList = new HashMap<>();
        myList.put("鞋",400);
        myList.put("衬衫",300);
        myList.put("干脆面",1);

        return myList;

    }

    /**
     *第2种需要携带参数访问的get请求
     * url:  ip:port/get/with/param/10/20
     * */

    @RequestMapping(value = "/get/with/param/{start}/{end}")
    @ApiOperation(value = "第2种需要携带参数访问的get请求",httpMethod = "GET")
    public Map myGetList(@PathVariable Integer start,
                         @PathVariable Integer end){

        Map<String,Integer> myList = new HashMap<>();
        myList.put("鞋",400);
        myList.put("衬衫",300);
        myList.put("干脆面",1);

        return myList;
    }

}
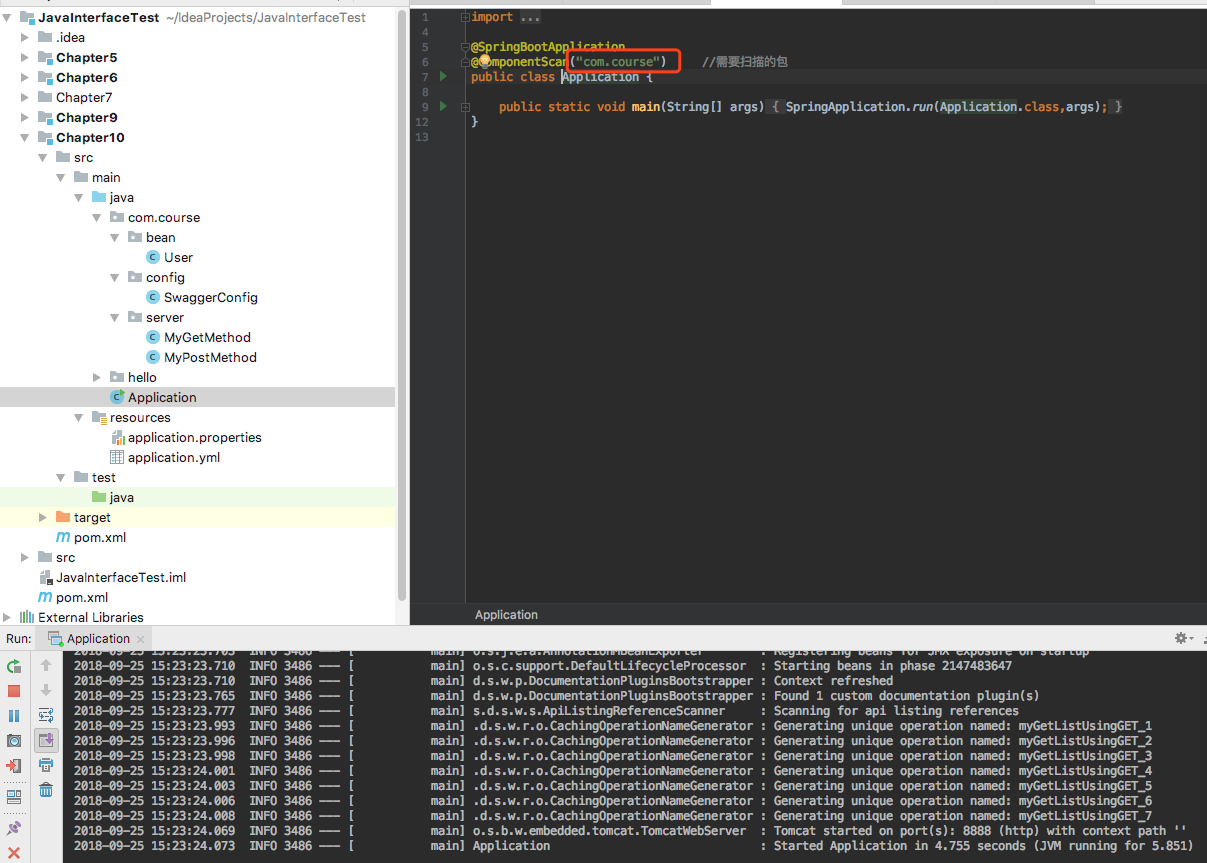
然后改变启动文件里面的要检测的包
然后在浏览器输入:http://localhost:8888/swagger-ui.html 就会出现所有的接口
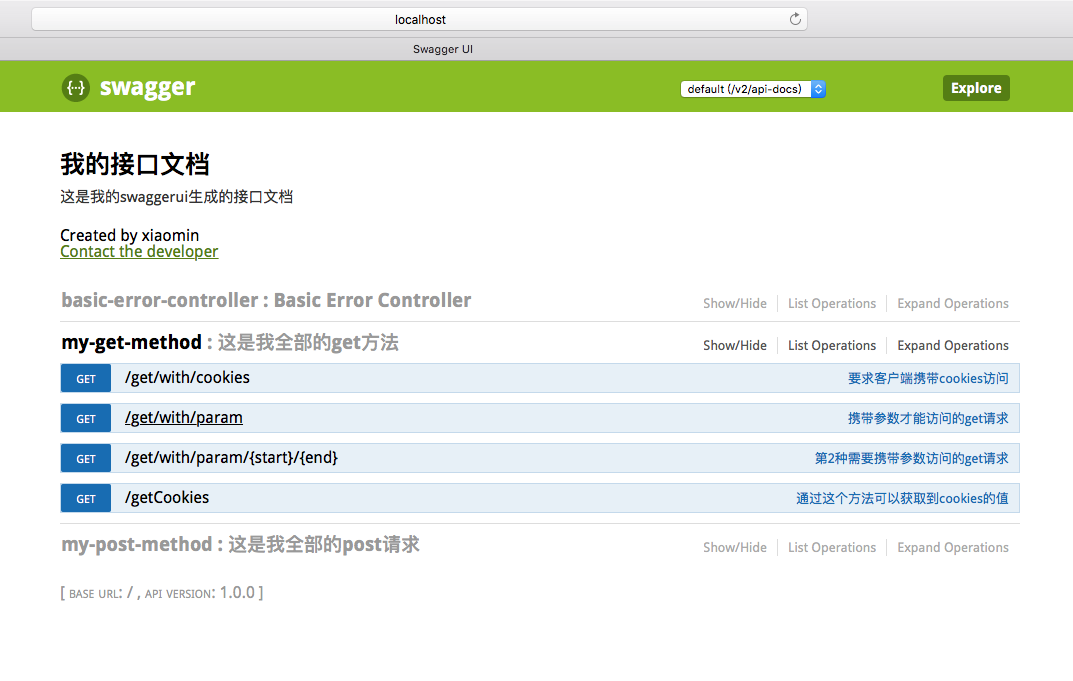
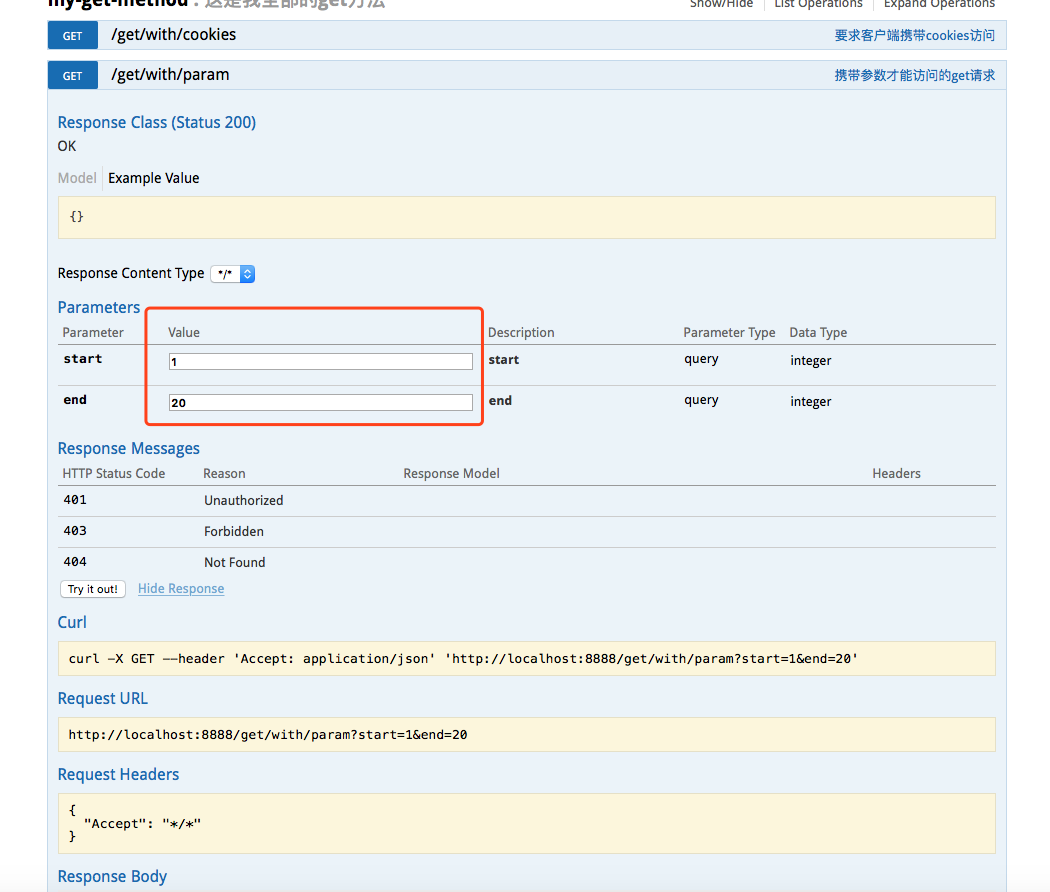
点击接口可以进行接口测试:try out就可以请求