使用动画的三个函数
v-on:before-enter="beforeEnter"
v-on:enter="enter"
v-on:after-enter="afterEnter"
将动画函数easy改成贝塞尔曲线的
效果:
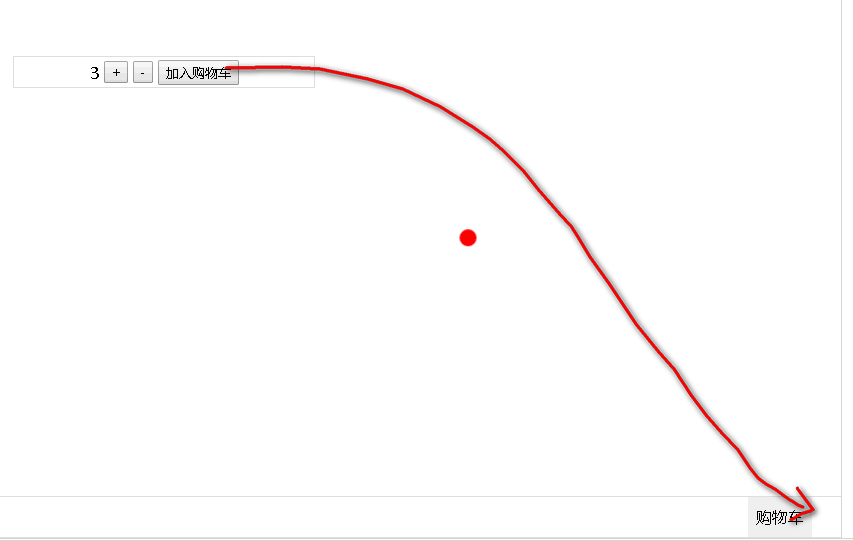
直接上代码:
<!DOCTYPE html>
<html>
<head>
  <meta charset="UTF-8">
  <!-- import CSS -->
  <link rel="stylesheet" href="https://unpkg.com/element-ui/lib/theme-chalk/index.css">
  <style type="text/css">
    html,body{margin:0;padding:0}
    body{
        position:fixed;
        width:100%;
        height:100%
    }
    #app,#app>div{
        width:100%;
        height:100%
    }
    .car{
        width:100%;
        height:40px;
        line-height:30px;
        position:absolute;
        bottom:0;
        border:1px solid #ddd;
        display:flex;
        justify-content:flex-end;
    }
    .car-content{
        margin-right:30px;
        background-color:#eee;
        padding:0 8px;
        display:flex;
        align-items:center;
    }
    .compute{
        position:absolute;
        width:300px;
        text-align:center;
        height:30px;
        line-height:27px;
        top:0;
        left:0;bottom:0;right:0;
        margin:auto;
        border:1px solid #ddd
    }
    .compute span,.compute button{
        vertical-align:middle
    }
    .ball{
        position:absolute;
        top: 448px;
        left: 743px;
        width:17px;
        height:17px;
        background-color:red;
        border-radius:50%;
        z-index:999;
    }
  </style>
</head>
<body>
  <div id="app">
        <div>
            <transition v-on:before-enter="beforeEnter" v-on:enter="enter" v-on:after-enter="afterEnter">
                <div class="ball" v-if="ballFlag"></div>
            </transition>

            <div class="compute">
                <span>{{num}}</span>
                <button @click="add">+</button>
                <button @click="sub">-</button>
                <button @click="addToshowCar" >加入购物车</button>
            </div>
            <div class="car">
                <span class="car-content">购物车</span>
            </div>
        </div>
  </div>
</body>
  <!-- import Vue before Element -->
  <script src="https://unpkg.com/vue/dist/vue.js"></script>
  <!-- import JavaScript -->
  <script src="https://unpkg.com/element-ui/lib/index.js"></script>
  <script>
    new Vue({
      el: '#app',
      data: function() {
            return {
                num:0,
                ballFlag:false
            }
        },
        methods:{
            add(){
                this.num++
            },
            sub(){
                if(this.num>1){
                    this.num--
                }else{
                    return false
                }
            },
            addToshowCar(){
                this.ballFlag = !this.ballFlag
            },
            // 动画钩子函数
            // 进入前状态
            beforeEnter (el) {
                el.style.transform = 'translate(0,0)'
            },
            // 进入中
            enter (el, done) {
                // 需要调用元素的offset操作,才有过渡的效果,否则会马上实现过渡
                el.offsetWidth
                el.style.transform = 'translate(569px,437px)'
                el.style.transition = "all 2s cubic-bezier(.4,-0.3,1,.68)"
                done()
            },
            // 进入后
            afterEnter () {
                this.ballFlag = !this.ballFlag
            },
        }
    })
  </script>
</html>
问题:
发现此种方法不适应于不同屏幕的分辨率,如果换了一个尺寸的小球的位置会发生变化
解决思路:
1、首先在页面进行resize的时候重新设置小球的top值left值
2、算出小球初始停下来的位置相对于页面的左边和顶部x,y getBoundingClientRect()可以获取
3、算出小球最终停下来的位置相对于页面的左边的顶部x1,y1
4、所以不管是多大的分辨率,将x1-x,y1-y算出来的结果值就是页面在动画之间移动的距离
5、将算出来的结果值放进动画进入中的translate里面
用到的知识点,使用v-if的时候会出现屏幕闪烁,可以添加v-cloak属性,然后再在样式中添加
[v-cloak] { display: none }
<!DOCTYPE html>
<html>
<head>
  <meta charset="UTF-8">
  <!-- import CSS -->
  <link rel="stylesheet" href="https://unpkg.com/element-ui/lib/theme-chalk/index.css">

  <style type="text/css">
    html,body{margin:0;padding:0}
    body{
        position:fixed;
        width:100%;
        height:100%
    }
    #app,#app>div{
        width:100%;
        height:100%
    }
    .car{
        width:100%;
        height:40px;
        line-height:30px;
        position:absolute;
        bottom:0;
        border:1px solid #ddd;
        display:flex;
        justify-content:flex-end;
    }
    .car-content{
        margin-right:30px;
        background-color:#eee;
        padding:0 8px;
        display:flex;
        align-items:center;
        position:relative
    }
    .car-content>.smallball{
        position:absolute;
        top:-8px;
        right:-8px;
        width:17px;
        height:17px;
        text-align:center;
        color:#fff;
        font-size:12px;
        line-height:17px;
        background-color:red;
        border-radius:50%;
        z-index:999;
    }
    .compute{
        position:absolute;
        width:300px;
        text-align:center;
        height:30px;
        line-height:27px;
        top:0;
        left:0;bottom:0;right:0;
        margin:auto;
        border:1px solid #ddd
    }
    .compute span,.compute button{
        vertical-align:middle
    }
    .ball{
        position:absolute;
        top: 294px;
        left: 548px;
        width:17px;
        height:17px;
        background-color:red;
        border-radius:50%;
        z-index:999;
        /*transform:translate(569px,437px)*/
    }
    [v-cloak] { display: none }
  </style>
</head>
<body>
  <div id="app">
        <div>
            <transition v-on:before-enter="beforeEnter" v-on:enter="enter" v-on:after-enter="afterEnter">
                <div class="ball" v-if="ballFlag" v-cloak ref="ball" :style="{top: `${tt}px`,left:`${ll}px`}"></div>
            </transition>

            <div class="compute">
                <button @click="sub">-</button>
                <span v-cloak ref="num">{{num}}</span>
                <button @click="add">+</button>
                <button @click="addToshowCar" ref="btn">加入购物车</button>
            </div>
            <div class="car">
                <div class="car-content">
                    购物车
                    <span class="smallball" id="smallball">{{carNum}}</span>
                </div>
            </div>
        </div>
  </div>
</body>
  <!-- import Vue before Element -->
  <script src="https://unpkg.com/vue/dist/vue.js"></script>
  <!-- import JavaScript -->
  <script src="https://unpkg.com/element-ui/lib/index.js"></script>
  <script>
    new Vue({
      el: '#app',
      data: function() {
            return {
                num:0,
                ballFlag:false,
                tt:0,//小球因为自适应需要重新设置top值
                ll:0,
                carNum:0
            }
        },
        mounted(){
            this.initTopLeft()
            window.addEventListener(
                "resize",this.initTopLeft,false
            );
        },
        methods:{
            initTopLeft(){
                let t = this.$refs.btn.getBoundingClientRect().top;
                let l = this.$refs.btn.getBoundingClientRect().left;
                this.tt = t
                this.ll = l
            },
            add(){
                this.num++
            },
            sub(){
                if(this.num>1){
                    this.num--
                }else{
                    return false
                }
            },
            addToshowCar(){
                this.ballFlag = !this.ballFlag
            },
            // 动画钩子函数
            // 进入前状态
            beforeEnter (el) {
                el.style.transform = 'translate(0,0)'
            },
            // 进入中
            enter (el, done) {
                // 需要调用元素的offset操作,才有过渡的效果,否则会马上实现过渡
                el.offsetWidth
                //获取小球相对于页面顶部或者
                const ball = this.$refs.ball.getBoundingClientRect()
                //方法二:获取徽标相对于页面顶部和底部的距离,
                //也可以用document.getElementById获取dom
                const badgePosition = document.getElementById("smallball").getBoundingClientRect()
                const xDist = badgePosition.left - ball.left
                const yDist = badgePosition.top - ball.top
                el.style.transform = `translate(${xDist}px,${yDist}px)`
                el.style.transition = "all .5s cubic-bezier(.4,-0.3,1,.68)"
                done()
            },
            // 进入后
            afterEnter () {
                this.ballFlag = !this.ballFlag
                this.carNum = this.num
            },
        }
    })
  </script>
</html>
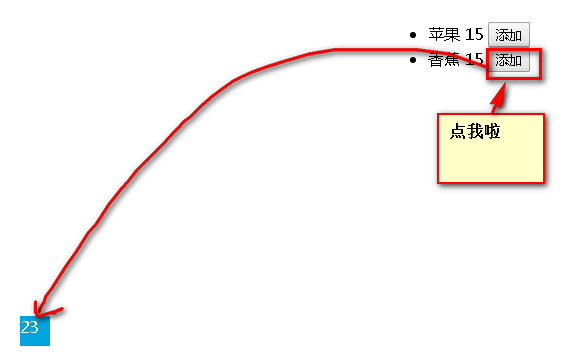
方法二:
github中看到,可以借鉴,没有使用getBoundingClientRect,代码量相对较多
<!DOCTYPE html>
<html>

    <head>
        <meta charset="utf-8" />
        <title></title>
        <style type="text/css">
            .shop {
                position: fixed;
                top: 300px;
                left: 400px;
            }

            .ball {
                position: fixed;
                left: 32px;
                bottom: 22px;
                z-index: 200;
                transition: all 0.4s cubic-bezier(0.49, -0.29, 0.75, 0.41);
                /*贝塞尔曲线*/
            }

            .inner {
                width: 16px;
                height: 16px;
                border-radius: 50%;
                background-color: rgb(0, 160, 220);
                transition: all 0.4s linear;
            }

            .cart {
                position: fixed;
                bottom: 22px;
                left: 32px;
                width: 30px;
                height: 30px;
                background-color: rgb(0, 160, 220);
                color: rgb(255, 255, 255);
            }
        </style>
    </head>

    <body>
        <div id="app">
            <ul class="shop">
                <li v-for="item in items">
                    <span>{{item.text}}</span>
                    <span>{{item.price}}</span>
                    <button @click="additem">添加</button>
                </li>
            </ul>
            <div class="cart" style="">{{count}}</div>
            <div class="ball-container">
                <!--小球-->
                <div v-for="ball in balls">
                    <transition name="drop" @before-enter="beforeDrop" @enter="dropping" @after-enter="afterDrop">
                        <div class="ball" v-show="ball.show">
                            <div class="inner inner-hook"></div>
                        </div>
                    </transition>
                </div>
            </div>
        </div>
        <script src="https://cdn.jsdelivr.net/npm/vue"></script>
        <script>
            new Vue({
                el: "#app",
                data: {
                    count: 0,
                    items: [{
                            text: "苹果",
                            price: 15
                        },
                        {
                            text: "香蕉",
                            price: 15
                        }
                    ],
                    balls: [ //小球 设为3个
                        {
                            show: false
                        },
                        {
                            show: false
                        },
                        {
                            show: false
                        },
                    ],
                    dropBalls: [],
                },
                methods: {
                    additem(event) {
                        this.drop(event.target);
                        this.count++;
                    },
                    drop(el) { //抛物
                        for(let i = 0; i < this.balls.length; i++) {
                            let ball = this.balls[i];
                            if(!ball.show) {
                                ball.show = true;
                                ball.el = el;
                                this.dropBalls.push(ball);
                                return;
                            }
                        }
                    },
                    beforeDrop(el) { /* 购物车小球动画实现 */
                        let count = this.balls.length;
                        while(count--) {
                            let ball = this.balls[count];
                            if(ball.show) {
                                let rect = ball.el.getBoundingClientRect(); //元素相对于视口的位置
                                let x = rect.left - 32;
                                let y = -(window.innerHeight - rect.top - 22); //获取y
                                el.style.display = '';
                                el.style.webkitTransform = 'translateY(' + y + 'px)'; //translateY
                                el.style.transform = 'translateY(' + y + 'px)';
                                let inner = el.getElementsByClassName('inner-hook')[0];
                                inner.style.webkitTransform = 'translateX(' + x + 'px)';
                                inner.style.transform = 'translateX(' + x + 'px)';
                            }
                        }
                    },
                    dropping(el, done) { /*重置小球数量  样式重置*/
                        let rf = el.offsetHeight;
                        el.style.webkitTransform = 'translate3d(0,0,0)';
                        el.style.transform = 'translate3d(0,0,0)';
                        let inner = el.getElementsByClassName('inner-hook')[0];
                        inner.style.webkitTransform = 'translate3d(0,0,0)';
                        inner.style.transform = 'translate3d(0,0,0)';
                        el.addEventListener('transitionend', done);
                    },
                    afterDrop(el) { /*初始化小球*/
                        let ball = this.dropBalls.shift();
                        if(ball) {
                            ball.show = false;
                            el.style.display = 'none';
                        }
                    }
                }
            })
        </script>
    </body>

</html>
效果图