Handler原理
Handler是支撑整个Android系统运行的基础,本质上Android系统都是由事件驱动的。而处理事件的核心就在于Handler。

关于Handler、Looper、MessageQueue和Message的概述如下:
Handler 消息机制中作为一个对外暴露的工具,其内部包含了一个 Looper 。负责Message的发送及处理。
Looper 作为消息循环的核心,其内部包含了一个消息队列 MessageQueue,用于记录所有待处理的消息。(线程切换在这里完成)
MessageQueue 则作为一个消息队列,则包含了一系列链接在一起的Message(内部是单链表)
Message 则是消息体,内部又包含了一个目标处理器target,这个target正是最终处理它的Handler
Handler的使用
Handler的使用非常简单,一般分为在主线程创建Handler和在子线程创建Handler两种方式。
一般是在主线程中实现一个Handler,然后在子线程中使用它。
public class MainActivity extends AppCompatActivity {
    private Handler handler = new MyHandler();
    @Override
    protected void onCreate(Bundle savedInstanceState) {
        super.onCreate(savedInstanceState);
        setContentView(R.layout.activity_main);
        new Thread(){
            @Override
            public void run() {
                handler.sendEmptyMessageDelayed(1, 1000);
            }
        };
    }
    // 自定义一个Handler
    class MyHandler extends Handler {
        @Override
        public void handleMessage(@NonNull Message msg) {
            Log.i("MainActivity", "主线程:handleMessage:" + msg.what);
        }
    }
}
或者有时候需要在子线程中创建运行在主线程中的Handler
public class MainActivity extends AppCompatActivity {
    private Handler handler = null;
    @Override
    protected void onCreate(Bundle savedInstanceState) {
        super.onCreate(savedInstanceState);
        setContentView(R.layout.activity_main);
        new Thread(){
            @Override
            public void run() {
                Looper.prepare();
                handler = new MyHandler();
                handler.sendEmptyMessageDelayed(1, 1000);
                Looper.loop();
            }
        };
    }
    // 自定义一个Handler
    class MyHandler extends Handler {
        @Override
        public void handleMessage(@NonNull Message msg) {
            Log.i("MainActivity", "主线程:handleMessage:" + msg.what);
        }
    }
}
Handler
Handler可以用来发送消息,我们这里从sendMessage()方法开始,源码如下所示:
public final boolean sendMessage(@NonNull Message msg) {
    return sendMessageDelayed(msg, 0);
}
调用了sendMessageDelayed方法:
public final boolean sendMessageDelayed(@NonNull Message msg, long delayMillis) {
    if (delayMillis < 0) {
        delayMillis = 0;
    }
    return sendMessageAtTime(msg, SystemClock.uptimeMillis() + delayMillis);
}
继而调用sendMessagAtTime方法:
public boolean sendMessageAtTime(@NonNull Message msg, long uptimeMillis) {
    MessageQueue queue = mQueue;
    if (queue == null) {
        RuntimeException e = new RuntimeException(
            this + " sendMessageAtTime() called with no mQueue");
        Log.w("Looper", e.getMessage(), e);
        return false;
    }
    return enqueueMessage(queue, msg, uptimeMillis);
}
在这里赋值MessageQueue并且将它作为参数传递给enqueueMessage()方法,其方法的调用顺序如下:
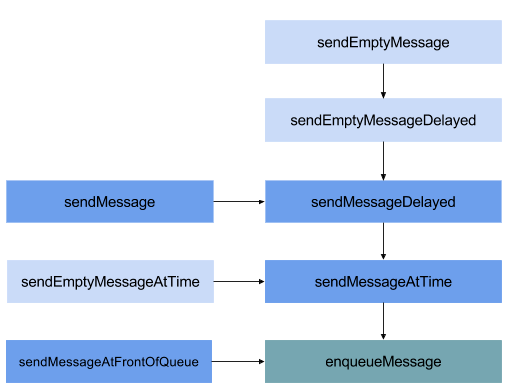
可以看到无论如何,最后都会走到enqueueMessage()方法中。接下来看看enqueueMessage()方法:
private boolean enqueueMessage(@NonNull MessageQueue queue, @NonNull Message msg, long uptimeMillis) {
    msg.target = this;
    msg.workSourceUid = ThreadLocalWorkSource.getUid();
    if (mAsynchronous) {
        msg.setAsynchronous(true);
    }
    return queue.enqueueMessage(msg, uptimeMillis);
}
enqueueMessage()方法一共做了两件事情,一个是给Message赋值,一个是调用传进来的这个MessageQueue的enqueueMessage()方法。
target表示的就是当前的Handler,也就是说每个发出去的Message都持有把它发出去的Handler的引用。
MessageQueue
Handler这个mQueue就是上文我们提到过的MessageQueue对象,它是一个单链表(一种链式存取的数据结构)。
我们在sendMessageAtTime()方法中对MessageQueue进行赋值,并且当做参数传递给Handler的enqueueMessage()方法。
public boolean sendMessageAtTime(@NonNull Message msg, long uptimeMillis) {
    // 对MessageQueue进行赋值,mQueue来源于构造方法
    MessageQueue queue = mQueue;
    if (queue == null) {
        RuntimeException e = new RuntimeException(
            this + " sendMessageAtTime() called with no mQueue");
        Log.w("Looper", e.getMessage(), e);
        return false;
    }
    return enqueueMessage(queue, msg, uptimeMillis);
}
其实MessageQueue是在构造方法中进行赋值的,接下来我们看看构造方法的源码:
public Handler(@Nullable Callback callback, boolean async) {
    if (FIND_POTENTIAL_LEAKS) {
        final Class<? extends Handler> klass = getClass();
        if ((klass.isAnonymousClass() || klass.isMemberClass() || klass.isLocalClass()) &&
            (klass.getModifiers() & Modifier.STATIC) == 0) {
            Log.w(TAG, "The following Handler class should be static or leaks might occur: " +
                  klass.getCanonicalName());
        }
    }
    mLooper = Looper.myLooper();
    if (mLooper == null) {
        throw new RuntimeException(
            "Can't create handler inside thread " + Thread.currentThread()
            + " that has not called Looper.prepare()");
    }
    // 对MessageQueue进行赋值,来自于Looper
    mQueue = mLooper.mQueue;
    mCallback = callback;
    mAsynchronous = async;
}
这里我们可以看到,MessageQueue的实例创建应该在Looper中,这里先不研究Looper,继续探索MessageQueue。
最后发送消息都调用的是MessageQueue的queue.enqueueMessage(msg, uptimeMillis)方法。
boolean enqueueMessage(Message msg, long when) {
    if (msg.target == null) {
        throw new IllegalArgumentException("Message must have a target.");
    }
    synchronized (this) {
        if (msg.isInUse()) {
            throw new IllegalStateException(msg + " This message is already in use.");
        }
        if (mQuitting) {
            IllegalStateException e = new IllegalStateException(
                msg.target + " sending message to a Handler on a dead thread");
            Log.w(TAG, e.getMessage(), e);
            msg.recycle();
            return false;
        }
        msg.markInUse();
        msg.when = when;
        // 拿到队列头部
        Message p = mMessages;
        boolean needWake;
        // 如果消息不需要延时或消息的执行时间比头部早,插到队列头部
        if (p == null || when == 0 || when < p.when) {
            msg.next = p;
            mMessages = msg;
            needWake = mBlocked;
        } else {
            // 消息插到队列中间
            needWake = mBlocked && p.target == null && msg.isAsynchronous();
            Message prev;
            for (;;) {
                prev = p;
                p = p.next;
                if (p == null || when < p.when) {
                    break;
                }
                if (needWake && p.isAsynchronous()) {
                    needWake = false;
                }
            }
            msg.next = p;
            prev.next = msg;
        }
        if (needWake) {
            nativeWake(mPtr);
        }
    }
    return true;
}
主要分为三个步骤,可以参看代码标注:
mMessages 是队列的第一消息,获取到它判断消息队列是不是空的,是则将当前的消息放到队列头部。
如果当前消息不需要延时,或当前消息的执行时间比头部消息早,也是放到队列头部。
如果不是以上情况,说明当前队列不为空,并且队列的头部消息执行时间比当前消息早,需要将它插入到队列的中间位置。
我们也许会产生疑问,如何判断这个位置呢?其实依旧是通过消息被执行的时间。
通过遍历整个队列,当队列中的某个消息的执行时间比当前消息晚时,将消息插到这个消息的前面。
Looper
我们再来看看Handler的构造方法,如下所示:
public Handler(@Nullable Callback callback, boolean async) {
    if (FIND_POTENTIAL_LEAKS) {
        final Class<? extends Handler> klass = getClass();
        if ((klass.isAnonymousClass() || klass.isMemberClass() || klass.isLocalClass()) &&
            (klass.getModifiers() & Modifier.STATIC) == 0) {
            Log.w(TAG, "The following Handler class should be static or leaks might occur: " +
                  klass.getCanonicalName());
        }
    }
    // 赋值Looper的实例
    mLooper = Looper.myLooper();
    if (mLooper == null) {
        throw new RuntimeException(
            "Can't create handler inside thread " + Thread.currentThread()
            + " that has not called Looper.prepare()");
    }
    // 对MessageQueue进行赋值,来自于Looper
    mQueue = mLooper.mQueue;
    mCallback = callback;
    mAsynchronous = async;
}
可以看到在这里通过mLooper = Looper.myLooper()代码赋值了Looper的实例,它作为消息循环的核心,不断的从MessageQueue中取出消息进行分发。
我们再来看看Lopper的myLooper()方法,源码如下:
/**
* Return the Looper object associated with the current thread.  Returns
* null if the calling thread is not associated with a Looper.
*/
public static @Nullable Looper myLooper() {
    return sThreadLocal.get();
}
可以看到这个sThreadLocal是一个ThreadLocal类,并且它的泛型是Looper对象。
ThreadLocal提供了线程的局部变量,每个线程都可以通过set()和get()来对这个局部变量进行操作,但不会和其他线程的局部变量进行冲突,实现了线程的数据隔离。
我们看到源码中有个注释:除非您已调用prepare(),否则sThreadLocal.get()将返回null。接下来看看prepare()方法:
public static void prepare() {
    prepare(true);
}
private static void prepare(boolean quitAllowed) {
    // 如果sThreadLocal有值,就抛异常,没有值才会塞进去一个值。
    if (sThreadLocal.get() != null) {
        throw new RuntimeException("Only one Looper may be created per thread");
    }
    sThreadLocal.set(new Looper(quitAllowed));
}
prepare方法必须调用但也只能调用一次,不调用没有值,抛异常,调用多次也还抛异常。
在构造Handler之前,必须调用Looper的prepare()方法创建Looper。
接下来看看sThreadLocal.set(new Looper(quitAllowed))方法的源码:
public void set(T value) {
    Thread t = Thread.currentThread();
    ThreadLocalMap map = getMap(t);
    if (map != null)
        map.set(this, value);
    else
        createMap(t, value);
}
set方法首先获取到了当前的线程,然后获取一个map。这个map是以键值对形式存储内容的。
如果不为空就塞进去值,如果获取的map为空,就创建一个map。这里面的key是当前的线程,这里面的value就是Looper。(线程绑定)
接下来我们去看看Lopper的构造方法,源码如下所示:
private Looper(boolean quitAllowed) {
    mQueue = new MessageQueue(quitAllowed);
    mThread = Thread.currentThread();
}
可以看到在Looper的构造方法中创建了MessageQueue对象。
由于prepare()方法只能调用一次,所以只会创建一个Looper对象,所以:
一个线程中只会创建一个Looper对象,而一个Looper对象也只会创建一个MessageQueue对象。
最后,主线程创建Handler没有调用prepare()方法,那么Looper是从哪里来的?
其实主线程的Looper是在ActivityThread类中main()方法中创建的,接下来我们看看这个main()方法:
public static void main(String[] args) {
    Trace.traceBegin(Trace.TRACE_TAG_ACTIVITY_MANAGER, "ActivityThreadMain");
    Process.setArgV0("<pre-initialized>");
    // 就是这里调用了prepare方法
    Looper.prepareMainLooper();
    ActivityThread thread = new ActivityThread();
    thread.attach(false, startSeq);
    if (sMainThreadHandler == null) {
        sMainThreadHandler = thread.getHandler();
    }
    if (false) {
        Looper.myLooper().setMessageLogging(new LogPrinter(Log.DEBUG, "ActivityThread"));
    }
    // End of event ActivityThreadMain.
    Trace.traceEnd(Trace.TRACE_TAG_ACTIVITY_MANAGER);
    // 就是这里给主线程创建了Looper
    Looper.loop();
    throw new RuntimeException("Main thread loop unexpectedly exited");
}
接下来我们看看Looper的prepareMainLooper方法:
public static void prepareMainLooper() {
    //设置不允许退出的Looper
    prepare(false);
    synchronized (Looper.class) {
        if (sMainLooper != null) {
            throw new IllegalStateException("The main Looper has already been prepared.");
        }
        sMainLooper = myLooper();
    }
}
prepare(false)创建了Looper并且把它和当前线程一起塞进map中的。
Looper要分发消息并不知道具体发送消息的时间,只能开启死循环不断从MessageQueue中获取消息,所以Looper.loop()方法就是开启了死循环:
public static void loop() {
    // 拿到当前线程的Looper
    final Looper me = myLooper();
    if (me == null) {
        throw new RuntimeException("No Looper; Looper.prepare() wasn't called on this thread.");
    }

    // ......
    for (;;) {
        Message msg = queue.next(); // might block
        if (msg == null) {
            // No message indicates that the message queue is quitting.
            return;
        }
        // ......
        msg.recycleUnchecked();
    }
}
在循环中Looper不停的取出消息,拿到Message对象以后,会去调用Message的target字段的dispatchMessage方法,其中target就是发送消息的Handler。
可以再来看看dispatchMessage方法,源码如下所示:
public void dispatchMessage(@NonNull Message msg) {
    if (msg.callback != null) {
        handleCallback(msg);
    } else {
        if (mCallback != null) {
            if (mCallback.handleMessage(msg)) {
                return;
            }
        }
        handleMessage(msg);
    }
}
可以看到在回调中调用了handleMessage(msg)方法。
通过Handler发送消息时,消息会回到Handler初始化的线程,而不一定是主线程,所以Handler其实是借助共享变量来进行线程切换的。
Looper和ANR
其实整个Android就是在一个Looper的loop循环的,整个Android的一切都是以Handler机制进行的,即只要有代码执行都是通过Handler来执行的,而所谓ANR便是Looper.loop()没有得到及时处理,一旦没有消息,Linux的epoll机制则会通过管道写文件描述符的方式来对主线程进行唤醒与沉睡,Android里调用了linux层的代码实现在适当时会睡眠主线程