本文的部分内容参考来自DroidPhone的博客(http://blog.csdn.net/droidphone/article/details/6271122),关于ALSA写得很不错的文章,只是少了实例。本文就是结合实例来分析ALSA音频驱动。
开发环境:ubuntu10.04
目标板:linux-2.6.37 (通过命令uname -r 查看linux内核版信息)
编译器:arm-none-linux-gnueabi- (none 代表编译器的制作者,比如:fsl代表飞思卡尔,内核里面谈EABI,OABI,其实相对于系统调用的方式,当然我们所说的系统限于arm系统)
接下来,我们首先要了解的是ALSA整体架构,架构图如下:
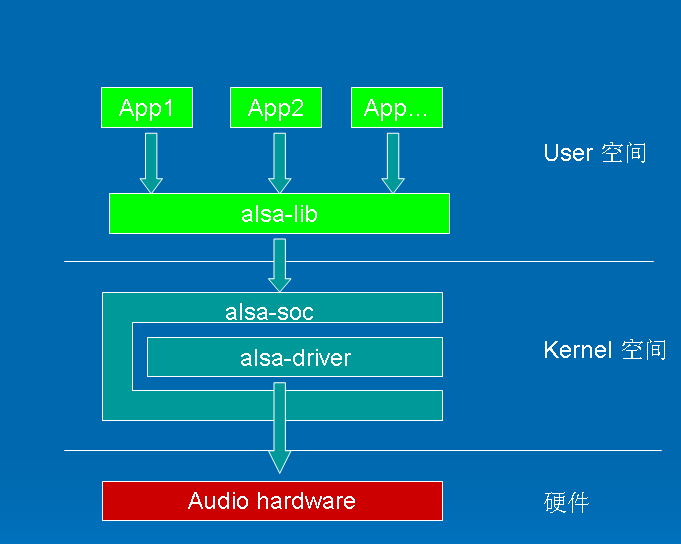
在内核设备驱动层,ALSA提供了alsa-driver,同时在应用层,ALSA为我们提供了alsa-lib,应用程序只要调用alsa-lib提供的API(本开发板/usr/lib/libasound.so.2 和 libasound.so.2.0.0 下alsa-lib库asound),即可以完成对底层音频硬件的控制。内核空间中,alsa-soc其实是对alsa-driver的进一步封装,他针对嵌入式设备提供了一些列增强的功能。
接下来我们查看设备文件和sys系统接口:

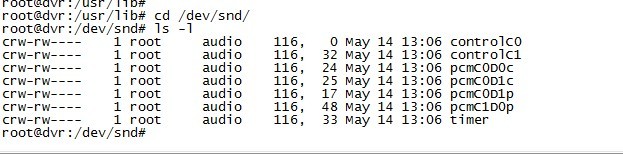
我们可以看到以下设备文件:
controlC0 --> 用于声卡1的控制,例如通道选择,混音,麦克风的控制等
controlC1 --> 用于声卡2的控制,例如通道选择,混音,麦克风的控制等
midiC0D0 --> 用于播放midi音频 (我的驱动不具有)
pcmC0D0c --> 用于声卡1录音的pcm设备(tvp5158音频采集)
pcmC0D1c --> 用于声卡1录音的pcm设备(tlv320aic3x音频采集)
pcmC0D1P --> 用于声卡1播放的pcm设备(tlv320aic3x音频输出)
pcmC1D0p --> 用于声卡2播放的pcm设备(hdmi音频输出)
seq --〉 音序器 (我的驱动不具有)
timer --〉 定时器
由此可以看出具有2个声卡,声卡1具有2个录音设备和一个播放设备,声卡2只具有一个播放设备
其中,C0D0代表的是声卡0中的设备0,pcmC0D0c最后一个c代表capture,pcmC0D0p最后一个p代表playback,这些都是alsa-driver中的命名规则。
从上面的分析可以看出,我的声卡下挂了7个设备(其实这里的设备是实际设备的逻辑分类),根据声卡的实际能力,驱动实际上可以挂上更多种类的设备,在include/sound/core.h中,定义了以下设备类型:

typedef int __bitwise snd_device_type_t;
#define    SNDRV_DEV_TOPLEVEL    ((__force snd_device_type_t) 0)
#define    SNDRV_DEV_CONTROL    ((__force snd_device_type_t) 1) //控制类型
#define    SNDRV_DEV_LOWLEVEL_PRE    ((__force snd_device_type_t) 2)
#define    SNDRV_DEV_LOWLEVEL_NORMAL ((__force snd_device_type_t) 0x1000)
#define    SNDRV_DEV_PCM        ((__force snd_device_type_t) 0x1001) //pcm类型
#define    SNDRV_DEV_RAWMIDI    ((__force snd_device_type_t) 0x1002)
#define    SNDRV_DEV_TIMER        ((__force snd_device_type_t) 0x1003) //定时器类型
#define    SNDRV_DEV_SEQUENCER    ((__force snd_device_type_t) 0x1004) //音序器类型
#define    SNDRV_DEV_HWDEP        ((__force snd_device_type_t) 0x1005)
#define    SNDRV_DEV_INFO        ((__force snd_device_type_t) 0x1006)
#define    SNDRV_DEV_BUS        ((__force snd_device_type_t) 0x1007)
#define    SNDRV_DEV_CODEC        ((__force snd_device_type_t) 0x1008) //解码器类型
#define    SNDRV_DEV_JACK          ((__force snd_device_type_t) 0x1009)
#define    SNDRV_DEV_LOWLEVEL    ((__force snd_device_type_t) 0x2000)
下面我们开始分析代码:
首先我们有两个声卡,那这两个声卡怎么来的呢?
首先你应该知道声卡的创建过程:
<1> 了解声卡的结构体struct snd_card(snd_card的定义位于头文件中:include/sound/core.h)
struct snd_card {
    int number;            /* number of soundcard (index to
                                snd_cards) */

    char id[16];            /* id string of this card */
    char driver[16];        /* driver name */
    char shortname[32];        /* short name of this soundcard */
    char longname[80];        /* name of this soundcard */
    char mixername[80];        /* mixer name */
    char components[128];        /* card components delimited with
                                space */
    struct module *module;        /* top-level module */

    void *private_data;        /* private data for soundcard */
    void (*private_free) (struct snd_card *card); /* callback for freeing of
                                private data */
    struct list_head devices;    /* devices */

    unsigned int last_numid;    /* last used numeric ID */
    struct rw_semaphore controls_rwsem;    /* controls list lock */
    rwlock_t ctl_files_rwlock;    /* ctl_files list lock */
    int controls_count;        /* count of all controls */
    int user_ctl_count;        /* count of all user controls */
    struct list_head controls;    /* all controls for this card */
    struct list_head ctl_files;    /* active control files */

    struct snd_info_entry *proc_root;    /* root for soundcard specific files */
    struct snd_info_entry *proc_id;    /* the card id */
    struct proc_dir_entry *proc_root_link;    /* number link to real id */

    struct list_head files_list;    /* all files associated to this card */
    struct snd_shutdown_f_ops *s_f_ops; /* file operations in the shutdown
                                state */
    spinlock_t files_lock;        /* lock the files for this card */
    int shutdown;            /* this card is going down */
    int free_on_last_close;        /* free in context of file_release */
    wait_queue_head_t shutdown_sleep;
    struct device *dev;        /* device assigned to this card */
    struct device *card_dev;    /* cardX object for sysfs */

#ifdef CONFIG_PM
    unsigned int power_state;    /* power state */
    struct mutex power_lock;    /* power lock */
    wait_queue_head_t power_sleep;
#endif

#if defined(CONFIG_SND_MIXER_OSS) || defined(CONFIG_SND_MIXER_OSS_MODULE)
    struct snd_mixer_oss *mixer_oss;
    int mixer_oss_change_count;
#endif
};
struct list_head devices 记录该声卡下所有逻辑设备的链表
struct list_head controls 记录该声卡下所有的控制单元的链表
void *private_data 声卡的私有数据,可以在创建声卡时通过参数指定数据的大小
<2> 创建一个声卡的实例
在ASoC首先注册平台驱动,等待平台设备的到来,当驱动发现相应的设备时,调用驱动的probe, 然后调用snd_soc_register_card去创建声卡,声卡的专用数据,设备驱动的ID的名字,创建声卡的功能部件(如pcm, mixer, MIDI,control等),注册声卡。
1> 注册平台驱动
/* ASoC platform driver */
static struct platform_driver soc_driver = {
    .driver        = {
        .name        = "soc-audio",
        .owner        = THIS_MODULE,
        .pm        = &soc_pm_ops,
    },
    .probe        = soc_probe,
    .remove        = soc_remove,
};
static int __init snd_soc_init(void)
{
#ifdef CONFIG_DEBUG_FS
    debugfs_root = debugfs_create_dir("asoc", NULL);
    if (IS_ERR(debugfs_root) || !debugfs_root) {
        printk(KERN_WARNING
               "ASoC: Failed to create debugfs directory
");
        debugfs_root = NULL;
    }

    if (!debugfs_create_file("codecs", 0444, debugfs_root, NULL,
                 &codec_list_fops))
        pr_warn("ASoC: Failed to create CODEC list debugfs file
");

    if (!debugfs_create_file("dais", 0444, debugfs_root, NULL,
                 &dai_list_fops))
        pr_warn("ASoC: Failed to create DAI list debugfs file
");

    if (!debugfs_create_file("platforms", 0444, debugfs_root, NULL,
                 &platform_list_fops))
        pr_warn("ASoC: Failed to create platform list debugfs file
");
#endif

    return platform_driver_register(&soc_driver);
}
module_init(snd_soc_init);

static void __exit snd_soc_exit(void)
{
#ifdef CONFIG_DEBUG_FS
    debugfs_remove_recursive(debugfs_root);
#endif
    platform_driver_unregister(&soc_driver);
}
module_exit(snd_soc_exit);
snd_soc_init(sound/soc/soc-core.c)函数主要是创建debugfs文件系统接口和平台设备驱动的注册(platform_driver_register)。
这里我们解释下DebugFS,顾名思义,是一种用于内核调试的虚拟文件系统,内核开发者通过debugfs和用户空间交换数据。类似的虚拟文件系统还有procfs和sysfs等,这几种虚拟文件系统都并不实际存储在硬盘上,而是Linux内核运行起来后才建立起来。用户空间通过mount -t debugfs debugfs /a 挂载debugfs文件系统到a目录,查看a目录:

在目录下我们发现了asoc这文件夹,在这个文件夹包含我们创建的几个文件codecs, dais, platforms:

2> 注册平台设备(跟具体的平台相关,我们TI达芬奇系列芯片)
static int __init ti81xx_dvr_soc_init(void)
{
    int ret;

    ti81xx_pdev0 = platform_device_alloc("soc-audio", 0);
    if (!ti81xx_pdev0)
        return -ENOMEM;

    platform_set_drvdata(ti81xx_pdev0, &ti81xx_dvr_snd_card0);
    ret = platform_device_add(ti81xx_pdev0);
    if (ret) {
        printk(KERN_ERR "Can't add soc platform device
");
        platform_device_put(ti81xx_pdev0);
        return ret;
    }

    ti81xx_pdev1 = platform_device_alloc("soc-audio", 1);
    if (!ti81xx_pdev1) {
        platform_device_put(ti81xx_pdev0);
        return -ENOMEM;
    }

    platform_set_drvdata(ti81xx_pdev1, &ti81xx_dvr_snd_card1);
    ret = platform_device_add(ti81xx_pdev1);
    if (ret) {
        printk(KERN_ERR "Can't add soc platform device
");
        platform_device_put(ti81xx_pdev0);
        platform_device_put(ti81xx_pdev1);
        return ret;
    }


    return ret;
}

static void __exit ti81xx_dvr_soc_exit(void)
{
    platform_device_unregister(ti81xx_pdev0);
    platform_device_unregister(ti81xx_pdev1);
}

module_init(ti81xx_dvr_soc_init);
module_exit(ti81xx_dvr_soc_exit);
ti81xx_dvr_soc_init(sound/soc/davinci)函数主要是创建两个平台设备。platform_device_alloc()函数为平台设备分配空间,platform_set_drvdata()函数设置平台设备的私有数据,platform_device_add()函数向平台总线增加平台设备。
3> probe的实现
先看上面两段代码发现都有"soc-audio" 这个字符串,这个字符串决定了驱动和设备的匹配,而且发现注册了两个平台设备。当平台驱动匹配一个平台设备,调用一次porbe, 因为注册了两个同名的平台设备,所有probe被调用了两次。也就是申请两个声卡驱动。
/* probes a new socdev */
static int soc_probe(struct platform_device *pdev)
{
    struct snd_soc_card *card = platform_get_drvdata(pdev);
    int ret = 0;

    /* Bodge while we unpick instantiation */
    card->dev = &pdev->dev;
    INIT_LIST_HEAD(&card->dai_dev_list);
    INIT_LIST_HEAD(&card->codec_dev_list);
    INIT_LIST_HEAD(&card->platform_dev_list);

    printk(KERN_WARNING "soc audio probe!
");

    ret = snd_soc_register_card(card);
    if (ret != 0) {
        dev_err(&pdev->dev, "Failed to register card
");
        return ret;
    }

    return 0;
}
4> 声卡创建
主要分析snd_soc_register_card()函数。