 进程

# *********通过process创建单个进程
from multiprocessing import Process
import os

# 子进程要执行的代码
def run_proc(name):
    print('Run child process %s (%s)...' % (name, os.getpid()))     # 获取当前进程的名字,pid值

if __name__=='__main__':
    print('Parent process %s.' %  os.getpid())
    p = Process(target=run_proc, args=('test',))    # 传入子进程的函数名,给子进程起个名字
    print('Child process will start.')
    p.start()
    p.join()
    print('Child process end.')

# Parent process 9976.
# Child process will start.
# Run child process test (9368)...
# Child process end.

# *************通过Pool创建多个进程,Pool内的参数为最多同时执行的进程数
from multiprocessing import Pool
import os, time, random

def long_time_task(name):
    print('Run task %s (%s)...' % (name, os.getpid()))
    start = time.time()
    time.sleep(random.random() * 3)
    end = time.time()
    print('Task %s runs %0.2f seconds.' % (name, (end - start)))

if __name__=='__main__':
    print('Parent process %s.' % os.getpid())
    p = Pool(4)
    for i in range(5):
        p.apply_async(long_time_task, args=(i,))
    print('Waiting for all subprocesses done...')
    p.close()
    p.join()
    print('All subprocesses done.')

# Parent process 8808.
# Waiting for all subprocesses done...
# Run task 0 (2956)...
# Run task 1 (5296)...
# Run task 2 (8432)...
# Run task 3 (8412)...
# Task 3 runs 0.10 seconds.
# Run task 4 (8412)...
# Task 2 runs 0.41 seconds.
# Task 4 runs 1.61 seconds.
# Task 1 runs 1.90 seconds.
# Task 0 runs 2.09 seconds.
# All subprocesses done.


#****************** subprocess可以让我们方便的启动一个子进程,然后控制其输入和输出,nslookup是终端下的一个命令,能查到指定网址的ip
import subprocess

print('$ nslookup www.python.org')
r = subprocess.call(['nslookup', 'www.python.org'])  # 创建了一个子进程并输入了 nslookup www.python.org
print('Exit code:', r)
'''
'''
#************** 如果子进程还需要输入,则可以通过communicate()方法输入
import subprocess

print('$ nslookup')
p = subprocess.Popen(['nslookup'], stdin=subprocess.PIPE, stdout=subprocess.PIPE, stderr=subprocess.PIPE)
output, err = p.communicate(b'set q=mx
python.org
exit
')
print(output.decode('gbk'))      # print(output.decode('utf-8')) 源码是utf-8 但是会报错,看底下的评论是编码问题,换成gbk就好了
# 因为pycharm默认的是utf-8,这也导致了上面的例子有乱码,  '$ nslookup www.baidu.com'相当于是运行在cmd中的命令,命令运行后显示的结果也是cmd中的结果,
# 而cmd本身默认编码是GBK的,所以会出现乱码。解决方法:File>>Settings>>File Encodings>>Project Encoding:(选择GBK)
print('Exit code:', p.returncode)
# 上面的代码相当于在命令行执行命令nslookup,然后手动输入:
# set q=mx
# python.org
# exit

# 输出结果如下
# $ nslookup
# Server:        192.168.19.4
# Address:    192.168.19.4#53
#
# Non-authoritative answer:
# python.org    mail exchanger = 50 mail.python.org.
#
# Authoritative answers can be found from:
# mail.python.org    internet address = 82.94.164.166
# mail.python.org    has AAAA address 2001:888:2000:d::a6
#
#
# Exit code: 0

#*************进程间通信
from multiprocessing import Process, Queue
import os, time, random

# 写数据进程执行的代码:
def write(q):
    print('Process to write: %s' % os.getpid())
    for value in ['A', 'B', 'C']:
        print('Put %s to queue...' % value)
        q.put(value)
        time.sleep(random.random())

# 读数据进程执行的代码:
def read(q):    # 通过q 传入Queue() 队列 这样就可以保存数据了
    print('Process to read: %s' % os.getpid())
    while True:
        value = q.get(True)     # 这里的True其实是一个参数(block=True) ,表示当queue中没有数据的时候阻塞
        print('Get %s from queue.' % value)

if __name__=='__main__':
    # 父进程创建Queue,并传给各个子进程:
    q = Queue()
    pw = Process(target=write, args=(q,))
    pr = Process(target=read, args=(q,))
    # 启动子进程pw,写入:
    pw.start()
    # 启动子进程pr,读取:
    pr.start()
    # 等待pw结束:
    pw.join()
    # pr进程里是死循环,无法等待其结束,只能强行终止:
    pr.terminate()
#****使用threading 创建线程
import time, threading

# 新线程执行的代码:
def loop():
    print('thread %s is running...' % threading.current_thread().name)
    n = 0
    while n < 5:
        n = n + 1
        print('thread %s >>> %s' % (threading.current_thread().name, n))
        time.sleep(1)
    print('thread %s ended.' % threading.current_thread().name)

print('thread %s is running...' % threading.current_thread().name)
t = threading.Thread(target=loop, name='LoopThread')    # 创建线程, target选择线程的函数 ,name 给这个线程起个名字
t.start()   # 开始线程
t.join()    # 等待线程结束
print('thread %s ended.' % threading.current_thread().name)
# thread MainThread is running...
# thread LoopThread is running...
# thread LoopThread >>> 1
# thread LoopThread >>> 2
# thread LoopThread >>> 3
# thread LoopThread >>> 4
# thread LoopThread >>> 5
# thread LoopThread ended.
# thread MainThread ended.


# *** Lock 多线程和多进程最大的不同在于,多进程中,同一个变量,各自有一份拷贝存在于每个进程中,互不影响,而多线程中,所有变量都由所有线程共享,
# 所以,任何一个变量都可以被任何一个线程修改,因此,线程之间共享数据最大的危险在于多个线程同时改一个变量,把内容给改乱了
import time, threading
# 假定这是你的银行存款:
balance = 0
def change_it(n):
    # 先存后取,结果应该为0:
    global balance
    balance = balance + n
    balance = balance - n
def run_thread(n):
    for i in range(100000):
        change_it(n)
t1 = threading.Thread(target=run_thread, args=(5,))     # 开启线程,线程函数run_thread  传入的参数 n = 5
t2 = threading.Thread(target=run_thread, args=(8,))
t1.start()
t2.start()
t1.join()
t2.join()
print(balance)
# 这样可能会出问题,因为 t1 ,t2是交替运行的,可能会把balance的值改乱了
# 如果我们要确保balance计算正确,就要给change_it()上一把锁,当某个线程开始执行change_it()时,
# 我们说,该线程因为获得了锁,因此其他线程不能同时执行change_it(),只能等待,直到锁被释放后,
# 获得该锁以后才能改。由于锁只有一个,无论多少线程,同一时刻最多只有一个线程持有该锁,所以,不会造成修改的冲突。
# 创建一个锁就是通过threading.Lock()来实现


import time, threading
# 假定这是你的银行存款:
balance = 0
def change_it(n):
    # 先存后取,结果应该为0:
    global balance
    balance = balance + n
    balance = balance - n

def run_thread(n):
    for i in range(100000):
        # 先要获取锁:
        lock.acquire()
        try:
            # 放心地改吧:
            change_it(n)
        finally:
            # 改完了一定要释放锁:
            lock.release()
t1 = threading.Thread(target=run_thread, args=(5,))     # 开启线程,线程函数run_thread  传入的参数 n = 5
t2 = threading.Thread(target=run_thread, args=(8,))
t1.start()
t2.start()
t1.join()
t2.join()
print(balance)
balance = 0
lock = threading.Lock()
# 当多个线程同时执行lock.acquire()时,只有一个线程能成功地获取锁,
# 然后继续执行代码,其他线程就继续等待直到获得锁为止。获得锁的线程用完后一定要释放锁,
# 否则那些苦苦等待锁的线程将永远等待下去,成为死线程。所以我们用try...finally来确保锁一定会被释放
#***ThreadLocal多线程中函数的传参问题
def process_student(name):  # 这个函数作为一个线程函数,通过这个函数创建多个线程,
    # 执行这个函数时再调用 do_task_1() 函数 和  do_task_2(std)函数
    std = Student(name)
    # std是局部变量,但是每个函数都要用它,因此必须传进去:
    do_task_1(std)
    do_task_2(std)

def do_task_1(std):
    do_subtask_1(std)   # 只能从上层函数一层一层的传参,不能把str作为全局变量,因为每个线程的name都是不同的,所以std也是不同的
    do_subtask_2(std)

def do_task_2(std):
    do_subtask_2(std)
    do_subtask_2(std)

#如果用一个全局dict存放所有的Student对象,然后以thread自身作为key获得线程对应的Student对象,这样就不必一层层传函数了
global_dict = {}

def std_thread(name):
    std = Student(name)
    # 把std放到全局变量global_dict中:
    global_dict[threading.current_thread()] = std
    do_task_1()
    do_task_2()

def do_task_1():
    # 不传入std,而是根据当前线程查找:
    std = global_dict[threading.current_thread()]   # 不用从上层函数获取参数,直接在全局变量中找参数
    ...

def do_task_2():
    # 任何函数都可以查找出当前线程的std变量:
    std = global_dict[threading.current_thread()]
    ...
#这种方式理论上是可行的,它最大的优点是消除了std对象在每层函数中的传递问题,但是,每个函数获取std的代码有点丑
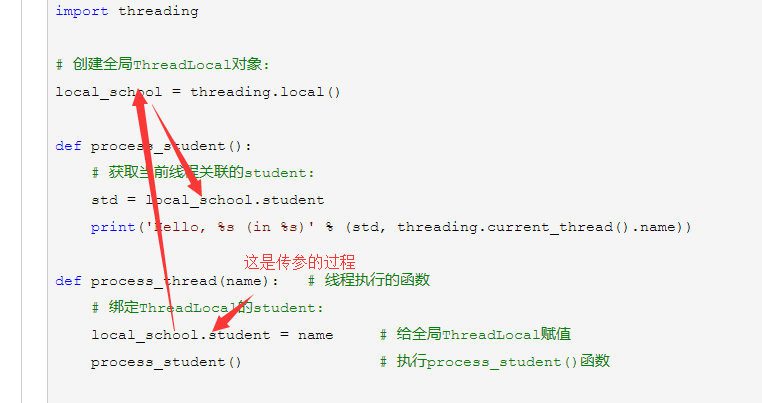
# 使用ThreadLocal,不用查找dict,ThreadLocal帮你自动做这件事
import threading

# 创建全局ThreadLocal对象:
local_school = threading.local()

def process_student():
    # 获取当前线程关联的student:
    std = local_school.student
    print('Hello, %s (in %s)' % (std, threading.current_thread().name))

def process_thread(name):   # 线程执行的函数
    # 绑定ThreadLocal的student:
    local_school.student = name     # 给全局ThreadLocal赋值
    process_student()               # 执行process_student()函数

t1 = threading.Thread(target= process_thread, args=('Alice',), name='Thread-A')
t2 = threading.Thread(target= process_thread, args=('Bob',), name='Thread-B')
t1.start()
t2.start()
t1.join()
t2.join()
# Hello, Alice (in Thread-A)
# Hello, Bob (in Thread-B)
#  一个ThreadLocal变量虽然是全局变量,但每个线程都只能读写自己线程的独立副本,互不干扰。
# ThreadLocal解决了参数在一个线程中各个函数之间互相传递的问题
# 这个代码的py文件名为 mymode.py
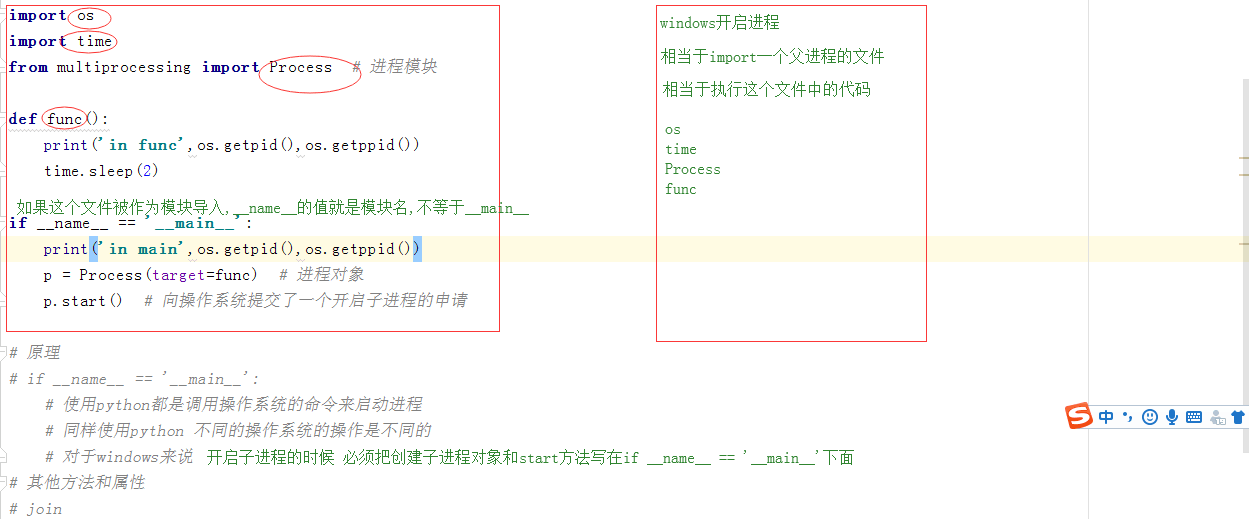
from multiprocessing import Process import os def func(): print('in func',os.getpid(),os.getppid()) print(__name__) if __name__ == '__main__': # 当直接运行当前py文件时,__name__被赋值为 __main__, # 当文件作为模块被其他py文件引用执行其他py时,__name__ 为引用的模块名即 mymode print('in main', os.getpid(), os.getppid()) p = Process(target=func) p.start() # __main__ # in main 10616 5764 # __mp_main__ # 按照引用来说这里应该是 mymode,可能是Process这个模块做的处理,使得它的名字变为 __mp_main__ # in func 13564 10616
如果在另一个 py文件写如下代码
import mymode  # 引用上面的文件作为模块
print(__name__)

# mymode  mymode 中的 print(__name__)
# __main__   本文件的 __name__
'''
进程:资源分配 的 最小单位
进程是一个正在运行的程序
程序和进程的区别 : 进程是正在运行的,程序没有运行
同步异步 阻塞非阻塞
    同步 就是顺序执行
    异步 可以同时执行
    阻塞 停住
    非阻塞 不停
并行和并发
    并行 有多个CPU在同时执行任务
    并发 只有一个CPU,交替执行多个任务
进程调度 : 就是多个进程(运行中的程序)在操作系统的控制下被CPU执行,去享用计算机的资源
    先来先服务
    短作业优先
    时间片轮转
    多级反馈队列
程序的并行与并发
    并行更快
    并发只是宏观上的同时执行
进程一共有三个状态:
    就绪 运行 阻塞
os.getpid() 获取当前进程pid
os.getppid()    获取父进程pid
'''
import os
import time
from multiprocessing import Process  # 进程模块

def func():
    time.sleep(2)
    print('in func',os.getpid(),os.getppid())


if __name__ == '__main__':
    print('in main',os.getpid(),os.getppid())
    p1 = Process(target=func)  # 进程对象
    p1.start()  # 向操作系统提交了一个开启子进程的申请
    p2 = Process(target=func)  # 进程对象
    p2.start()  # 向操作系统提交了一个开启子进程的申请
    print('主进程 的 代码执行结束了')
# 原理
# if __name__ == '__main__':
    # 使用python都是调用操作系统的命令来启动进程
    # 同样使用python 不同的操作系统的操作是不同的
    # 对于windows来说 必要加if __name__ == '__main__':
    # 对于linux ios来说 不必要加if __name__ == '__main__':


# 给子进程传参数 Process(target=func,args=(1,)) 使用args元组传给子进程函数参
def func(num):
    time.sleep(2)
    print('in func',num,os.getpid(),os.getppid())


if __name__ == '__main__':
    print('in main',os.getpid(),os.getppid())
    p1 = Process(target=func,args=(1,))  # 进程对象
    p1.start()  # 向操作系统提交了一个开启子进程的申请
    p2 = Process(target=func,args=(2,))  # 进程对象
    p2.start()  # 向操作系统提交了一个开启子进程的申请
    print('主进程 的 代码执行结束了')


# 其他方法和属性
# 1.开启多个子进程
def func(num):
    print('in func',num,os.getpid(),os.getppid())

if __name__ == '__main__':
    print('in main',os.getpid(),os.getppid())
    for i in range(10):
        p = Process(target=func,args=(i,))
        p.start()  # start不是运行一个程序,而是调用操作系统的命令,要创建子进程
    print('主进程 的 代码执行结束了')

# 2.join方法
def func(num):
    time.sleep(1)
    print('in func',num,os.getpid(),os.getppid())

if __name__ == '__main__':
    print('in main',os.getpid(),os.getppid())
    p = Process(target=func,args=(1,))
    p.start()  # start不是运行一个程序,而是调用操作系统的命令,要创建子进程
    p.join()   # 阻塞,直到p这个子进程执行完毕之后再继续执行
    print('主进程 的 代码执行结束了')

# 3.一批任务使用join
def func(num):
    print('in func',num,os.getpid(),os.getppid())

if __name__ == '__main__':
    print('in main',os.getpid(),os.getppid())
    p_l = []
    for i in range(10):
        p = Process(target=func,args=(i,))
        p.start()  # start不是运行一个程序,而是调用操作系统的命令,要创建子进程,非阻塞
        p_l.append(p)   # 如果在for循环里直接 p.join()的话则会一个子进程执行完了之后才会开启下一个子进程然后执行
    print(p_l)
    for p in p_l :
        p.join() # 阻塞,直到p这个子进程执行完毕之后再继续执行,在上一个for循环中所有的子进程都开启了,这里把这些子进程都设置为join,主进程等待这些子进程都执行完后才继续执行
    print('主进程 的 代码执行结束了')

# 4.is_alive terminate
def func(num):
    time.sleep(2)
    print('in func',num,os.getpid(),os.getppid())


if __name__ == '__main__':
    print('in main',os.getpid(),os.getppid())
    p1 = Process(target=func,args=(1,))  # 进程对象
    p1.start()  # 向操作系统提交了一个开启子进程的申请
    print(p1.is_alive())  # 检测进程是否在执行任务
    p1.terminate()   # 强制结束子进程 - 非阻塞,就是说当执行这条命令后立即执行print(p1.is_alive())可能得到的结果是True,因为 p1.terminate()这条命令可能还没有执行完
    print(p1.is_alive())  # 检测进程是否在执行任务
    print('主进程 的 代码执行结束了')

# 用面向对象的方式开启子进程
class MyProcess(Process):   # 创建一个类继承Process方法
    def __init__(self,num): # 使用num 传参
        super().__init__()  # 保留Process()方法的属性
        self.num = num  # 传参
    def run(self):
        print('in run ',self.num,os.getpid(),os.getppid())

if __name__ == '__main__':
    print('in main ', os.getpid(), os.getppid())
    p = MyProcess(1)
    p.start()
=================================================================================================== ''' 数据隔离 进程与进程之间的数据是隔离的;内存空间是不能共享的;所以要想进行通信,必须借助其他手段(socket通信中的文件家族或网络家族);且这两个进程都是自愿的 # 主进程和子进程数据隔离''' from multiprocessing import Process import time def func(i): time.sleep(1) print('子进程',i) if __name__ == '__main__': i = [] p = Process(target=func, args=(i,)) p.start() i.append(10) print('主进程',1) # 主进程 1 # 子进程 [] # 主进程创建子进程时传参 from multiprocessing import Process def func(i): print('子进程',i) if __name__ == '__main__': i = 10 p = Process(target=func, args=(i,)) p.start() print('主进程',i) # 主进程 10 # 子进程 10 ''' # 守护进程 *** # 守护进程会在主进程的代码执行完毕之后直接结束,无论守护进程是否执行完毕(注意这里是主进程的代码执行完毕而不是主进程结束,因为主进程需要给其他子进程收尸,即等待其他子进程结束后回收资源) # 守护进程常被用来报活,当服务器执行一段死循环的主进程时,使用子进程作为守护进程来报活,只有当主进程因为出错而跳出循环后然后执行完代码这时守护进程就结束了也就停止报活了(报活是守护进程每隔一段时间发送一条信息) '''def func1(): print('begin') time.sleep(3) print('wahaha') def func2(): while True: print('in func2') time.sleep(0.5) if __name__ == '__main__': Process(target=func1).start() p = Process(target=func2) p.daemon = True # 守护进程的属性,默认是False,如果设置成True,就表示设置这个子进程为一个守护进程 # 设置守护进程的操作应该在开启子进程之前 # p.start() # time.sleep(1) # print('主进程') # begin # in func2 # in func2 # 主进程 # wahaha ''' # 锁 Lock ***** # 当多个进程共享一段数据(文件,因为进程的内存的隔离的)的时候,数据会出现不安全的现象, # 需要加锁来维护数据的安全性 ''' lock = Lock() # 创造了一把锁 lock.acquire() # 获取了这把锁的钥匙 这个代码放到需要加锁的代码前 lock.release() # 归还这把锁的钥匙 这个代码放到需要加锁的代码后 # 可以用 with 上下文管理语句 with lock: 等价于 lock.acquire() 代码 <====> 代码 lock.release() # 这是因为 with as 的机制,先执行 __enter__ 语句,然后执行with内代码, 最后执行 __exit__ 语句 # Lock()类中一定是有 __enter__方法,这个方法中有lock.acquire()命令,也一定有__exit__方法,这个方法中有lock.release()命令 # 买票 多人买票 import json import time from multiprocessing import Lock from multiprocessing import Process def search(i): with open('db','r') as f:count_dic = json.load(f) # db 文件中存放中json格式的一个字典票数信息,{"count":1} time.sleep(0.2) # 模拟网络延时 print('person %s 余票 : %s张'%(i,count_dic['count'])) def buy(i): with open('db','r') as f:count_dic = json.load(f) time.sleep(0.2) if count_dic['count'] > 0: count_dic['count'] -= 1 print('person %s 购票成功'%i) time.sleep(0.2) with open('db','w') as f:json.dump(count_dic,f) def task(i,lock): search(i) lock.acquire() # 如果之前已经被acquire了 且 没有被release 那么进程会在这里阻塞 buy(i) lock.release() if __name__ == '__main__': lock = Lock() for i in range(10): p = Process(target=task,args=(i,lock)) p.start() # 信号量 Semaphore *** # 信号量的机制就是 锁 + 计数器 # sem = Semaphore(3) # 设置钥匙个数,即有几个进程可以执行锁内的代码 # sem.acquire() # 拿钥匙执行代码 # print(1) # sem.acquire() # 拿钥匙执行代码 # print(2) # sem.acquire() # 拿钥匙执行代码 # print(3) # sem.acquire() # 阻塞,钥匙被拿完,但是没有还钥匙会阻塞,知道有进程还钥匙 # print(4) import time import random from multiprocessing import Process,Semaphore def ktv(num,sem): sem.acquire() print('person%s进入了ktv' % num) time.sleep(random.randint(1,4)) print('person%s走出了ktv' % num) sem.release() if __name__ == '__main__': sem = Semaphore(4) # 设置了信号量的个数为4,只能有四个进程同时拿到钥匙 for i in range(10): p = Process(target=ktv,args=(i,sem)) # 把Semaphore()的对象传到子进程中 p.start() ''' # 事件 Event **3 通过一个标记来控制对多个进程进行同步控制 wait() 方法,看Event()对象的标志,默认是False阻塞 如果事件对象标志是False 那么就阻塞 如果事件对象标志是True 那么就非阻塞 is_set()查看标志 set()将标志设置为True clear() 将标志设置为False ''' from multiprocessing import Event,Process e = Event() print(e.is_set()) # 在事件的创建之初 默认是False e.set() # 将标志设置为True print(e.is_set()) e.wait() # 相当于什么都没做pass e.clear() # 将标志设置为False # e.wait() # 永远阻塞 e.wait(timeout=10) # 如果信号在阻塞10s之内变为True,那么不继续阻塞直接pass, # 如果就阻塞10s之后状态还是没变,那么继续, print(e.is_set()) # 无论前面的wait的timeout是否通过,我的状态都不会因此改变 # 红绿灯模型 # 控制交通灯的进程 import time import random def traffic_light(e): print('�33[1;31m 红灯亮�33[0m') # 因为刚开始默认是阻塞的,所以开始设为红灯,输出红颜色的文字 while True: time.sleep(2) # 每隔2秒红绿灯切换一次 if e.is_set(): print('�33[1;31m 红灯亮�33[0m') e.clear() else: print('�33[1;32m 绿灯亮�33[0m') e.set() # 车 等或者通过 def car(id,e): if not e.is_set(): print('car %s 等待' % id) e.wait() print('car %s 通过'%id) def police_car(id,e): if not e.is_set(): # 警车只等 0.5秒 ,0.5秒后还是红灯则不等待直接通过 e.wait(timeout = 0.5) print('police car %s 通过' % id) # 主进程 启动交通控制灯 启动车的进程 if __name__ == '__main__': e = Event() p = Process(target=traffic_light,args=(e,)) p.start() car_lst = [car,police_car] for i in range(20): p = Process(target=random.choice(car_lst), args=(i,e)) p.start() time.sleep(random.randrange(0,3,2)) =================================================================================================
''' ============================================================== 进程之间的通信(底层都是通过socket实现的) 队列 ***** 任何语言都有队列这种数据类型 队列 = 管道 + 锁 先进先出FIFO - 维护秩序的时候用的比较多 买票 秒杀 from queue import Queue q = Queue(5) # 创建一个队列,没有参数表示可以放无限多的数据,有参数表示只能放这么多的数,保护内存,防止内存被占用太多 print(q.qsize()) # 输出对列的个数 q.put(12) # 放进数据,当队列中没有位置时阻塞 q.put_nowait(4) # 放进数据,当队列中没有位置时不等待,舍弃这个要放的数据 print(q.get()) # 取数据,当队列中没有数据时阻塞 print(q.get_nowait()) # 取数据,当对列中没有数据时,报错,可以使用try方法把这个错误忽略掉,这样就不会阻塞了 print(q.full()) # 判断对列是否满了 print(q.empty()) # 判断对列是否是空的 和队列对应的有个栈,先进后出,主要用于算法 /*--------------------------------------------------------------------*/ 进程之间通信 - IPC inter - process communication 在多进程中 q.empty() q.full()是不准的,因为当一个进程进行 q.empty()判断时,可能另一个进程取了(或放了)队列中的数据, 因为网络延迟或其他原因得到的结果是错误的(注意这里不是两个进程同时放数据也不是同时取数据所以和锁是没关系的, 队列的锁只是不允许多个进程同时放数据或者取数据) ''' # 主进程放 子进程取 from multiprocessing import Queue,Process def con(q): print(q.get()) if __name__ == '__main__': q = Queue() p = Process(target=con,args=(q,)) p.start() q.put(123) # 子进程放 另一个子进程取 from multiprocessing import Queue,Process def con(q): print(q.get()) def pro(q): q.put(123) if __name__ == '__main__': q = Queue() p = Process(target=con,args=(q,)) p.start() p = Process(target=pro, args=(q,)) p.start() # 生产者消费者模型 - 解决创造(生产)数据和处理(消费)数据的效率不平衡问题 # 把创造数据 和 处理数据放在不同的进程中, # 根据他们的效率来调整进程的个数 # 生产数据快 消费数据慢 内存空间的浪费 # 消费数据快 生产数据慢 效率低下 import time import random from multiprocessing import Process,Queue def consumer(q,name): while True: food = q.get() if food == 'stop':break print('%s 吃了 %s'%(name,food)) time.sleep(random.random()) def producer(q,name,food,n=10): for i in range(n): time.sleep(random.random()) fd = food+str(i)
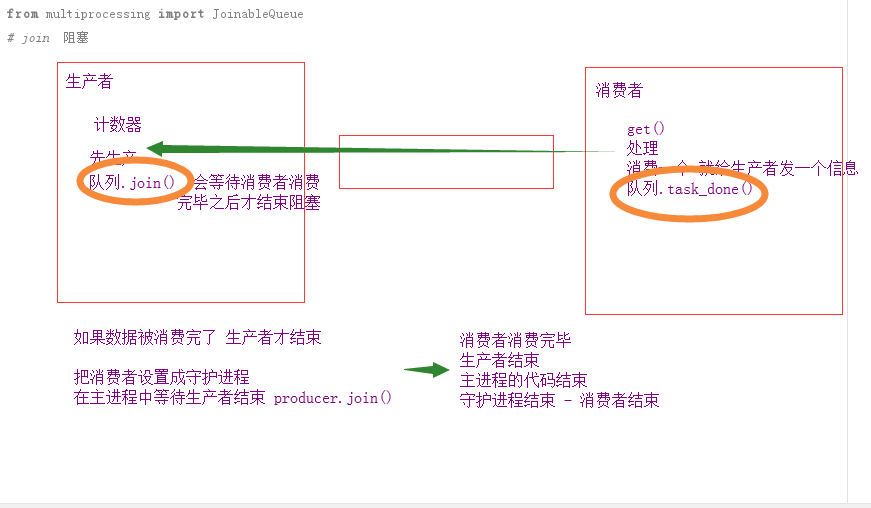
q.put(fd) print('%s 生产了 %s'%(name,fd)) if __name__ == '__main__': q = Queue(10) c1 = Process(target=consumer,args=(q,'alex')) c1.start() c2 = Process(target=consumer, args=(q, 'alex')) c2.start() p1 = Process(target=producer,args=(q,'太白','泔水')) p1.start() p2 = Process(target=producer, args=(q, 'egon', '鱼刺')) p2.start() p1.join() p2.join() q.put('stop') q.put('stop') # 让consumer停下来的方法 # 在所有生产者结束生产之后 向队列中放入一个结束符 # 有几个consumer就向队列中放几个结束符 # 在消费者消费的过程中,接收到结束符,就结束消费的进程 ------------------------------------- # JoinableQueue # 在消费数据的时候 task_done # 在生产端主进程 join import time import random from multiprocessing import JoinableQueue,Process # join 阻塞 def consumer(q,name): while True: food = q.get() print('%s 吃了 %s'%(name,food)) time.sleep(random.random()) q.task_done() # 每处理一个数据就发送一个信号给生产者 def producer(q,name,food,n=10): for i in range(n): time.sleep(random.random()) fd = food+str(i) print('%s 生产了 %s'%(name,fd)) q.put(fd) q.join() # 阻塞,等待消费者处理完数据后才会结束阻塞(当生产者生产的数据和生产者接收到的消费者发来的task_done()信号数一样时,认为消费者处理完数据), # 这个语句也可以写在主进程中 if __name__ == '__main__': q = JoinableQueue() c1 = Process(target=consumer,args=(q,'alex')) c1.daemon = True # 设置消费者为守护进程,当主进程代码结束后,消费者进程结束,有因为生产者设置了阻塞,只有消费者处理完之后生产者才结束 # 所以主进程结束===>消费者进程结束 c1.start() c2 = Process(target=consumer, args=(q, 'alex')) c2.daemon = True c2.start() p1 = Process(target=producer,args=(q,'太白','泔水')) p1.start() p2 = Process(target=producer, args=(q, 'egon', '鱼刺')) p2.start() p1.join() # 设置生产者阻塞,这样只有生产者生产完了之后主进程代码才结束,然后守护进程才结束,不至于一上来主进程代码就执行完使得守护进程结束 p2.join() # 生产 ===> 消费 ====>生产者结束 # q.join() 如果要把生产者的join写在主进程可以写在这个位置
'''

    管道 ***
        队列是基于管道实现的,但是因为管道没有加锁,所有数据会不安全,通常是不直接使用管道的'''
        from multiprocessing import Pipe
        left,right = Pipe()     # 一个管道有两个口(这是两个元组)
        left.send('aaa')
        print(right.recv())


        from multiprocessing import Pipe,Process
        def consumer(left,right):
            left.close()
            while True:
                try:
                    print(right.recv())
                except EOFError:
                    break

        if __name__ == '__main__':
            left,right = Pipe()
            p = Process(target=consumer,args=(left,right))
            p.start()
            right.close()
            for i in range(10):
                left.send('hello')  # 使用管道发送10次 hello
            left.close()    # 发送完了关闭 left端点,因为子进程中的left端点也关闭了,所以管道没有了left口,这是抛出EOFError错误,子进程捕捉错误结束

        # EOF异常的触发
        #     在这一个进程中 如果不在用这个端点了,应该close
        #     这一在recv的时候,如果其他端点都被关闭了,就能够知道不会在有新的消息传进来
        #     此时就不会在这里阻塞等待,而是抛出一个EOFError
        #     * close并不是关闭了整个管道,而是修改了操作系统对管道端点的引用计数的处理

        # 使用管道写的生产者消费者模型
        from multiprocessing import Process,Pipe

        def consumer(p,name):
            produce, consume=p
            produce.close()
            while True:
                try:
                    baozi=consume.recv()
                    print('%s 收到包子:%s' %(name,baozi))
                except EOFError:
                    break

        def producer(p,seq=10):
            produce, consume=p
            consume.close()
            for i in range(seq):
                produce.send(i)

        if __name__ == '__main__':
            produce,consume=Pipe()
            for i in range(5):
                c=Process(target=consumer,args=((produce,consume),'c1'))
                c.start()
            for i in range(5):
                p = Process(target=producer, args=((produce, consume),))
                p.start()
            producer((produce,consume))
            produce.close()
            consume.close()


'''
进程之间的数据共享 *'''
    # 用的很少
    from multiprocessing import Manager,Process,Lock
    def work(d,lock):
        with lock:
            d['count']-=1

    if __name__ == '__main__':
        lock = Lock()
        m = Manager()
        dic=m.dict({'count':100})   # 将一个字典类型的数据通过Manager()对象赋值给一个变量,这个变量就可以在进程中共享了
        p_l=[]
        for i in range(100):    # 开启100个进程,每个进程都对dic['count'] -= 1 加锁,使得只能一个进程一个进程的减
            p=Process(target=work,args=(dic,lock))
            p_l.append(p)
            p.start()
        for p in p_l:   # 设置所有子进程阻塞,当所有子进程都执行完后,才执行下面的打印语句
            p.join()
        print(dic)


'''
进程池 *****
开启进程和回收进程都是很浪费时间和内存的
几个CPU就能同时运行几个进程(注意这里是同时运行,几个cpu异步,不是操作系统的调度) 进程的个数不是无限开启的
进程池是将100个任务分配给4个进程,这4个进程放到进程池中,这4个进程先同时执行4个任务,然后有进程执行完后退出进程池,然后这个进程执行下一个任务再次进入进程池
# 如果必须用多个进程
    # 且是高计算型 没有IO 型的程序(如果有阻塞,进程池就会变慢很多)
    # 希望并行 最充分的使用CPU
'''
    import os
    import time
    from multiprocessing import Pool
    def func(i):
        time.sleep(0.1)
        print(os.getpid(),i)

    if __name__ == '__main__':
        p = Pool(5)     # 创建进程池对象
        for i in range(20):
            p.apply_async(func,args=(i,))   # 使用进程池处理20个进程,进程函数为func,参数为 i
        p.close()   # 关闭进程池
        time.sleep(2)
        p.join()
'''
================================================================
'''
'''================================================''' # 进程池写的多socket服务 import socket from multiprocessing import Pool def talk(conn): try: while True: conn.send(b'hello') print(conn.recv(1024)) finally: conn.close() if __name__ == '__main__': p = Pool(5) sk = socket.socket() sk.bind(('127.0.0.1',9090)) sk.listen() while True: conn,addr = sk.accept() p.apply_async(func=talk,args=(conn,)) import socket import os sk = socket.socket() sk.connect(('127.0.0.1',9090)) while True: print(sk.recv(1024)) sk.send(str(os.getpid()).encode('utf-8')) '''-------------------------------------------------------------''' # 进程池 import os import time from multiprocessing import Pool # eg1: # 同步请求的 # def wahaha(): # time.sleep(1) # print(os.getpid()) # return True # # if __name__ == '__main__': # p = Pool(5) # CPU的个数 或者 +1 # ret_l = [] # for i in range(20): # ret = p.apply(func = wahaha) # 同步的,不用 # print(ret) # 异步提交,不获取返回值 # eg2: def wahaha(): time.sleep(1) print(os.getpid()) if __name__ == '__main__': p = Pool(5) # CPU的个数 或者 +1 ret_l = [] for i in range(20): ret = p.apply_async(func = wahaha) # async 异步的 ret_l.append(ret) p.close() # 关闭 不是进程池中的进程不工作了 # 而是关闭了进程池,让任务不能再继续提交了 p.join() # 等待这个池中提交的任务都执行完 # # 表示等待所有子进程中的代码都执行完 主进程才结束 # 异步提交,获取返回值,等待所有任务都执行完毕之后再统一获取结果 # eg3 def wahaha(): time.sleep(1) print(os.getpid()) return True if __name__ == '__main__': p = Pool(5) # CPU的个数 或者 +1 ret_l = [] for i in range(20): ret = p.apply_async(func = wahaha) # async 异步的 ret_l.append(ret) p.close() # 关闭 不是进程池中的进程不工作了 # 而是关闭了进程池,让任务不能再继续提交了 p.join() # 等待这个池中提交的任务都执行完 p.close() p.join() 一定是配合使用的 for ret in ret_l: print(ret.get()) # 异步提交,获取返回值,一个任务执行完毕之后就可以获取到一个结果(顺序是按照提交任务的顺序) # eg4 def wahaha(): time.sleep(1) print(os.getpid()) return True if __name__ == '__main__': p = Pool(5) # CPU的个数 或者 +1 ret_l = [] for i in range(20): ret = p.apply_async(func = wahaha) # async 异步的 ret_l.append(ret) for ret in ret_l: print(ret.get()) # 因为要获取返回值,所以一定要逐个的等待子进程都结束,这里就不用写 p.close() p.join() 了 # 异步的 apply_async # 1.如果是异步的提交任务,那么任务提交之后进程池和主进程也异步了, #主进程不会自动等待进程池中的任务执行完毕 # 2.如果需要主进程等待,需要p.join # 但是join的行为是依赖close # 3.如果这个函数是有返回值的 # 也可以通过ret.get()来获取返回值 # 但是如果一边提交一遍获取返回值会让程序变成同步的 # 所以要想保留异步的效果,应该讲返回对象保存在列表里,所有任务提交完成之后再来取结果 # 这种方式也可以去掉join,来完成主进程的阻塞等待池中的任务执行完毕 # 普通进程 主进程和子进程异步,主进程代码结束,子进程不结束,子进程全部结束,主进程收尸 # 进程池 主进程和子进程,子进程之间全部异步(使用apply_async()),主进程代码结束,子进程结束(必须使用阻塞等待子进程执行完 1.time.sleep 2.子进程.join() 3.接收子进程的返回值 ret.get() 只有当子进程执行完后才会有返回值) '''-----------------------------------------------------------------''' # 回调函数 import os import time import random from multiprocessing import Pool # 异步提交,获取返回值,从头到尾一个任务执行完毕之后就可以获取到一个结果 def wahaha(num): time.sleep(random.random()) print('pid : ',os.getpid(),num) return num def back(arg): print('call_back : ',os.getpid(),arg) if __name__ == '__main__': print('主进程',os.getpid()) p = Pool(5) # CPU的个数 或者 +1 for i in range(20): p.apply_async(func = wahaha,args=(i,),callback=back) # async 异步的 p.close() p.join() # 回调函数 _ 在主进程中执行 # 在发起任务的时候 指定callback参数 # 在每个进程执行完apply_async任务之后,返回值会直接作为参数传递给callback的函数,执行callback函数中的代码 '''================================================================''' # 进程 # 是计算机中最小的资源分配单位 # 在利用多个CPU执行的过程中,对多个程序的资源进行管理和隔离 # 进程的弊端 # 开启和关闭 以及 切换 都会带来很大的时间开销 # 过多的进程还会造成操作系统调度的压力 # 线程 # 线程是CPU调度的最小单位 # 每个进程中至少有一个线程 # 实际上执行代码的是线程 # 线程属于进程 # 进程负责获取操作系统分配给我的资源 # 线程负责执行代码 # 从代码的角度上来看 # 多进程 # 开启和结束 时间开销大 # 切换的效率低 # 内存隔离 # 多线程 # 开启和结束 时间开销非常小 # 切换效率高 # 内存不隔离 # Cpython解释器下的全局解释器锁 # 在同一个进程中的多个线程在同一时刻只能有一个线程访问CPU # 多线程无法形成并行 # 锁的线程 # 什么时候才会有到CPU # 程序计算的时候(当然我们知道CPU包括运算逻辑部件、寄存器部件和控制部件,这里说的cpu是运算逻辑部件和寄存器部件,可能是控制部件) # IO阻塞 # 是不会用到CPU的 # Jpython解释器就没有全局解释器锁 # pypy解释没有全局解释器锁 '''-------------------------------------------------------''' # 开启一个线程,开启线程和开启进程几乎一样,只是因为线程不会向进程一样创建新的内存空间,所以不需要使用 if __name__ == '__main__',当然为了保持一致性我们一般也会写上 import os import time from threading import Thread def func(): time.sleep(1) print(123,os.getpid()) print(123,os.getpid()) for i in range(10): Thread(target=func).start() '''----------------------------------------------------------------''' import time from threading import Thread from multiprocessing import Process # 测试效率差别 def func(a): a = a + 1 if __name__ == '__main__': start = time.time() t_l = [] for i in range(50): t = Thread(target=func,args=(i,)) # 开线程 t.start() t_l.append(t) # t_l 50个线程对象 for t in t_l : t.join() print('主线程') print(time.time() - start) start = time.time() t_l = [] for i in range(50): t = Process(target=func, args=(i,)) # 开进程 t.start() t_l.append(t) # t_l 50个线程对象 for t in t_l: t.join() print('主进程') print(time.time() - start) # start join # terminate 在线程中没有 '''---------------------------------------------------------''' # 在多个进程线程同时访问一个数据的时候就会产生数据不安全的现象 # 多进程 访问文件 # 多线程 # 同时去访问一个数据 # GIL 全局解释器锁 # 在同一个进程里的每一个线程同一时间只能有一个线程访问cpu # 尽量不要设置全局变量 # 只要在多线程/进程之间用到全局变量 就加上锁 from threading import Lock,Thread noodle = 100 def func(name,lock): global noodle lock.acquire() noodle -= 1 lock.release() print('%s吃到面了'%name) if __name__ == '__main__': lock = Lock() # 线程锁 互斥锁 t_lst = [] for i in range(10): t = Thread(target=func,args=(i,lock)) t.start() t_lst.append(t) for t in t_lst: t.join() print(noodle) # 科学家吃面问题 import time from threading import Thread,Lock lock = Lock() noodle_lock = Lock() fork_lock = Lock() def eat1(name): noodle_lock.acquire() print('%s拿到了面' % name) fork_lock.acquire() print('%s拿到了叉子' % name) print('%s在吃面'%name) time.sleep(0.5) fork_lock.release() # 0.01 noodle_lock.release() # 0.01 def eat2(name): fork_lock.acquire() # 0.01 print('%s拿到了叉子' % name) # 0.01 noodle_lock.acquire() print('%s拿到了面' % name) print('%s在吃面'%name) time.sleep(0.5) noodle_lock.release() fork_lock.release() eat_lst = ['alex','wusir','太白','yuan'] for name in eat_lst: # 当一个人拿到了叉子,另一个人拿到了面,这时两个人都不能完成吃面,也就不能在释放锁,这时就会形成死锁的现象 Thread(target=eat1,args=(name,)).start() Thread(target=eat2,args=(name,)).start() # 递归锁 from threading import RLock rlock = RLock() rlock.acquire() print(1) rlock.acquire() print(2) rlock.acquire() print(3)# 递归锁解决死锁问题,递归锁相当于一个人拿着一串钥匙 一个acquire()就进入一扇门,在来一个acquire()就再往里进一扇门,一个release()就出一扇门,再来一个release()就再外出一扇门 import time from threading import Thread,RLock lock = RLock() def eat1(name): lock.acquire() print('%s拿到了面' % name) lock.acquire() print('%s拿到了叉子' % name) print('%s在吃面'%name) time.sleep(0.5) lock.release() # 0.01 lock.release() # 0.01 def eat2(name): lock.acquire() # 0.01 print('%s拿到了叉子' % name) # 0.01 lock.acquire() print('%s拿到了面' % name) print('%s在吃面'%name) time.sleep(0.5) lock.release() lock.release() eat_lst = ['alex','wusir','太白','yuan'] for name in eat_lst: Thread(target=eat1,args=(name,)).start() Thread(target=eat2,args=(name,)).start() # 互斥锁解决死锁问题 # 死锁问题本质上都是代码的逻辑出现了问题,一把锁可以完成的使用了多把锁而这些锁在进程/线程间出现了关联,所以尽管我们可以使用递归锁解决死锁问题,但是最终还是要从新构建逻辑使用互斥锁解决 import time from threading import Thread,Lock lock = Lock() def eat1(name): lock.acquire() print('%s拿到了面' % name) print('%s拿到了叉子' % name) print('%s在吃面'%name) time.sleep(0.5) lock.release() # 0.01 def eat2(name): lock.acquire() # 0.01 print('%s拿到了叉子' % name) # 0.01 print('%s拿到了面' % name) print('%s在吃面'%name) time.sleep(0.5) lock.release() eat_lst = ['alex','wusir','太白','yuan'] for name in eat_lst: Thread(target=eat1,args=(name,)).start() Thread(target=eat2,args=(name,)).start() # 死锁 # 多把锁同时应用在多个线程中 # 互斥锁和递归锁哪个好 # 递归锁 快速恢复服务 # 死锁问题的出现 是程序的设计或者逻辑的问题 # 还应该进一步的排除和重构逻辑来保证使用互斥锁也不会发生死锁 # 互斥锁和递归锁的区别 # 互斥锁 就是在一个线程中不能连续多次ACQUIRE # 递归锁 可以在同一个线程中acquire任意次,注意acquire多少次就需要release多少次 # from multiprocessing import RLock 进程中的递归锁 '''------------------------------------------------------------------------------''' import time from multiprocessing import Semaphore,Process,Pool def ktv1(sem,i): sem.acquire() i += 1 sem.release() def ktv2(i): i += 1 if __name__ == '__main__': sem = Semaphore(5) start = time.time() p_l = [] for i in range(100): p = Process(target=ktv1,args=(sem,i)) p.start() p_l.append(p) for p in p_l : p.join() print('###',time.time() - start) start = time.time() p = Pool(5) p_l = [] for i in range(100): ret = p.apply_async(func=ktv2, args=(sem, i)) p_l.append(ret) p.close() p.join() print('***',time.time() - start) # 池 和 信号量 # 池 效率高 # 池子里有几个一共就起几个 # 不管多少任务 池子的个数是固定的 # 开启进程和关闭进程这些事都是需要固定的开销 # 就不产生额外的时间开销 # 且进程程池中的进程数控制的好,那么操作系统的压力也小 # 信号量 # 有多少个任务就起多少进程/线程 # 可以帮助你减少操作系统切换的负担 # 但是并不能帮助你减少进/线程开启和关闭的时间 # 事件 # wait # 等 到 事件内部的信号变成True就不阻塞了 # set # 设置信号变成True # clear # 设置信号变成False # is_set # 查看信号是否为True '''-------------------------------------------------------------------''' # 事件 数据库连接 import time import random from threading import Event,Thread def check(e): '''检测一下数据库的网络和我的网络是否通''' print('正在检测两台机器之间的网络情况 ...') time.sleep(random.randint(1,3)) e.set() def connet_db(e): e.wait() print('连接数据库 ... ') print('连接数据库成功~~~') e = Event() Thread(target=connet_db,args=(e,)).start() Thread(target=check,args=(e,)).start() import time import random from threading import Event,Thread def check(e): '''检测一下数据库的网络和我的网络是否通''' print('正在检测两台机器之间的网络情况 ...') time.sleep(random.randint(0,2)) e.set() def connet_db(e): n = 0 while n < 3: if e.is_set(): break else: e.wait(0.5) n += 1 if n == 3: raise TimeoutError print('连接数据库 ... ') print('连接数据库成功~~~') e = Event() Thread(target=connet_db,args=(e,)).start() Thread(target=check,args=(e,)).start()
'''=================================================================='''
# 线程  条件
from threading import Condition
# acquire
# release
# wait    阻塞
# notify  让wait解除阻塞的工具
# wait还是notify在执行这两个方法的前后 必须执行acquire和release
from threading import Condition,Thread
def func(con,i):
    con.acquire()
    # 判断某条件
    con.wait()
    print('threading : ',i)
    con.release()

con = Condition()
for i in range(20):
    Thread(target=func,args=(con,i)).start()
# con.acquire()
# # 帮助wait的子线程处理某个数据直到满足条件
# con.notify_all()     # 释放所有线程
# con.release()
while True:
    num = int(input('num >>>'))
    con.acquire()
    con.notify(num)  #  解除num个线程的阻塞,即释放num个线程
    con.release()
'''--------------------------------------------------------------'''
# 定时器
from threading import Timer
def func():
    print('执行我啦')

# interval 时间间隔
Timer(0.2,func).start()  # 定时器
# 创建线程的时候,就规定它多久之后去执行
'''-----------------------------------------------------------'''
# 队列
from multiprocessing import Queue,JoinableQueue  # 进程IPC队列
from queue import Queue  # 线程队列  先进先出的
from queue import LifoQueue  # 后进先出的 也可以理解为栈
# 队列中的方法put get put_nowait get_nowait full empty qsize
# 队列Queue
    # 先进先出
    # 自带锁 数据安全
# 栈 LifoQueue
    # 后进先出
    # 自带锁 数据安全
from queue import PriorityQueue # 优先级队列
pq = PriorityQueue()    # 传入元组,元组第一个元素是数字,按数字的大小进行优先级排序,数字越小,越优先拿出,数字相同,按字符串的ASCII码
pq.put((10,'aaa'))      # 也可只传入数字,则只按数字的大小进行优先级
pq.put((5,'zzz'))       # 只传入字符串,按字符串的ASCII码
pq.put((5,'bbb'))
pq.put((20,'ccc'))

print(pq.get())
print(pq.get())
print(pq.get())
print(pq.get())
# (5, 'bbb')
# (5, 'zzz')
# (10, 'aaa')
# (20, 'ccc')

'''----------------------------------------------------------------'''
# 进程池
# Threading 没有线程池的
# Multiprocessing Pool
# concurrent.futures帮助你管理线程池和进程池(我们使用这种方式可以很快的将线程池改为进程池,因为这个模块中的进程池线程池的方法都一样,所以只要在导入模块的时候改下就行了)

import time
from threading import currentThread,get_ident      # currentThread  返回当前的线程变量  get_ident  返回当前的线程号,对比进程中的os.getpid
from concurrent.futures import ThreadPoolExecutor  # 帮助你启动线程池的类
from concurrent.futures import ProcessPoolExecutor  # 帮助你启动线程池的类

def func(i):
    time.sleep(1)
    print('in %s %s'%(i,currentThread()))
    return i**2

def back(fn):
    print(fn.result(),currentThread())

# map启动多线程任务
t = ThreadPoolExecutor(5)
t.map(func,range(20))
# 等价于
for i in range(20):
    t.submit(func,i)


# submit异步提交任务
t = ThreadPoolExecutor(5)
for i in range(20):
    t.submit(fn=func,)
t.shutdown()     # t.shutdown() 等价于 t.close()  t.join(),所以这个模块是高度封装的,帮我们省了很多事
print('main : ',currentThread())
# 起多少个线程池
    # 5*CPU的个数


# 获取任务结果
t = ThreadPoolExecutor(20)
ret_l = []
for i in range(20):
    ret = t.submit(func,i)
    ret_l.append(ret)
t.shutdown()
for ret in ret_l:
    print(ret.result())
print('main : ',currentThread())

# 回调函数
t = ThreadPoolExecutor(20)
for i in range(100):
    t.submit(func,i).add_done_callback(back)

# 回调函数(进程版)
import os
import time
from concurrent.futures import ProcessPoolExecutor  # 帮助你启动线程池的类

def func(i):
    time.sleep(1)
    print('in %s 子进程pid%s'%(i,os.getpid()))
    return i**2

def back(fn):
    print(fn.result(),os.getpid())  # 和mulitiprocessing 中的接收的参数就是返回值不同,这里的fn并不是返回值而是一个对象,需要使用fn,result()来得到返回值
if __name__ == '__main__':
    print('main : ',os.getpid())
    t = ProcessPoolExecutor(20)
    for i in range(100):
        t.submit(func,i).add_done_callback(back)

# multiprocessing模块自带进程池的
# threading模块是没有线程池的
# concurrent.futures 进程池 和 线程池
    # 高度封装
    # 进程池/线程池的统一的使用方式
# 创建线程池/进程池  ProcessPoolExecutor  ThreadPoolExecutor
# ret = t.submit(func,arg1,arg2....)  异步提交任务
# ret.result() 获取结果,如果要想实现异步效果,应该是使用列表
# map(func,iterable)
# shutdown 等价于 close+join 同步控制的\
# add_done_callback 回调函数,在回调函数内接收的参数是一个对象,需要通过result来获取返回值
    # 进程池回调函数仍然在主进程中执行
    # 线程池中的回调函数在子线程中执行

# 线程池中使用回调函数
import os
import time
from threading import currentThread,get_ident
from concurrent.futures import ThreadPoolExecutor  # 帮助你启动线程池的类

def func(i):
    time.sleep(1)
    print('in %s 子线程pid %s'%(i,get_ident()))
    return i**2

def back(fn):
    print(fn.result(),'回调函数中的线程号',get_ident())
if __name__ == '__main__':
    print('main 主进程: ',os.getpid())
    t = ThreadPoolExecutor(20)
    for i in range(100):
        t.submit(func,i).add_done_callback(back)

'''------------------------------------------------------------------'''
# 协程

# 进程 : 资源分配的最小单位,班级
# 线程 : CPU调度最小单位,人
# 协程 : 能在一条线程的基础上,在多个任务之间互相切换

# CPython线程不能利用多核的
# 多线程凭什么能够做到并发???  时间片轮转,IO阻塞进入下一个进程

# 多个线程无法利用多核
# 协程比起线程的好处
    # 充分的利用了一条线程来提高CPU的工作效率
    # 不存在数据不安全的问题
# 一个线程
    # 能同时执行多个任务


# 节省了线程开启的消耗
# 是从python代码的级别调度的
    # 正常的线程是CPU调度的最小单位
    # 协程的调度并不是由操作系统来完成的

# python原生协程 yield
def func():
    print(1)
    x = yield 'aaa'
    print(x)
    yield 'bbb'

g = func()
print(next(g))
print(g.send('****'))
# 1     运行func遇到第一个yield停止
# aaa   执行第一个yield, 返回 aaa ,打印出返回值
# ****  将 **** 发送给上一个yield的值,即x,然后执行 print(x)
# bbb   g.sennd() 使得执行下一个yield ,返回 bbb ,打印这个返回值
'''使用greenlet模块进行协程间的切换'''
# greenlet 是第三方模块需要安装 pip3 install greenlet
import time
from greenlet import greenlet
# 协程模块  # 单纯的程序切换耗费时间
def eat():
    print('吃')
    time.sleep(1)
    g2.switch()  # 切换
    print('吃完了')
    time.sleep(1)
    g2.switch()

def play():
    print('玩儿')
    time.sleep(1)
    g1.switch()
    print('玩儿美了')
    time.sleep(1)

g1 = greenlet(eat)
g2 = greenlet(play)
g1.switch()   # 切换

# 吃
# 玩儿
# 吃完了
# 玩儿美了
'''使用gevent模块来进行协程间的切换'''
# 使用协程减少IO操作带来的时间消耗
from gevent import monkey;monkey.patch_all()
import gevent
import time

def eat():
    print('吃')
    time.sleep(2)
    print('吃完了')

def play():
    print('玩儿')
    time.sleep(1)
    print('玩儿美了')

g1 = gevent.spawn(eat)
g2 = gevent.spawn(play)
gevent.joinall([g1,g2])  #等价于 g1.join()  +  g2,join()
# 吃
# 玩儿
# 玩儿美了
# 吃完了
    # gevent帮你做了切换,做切换是有条件的,遇到IO才切换
    # gevent不认识除了gevent这个模块内以外的IO操作
    # 使用join可以一直阻塞直到协程任务完成
# 帮助gevent来认识其他模块中的阻塞
    # from gevent import monkey;monkey.patch_all()写在其他模块导入之前
'''协程完成的socket一对多通信'''
# 服务端
from gevent import monkey;monkey.patch_all()
import socket
import gevent
def talk(conn):
    while True:
        conn.send(b'hello')
        print(conn.recv(1024))

sk = socket.socket()
sk.bind(('127.0.0.1',9090))
sk.listen()
while True:
    conn,addr = sk.accept()     # 这就是阻塞,当没有接受到连接就阻塞,gevent自动切换到talk()任务中,接受到连接则继续循环直到没有接受连接,阻塞,切换
    gevent.spawn(talk,conn)

# 客户端
import  socket
from threading import Thread
def client():
    sk = socket.socket()
    sk.connect(('127.0.0.1',9090))
    while True:
        print(sk.recv(1024))
        sk.send(b'bye')

for i in range(500):
    Thread(target=client).start()
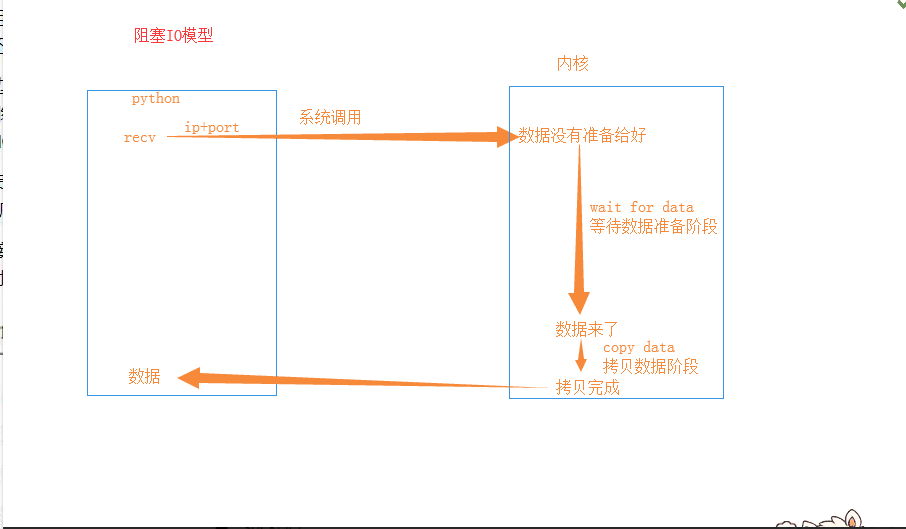
# 网络IO模型 socket # *blocking IO 阻塞IO 平时用的 tcp/udp # *nonblocking IO 非阻塞IO # *IO multiplexing IO多路复用 - ***** # *asynchronous IO 异步IO python中已经有异步的框架了 # 网络IO # 输入 : recv accept recvfrom # 输出 : send sendto sendall connect 等待的时间
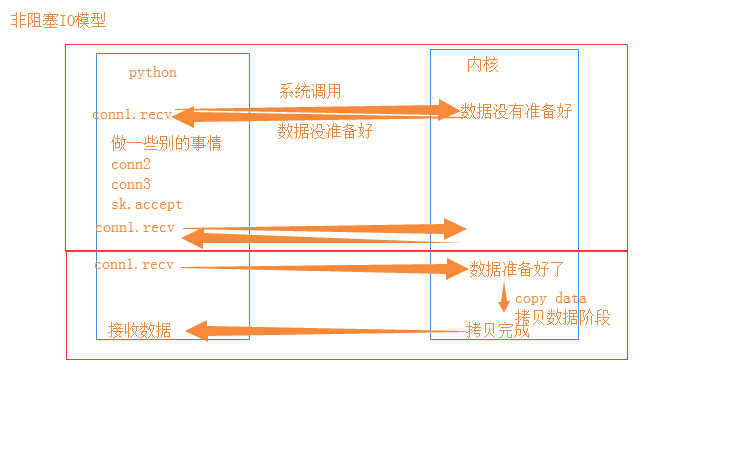
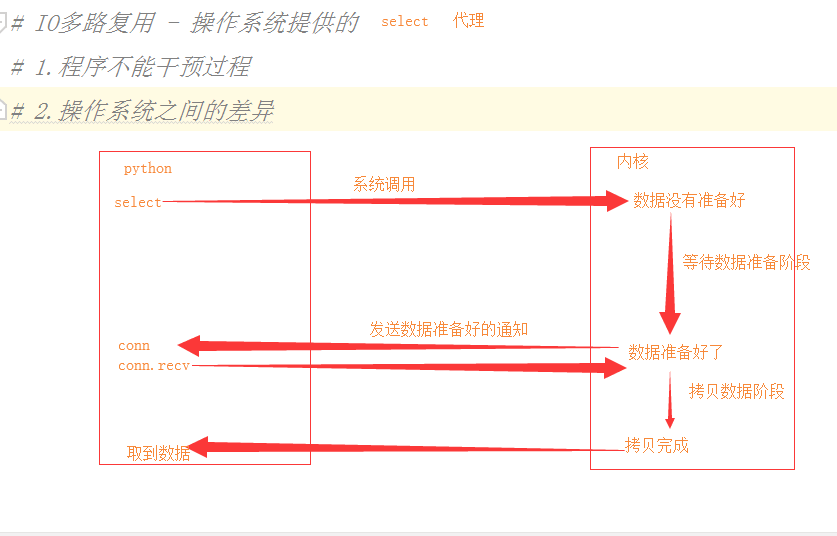
'''-------------------------非阻塞IO------------------------''' import socket sk = socket.socket() sk.bind(('127.0.0.1',9090)) sk.setblocking(False) # 设置IO为非阻塞模式 sk.listen() conn_l = [] del_l = [] while True: try: conn,addr = sk.accept() conn_l.append(conn) except BlockingIOError as e: # 没有收到连接报错 BlockingIOError for conn in conn_l: # 当没有收到连接时, conn_l 为空 ,for 中内容不执行 try: ret = conn.recv(1024) # recv 当没有接收到值时,报错 BlockingIOError if ret: # 对于不同的操作系统,当接收完发送的东西后,继续接收,可能收到空字符串,也可能报错 print(ret) conn.send(b'hello') else: conn.close() del_l.append(conn) # 把断开连接的客户端记录到 del_l列表中准备删除 except (BlockingIOError,OSError) :pass for conn in del_l: conn_l.remove(conn) # 删除已经断开的连接 del_l.clear() # 使用完后,每次循环清空这个del_l 列表- '''---------------------------------------IO多路复用-----------------------------------''' # IO多路复用 - 操作系统提供的 # 1.程序不能干预过程 # 2.操作系统之间的差异 import select import socket sk = socket.socket() sk.bind(('127.0.0.1',9090)) sk.listen() sk.setblocking(False) rlst = [sk] while True: rl,wl,xl = select.select(rlst,[],[]) #[sk,conn1,conn2] # 为什么突然把sk返回回来了? sk对象有数据可以被读了 # 为什么返回三个列表? 读事件的列表 写事件的列表 条件的列表 # 为什么是列表? 有可能同时有多个被监听的对象发生读事件 for obj in rl: if obj is sk: # is的意思更精准,判断的是obj就是sk conn,addr = obj.accept() rlst.append(conn) else: try: ret = obj.recv(1024) print(ret) obj.send(b'hello') except ConnectionResetError: obj.close() rlst.remove(obj) # TCP协议来说,如果对方关闭了连接 # 另一方有可能继续 接收 空消息 或者 报错 # 什么叫IO多路复用 # io多路复用是操作系统提供的一种 监听 网络IO操作的机制 # 监听三个列表 # 当某一个列表有对应的事件发生的时候 # 操作系统通知应用程序 # 操作系统根据返回的内容做具体的操作 # 对于只有一个对象需要监听的情况 IO多路复用并无法发挥作用 # 对于并发接收网络请求的应用场景 IO多路复用可以帮助你在节省CPU利用率和操作系统调用的基础上完成并发需求 # IO多路复用 # select 是windows上的机制 轮询的方式来监听每一个对象是否有对应的事件发生的,数据越多延迟越大 # 能够处理的对象数是有限的,最多监听1024个 # poll linux 和select的机制基本一致,对底层存储被监听对象的数据结构做了优化 # 能够处理的对象个数增加了,没有限制 # epoll linux 采用了回调函数的方式来通知应用被监听的对象有事件发生了
 1 # from gevent import monkey;monkey.patch_all()  # 不能使用monkey 会把进程和线程里的sleep也识别到,后果很难预料
 2 from concurrent.futures import ThreadPoolExecutor
 3 from concurrent.futures import ProcessPoolExecutor
 4 from threading import get_ident
 5 import os
 6 import time
 7 import random
 8 import gevent
 9
10 def process_func(i):
11     time.sleep(random.random())
12     print('在子进程%s	进程号%s:'% (i,os.getpid()))
13     t = ThreadPoolExecutor(20)
14     for x in range(20):
15         t.submit(thread_func,i)
16     t.shutdown()
17
18 def thread_func(i):
19     time.sleep(random.random())
20     print('在子进程%s	进程号%s	线程号%s:'% (i,os.getpid(),get_ident()))
21     g_lst = []
22     for y in range(500):
23         g = gevent.spawn(xiecheng_func,y)
24         g_lst.append(g)
25     gevent.joinall(g_lst)   # 必须要阻塞,不然主线程执行完了协程还没有执行完就结束了
26
27 def xiecheng_func(i):
28     gevent.sleep(random.random())
29     print('在协程%s中'% i)
30
31
32
33 if __name__ == '__main__':
34     '''开辟了一个进程池里面有5个进程,每个进程又开辟了一个线程池里面有20个线程,每个线程作为主线程里面有500个协程,这就是老师说的一般最大开辟的进程线程协程数'''
35     print('主进程',os.getpid())
36     p = ProcessPoolExecutor(5)
37
38     for i in range(5):
39         p.submit(process_func,i)    # 不能在主进程中实例化线程池,然后通过submit传参传过去,所以只能在子进程中实例化线程池了
40     p.shutdown()