本文由HeapDump性能社区首席讲师鸠摩(马智)授权整理发布
第9篇-字节码指令的定义
之前的文章介绍了解释执行下的Java栈帧创建以及字节码分派逻辑,但是始终没有讲到虚拟机到底是怎么执行Java方法中的字节码的,在介绍字节码的执行之前,需要先知道字节码指令的定义。在Bytecodes::initialize()函数中会定义字节码指令的一些属性。这个函数的调用链如下:
init_globals()
bytecodes_init()
Bytecodes::initialize()
在Bytecodes::initialize()函数中有类似这样的定义:
//  bytecode               bytecode name           format   wide f.   result tp  stk traps
def(_nop                 , "nop"                 , "b"    , NULL    , T_VOID   ,  0, false);
def(_aconst_null         , "aconst_null"         , "b"    , NULL    , T_OBJECT ,  1, false);
def(_iconst_m1           , "iconst_m1"           , "b"    , NULL    , T_INT    ,  1, false);
def(_iconst_0            , "iconst_0"            , "b"    , NULL    , T_INT    ,  1, false);
def(_iconst_1            , "iconst_1"            , "b"    , NULL    , T_INT    ,  1, false);
// ...
现在Java虚拟机规范定义的202个字节码指令都会向上图那样,调用def()函数进行定义,我们需要重点关注调用def()函数时传递的参数bytecode name、format等。 下面一个一个解释,如下:
- bytecode name就是字节码名称;
- wide表示字节码前面是否可以加wide,如果可以,则值为"wbii";
- result tp表示指令执行后的结果类型,如为T_ILLEGAL时,表示只参考当前字节码无法决定执行结果的类型,如_invokevirtual方法调用指令,结果类型应该为方法返回类型,但是此时只参考这个调用方法的字节码指令是无法决定的;
- stk表示对表达式栈深度的影响,如_nop指令不执行任何操作,所以对表达式栈的深度无影响,stk的值为0;当用_iconst_0向栈中压入0时,栈的深度增加1,所以stk的值为1。当为_lconst_0时,栈的深度会增加2;当为_lstore_0时,栈的深度会减少2;
- traps表示can_trap,这个比较重要,在后面会详细介绍。
- format,这个属性能表达2个意思,首先能表达字节码的格式,另外还能表示字节码的长度。
下面我们需要重点介绍一下format这个参数。format表示字节码的格式,当字符串中有一个字符时就是一个字节长度的字节码,当为2个字符时就是2个字节长度的字节码...,如_iconst_0就是一个字节宽度的字节码,_istore的format为"bi",所以是2个字节宽度。format还可能为空字符串,当为空字符串时,表示当前的字节码不是Java虚拟机规范中定义的字节码,如为了提高解释执行效率的_fast_agetfield、_fast_bgetfield等字节码,这些字节码是虚拟机内部定义的。还能表达字节码的格式,其中的字符串中各个字符的含义如下:
b: 表示字节码指令是非可变长度的,所以对于tableswitch、lookupswitch这种可变长度的指令来说,format字符串中不会含有b字符;
c:操作数为有符号的常量,如bipush指令将byte带符号扩展为一个int类型的值,然后将这个值入栈到操作数栈中;
i:操作数为无符号的本地变量表索引值,如iload指令从局部变量表加载一个int类型的值到操作数栈中;
j:操作数为常量池缓存的索引,注意常量池缓存索引不同与常量池索引,关于常量池索引,在《深入剖析Java虚拟机:源码剖析与实例详解》基础卷中详细介绍过,这里不再介绍;
k:操作数为无符号的常量池索引,如ldc指令将从运行时常量池中提取数据并压入操作数栈,所以格式为"bk";
o:操作数为分支偏移,如ifeq表示整数与零比较,如果整数为0,则比较结果为真,将操作数看为分支偏移量进行跳转,所以格式为”boo“;
_:可直接忽略
w:可用来扩展局部变量表索引的字节码,这些字节码有iload、fload等,所以wild的值为"wbii";
调用的def()函数的实现如下:
void Bytecodes::def(
Code          code,
const char*   name,
const char*   format,
const char*   wide_format,
BasicType     result_type,
int           depth,
bool          can_trap,
Code          java_code
) {
  int len  = (format      != NULL ? (int) strlen(format)      : 0);
  int wlen = (wide_format != NULL ? (int) strlen(wide_format) : 0);

  _name          [code] = name;
  _result_type   [code] = result_type;
  _depth         [code] = depth;
  _lengths       [code] = (wlen << 4) | (len & 0xF); // 0xF的二进制值为1111
  _java_code     [code] = java_code;


  int bc_flags = 0;
  if (can_trap){
    // ldc、ldc_w、ldc2_w、_aload_0、iaload、iastore、idiv、ldiv、ireturn等
    // 字节码指令都会含有_bc_can_trap
    bc_flags |= _bc_can_trap;
  }
  if (java_code != code){
    bc_flags |= _bc_can_rewrite; // 虚拟机内部定义的指令都会有_bc_can_rewrite
  }

  // 在这里对_flags赋值操作
  _flags[(u1)code+0*(1<<BitsPerByte)] = compute_flags(format,      bc_flags);
  _flags[(u1)code+1*(1<<BitsPerByte)] = compute_flags(wide_format, bc_flags);
}
其中的_name、_result_type等都是在Bytecodes类中定义的静态数组,其下标为Opcode值,而存储的值就是name、result_type等。这些变量的定义如下:
const char*     Bytecodes::_name          [Bytecodes::number_of_codes];
BasicType       Bytecodes::_result_type   [Bytecodes::number_of_codes];
s_char          Bytecodes::_depth         [Bytecodes::number_of_codes];
u_char          Bytecodes::_lengths       [Bytecodes::number_of_codes];
Bytecodes::Code Bytecodes::_java_code     [Bytecodes::number_of_codes];
u_short         Bytecodes::_flags         [(1<<BitsPerByte)*2];
Bytecodes::number_of_codes的值为234,足够存储所有的字节码指令了(包含虚拟机内部扩展的指令)。
回看Bytecodes::def()函数,通过调用compute_flags()函数根据传入的wide_format和format来计算字节码的一些属性,然后存储到高8位和低8位中。调用的compute_flags()函数的实现如下:
int Bytecodes::compute_flags(const char* format, int more_flags) {
  if (format == NULL) {
	  return 0;  // not even more_flags
  }

  int flags = more_flags;
  const char* fp = format;
  switch (*fp) {
  case '\0':
    flags |= _fmt_not_simple; // but variable
    break;
  case 'b':
    flags |= _fmt_not_variable;  // but simple
    ++fp;  // skip 'b'
    break;
  case 'w':
    flags |= _fmt_not_variable | _fmt_not_simple;
    ++fp;  // skip 'w'
    guarantee(*fp == 'b', "wide format must start with 'wb'");
    ++fp;  // skip 'b'
    break;
  }

  int has_nbo = 0, has_jbo = 0, has_size = 0;
  for (;;) {
    int this_flag = 0;
    char fc = *fp++;
    switch (fc) {
    case '\0':  // end of string
      assert(flags == (jchar)flags, "change _format_flags");
      return flags;

    case '_': continue;         // ignore these

    case 'j': this_flag = _fmt_has_j; has_jbo = 1; break;
    case 'k': this_flag = _fmt_has_k; has_jbo = 1; break;
    case 'i': this_flag = _fmt_has_i; has_jbo = 1; break;
    case 'c': this_flag = _fmt_has_c; has_jbo = 1; break;
    case 'o': this_flag = _fmt_has_o; has_jbo = 1; break;

    case 'J': this_flag = _fmt_has_j; has_nbo = 1; break;
    ...
    default:  guarantee(false, "bad char in format");
    }// 结束switch

    flags |= this_flag;

    guarantee(!(has_jbo && has_nbo), "mixed byte orders in format");
    if (has_nbo){
      flags |= _fmt_has_nbo;
    }

    int this_size = 1;
    if (*fp == fc) {
      // advance beyond run of the same characters
      this_size = 2;
      while (*++fp == fc){
    	  this_size++;
      }
      switch (this_size) {
      case 2: flags |= _fmt_has_u2; break; // 如sipush、ldc_w、ldc2_w、wide iload等
      case 4: flags |= _fmt_has_u4; break; // 如goto_w和invokedynamic指令
      default:
    	  guarantee(false, "bad rep count in format");
      }
    }

    has_size = this_size;
  }
}
函数要根据wide_format和format来计算flags的值,通过flags中的值能够表示字节码的b、c、i、j、k、o、w(在之前介绍format时介绍过)和字节码操作数的大小(操作数是2字节还是4字节)。以_fmt开头的一些变量在枚举类中已经定义,如下:
// Flag bits derived from format strings, can_trap, can_rewrite, etc.:
enum Flags {
// semantic flags:
_bc_can_trap      = 1<<0,     // bytecode execution can trap(卡住) or block
// 虚拟机内部定义的字节码指令都会含有这个标识
_bc_can_rewrite   = 1<<1,     // bytecode execution has an alternate(代替者) form

// format bits (determined only by the format string):
_fmt_has_c        = 1<<2,     // constant, such as sipush "bcc"
_fmt_has_j        = 1<<3,     // constant pool cache index, such as getfield "bjj"
_fmt_has_k        = 1<<4,     // constant pool index, such as ldc "bk"
_fmt_has_i        = 1<<5,     // local index, such as iload
_fmt_has_o        = 1<<6,     // offset, such as ifeq

_fmt_has_nbo      = 1<<7,     // contains native-order field(s)
_fmt_has_u2       = 1<<8,     // contains double-byte field(s)
_fmt_has_u4       = 1<<9,     // contains quad-byte field
_fmt_not_variable = 1<<10,    // not of variable length (simple or wide) 不可变长度的指令
_fmt_not_simple   = 1<<11,    // either wide or variable length 或者是可加wild的字节码指令,或者是可变长度的指令
_all_fmt_bits     = (_fmt_not_simple*2 - _fmt_has_c),

// ...
};
与format的对应关系如下:
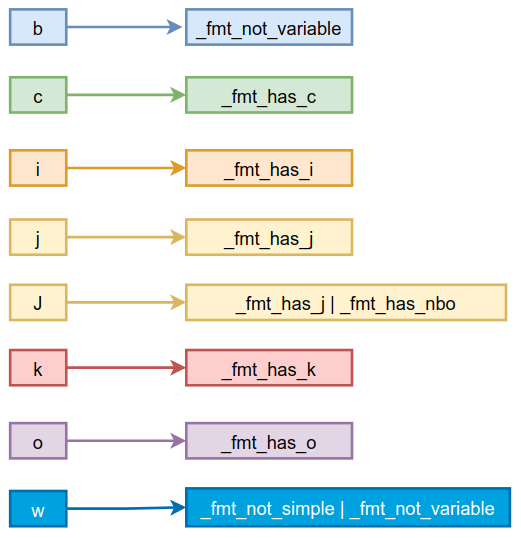
这样通过组合就可表示出不同的值,枚举类中定义了常用的组合如下:
_fmt_b      = _fmt_not_variable,
_fmt_bc     = _fmt_b | _fmt_has_c,
_fmt_bi     = _fmt_b | _fmt_has_i,
_fmt_bkk    = _fmt_b | _fmt_has_k | _fmt_has_u2,
_fmt_bJJ    = _fmt_b | _fmt_has_j | _fmt_has_u2 | _fmt_has_nbo,
_fmt_bo2    = _fmt_b | _fmt_has_o | _fmt_has_u2,
_fmt_bo4    = _fmt_b | _fmt_has_o | _fmt_has_u4
例如字节码为bipush时,format就是"bc",那么flags的值为_fmt_b | _fmt_has_c,ldc字节码的format为"bk",则flags的值为_fmt_b | _fmt_has_k。
第10篇-初始化模板表
在第9篇-字节码指令的定义我们介绍了字节码指令并且将字节码指令相关的信息都存储到了相关数组中,只需要通过Opcode就可从相关数组中获取对应的信息。
在init_globals()函数中调用bytecodes_init()函数初始化好字节码指令后会调用interpreter_init()函数初始化解释器。函数最终会调用到TemplateInterpreter::initialize()函数。这个函数的实现如下:
源代码位置:/src/share/vm/interpreter/templateInterpreter.cpp
void TemplateInterpreter::initialize() {
  if (_code != NULL)
       return;

  // 抽象解释器AbstractInterpreter的初始化,
  // AbstractInterpreter是基于汇编模型的解释器的共同基类,
  // 定义了解释器和解释器生成器的抽象接口
  AbstractInterpreter::initialize();

  // 模板表TemplateTable的初始化,模板表TemplateTable保存了各个字节码的模板
  TemplateTable::initialize();

  // generate interpreter
  {
     ResourceMark rm;
     int code_size = InterpreterCodeSize;
     // CodeCache的Stub队列StubQueue的初始化
     _code = new StubQueue(new InterpreterCodeletInterface, code_size, NULL,"Interpreter");
     //  实例化模板解释器生成器对象TemplateInterpreterGenerator
     InterpreterGenerator g(_code);
  }

  // 初始化字节分发表
  _active_table = _normal_table;
}
这个初始化函数中涉及到的初始化逻辑比较多,而且比较复杂。我们将初始化分为4部分:
(1)抽象解释器AbstractInterpreter的初始化,AbstractInterpreter是基于汇编模型的解释器的共同基类,定义了解释器和解释器生成器的抽象接口。
(2)模板表TemplateTable的初始化,模板表TemplateTable保存了各个字节码的模板(目标代码生成函数和参数);
(3)CodeCache的Stub队列StubQueue的初始化;
(4)解释器生成器InterpreterGenerator的初始化。
其中抽象解释器初始化时会涉及到一些计数,这些计数主要与编译执行有关,所以这里暂不过多介绍,到后面介绍编译执行时再介绍。
下面我们分别介绍如上3个部分的初始化过程,这一篇只介绍模板表的初始化过程。
函数TemplateTable::initialize()的实现如下:
模板表TemplateTable保存了各个字节码的执行模板(目标代码生成函数和参数),而前一篇介绍对字节码的定义已经进行了详细介绍,执行模板定义的是每个字节码如何在解释模式下执行的。initialize()函数的实现如下:
源代码位置:/src/share/vm/interpreter/templateInterpreter.cpp
void TemplateTable::initialize() {
  if (_is_initialized) return;


  _bs = Universe::heap()->barrier_set();

  // For better readability
  const char _    = ' ';
  const int  ____ = 0;
  const int  ubcp = 1 << Template::uses_bcp_bit;
  const int  disp = 1 << Template::does_dispatch_bit;
  const int  clvm = 1 << Template::calls_vm_bit;
  const int  iswd = 1 << Template::wide_bit;
  //                                    interpr. templates
  // Java spec bytecodes                ubcp|disp|clvm|iswd  in    out   generator             argument
  def(Bytecodes::_nop                 , ____|____|____|____, vtos, vtos, nop                 ,  _           );
  def(Bytecodes::_aconst_null         , ____|____|____|____, vtos, atos, aconst_null         ,  _           );
  def(Bytecodes::_iconst_m1           , ____|____|____|____, vtos, itos, iconst              , -1           );
  def(Bytecodes::_iconst_0            , ____|____|____|____, vtos, itos, iconst              ,  0           );
  // ...
  def(Bytecodes::_tableswitch         , ubcp|disp|____|____, itos, vtos, tableswitch         ,  _           );
  def(Bytecodes::_lookupswitch        , ubcp|disp|____|____, itos, itos, lookupswitch        ,  _           );
  def(Bytecodes::_ireturn             , ____|disp|clvm|____, itos, itos, _return             , itos         );
  def(Bytecodes::_lreturn             , ____|disp|clvm|____, ltos, ltos, _return             , ltos         );
  def(Bytecodes::_freturn             , ____|disp|clvm|____, ftos, ftos, _return             , ftos         );
  def(Bytecodes::_dreturn             , ____|disp|clvm|____, dtos, dtos, _return             , dtos         );
  def(Bytecodes::_areturn             , ____|disp|clvm|____, atos, atos, _return             , atos         );
  def(Bytecodes::_return              , ____|disp|clvm|____, vtos, vtos, _return             , vtos         );
  def(Bytecodes::_getstatic           , ubcp|____|clvm|____, vtos, vtos, getstatic           , f1_byte      );
  def(Bytecodes::_putstatic           , ubcp|____|clvm|____, vtos, vtos, putstatic           , f2_byte      );
  def(Bytecodes::_getfield            , ubcp|____|clvm|____, vtos, vtos, getfield            , f1_byte      );
  def(Bytecodes::_putfield            , ubcp|____|clvm|____, vtos, vtos, putfield            , f2_byte      );
  def(Bytecodes::_invokevirtual       , ubcp|disp|clvm|____, vtos, vtos, invokevirtual       , f2_byte      );
  def(Bytecodes::_invokespecial       , ubcp|disp|clvm|____, vtos, vtos, invokespecial       , f1_byte      );
  def(Bytecodes::_invokestatic        , ubcp|disp|clvm|____, vtos, vtos, invokestatic        , f1_byte      );
  def(Bytecodes::_invokeinterface     , ubcp|disp|clvm|____, vtos, vtos, invokeinterface     , f1_byte      );
  def(Bytecodes::_invokedynamic       , ubcp|disp|clvm|____, vtos, vtos, invokedynamic       , f1_byte      );
  def(Bytecodes::_new                 , ubcp|____|clvm|____, vtos, atos, _new                ,  _           );
  def(Bytecodes::_newarray            , ubcp|____|clvm|____, itos, atos, newarray            ,  _           );
  def(Bytecodes::_anewarray           , ubcp|____|clvm|____, itos, atos, anewarray           ,  _           );
  def(Bytecodes::_arraylength         , ____|____|____|____, atos, itos, arraylength         ,  _           );
  def(Bytecodes::_athrow              , ____|disp|____|____, atos, vtos, athrow              ,  _           );
  def(Bytecodes::_checkcast           , ubcp|____|clvm|____, atos, atos, checkcast           ,  _           );
  def(Bytecodes::_instanceof          , ubcp|____|clvm|____, atos, itos, instanceof          ,  _           );
  def(Bytecodes::_monitorenter        , ____|disp|clvm|____, atos, vtos, monitorenter        ,  _           );
  def(Bytecodes::_monitorexit         , ____|____|clvm|____, atos, vtos, monitorexit         ,  _           );
  def(Bytecodes::_wide                , ubcp|disp|____|____, vtos, vtos, wide                ,  _           );
  def(Bytecodes::_multianewarray      , ubcp|____|clvm|____, vtos, atos, multianewarray      ,  _           );
  def(Bytecodes::_ifnull              , ubcp|____|clvm|____, atos, vtos, if_nullcmp          , equal        );
  def(Bytecodes::_ifnonnull           , ubcp|____|clvm|____, atos, vtos, if_nullcmp          , not_equal    );
  def(Bytecodes::_goto_w              , ubcp|____|clvm|____, vtos, vtos, goto_w              ,  _           );
  def(Bytecodes::_jsr_w               , ubcp|____|____|____, vtos, vtos, jsr_w               ,  _           );

  // wide Java spec bytecodes
  def(Bytecodes::_iload               , ubcp|____|____|iswd, vtos, itos, wide_iload          ,  _           );
  def(Bytecodes::_lload               , ubcp|____|____|iswd, vtos, ltos, wide_lload          ,  _           );
  // ...

  // JVM bytecodes
  // ...

  def(Bytecodes::_shouldnotreachhere   , ____|____|____|____, vtos, vtos, shouldnotreachhere ,  _           );
}
TemplateTable的初始化调用def()将所有字节码的目标代码生成函数和参数保存在_template_table或_template_table_wide(wide指令)模板数组中。除了虚拟机规范本身定义的字节码指令外,HotSpot虚拟机也定义了一些字节码指令,这些指令为了辅助虚拟机进行更好的功能实现,例如Bytecodes::_return_register_finalizer等在之前已经介绍过,可以更好的实现finalizer类型对象的注册功能。
我们只给出部分字节码指令的模板定义,调用def()函数对每个字节码指令的模板进行定义,传递的参数是我们关注的重点:
(1)指出为哪个字节码指令定义模板
(2)ubcp|disp|clvm|iswd,这是一个组合数字,具体的数字与Template中定义的枚举类紧密相关,枚举类中定义的常量如下:
enum Flags {
 uses_bcp_bit,        // set if template needs the bcp pointing to bytecode
 does_dispatch_bit,   // set if template dispatches on its own 就其本身而言; 靠自己
 calls_vm_bit,        // set if template calls the vm
 wide_bit             // set if template belongs to a wide instruction
};
下面详细解释这几个参数,如下:
- uses_bcp_bit,标志需要使用字节码指针(byte code pointer,数值为字节码基址+字节码偏移量)。表示生成的模板代码中是否需要使用指向字节码指令的指针,其实也就是说是否需要读取字节码指令的操作数,所以含有操作数的指令大部分都需要bcp,但是有一些是不需要的,如monitorenter与monitorexit等,这些的操作数都在表达式栈中,表达式栈顶就是其操作数,并不需要从Class文件中读取,所以不需要bcp;
- does_dispatch_bit,标志表示自己是否含有控制流转发逻辑,如tableswitch、lookupswitch、invokevirtual、ireturn等字节码指令,本身就需要进行控制流转发;
- calls_vm_bit,标志是否需要调用JVM函数,在调用TemplateTable::call_VM()函数时都会判断是否有这个标志,通常方法调用JVM函数时都会通过调用TemplateTable::call_VM()函数来间接完成调用。JVM函数就是用C++写的函数。
- wide_bit,标志是否是wide指令(使用附加字节扩展全局变量索引)
(3)_tos_in与_tos_out:表示模板执行前与模板执行后的TosState(操作数栈栈顶元素的数据类型,TopOfStack,用来检查模板所声明的输出输入类型是否和该函数一致,以确保栈顶元素被正确使用)。
_tos_in与_tos_out的值必须是枚举类中定义的常量,如下:
enum TosState {         // describes the tos cache contents
  btos = 0,             // byte, bool tos cached
  ctos = 1,             // char tos cached
  stos = 2,             // short tos cached
  itos = 3,             // int tos cached
  ltos = 4,             // long tos cached
  ftos = 5,             // float tos cached
  dtos = 6,             // double tos cached
  atos = 7,             // object cached
  vtos = 8,             // tos not cached
  number_of_states,
  ilgl                  // illegal state: should not occur
};
如iload指令,执行之前栈顶状态为vtos,表示并不会使用栈顶的数据,所以如果程序为了提高执行效率将上一次执行的结果缓存到了寄存器中,那么此时就应该在执行iload指令之前将这个寄存器的值压入栈顶。iload指令执行之后的栈顶状态为itos,因为iload是向操作数栈中压入一个整数,所以此时的栈顶状态为int类型,那么这个值可以缓存到寄存器中,假设下一个指令为ireturn,那么栈顶之前与之后的状态分别为itos和itos,那么可直接将缓存在寄存器中的int类型返回即可,不需要做任何和操作数栈相关的操作。
(4)_gen与_arg:_gen表示模板生成器(函数指针),这个函数会为对应的字节码生成对应的执行逻辑;_arg表示为模板生成器传递的参数。调用函数指针会为每个字节码指令按其语义针对不同的平台上生成不同的机器指令,这里我们只讨论x86架构下64位的机器指令实现,由于机器指令很难读懂,所以我们后续只阅读由机器指令反编译的汇编指令。
下面看一下TemplateTable::initialize()函数中调用的Template::def()函数,如下:
void TemplateTable::def(
  Bytecodes::Code code,    // 字节码指令
  int flags,               // 标志位
  TosState in,             // 模板执行前TosState
  TosState out,            // 模板执行后TosState
  void (*gen)(int arg),    // 模板生成器,是模板的核心组件
  int arg
) {
  // 表示是否需要bcp指针
  const int ubcp = 1 << Template::uses_bcp_bit;
  // 表示是否在模板范围内进行转发
  const int disp = 1 << Template::does_dispatch_bit;
  // 表示是否需要调用JVM函数
  const int clvm = 1 << Template::calls_vm_bit;
  // 表示是否为wide指令
  const int iswd = 1 << Template::wide_bit;

  // 如果是允许在字节码指令前加wide字节码指令的一些指令,那么
  // 会使用_template_table_wild模板数组进行字节码转发,否则
  // 使用_template_table模板数组进行转发
  bool is_wide = (flags & iswd) != 0;
  Template* t = is_wide ? template_for_wide(code) : template_for(code);

  // 调用模板表t的initialize()方法初始化模板表
  t->initialize(flags, in, out, gen, arg);
}
模板表由模板表数组与一组生成器组成:
模板数组有_template_table与_template_table_wild,数组的下标为字节码的Opcode,值为Template。定义如下:
Template  TemplateTable::_template_table[Bytecodes::number_of_codes];
Template TemplateTable::_template_table_wide[Bytecodes::number_of_codes];
模板数组的值为Template,这个Template类中定义了保存标志位flags的_flags属性,保存栈顶缓存状态in和out的_tos_in和_tos_out,还有保存生成器gen及参数arg的_gen与_arg,所以调用t->initialize()后其实是初始化Template中的变量。initialize()函数的实现如下:
void Template::initialize(
 int flags,
 TosState tos_in,
 TosState tos_out,
 generator gen,
 int arg
) {
  _flags   = flags;
  _tos_in  = tos_in;
  _tos_out = tos_out;
  _gen     = gen;
  _arg     = arg;
}
不过这里并不会调用gen函数生成对应的汇编代码,只是将传递给def()函数的各种信息保存到Template实例中,在TemplateTable::def()函数中,通过template_for()或template_for_wild()函数获取到数组中对应的Template实例后,就会调用Template::initialize()函数将信息保存到对应的Template实例中,这样就可以根据字节码索引从数组中获取对应的Template实例,进而获取字节码指令模板的相关信息。
虽然这里并不会调用gen来生成字节码指令对应的机器指令,但是我们可以提前看一下gen这个指针函数是怎么为某个字节码指令生成对应的机器指令的。
看一下TemplateTable::initialize()函数中对def()函数的调用,以_iinc(将局部变量表中对应的slot位的值增加1)为例,调用如下:
def(
 Bytecodes::_iinc,     // 字节码指令
 ubcp|____|clvm|____,  // 标志
 vtos,                 // 模板执行前的TosState
 vtos,                 // 模板执行后的TosState
 iinc ,                // 模板生成器,是一个iinc()函数的指针
 _                     // 不需要模板生成器参数
);
设置标志位uses_bcp_bit和calls_vm_bit,表示iinc指令的生成器需要使用bcp指针函数at_bcp(),且需要调用JVM函数,下面给出了生成器的定义:
源代码位置:/hotspot/src/cpu/x86/vm/templateTable_x86_64.cpp
void TemplateTable::iinc() {
  transition(vtos, vtos);
  __ load_signed_byte(rdx, at_bcp(2)); // get constant
  locals_index(rbx);
  __ addl(iaddress(rbx), rdx);
}
由于iinc指令只涉及到对局部变量表的操作,并不会影响操作数栈,也不需要使用操作数栈顶的值,所以栈顶之前与之后的状态为vtos与vtos,调用transition()函数只是验证栈顶缓存的状态是否正确。
iinc指令的字节码格式如下:
iinc
index // 局部变量表索引值
const // 将局部变量表索引值对应的slot值加const
操作码iinc占用一个字节,而index与const分别占用一个字节。使用at_bcp()函数获取iinc指令的操作数,2表示偏移2字节,所以会将const取出来存储到rdx中。调用locals_index()函数取出index,locals_index()就是JVM函数。最终生成的汇编如下:
// %r13存储的是指向字节码的指针,偏移
// 2字节后取出const存储到%edx
movsbl 0x2(%r13),%edx
// 取出index存储到%ebx
movzbl 0x1(%r13),%ebx
neg    %rbx
// %r14指向本地变量表的首地址,将%edx加到
// %r14+%rbx*8指向的内存所存储的值上
// 之所以要对%rbx执行neg进行符号反转,
// 是因为在Linux内核的操作系统上,
// 栈是向低地址方向生长的
add    %edx,(%r14,%rbx,8)
注释解释的已经非常清楚了,这里不再过多介绍。
第11篇-认识Stub与StubQueue
在第10篇-初始化模板表我们介绍过TemplateInterpreter::initialize()函数,在这个函数中会调用TemplateTable::initialize()函数初始化模板表,随后会使用new关键字初始化定义在AbstractInterpreter类中的_code静态属性,如下:
static StubQueue* _code;
由于TemplateInterpreter继承自AbstractInterpreter,所以在TemplateInterpreter中初始化的_code属性其实就是AbstractInterpreter类中定义的_code属性。
在initialize()函数中初始化_code变量的代码如下:
// InterpreterCodeSize是在平台相关
// 的templateInterpreter_x86.hpp中
// 定义的,64位下是256 * 1024
int code_size = InterpreterCodeSize;
_code = new StubQueue(
                new InterpreterCodeletInterface,
                code_size,
                NULL,
                "Interpreter");
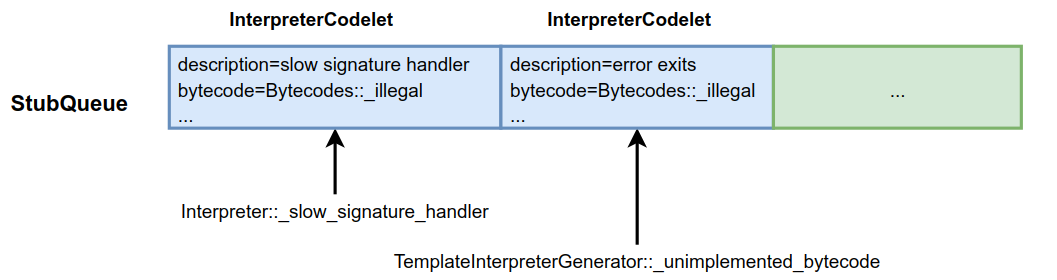
StubQueue是用来保存生成的本地代码的Stub队列,队列每一个元素对应一个InterpreterCodelet对象,InterpreterCodelet对象继承自抽象基类Stub,包含了字节码对应的本地代码以及一些调试和输出信息。下面我们介绍一下StubQueue类及相关类Stub、InterpreterCodelet类和CodeletMark类。
1、InterpreterCodelet与Stub类
Stub类的定义如下:
class Stub VALUE_OBJ_CLASS_SPEC { ... };
InterpreterCodelet类继承自Stub类,具体的定义如下:
class InterpreterCodelet: public Stub {
 private:
  int                _size;         // the size in bytes
  const char*        _description;  // a description of the codelet, for debugging & printing
  Bytecodes::Code    _bytecode;     // associated bytecode if any

 public:
  // Code info
  address code_begin() const  {
     return (address)this + round_to(sizeof(InterpreterCodelet), CodeEntryAlignment);
  }
  address code_end() const {
     return (address)this + size();
  }

  int size() const {
     return _size;
  }
  // ...
  int code_size() const {
     return code_end() - code_begin();
  }
  // ...
};
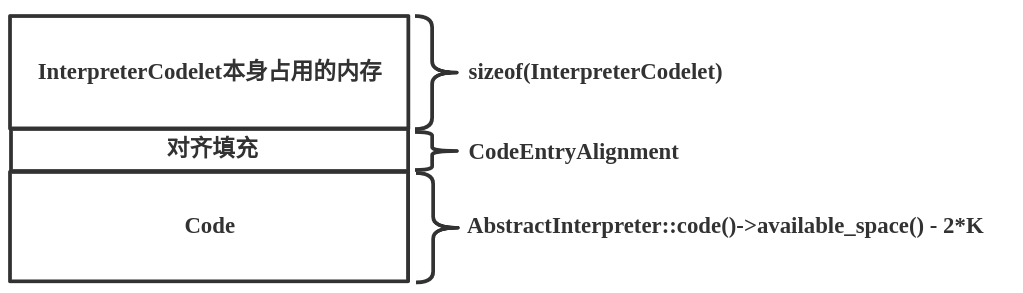
InterpreterCodelet实例存储在StubQueue中,每个InterpreterCodelet实例都代表一段机器指令(包含了字节码对应的机器指令片段以及一些调试和输出信息),如每个字节码都有一个InterpreterCodelet实例,所以在解释执行时,如果要执行某个字节码,则执行的就是由InterpreterCodelet实例代表的机器指令片段。
类中定义了3个属性及一些函数,其内存布局如下图所示。

在对齐至CodeEntryAlignment后,紧接着InterpreterCodelet的就是生成的目标代码。
2、StubQueue类
StubQueue是用来保存生成的本地机器指令片段的Stub队列,队列每一个元素都是一个InterpreterCodelet实例。
StubQueue类的定义如下:
class StubQueue: public CHeapObj<mtCode> {
 private:
  StubInterface* _stub_interface;     // the interface prototype
  address        _stub_buffer;        // where all stubs are stored

  int            _buffer_size;       // the buffer size in bytes
  int            _buffer_limit;      // the (byte) index of the actual buffer limit (_buffer_limit <= _buffer_size)

  int            _queue_begin;       // the (byte) index of the first queue entry (word-aligned)
  int            _queue_end;         // the (byte) index of the first entry after the queue (word-aligned)

  int            _number_of_stubs;   // the number of buffered stubs


  bool is_contiguous() const {
      return _queue_begin <= _queue_end;
  }
  int index_of(Stub* s) const {
      int i = (address)s - _stub_buffer;
      return i;
  }
  Stub* stub_at(int i) const {
      return (Stub*)(_stub_buffer + i);
  }
  Stub* current_stub() const {
      return stub_at(_queue_end);
  }

  // ...
}
这个类的构造函数如下:
StubQueue::StubQueue(
 StubInterface* stub_interface,  // InterpreterCodeletInterface对象
 int            buffer_size,     // 256*1024
 Mutex*         lock,
 const char*    name) : _mutex(lock)
{
  intptr_t     size = round_to(buffer_size, 2*BytesPerWord); // BytesPerWord的值为8
  BufferBlob*  blob = BufferBlob::create(name, size); // 在StubQueue中创建BufferBlob对象

  _stub_interface  = stub_interface;

  _buffer_size     = blob->content_size();
  _buffer_limit    = blob->content_size();
  _stub_buffer     = blob->content_begin();

  _queue_begin     = 0;
  _queue_end       = 0;
  _number_of_stubs = 0;
}
stub_interface用来保存一个InterpreterCodeletInterface类型的实例,InterpreterCodeletInterface类中定义了操作Stub的函数,避免了在Stub中定义虚函数。每个StubQueue都有一个InterpreterCodeletInterface,可以通过这个来操作StubQueue中存储的每个Stub实例。
调用BufferBlob::create()函数为StubQueue分配内存,这里我们需要记住StubQueue用的内存是通过BufferBlob分配出来的,也就是BufferBlob其本质可能是一个StubQueue。下面就来详细介绍下create()函数。
BufferBlob* BufferBlob::create(const char* name, int buffer_size) {
  // ...
  BufferBlob*    blob = NULL;
  unsigned int   size = sizeof(BufferBlob);

  // align the size to CodeEntryAlignment
  size = align_code_offset(size);
  size += round_to(buffer_size, oopSize); // oopSize是一个指针的宽度,在64位上就是8

  {
     MutexLockerEx mu(CodeCache_lock, Mutex::_no_safepoint_check_flag);
     blob = new (size) BufferBlob(name, size);
  }

  return blob;
}
通过new关键字为BufferBlob分配内存,new重载运算符如下:
void* BufferBlob::operator new(size_t s, unsigned size, bool is_critical) throw() {
  void* p = CodeCache::allocate(size, is_critical);
  return p;
}
从codeCache中分配内存,CodeCache使用的是本地内存,有自己的内存管理办法,在后面将会详细介绍。
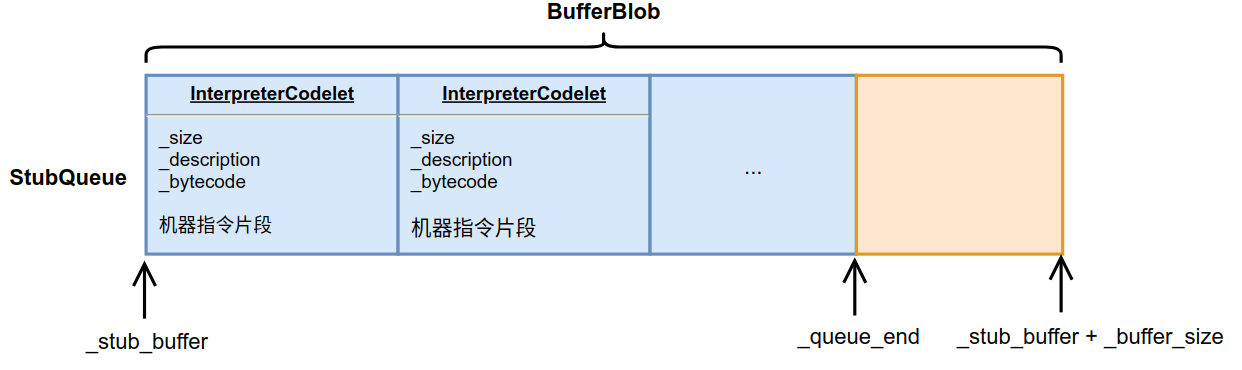
StubQueue的布局结构如下图所示。

队列中的InterpreterCodelet表示一个小例程,比如iconst_1对应的机器码,invokedynamic对应的机器码,异常处理对应的代码,方法入口点对应的代码,这些代码都是一个个InterpreterCodelet。整个解释器都是由这些小块代码例程组成的,每个小块例程完成解释器的部分功能,以此实现整个解释器。
第12篇-认识CodeletMark
InterpreterCodelet依赖CodeletMark完成自动创建和初始化。CodeletMark继承自ResourceMark,允许自动析构,执行的主要操作就是,会按照InterpreterCodelet中存储的实际机器指令片段分配内存并提交。这个类的定义如下:
class CodeletMark: ResourceMark {
 private:
  InterpreterCodelet*           _clet; // InterpreterCodelet继承自Stub
  InterpreterMacroAssembler**   _masm;
  CodeBuffer                    _cb;

 public:
  // 构造函数
  CodeletMark(
     InterpreterMacroAssembler*&    masm,
     const char*                    description,
     Bytecodes::Code                bytecode = Bytecodes::_illegal):
      // AbstractInterpreter::code()获取的是StubQueue*类型的值,调用request()方法获取的
      // 是Stub*类型的值,调用的request()方法实现在vm/code/stubs.cpp文件中
      _clet( (InterpreterCodelet*)AbstractInterpreter::code()->request(codelet_size()) ),
      _cb(_clet->code_begin(), _clet->code_size())
  {

     // 初始化InterpreterCodelet中的_description和_bytecode属性
     _clet->initialize(description, bytecode);

     // InterpreterMacroAssembler->MacroAssembler->Assembler->AbstractAssembler
     // 通过传入的cb.insts属性的值来初始化AbstractAssembler的_code_section与_oop_recorder属性的值
     // create assembler for code generation
     masm  = new InterpreterMacroAssembler(&_cb); // 在构造函数中,初始化r13指向bcp、r14指向本地局部变量表
     _masm = &masm;
  }

  // ... 省略析构函数
};
在构造函数中主要完成2个任务:
(1)初始化InterpreterCodelet类型的变量_clet。对InterpreterCodelet实例中的3个属性赋值;
(2)创建一个InterpreterMacroAssembler实例并赋值给masm与_masm,此实例会通过CodeBuffer向InterpreterCodelet实例写入机器指令。
在析构函数中,通常在代码块结束时会自动调用析构函数,在析构函数中完成InterpreterCodelet使用的内存的提交并清理相关变量的值。
1、CodeletMark构造函数
在CodeletMark构造函数会从StubQueue中为InterpreterCodelet分配内存并初始化相关变量
在初始化_clet变量时,调用AbstractInterpreter::code()方法返回AbstractInterpreter类的_code属性的值,这个值在之前TemplateInterpreter::initialize()方法中已经初始化了。继续调用StubQueue类中的request()方法,传递的就是要求分配的用来存储code的大小,通过调用codelet_size()函数来获取,如下:
int codelet_size() {
  // Request the whole code buffer (minus a little for alignment).
  // The commit call below trims it back for each codelet.
  int codelet_size = AbstractInterpreter::code()->available_space() - 2*K;

  return codelet_size;
}
需要注意,在创建InterpreterCodelet时,会将StubQueue中剩下的几乎所有可用的内存都分配给此次的InterpreterCodelet实例,这必然会有很大的浪费,不过我们在析构函数中会按照InterpreterCodelet实例的实例大小提交内存的,所以不用担心浪费这个问题。这么做的主要原因就是让各个InterpreterCodelet实例在内存中连续存放,这样有一个非常重要的应用,那就是只要简单通过pc判断就可知道栈帧是否为解释栈帧了,后面将会详细介绍。
通过调用StubQueue::request()函数从StubQueue中分配内存。函数的实现如下:
Stub* StubQueue::request(int  requested_code_size) {

  Stub* s = current_stub();

  int x = stub_code_size_to_size(requested_code_size);
  int requested_size = round_to( x , CodeEntryAlignment);  // CodeEntryAlignment=32

  // 比较需要为新的InterpreterCodelet分配的内存和可用内存的大小情况
  if (requested_size <= available_space()) {
    if (is_contiguous()) { // 判断_queue_begin小于等于_queue_end时,函数返回true
      // Queue: |...|XXXXXXX|.............|
      //        ^0  ^begin  ^end          ^size = limit
      assert(_buffer_limit == _buffer_size, "buffer must be fully usable");
      if (_queue_end + requested_size <= _buffer_size) {
        // code fits in(适应) at the end => nothing to do
        CodeStrings  strings;
        stub_initialize(s, requested_size, strings);
        return s; // 如果够的话就直接返回
      } else {
        // stub doesn't fit in at the queue end
        // => reduce buffer limit & wrap around
        assert(!is_empty(), "just checkin'");
        _buffer_limit = _queue_end;
        _queue_end = 0;
      }
    }
  }

  // ...

  return NULL;
}
通过如上的函数,我们能够清楚看到如何从StubQueue中分配InterpreterCodelet内存的逻辑。
首先计算此次需要从StubQueue中分配的内存大小,调用的相关函数如下:
调用的stub_code_size_to_size()函数的实现如下:
// StubQueue类中定义的函数
int stub_code_size_to_size(int code_size) const {
  return _stub_interface->code_size_to_size(code_size);
}

// InterpreterCodeletInterface类中定义的函数
virtual int  code_size_to_size(int code_size) const {
    return InterpreterCodelet::code_size_to_size(code_size);
}

// InterpreterCodelet类中定义的函数
static  int code_size_to_size(int code_size) {
  // CodeEntryAlignment = 32
  // sizeof(InterpreterCodelet)  = 32
  return round_to(sizeof(InterpreterCodelet), CodeEntryAlignment) + code_size;
}
通过如上的分配内存大小的方式可知内存结构如下:
在StubQueue::request()函数中计算出需要从StubQueue中分配的内存大小后,下面进行内存分配。StubQueue::request()函数只给出了最一般的情况,也就是假设所有的InterpreterCodelet实例都是从StubQueue的_stub_buffer地址开始连续分配的。is_contiguous()函数用来判断区域是否连续,实现如下:
bool is_contiguous() const {
  return _queue_begin <= _queue_end;
}
调用的available_space()函数得到StubQueue可用区域的大小,实现如下:
// StubQueue类中定义的方法
int available_space() const {
 int d = _queue_begin - _queue_end - 1;
 return d < 0 ? d + _buffer_size : d;
}
调用如上函数后得到的大小为下图的黄色区域部分。
继续看StubQueue::request()函数,当能满足此次InterpreterCodelet实例要求的内存大小时,会调用stub_initialize()函数,此函数的实现如下:
// 下面都是通过stubInterface来操作Stub的
void  stub_initialize(Stub* s, int size,CodeStrings& strings)    {
  // 通过_stub_interface来操作Stub,会调用s的initialize()函数
  _stub_interface->initialize(s, size, strings);
}

// 定义在InterpreterCodeletInterface类中函数
virtual void  initialize(Stub* self, int size,CodeStrings& strings){
  cast(self)->initialize(size, strings);
}

// 定义在InterpreterCodelet类中的函数
void initialize(int size,CodeStrings& strings) {
  _size = size;
}
我们通过StubInterface类中定义的函数来操作Stub,至于为什么要通过StubInterface来操作Stub,就是因为Stub实例很多,所以为了避免在Stub中写虚函数(C++中对含有虚函数的类需要分配一个指针的空间指向虚函数表)浪费内存空间而采取的办法。
如上3个函数最终只完成了一件事儿,就是将此次分配到的内存大小记录在InterpreterCodelet的_size属性中。前面在介绍函数codelet_size()时提到过,这个值在存储了机器指令片段后通常还会空余很多空间,不过不要着急,下面要介绍的析构函数会根据InterpreterCodelet实例中实际生成的机器指令的大小更新这个属性值。
2、CodeletMark析构函数
析构函数的实现如下:
// 析构函数
~CodeletMark() {
   // 对齐InterpreterCodelet
   (*_masm)->align(wordSize);

   // 确保生成的所有机器指令片段都存储到了InterpreterCodelet实例中
   (*_masm)->flush();

   // 更新InterpreterCodelet实例的相关属性值
   AbstractInterpreter::code()->commit((*_masm)->code()->pure_insts_size(), (*_masm)->code()->strings());

   // 设置_masm,这样就无法通过这个值继续向此InterpreterCodelet实例中生成机器指令了
   *_masm = NULL;
}
调用AbstractInterpreter::code()函数获取StubQueue。调用(*_masm)->code()->pure_insts_size()获取的就是InterpreterCodelet实例的机器指令片段实际需要的内存大小。
StubQueue::commit()函数的实现如下:
void StubQueue::commit(int committed_code_size, CodeStrings& strings) {
  int x = stub_code_size_to_size(committed_code_size);
  int committed_size = round_to(x, CodeEntryAlignment);

  Stub* s = current_stub();
  assert(committed_size <= stub_size(s), "committed size must not exceed requested size");

  stub_initialize(s, committed_size, strings);
  _queue_end += committed_size;
  _number_of_stubs++;
}
调用stub_initialize()函数通过InterpreterCodelet实例的_size属性记录此实例中机器指令片段实际内存大小。同时更新StubQueue的_queue_end和_number_of_stubs属性的值,这样就可以为下次InterpreterCodelet实例继续分配内存了。
第13篇-通过InterpreterCodelet存储机器指令片段
在TemplateInterpreterGenerator::generate_all()函数中生成了许多字节码指令以及一些虚拟机辅助执行的机器指令片段,例如生成空指针异常抛出入口的实现如下:
{
    CodeletMark cm(_masm, "throw exception entrypoints");
    // ...
    Interpreter::_throw_NullPointerException_entry = generate_exception_handler("java/lang/NullPointerException",NULL);
    // ...
}
调用generate_exception_handler()函数生成抛出空指针的代码片段。
address generate_exception_handler(const char* name, const char* message) {
    return generate_exception_handler_common(name, message, false);
}
调用的generate_exception_handler_common()函数的实现如下:
address TemplateInterpreterGenerator::generate_exception_handler_common(
const char* name,
const char* message,
bool pass_oop
) {

  assert(!pass_oop || message == NULL, "either oop or message but not both");
  address entry = __ pc();
  if (pass_oop) {
    // object is at TOS
    __ pop(c_rarg2);
  }

  // expression stack must be empty before entering the VM if an
  // exception happened
  __ empty_expression_stack();

  // setup parameters
  __ lea(c_rarg1, ExternalAddress((address)name));

  if (pass_oop) {
    __ call_VM(rax,
               CAST_FROM_FN_PTR(address,InterpreterRuntime::create_klass_exception),
               c_rarg1,c_rarg2);
  } else {
    // kind of lame ExternalAddress can't take NULL because
    // external_word_Relocation will assert.
    if (message != NULL) {
      __ lea(c_rarg2, ExternalAddress((address)message));
    } else {
      __ movptr(c_rarg2, NULL_WORD);
    }
    __ call_VM(rax,
               CAST_FROM_FN_PTR(address, InterpreterRuntime::create_exception),
               c_rarg1, c_rarg2);
  }

  // throw exception
  __ jump(ExternalAddress(Interpreter::throw_exception_entry()));

  return entry;
}
生成的汇编代码如下:
0x00007fffe10101cb: mov    -0x40(%rbp),%rsp
0x00007fffe10101cf: movq   $0x0,-0x10(%rbp)
0x00007fffe10101d7: movabs $0x7ffff6e09878,%rsi
0x00007fffe10101e1: movabs $0x0,%rdx
0x00007fffe10101eb: callq  0x00007fffe10101f5
0x00007fffe10101f0: jmpq   0x00007fffe1010288
0x00007fffe10101f5: lea    0x8(%rsp),%rax
0x00007fffe10101fa: mov    %r13,-0x38(%rbp)
0x00007fffe10101fe: mov    %r15,%rdi
0x00007fffe1010201: mov    %rbp,0x200(%r15)
0x00007fffe1010208: mov    %rax,0x1f0(%r15)
0x00007fffe101020f: test   $0xf,%esp
0x00007fffe1010215: je     0x00007fffe101022d
0x00007fffe101021b: sub    $0x8,%rsp
0x00007fffe101021f: callq  0x00007ffff66b3fbc
0x00007fffe1010224: add    $0x8,%rsp
0x00007fffe1010228: jmpq   0x00007fffe1010232
0x00007fffe101022d: callq  0x00007ffff66b3fbc
0x00007fffe1010232: movabs $0x0,%r10
0x00007fffe101023c: mov    %r10,0x1f0(%r15)
0x00007fffe1010243: movabs $0x0,%r10
0x00007fffe101024d: mov    %r10,0x200(%r15)
0x00007fffe1010254: cmpq   $0x0,0x8(%r15)
0x00007fffe101025c: je     0x00007fffe1010267
0x00007fffe1010262: jmpq   0x00007fffe1000420
0x00007fffe1010267: mov    0x250(%r15),%rax
0x00007fffe101026e: movabs $0x0,%r10
0x00007fffe1010278: mov    %r10,0x250(%r15)
0x00007fffe101027f: mov    -0x38(%rbp),%r13
0x00007fffe1010283: mov    -0x30(%rbp),%r14
0x00007fffe1010287: retq
0x00007fffe1010288: jmpq   0x00007fffe100f3d3
在这里的重点不是读懂TemplateInterpreterGenerator::generate_exception_handler_common()函数的逻辑及生成的汇编代码,而是要清楚知道CodeletMark的应用,以及generate_exception_handler_common()函数生成的机器指令是如何写入InterpreterCodelet实例中的。之前介绍过InterpreterCodelet与CodeBuffer类,如下:
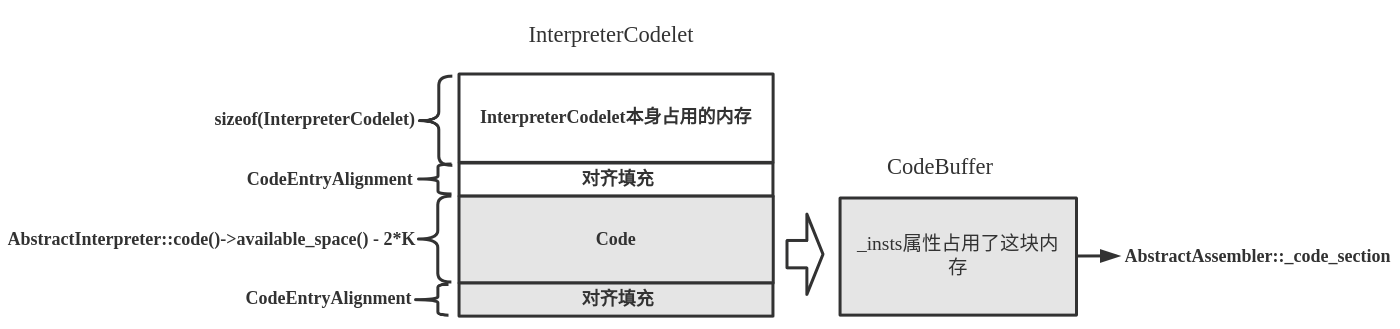
通过CodeBuffer操作InterpreterCodelet实例的存储机器指令片段的内存区域,而CodeBuffer中的代码部分(CodeSection)被赋值给AbstractAssembler::_code_section。这样我们就可以通过_code_section属性向InterpreterCodelet实例中写入机器指令了。
向CodeletMark中传入的_masm参数定义在AbstractInterpreterGenerator类中,如下:
class AbstractInterpreterGenerator: public StackObj {
   protected:
      InterpreterMacroAssembler* _masm;
      // ...
}
generate_exception_handler_common()函数中的__是一个宏,定义如下:
#define __ _masm->
这样其实就是调用InterpreterMacroAssembler类中的相关函数写机器指令,例如
__ pop(c_rarg2);
调用的pop()函数如下:
// 定义在InterpreterMacroAssembler中
void pop(Register r ) {
  ((MacroAssembler*)this)->pop(r);
}

// 定义在Assembler类中
void Assembler::pop(Register dst) {
  int encode = prefix_and_encode(dst->encoding());
  emit_int8(0x58 | encode);
}

// 定义在AbstractAssembler类中
void emit_int8(   int8_t  x) {
   code_section()->emit_int8(   x);
}
code_section()函数获取的就是AbstractAssembler的_code_section属性的值。
第14篇-生成重要的例程
之前介绍过TemplateInterpreter::initialize()函数,在这个函数中初始化了模板表和StubQueue实例,通过如下方式创建InterpreterGenerator实例:
InterpreterGenerator g(_code);
在创建InterpreterGenerator实例时会调用generate_all()函数,如下:
InterpreterGenerator::InterpreterGenerator(StubQueue* code)
  : TemplateInterpreterGenerator(code) {
   generate_all();
}
在generate_all()函数中生成各种例程(机器指令片段)并存储到Interpretercodelet实例中。在HotSpot VM中,不仅有字节码对应的例程,还有许多辅助虚拟机运行时的例程,如之前介绍的普通方法入口entry_point例程,处理异常的例程等等。这些例程都会存储到StubQueue中,如下图所示。
生成的一些重要例程如下表所示。

其中非本地方法的入口、本地方法的入口和字节码的入口比较重要,也是我们后面介绍的重点内容。 这一篇介绍非本地方法的入口和字节码的入口,对于本地方法的入口将在介绍本地方法时详细介绍,这里不过多介绍。
1、非本地方法入口
我们在之前介绍为非本地的普通方法创建Java栈帧的时候提到过,主要的非本地方法入口有如下几类:
enum MethodKind {
    zerolocals,  // 普通的方法
    zerolocals_synchronized,  // 普通的同步方法
    ...
}
在generate_all()函数中生成普通方法和普通的同步方法的入口逻辑如下:
{
 CodeletMark cm(_masm, "method entry point (kind = " "zerolocals" ")");
 Interpreter::_entry_table[Interpreter::zerolocals] = generate_method_entry(Interpreter::zerolocals);
}
{
 CodeletMark cm(_masm, "method entry point (kind = " "zerolocals_synchronized" ")");
 Interpreter::_entry_table[Interpreter::zerolocals_synchronized] = generate_method_entry(Interpreter::zerolocals_synchronized);
}
调用的generate_method_entry()函数在第6篇已经详细介绍过,最终会生成创建Java栈帧的例程,将例程的首地址存储到Interpreter::_entry_table数组中。
关于同步方法的栈帧建立及特殊逻辑的处理将在介绍锁相关知识时详细介绍,这里不在过多介绍。
除了普通的方法外,还为一些方法生成了一些特殊的入口地址,如为java.lang.Math.sin()、java.lang.Math.cos()等方法生成的例程。如果大家有兴趣可以自己研究一下,这里不在详细介绍。
2、字节码入口
在generate_all()函数中会调用set_entry_points_for_all_bytes()函数,此函数对所有被定义的字节码生成例程并通过对应的属性保存入口,这些入口指向了例程的首地址。set_entry_points_for_all_bytes()函数的实现如下:
void TemplateInterpreterGenerator::set_entry_points_for_all_bytes() {
  for (int i = 0; i < DispatchTable::length; i++) {
     Bytecodes::Code code = (Bytecodes::Code)i;
     if (Bytecodes::is_defined(code)) {
         set_entry_points(code);
     } else {
         set_unimplemented(i);
     }
  }
}
当code是Java虚拟机规范中定义的字节码指令时,调用set_entry_points()函数,此函数取出该字节码指令对应的Template模板并调用set_short_enrty_points()函数进行处理,将入口地址保存在转发表(DispatchTable)_normal_table或_wentry_table(使用wide指令)中。Template模板在之前已经介绍过,字节码指令都会对应一个Template模板,而模板中保存着字节码指令生成对应代码例程中需要的信息。
set_entry_points()函数的实现如下:
void TemplateInterpreterGenerator::set_entry_points(Bytecodes::Code code) {
  CodeletMark cm(_masm, Bytecodes::name(code), code);

  address bep = _illegal_bytecode_sequence;
  address cep = _illegal_bytecode_sequence;
  address sep = _illegal_bytecode_sequence;
  address aep = _illegal_bytecode_sequence;
  address iep = _illegal_bytecode_sequence;
  address lep = _illegal_bytecode_sequence;
  address fep = _illegal_bytecode_sequence;
  address dep = _illegal_bytecode_sequence;
  address vep = _unimplemented_bytecode;
  address wep = _unimplemented_bytecode;

  // 处理非wide指令,注意指的是那些不能在前面加wide指令的字节码指令
  if (Bytecodes::is_defined(code)) {
     Template* t = TemplateTable::template_for(code);
     set_short_entry_points(t, bep, cep, sep, aep, iep, lep, fep, dep, vep);
  }

  // 处理wide指令,注意指的是那些能在前面加wide指令的字节码指令
  if (Bytecodes::wide_is_defined(code)) {
     Template* t = TemplateTable::template_for_wide(code);
     set_wide_entry_point(t, wep);
  }

  // 当为非wide指令时,共有9个入口,当为wide指令时,只有一个入口
  EntryPoint  entry(bep, cep, sep, aep, iep, lep, fep, dep, vep);
  Interpreter::_normal_table.set_entry(code, entry);
  Interpreter::_wentry_point[code] = wep;
}
注意函数开始时声明时创建了一个变量cm,此时会调用CodeletMark构造函数在StubQueue中创建出存储机器片段的InterpreterCodelet实例,所以调用TemplateInterpreterGenerator::set_short_entry_points()等函数生成的机器指令都会写入到这个实例中。当函数执行完成后,CodeletMark析构函数会提交使用的内存并重置相关属性值。
接下来就是为表示栈顶缓存(Top-of-Stack Caching,缩写为TOSCA,简称Tos)状态的变量赋初始值,其中的_illegal_bytecode_sequence与_unimplemented_bytecode变量指向的也是特定例程的入口地址,这些例程就是在generate_all()函数中生成的,如果大家有兴趣,可以研究一下这些例程是怎么处理非法字节码等情况的。
调用set_short_entry_points()函数时,需要传入栈顶缓存状态,也就是上一个字节码执行时可能会将产生的结果存储到寄存器中。使用栈顶缓存主要还是为了提高解释执行的效率。HotSpot VM共定义了9种TosState,通过枚举常量来表示,如下:
enum TosState {      // describes the tos cache contents
  btos = 0,          // byte, bool tos cached
  ctos = 1,          // char tos cached
  stos = 2,          // short tos cached
  itos = 3,          // int tos cached
  ltos = 4,          // long tos cached
  ftos = 5,          // float tos cached
  dtos = 6,          // double tos cached
  atos = 7,          // object cached
  vtos = 8,          // tos not cached
  number_of_states,
  ilgl               // illegal state: should not occur
};
以非wide指令为例进行说明,bep(byte entry point)、cep、 sep、aep、iep、lep、fep、dep、vep分别表示指令执行前栈顶元素状态为byte/boolean、char、short、array/reference(对象引用)、int、long、float、double、void类型时的入口地址。举个例子,如iconst_0表示向栈中压入常量0,那么字节码指令模板中有如下定义:
def(Bytecodes::_iconst_0 , ____|____|____|____, vtos, itos, iconst,0);
第3个参数指明了tos_in,第4个参数为tos_out,tos_in与tos_out是指令执行前后的TosState。也就是说,执行此字节码指令之前不需要获取栈顶缓存的值,所以为void;执行完成后栈顶会缓存一个int类型的整数,也就是0。缓存通常会缓存到寄存器中,所以比起压入栈中,获取的效率要更高一些,如果下一个执行的字节码指令不需要,那么还需要将缓存的0值压入栈内。假设下一个执行的字节码也为iconst,那么要从iconst指令的iep(上一个缓存了int类型整数0)入口来执行,由于iconst的入口要求为vtos,所以需要将寄存器中的int类型数值0入栈。所以每个字节码指令都会有多个入口,这样任何一个字节码指令在执行完成后,都可以根据当前执行后的栈顶缓存状态找到下一个需要执行字节码的对应入口。
再回头看一下我们第8篇介绍的分发字节码相关内容,为各个字节码设置入口的函数DispatchTable::set_entry(),其中的_table的一维为栈顶缓存状态,二维为Opcode,通过这2个维度能够找到一段机器指令,这就是根据当前的栈顶缓存状态定位到的字节码需要执行的例程。我们看一下TemplateInterpreterGenerator::set_entry_points()函数,最后会调用DispatchTable::set_entry()函数为_table属性赋值。这样类型为DispatchTable的TemplateInterpreter::_normal_table与TemplateInterpreter::_wentry_point变量就可以完成字节码分发了。
调用TemplateTable::template_for()函数可以从TemplateTable::_template_table数组中获取对应的Template实例,然后调用set_short_entry_points()函数生成例程。非wild指令调用set_short_entry_points()函数,set_short_entry_points()函数的实现如下:
void TemplateInterpreterGenerator::set_short_entry_points(
Template* t,
address& bep, address& cep, address& sep, address& aep, address& iep,
address& lep, address& fep, address& dep, address& vep
) {
  switch (t->tos_in()) {
    case btos:
    case ctos:
    case stos:
      ShouldNotReachHere();
      break;
    case atos: vep = __ pc(); __ pop(atos); aep = __ pc(); generate_and_dispatch(t);   break;
    case itos: vep = __ pc(); __ pop(itos); iep = __ pc(); generate_and_dispatch(t);   break;
    case ltos: vep = __ pc(); __ pop(ltos); lep = __ pc(); generate_and_dispatch(t);   break;
    case ftos: vep = __ pc(); __ pop(ftos); fep = __ pc(); generate_and_dispatch(t);   break;
    case dtos: vep = __ pc(); __ pop(dtos); dep = __ pc(); generate_and_dispatch(t);   break;
    case vtos: set_vtos_entry_points(t, bep, cep, sep, aep, iep, lep, fep, dep, vep);  break;
    default  : ShouldNotReachHere();                                                   break;
  }
}
set_short_entry_points()函数会根据Template实例中保存的字节码模板信息生成最多9个栈顶入口并赋值给传入参数bep、cep等,也就是给Template代表的特定字节码指令生成相应的入口地址。
set_short_entry_points()函数根据操作数栈栈顶元素类型进行判断,首先byte、char和short类型都应被当做int类型进行处理,所以不会为字节码指令生成这几个类型的入口地址;如果当前字节码执行之前要求有栈顶元素并且类型是atos对象类型,那么当没有栈顶缓存时,从vep入口进入,然后弹出表达式栈中的对象到栈顶缓存寄存器后,就可以直接从aep进入,itos、ltos、ftos和dtos也都类似,会分别成为2个入口地址;如果不要求有栈顶元素,那么就是vtos,非void类型将调用generate_and_dispatch()函数生成各种入口。
set_vtos_entry_points()函数的实现如下:
void TemplateInterpreterGenerator::set_vtos_entry_points(
 Template* t,
 address& bep,
 address& cep,
 address& sep,
 address& aep,
 address& iep,
 address& lep,
 address& fep,
 address& dep,
 address& vep) {
  Label L;
  aep = __ pc();  __ push_ptr();  __ jmp(L);
  fep = __ pc();  __ push_f();    __ jmp(L);
  dep = __ pc();  __ push_d();    __ jmp(L);
  lep = __ pc();  __ push_l();    __ jmp(L);
  bep = cep = sep =
  iep = __ pc();  __ push_i();
  vep = __ pc();
  __ bind(L);
  generate_and_dispatch(t);
}
如果字节码不要求有栈顶缓存时(即vtos状态),会为当前字节码生成9个入口地址,由bep、cep等保存下来。如生成aep入口时,因为当前执行的字节码栈不需要顶缓存状态,所以要把值压入表达式栈中,然后跳转到L处执行,也就是相当于从vep入口进入执行了。
现在简单梳理一下,上一个字节码指令到底从哪个入口进入到下一个字节码指令要通过上一个字节码指令的执行结果而定。如果上一个字节码指令执行的结果为fep,而当前字节码指令执行之前的栈顶缓存状态要求是vtos,则从TemplateInterpreterGenerator::set_vtos_entry_points()函数中给fep赋值的地方开始执行。所以说,上一个字节码指令的执行结果和下一个将要执行的字节码指令执行之前要求的栈顶缓存状态共同决定了从哪个入口进入。
push_f()函数的实现如下:
源代码位置:/hotspot/src/cpu/x86/vm/interp_masm_x86_64.cpp
void InterpreterMacroAssembler::push_f(XMMRegister r) { // r的默认值为xmm0
    subptr(rsp, wordSize);       // wordSize为机器字长,64位下为8字节,所以值为8
    movflt(Address(rsp, 0), r);
}

void MacroAssembler::subptr(Register dst, int32_t imm32) {
  LP64_ONLY(subq(dst, imm32)) NOT_LP64(subl(dst, imm32));
}

void Assembler::subq(Register dst, int32_t imm32) {
   (void) prefixq_and_encode(dst->encoding());
   emit_arith(0x81, 0xE8, dst, imm32);
}

void Assembler::emit_arith(int op1, int op2, Register dst, int32_t imm32) {
  assert(isByte(op1) && isByte(op2), "wrong opcode");
  assert((op1 & 0x01) == 1, "should be 32bit operation");
  assert((op1 & 0x02) == 0, "sign-extension bit should not be set");
  if (is8bit(imm32)) {
    emit_int8(op1 | 0x02); // set sign bit
    emit_int8(op2 | encode(dst));
    emit_int8(imm32 & 0xFF);
  } else {
    emit_int8(op1);
    emit_int8(op2 | encode(dst));
    emit_int32(imm32);
  }
}
调用emit_arith()、emit_int8()等函数生成机器指令片段,生成的内容最后会存储到StubQueue的InterpreterCodelet实例中,关于机器指令和生成存储过程在之前已经介绍过,这里不做过多介绍。
set_vtos_entry_points()函数生成的机器指令片段经过反编译后,对应的汇编代码后如下:
// aep的入口
push   %rax
jmpq   L

// fep入口
sub    $0x8,%rsp
movss  %xmm0,(%rsp)
jmpq   L

// dep入口
sub    $0x10,%rsp
movsd  %xmm0,(%rsp)
jmpq   L

// lep入口
sub    $0x10,%rsp
mov    %rax,(%rsp)
jmpq   L

// iep入口
push   %rax

// ---- L ----
set_vtos_entry_points()函数最后调用generate_and_dispatch()函数写入当前字节码指令对应的机器指令片段和跳转到下一个字节码指令继续执行的逻辑处理部分。
generate_and_dispatch()函数的主要实现如下:
void TemplateInterpreterGenerator::generate_and_dispatch(Template* t, TosState tos_out) {
  // 生成当前字节码指令对应的机器指令片段
  t->generate(_masm);

  if (t->does_dispatch()) {
     // asserts
  } else {
     // 生成分发到下一个字节码指令的逻辑
     __ dispatch_epilog(tos_out, step);
  }
}
这里以iconst字节码为例分析generate()函数的实现:
void Template::generate(InterpreterMacroAssembler* masm) {
  // parameter passing
  TemplateTable::_desc = this;
  TemplateTable::_masm = masm;
  // code generation
  _gen(_arg);
  masm->flush();
}
generate()函数会调用生成器函数_gen(_arg),对于iconst指令来说,生成器函数为iconst()。generate()函数根据平台而不同,如x86_64平台下,定义如下:
源代码位置:/hotspot/src/cpu/x86/vm/templateTable_x86_64.cpp
void TemplateTable::iconst(int value) {
  if (value == 0) {
    __ xorl(rax, rax);
  } else {
    __ movl(rax, value);
  }
}
我们知道,iconst_i指令是将i压入栈,这里生成器函数iconst()在i为0时,没有直接将0写入rax,而是使用异或运算清零,即向代码缓冲区写入指令”xor %rax, %rax”;当i不为0时,写入指令”mov $0xi, %rax”
当不需要转发时,会在TemplateInterpreterGenerator::generate_and_dispatch()函数中调用dispatch_epilog()函数生成取下一条指令和分派的目标代码:
void InterpreterMacroAssembler::dispatch_epilog(TosState state, int step) {
   dispatch_next(state, step);
}
dispatch_next()函数的实现如下:
void InterpreterMacroAssembler::dispatch_next(TosState state, int step) {
  // load next bytecode (load before advancing r13 to prevent AGI)
  load_unsigned_byte(rbx, Address(r13, step));
  // advance r13
  increment(r13, step);
  dispatch_base(state, Interpreter::dispatch_table(state));
}
这个函数在之前已经介绍过,这里不再介绍。
第15章-解释器及解释器生成器
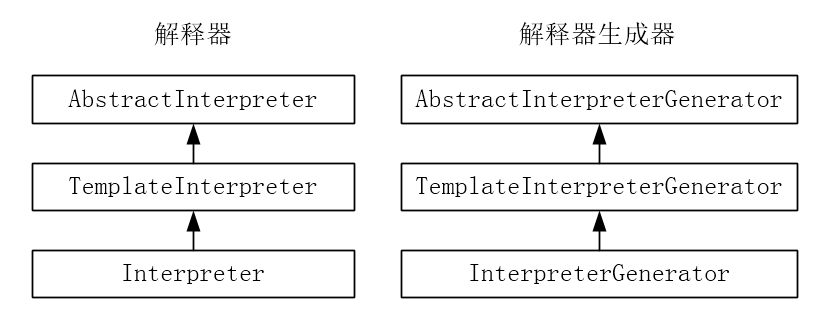
方法解释执行时需要解释器与解释器生成器的支持。解释器与解释器生成器的继承体系如下:
下面详细介绍解释器与解释器生成器。
1、解释器
解释器是一堆本地代码例程构造的,这些例程会在虚拟机启动的时候写入到StubQueue中,以后解释执行时就只需要进入指定例程即可。
解释器的继承体系如下:
AbstractInterpreter        /interpreter/abstractInterpreter.hpp
     CppInterpreter
     TemplateInterpreter   /interpreter/templateInterpreter.hpp
            Interpreter    /interpreter/templateInterpreter.hpp
Interpreter通过宏可以继承自CppInterpreter或者TemplateInterpreter,前者称为C++解释器,每个字节码指令都对应一段C++代码,通过switch的方式处理字节码,后者称为模板解释器,每个指令对应一段机器指令片段,通过指令模板的方式处理字节码,HotSpot VM默认使用模板解释器。
(1)抽象解释器AbstractInterpreter
所有的解释器都继承自抽象解释器,类及重要属性的定义如下:
class AbstractInterpreter{
   StubQueue* _code
   address    _entry_table[n];
   // ...
};
_code属性在之前已经介绍过,这是一个队列,队列中的InterpreterCodelet表示一个例程,比如iconst_1对应的代码,invokedynamic对应的代码,异常处理对应的代码,方法入口点对应的代码,这些代码都是一个个InterpreterCodelet。整个解释器都是由这些例程组成的,每个例程完成解释器的部分功能,以此实现整个解释器。
_entry_table数组会会保存方法入口点,例如普通方法的入口点为_entry_table[0]、同步的普通方法的入口点为_entry_table[1],这些_entry_table[0],_entry_table[1]指向的就是之前_code队列里面的例程。这些逻辑都在是generate_all()函数中完成的,如下:
void TemplateInterpreterGenerator::generate_all() {
  // ...

  method_entry(zerolocals)
  method_entry(zerolocals_synchronized)
  method_entry(empty)
  method_entry(accessor)
  method_entry(abstract)
  method_entry(java_lang_math_sin  )
  method_entry(java_lang_math_cos  )
  method_entry(java_lang_math_tan  )
  method_entry(java_lang_math_abs  )
  method_entry(java_lang_math_sqrt )
  method_entry(java_lang_math_log  )
  method_entry(java_lang_math_log10)
  method_entry(java_lang_math_exp  )
  method_entry(java_lang_math_pow  )
  method_entry(java_lang_ref_reference_get)

  // ...
}
method_entry宏的定义如下:
#define method_entry(kind)                                                                    \
{                                                                                             \
    CodeletMark cm(_masm, "method entry point (kind = " #kind ")");                           \
    Interpreter::_entry_table[Interpreter::kind] = generate_method_entry(Interpreter::kind);  \
}
可以看到,调用generate_method_entry()函数会返回例程对应的入口地址,然后保存到AbstractInterpreter类中定义的_entry_table数组中。调用generate_method_entry()函数传入的参数是枚举常量,表示一些特殊的方法和一些常见的方法类型。
(2)模板解释器TemplateInterpreter
模板解释器类的定义如下:
class TemplateInterpreter: public AbstractInterpreter {
  protected:
    // 数组越界异常例程
    static address    _throw_ArrayIndexOutOfBoundsException_entry;
    // 数组存储异常例程
    static address    _throw_ArrayStoreException_entry;
    // 算术异常例程
    static address    _throw_ArithmeticException_entry;
    // 类型转换异常例程
    static address    _throw_ClassCastException_entry;
    // 空指针异常例程
    static address    _throw_NullPointerException_entry;
    // 抛异常公共例程
    static address    _throw_exception_entry;

    // ...
}
抽象解释器定义了必要的例程,具体的解释器在这之上还有自己的特设的例程。模板解释器就是一个例子,它继承自抽象解释器,在那些例程之上还有自己的特设例程,例如上面定义的一些属性,保存了程序异常时的入口例程,其实还有许多为保存例程入口而定义的字段或数组,这里就不一一介绍了。
(3)解释器Interpreter
类的定义如下:
class Interpreter: public CC_INTERP_ONLY(CppInterpreter) NOT_CC_INTERP(TemplateInterpreter) {
  // ...
}
没有定义新的属性,只有几个函数。Interpreter默认通过宏扩展的方式继承TemplateInterpreter。
2、解释器生成器
要想得到可运行的解释器还需要解释器生成器。解释器生成器本来可以独自完成填充工作,可能为了解耦,也可能是为了结构清晰,HotSpot VM将字节码的例程抽了出来放到了TemplateTable模板表中,它辅助模板解释器生成器templateInterpreterGenerator生成各种例程。
解释器生成器的继承体系如下:
AbstractInterpreterGenerator        /interpreter/abstractInterpreter.hpp
     TemplateInterpreterGenerator   /interpreter/templateInterpreter.hpp
              InterpreterGenerator  /interpreter/interpreter.hpp
模板解释器生成器扩展了抽象解释器生成器。解释器生成器与解释器其实有某种意义上的对应关系,如抽象解释器生成器中定义了一些函数,调用这些函数会初始化抽象解释器中的属性,如保存例程的_entry_table数组等,在模板解释器生成器中定义的函数会初始化模板解释器中定义的一些属性,如_throw_ArrayIndexOutOfBoundsException_entry等。之前介绍过空指针的例程就是在这个TemplateInterpreterGenerator类的generate_all()函数中生成的。如下:
{
    CodeletMark cm(_masm, "throw exception entrypoints");
    // ...
    Interpreter::_throw_NullPointerException_entry = generate_exception_handler("java/lang/NullPointerException",NULL);
    // ...
}
关于解释器生成器不再过多介绍。
这里我们需要提醒的是,解释器和解释器生成器中定义的函数在实现过程中,有些和平台是无关的,所以会在/interpreter文件夹下的文件中实现。例如Interpreter和InterpreterGenerator类定义在/interpreter文件夹下,其中定义的函数会在/interpreter文件夹下的interpreter.cpp文件中实现,但是有些函数是针对特定平台,我们只讨论linux在x86架构下的64位实现,所以cpu/x86/vm文件夹下也有interpreter_x86.hpp和interpreter_x86_64.cpp等文件,只需要在定义Interpreter类时包含interpreter_x86.hpp文件即可。
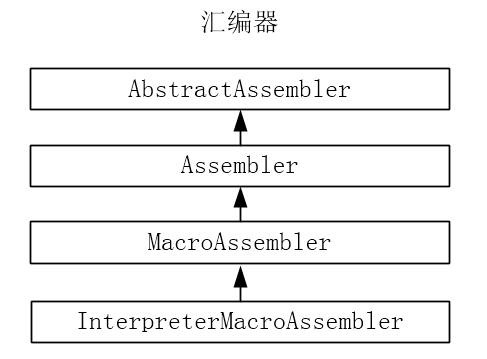
第16章-虚拟机中的汇编器
汇编器的继承体系如下:
为解析器提供的相关汇编接口,所以每个字节码指令都会关联一个生成器函数,而生成器函数会调用汇编器生成机器指令片段,例如为iload字节码指令生成例程时,调用的生成函数为TemplateTable::iload(int n),此函数的实现如下:
源代码位置:hotspot/src/cpu/x86/vm/templateTable_x86_64.cpp
void TemplateTable::iload() {
  transition(vtos, itos);
  ...
  // Get the local value into tos
  locals_index(rbx);
  __ movl(rax, iaddress(rbx)); // iaddress(rb)为源操作数,rax为目地操作数
}
函数调用了__ movl(rax,iaddress(rbx))函数生成对应的机器指令,所生成的机器指令为mov reg,operand,其中__为宏,定义如下:
源代码位置:hotspot/src/cpu/x86/vm/templateTable_x86_64.cpp
#define __ _masm->
_masm变量的定义如下:
源代码位置:hotspot/src/share/vm/interpreter/abstractInterpreter.hpp
class AbstractInterpreterGenerator: public StackObj {
 protected:
  InterpreterMacroAssembler* _masm;
  ...
}
最终_masm会被实例化为InterprterMacroAssembler类型。
在x86的64位平台上调用movl()函数的实现如下:
源代码位置:hotspot/src/cpu/x86/vm/assembler_86.cpp
void Assembler::movl(Register dst, Address src) {
  InstructionMark im(this);
  prefix(src, dst);
  emit_int8((unsigned char)0x8B);
  emit_operand(dst, src);
}
调用prefix()、emit_int8()等定义在汇编器中的函数时,这些函数会通过AbstractAssembler::_code_section属性向InterpreterCodelet实例中写入机器指令,这个内容在之前已经介绍过,这里不再介绍。
1、AbstractAssembler类
AbstractAssembler类中定义了生成汇编代码的抽象公共基础函数,如获取关联CodeBuffer的当前内存位置的pc()函数,将机器指令全部刷新到InterpreterCodelet实例中的flush()函数,绑定跳转标签的bind()函数等。AbstractAssembler类的定义如下:
源代码位置:hotspot/src/share/vm/asm/assembler.hpp
// The Abstract Assembler: Pure assembler doing NO optimizations on the
// instruction level; i.e., what you write is what you get.
// The Assembler is generating code into a CodeBuffer.
class AbstractAssembler : public ResourceObj  {
  friend class Label;

 protected:
  CodeSection* _code_section;      // section within the code buffer
  OopRecorder* _oop_recorder;      // support for relocInfo::oop_type

  ...

  void emit_int8(int8_t  x) {
    code_section()->emit_int8(x);
  }
  void emit_int16(int16_t x) {
    code_section()->emit_int16(x);
  }
  void emit_int32(int32_t x) {
    code_section()->emit_int32(x);
  }
  void emit_int64(int64_t x) {
    code_section()->emit_int64(x);
  }

  void emit_float(  jfloat  x) {
    code_section()->emit_float(x);
  }
  void emit_double( jdouble x) {
    code_section()->emit_double(x);
  }
  void emit_address(address x) {
    code_section()->emit_address(x);
  }
  ...
}
汇编器会生成机器指令序列,并且将生成的指令序列存储到缓存中,而_code_begin指向缓存区首地址,_code_pos指向缓存区的当前可写入的位置。
这个汇编器提供了写机器指令的基础函数,通过这些函数可方便地写入8位、16位、32位和64位等的数据或指令。这个汇编器中处理的业务不会依赖于特定平台。
2、Assembler类
assembler.hpp文件中除定义AbstractAssembler类外,还定义了jmp跳转指令用到的标签Lable类,调用bind()函数后就会将当前Lable实例绑定到指令流中一个特定的位置,比如jmp指令接收Lable参数,就会跳转到对应的位置处开始执行,可用于实现循环或者条件判断等控制流操作。
Assembler的定义跟CPU架构有关,通过assembler.hpp文件中的宏包含特定CPU下的Assembler实现,如下:
源代码位置:hotspot/src/share/vm/asm/assembler.hpp
#ifdef TARGET_ARCH_x86
# include "assembler_x86.hpp"
#endif
Assembler类添加了特定于CPU架构的指令实现和指令操作相关的枚举。 定义如下:
源代码位置:hotspot/src/cpu/x86/vm/assembler_x86.hpp
// The Intel x86/Amd64 Assembler: Pure assembler doing NO optimizations on the instruction
// level (e.g. mov rax, 0 is not translated into xor rax, rax!); i.e., what you write
// is what you get. The Assembler is generating code into a CodeBuffer.
class Assembler : public AbstractAssembler  {
   ...
}
提供的许多函数基本是对单个机器指令的实现,例如某个movl()函数的实现如下:
void Assembler::movl(Register dst, Address src) {
  InstructionMark im(this);
  prefix(src, dst);
  emit_int8((unsigned char)0x8B);
  emit_operand(dst, src);
}
subq()函数的实现如下:
void Assembler::subq(Register dst, int32_t imm32) {
  (void) prefixq_and_encode(dst->encoding());
  emit_arith(0x81, 0xE8, dst, imm32);
}
如上函数将会调用emit_arith()函数,如下:
void Assembler::emit_arith(int op1, int op2, Register dst, int32_t imm32) {
  assert(isByte(op1) && isByte(op2), "wrong opcode");
  assert((op1 & 0x01) == 1, "should be 32bit operation");
  assert((op1 & 0x02) == 0, "sign-extension bit should not be set");

  if (is8bit(imm32)) {
    emit_int8(op1 | 0x02); // set sign bit
    emit_int8(op2 | encode(dst));
    emit_int8(imm32 & 0xFF);
  } else {
    emit_int8(op1);
    emit_int8(op2 | encode(dst));
    emit_int32(imm32);
  }
}
调用emit_int8()或emit_int32()等函数写入机器指令。最后写入的指令如下:
83 EC 08
由于8可由8位有符号数表示,第一个字节为0x81 | 0x02,即0x83,rsp的寄存器号为4,第二个字节为0xE8 | 0x04,即0xEC,第三个字节为0x08 & 0xFF,即0x08,该指令即AT&T风格的sub $0x8,%rsp。
我在这里并不会详细解读汇编器中emit_arith()等函数的实现逻辑,这些函数如果在不理解机器指令编码的情况下很难理解其实现过程。后面我们根据Intel手册介绍了机器指令编码格式后会选几个典型的实现进行解读。
3、MacroAssembler类
MacroAssembler类继承自Assembler类,主要是添加了一些常用的汇编指令支持。类的定义如下:
源代码位置:hotspot/src/cpu/x86/vm/macroAssembler_x86.hpp
// MacroAssembler extends Assembler by frequently used macros.
//
// Instructions for which a 'better' code sequence exists depending
// on arguments should also go in here.

class MacroAssembler: public Assembler {
   ...
}
这个类中的函数通过调用MacroAssembler类或Assembler类中定义的一些函数来完成,可以看作是通过对机器指令的组合来完成一些便于业务代码操作的函数。
根据一些方法传递的参数可知,能够支持JVM内部数据类型级别的操作。
例如机器指令在做加法操作时,不允许两个操作数同时都是存储器操作数,或者一个来自内存,另外一个来自立即数,但是MacroAssembler汇编器中却提供了这样的函数。
4、InterpreterMacroAssembler类
在templateTable.hpp文件中已经根据平台判断要引入的文件了,如下:
#ifdef TARGET_ARCH_x86
# include "interp_masm_x86.hpp"
#endif
在interp_masm_x86.hpp文件中定义了InterpreterMacroAssembler类,如下:
源代码位置:hotspot/src/cpu/x86/vm/interp_masm_x86.hpp
// This file specializes the assember with interpreter-specific macros

class InterpreterMacroAssembler: public MacroAssembler {
...
#ifdef TARGET_ARCH_MODEL_x86_64
# include "interp_masm_x86_64.hpp"
#endif
...
}
对于64位平台来说,引入了interp_masm_x86_64.hpp文件。
在interp_masm_x86_64.cpp文件中定义了如下几个函数:
(1)InterpreterMacroAssembler::lock_object()
(2)InterpreterMacroAssembler::unlock_object()
(3)InterpreterMacroAssembler::remove_activation()
(4)InterpreterMacroAssembler::dispatch_next()
其中的dispatch_next()函数大家应该不陌生,这个函数在之前介绍过,是为分发字节码指令生成例程;lock_object()和unlock_object()是在解释执行的情况下,为加载和释放锁操作生成对应的例程,在后面介绍锁相关的知识时会详细介绍;remove_activation()函数表示移除对应的栈帧,例如在遇到异常时,如果当前的方法不能处理此异常,那就需要对栈进行破坏性展开,在展开过程中需要移除对应的栈帧。
公众号【深入剖析Java虚拟机HotSpot】已经更新虚拟机源代码剖析相关文章到60+,欢迎关注,如果有任何问题,可加作者微信mazhimazh,拉你入虚拟机群交流。
