Spring + SpringMVC + Mybatis整合流程
1 需求
1.1 客户列表查询
1.2 根据客户姓名模糊查询
2 整合思路
第一步:整合dao层
Mybatis和spring整合,通过spring管理mapper接口,使用mapper扫描器自动扫描mapper接口,并在spring中进行注册。
第二步:整合service层
通过spring管理service层,service调用mapper接口。使用配置方式将service接口配置在spring配置文件中,并且进行事务控制。
第三步:整合springMVC
由于springMVC是spring的模块,不需要整合。
3 准备环境
3.1 数据库版本
mysql5.7
3.2
编译器
eclipse
3.3 Jar 包
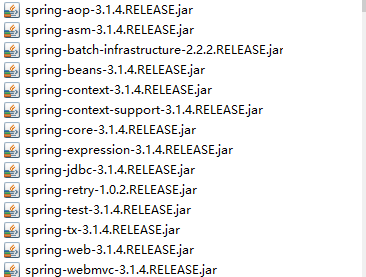
3.3.1 spring的jar包

3.3.2 spring与mybatis的整合jar包

3.3.3 mybatis的jar包

3.3.4 数据库驱动包

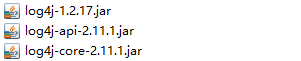
3.3.5 log4j包
3.3.6 log4j配置文件
### direct log messages to stdout ###
log4j.appender.stdout=org.apache.log4j.ConsoleAppender
log4j.appender.stdout.Target=System.err
log4j.appender.stdout.layout=org.apache.log4j.PatternLayout
log4j.appender.stdout.layout.ConversionPattern=%d{ABSOLUTE} %5p %c{1}:%L - %m%n

### direct messages to file mylog.log ###
log4j.appender.file=org.apache.log4j.FileAppender
log4j.appender.file.File=c:\mylog.log
log4j.appender.file.layout=org.apache.log4j.PatternLayout
log4j.appender.file.layout.ConversionPattern=%d{ABSOLUTE} %5p %c{1}:%L - %m%n


### set log levels - for more verbose logging change 'info' to 'debug' ###
log4j.rootLogger=debug, stdout
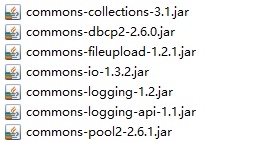
3.3.7 dbcp数据库连接池包
3.3.8 jstl包

4 整合dao
4.1 sqlMapconfig.xml
mybatis的配置文件:
<?xml version="1.0" encoding="UTF-8" ?>
<!DOCTYPE configuration
PUBLIC "-//mybatis.org//DTD Config 3.0//EN"
"http://mybatis.org/dtd/mybatis-3-config.dtd">
<configuration>
   <!-- 定义别名 -->
   <typeAliases>
      <package name="com.haohan.ssm.po" />
   </typeAliases>
   <!-- 配置mapper映射文件 -->
   <mappers>
      <!-- 加载 原始dao使用映射文件 -->
      <!-- <mapper resource="sqlmap/User.xml" /> --
      <!--批量mapper扫描 遵循规则:将mapper.xml和mapper.java文件放在一个目录 且文件名相同 ,现在由spring配置扫描-->
      <!-- <package name="cn.itcast.ssm.dao.mapper" /> -->
   </mappers>
</configuration>
4.2 db.properties数据库配置文件
jdbc.driver=com.mysql.jdbc.Driver
jdbc.url=jdbc:mysql://localhost:3306/haohan1?characterEncoding=utf8&useSSL=false
jdbc.username=root
jdbc.password=123456
4.3 applicationContext-dao.xml
spring在这个xml文件中配置dbcp连接池,sqlSessionFactory,mapper的批量扫描。
<?xml version="1.0" encoding="UTF-8"?>
<beans xmlns="http://www.springframework.org/schema/beans"
   xmlns:xsi="http://www.w3.org/2001/XMLSchema-instance"
  xmlns:context="http://www.springframework.org/schema/context"
  xmlns:aop="http://www.springframework.org/schema/aop"
   xmlns:tx="http://www.springframework.org/schema/tx"
  xsi:schemaLocation="http://www.springframework.org/schema/beans
   http://www.springframework.org/schema/beans/spring-beans.xsd
   http://www.springframework.org/schema/context
   http://www.springframework.org/schema/context/spring-context.xsd
   http://www.springframework.org/schema/aop
   http://www.springframework.org/schema/aop/spring-aop.xsd
   http://www.springframework.org/schema/tx
   http://www.springframework.org/schema/tx/spring-tx.xsd">
   <!--1. 数据源 -->
   <!-- 加载配置文件 -->
   <context:property-placeholder location="classpath:db.properties"/>
   <!-- 配置dbcp连接池 -->
      <bean id="dataSource" class="org.apache.commons.dbcp2.BasicDataSource"
      destroy-method="close">
      <property name="driverClassName" value="${jdbc.driver}"></property>
      <property name="url" value="${jdbc.url}"></property>
      <property name="username" value="${jdbc.name}"></property>
      <property name="password" value="${jdbc.password}"</property>
      </bean>
     <!--2. sqlSessionFactory -->
   <bean id="sqlSessionFactory" class="org.mybatis.spring.SqlSessionFactoryBean">
      <property name="configLocation" value="classpath:mybatis/sqlMapConfig.xml"></property>
      <property name="dataSource" ref="dataSource"></property>
   </bean>
   <!-- 3. mapper的批量扫描-->
   <!-- mapper的批量扫描 :从mapper包中扫描mapper接口,自动创建代理对象并且在spring容器中注册。
   遵循的规范:需要将mapper的接口类名和mapper.xml映射文件名保持一致,且在一个目录中。
   自动扫描出来的mapper的bean的id为mapper类名(首字母小写)
   -->
   <bean class="org.mybatis.spring.mapper.MapperScannerConfigurer">
      <!-- 指定扫描的包名
      如果扫描多个包,用半角逗号分开
      -->
      <property name="basePackage" value="cn.haohan.ssm.mapper"></property>
      <property name="sqlSessionFactoryBeanName" value="sqlSessionFactory"></property>
   </bean>
</beans>
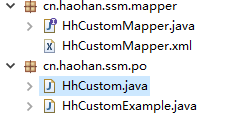
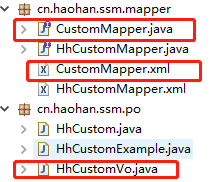
4.4 逆向工程生成po类和mapper接口和mapper.xml文件
参考:http://how2j.cn/k/mybatis/mybatis-generator/1376.html
生成如下图的文件:
4.5 自定义mapper接口和xml文件,以及po的包装类
4.5.1 CustomMapper.java
public interface CustomMapper {
   public List<HhCustom> findAllCustom(HhCustomVo hhCustomVo)throws Exception;
}
4.5.1 CustomMapper.xml
<?xml version="1.0" encoding="UTF-8"?>
<!DOCTYPE mapper
PUBLIC "-//mybatis.org//DTD Mapper 3.0//EN"
"http://mybatis.org/dtd/mybatis-3-mapper.dtd">
<!-- namespace:命名空间,作用是对sql进行分类化管理,sql隔离 -->
<mapper namespace="cn.haohan.ssm.mapper.CustomMapper">
   <sql id="query_custom_where">
       <if test="hhCustom!=null">
       <if test="hhCustom.name!=null and hhCustom.name!=''">
          name like '%${hhCustom.name}%'
       </if>
       </if>
   </sql>
   <resultMap type="hhCustom" id="hhCustomResultMap">
   <id column="id" property="id"/>
   <result column="phone_number" property="phoneNumber"/>
   </resultMap>
   <select id="findAllCustom" parameterType="cn.haohan.ssm.po.HhCustomVo" resultMap="hhCustomResultMap">
      SELECT
      * FROM hh_custom
       <where>
         <include refid="query_custom_where"></include>
      </where>
   </select>
</mapper>
4.5.2 HhCustomVo
//客户的包装类
public class HhCustomVo {
   //客户信息
   private HhCustom hhCustom;
   public HhCustom getHhCustom() {
      return hhCustom;
   }
   public void setHhCustom(HhCustom hhCustom) {

      this.hhCustom = hhCustom;
   }
}
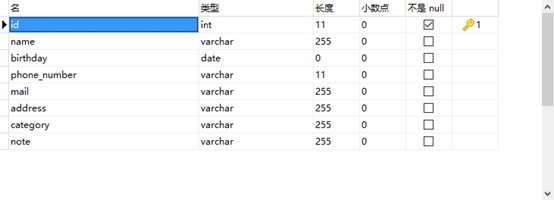
4.6 数据库表结构
5 整合service
5.1 定义service接口
public interface CustomService {
   public HhCustom findCustomById(Integer id)throws Exception;
   public List<HhCustom> findAllCustom(HhCustomVo hhCustomVo)throws Exception;
}
5.2 service接口实现
public class CustomServiceImpl implements CustomService{

   @Autowired
   HhCustomMapper hhCustomMapper;
   @Autowired
   CustomMapper customMapper;
   @Override
   public HhCustom findCustomById(Integer id) throws Exception {
      // TODO Auto-generated method stub
      return hhCustomMapper.selectByPrimaryKey(id);
   }
   @Override
   public List<HhCustom> findAllCustom(HhCustomVo hhCustomVo) throws Exception {
      // TODO Auto-generated method stub
      return customMapper.findAllCustom(hhCustomVo);
   }
}
5.3 在spring容器配置service(applicationContext-service)
<?xml version="1.0" encoding="UTF-8"?>
<beans xmlns="http://www.springframework.org/schema/beans"
   xmlns:xsi="http://www.w3.org/2001/XMLSchema-instance"
  xmlns:context="http://www.springframework.org/schema/context"
   xmlns:aop="http://www.springframework.org/schema/aop"
   xmlns:tx="http://www.springframework.org/schema/tx"
  xsi:schemaLocation="http://www.springframework.org/schema/beans
   http://www.springframework.org/schema/beans/spring-beans.xsd
   http://www.springframework.org/schema/context
   http://www.springframework.org/schema/context/spring-context.xsd
   http://www.springframework.org/schema/aop
   http://www.springframework.org/schema/aop/spring-aop.xsd
   http://www.springframework.org/schema/tx
   http://www.springframework.org/schema/tx/spring-tx.xsd">
   <bean id="CustomServiceImpl" class="cn.haohan.ssm.service.impl.CustomServiceImpl"></bean>
</beans>
5.4 事务控制(applicationContext-transaction)
<?xml version="1.0" encoding="UTF-8"?>
<beans xmlns="http://www.springframework.org/schema/beans"
   xmlns:xsi="http://www.w3.org/2001/XMLSchema-instance"
   xmlns:context="http://www.springframework.org/schema/context"
   xmlns:aop="http://www.springframework.org/schema/aop"
   xmlns:tx="http://www.springframework.org/schema/tx"
   xsi:schemaLocation="http://www.springframework.org/schema/beans
   http://www.springframework.org/schema/beans/spring-beans.xsd
   http://www.springframework.org/schema/context
   http://www.springframework.org/schema/context/spring-context.xsd
   http://www.springframework.org/schema/aop
   http://www.springframework.org/schema/aop/spring-aop.xsd
   http://www.springframework.org/schema/tx
   http://www.springframework.org/schema/tx/spring-tx.xsd">
   <!-- 配置事务管理器
   对mybatis操作数据库事务控制,spring使用jdbc事务控制类-->
   <bean id="transactionManager" class="org.springframework.jdbc.datasource.DataSourceTransactionManager">
      <!-- 配置数据源 -->
      <property name="dataSource" ref="dataSource"></property>
   </bean>
   <!-- 配置事务增强(通知) -->
      <tx:advice id="txadvice" transaction-manager="transactionManager">
      <tx:attributes>
          <!-- 设置进行事务操作的方法匹配规则 -->
          <tx:method name="save*" propagation="REQUIRED"/>
          <tx:method name="update*" propagation="REQUIRED"/>
          <tx:method name="insert*" propagation="REQUIRED"/>
          <tx:method name="delete*" propagation="REQUIRED"/>
          <tx:method name="find*" propagation="SUPPORTS"/>
          <tx:method name="get*" propagation="SUPPORTS"/>
          <tx:method name="select*" propagation="SUPPORTS"/>
      </tx:attributes>
      </tx:advice>
     <!-- aop操作 -->
     <aop:config>
       <aop:advisor advice-ref="txadvice" pointcut="execution(* cn.haohan.ssm.serivce.impl.*.*(..))"/>
     </aop:config>
</beans>
6 整合springMVC
6.1 springmvc.xml
在springmvc.xml中配置适配器映射器、适配器处理器、视图解析器
<?xml version="1.0" encoding="UTF-8"?>
<beans xmlns="http://www.springframework.org/schema/beans"
   xmlns:xsi="http://www.w3.org/2001/XMLSchema-instance"
xmlns:context="http://www.springframework.org/schema/context"
   xmlns:aop="http://www.springframework.org/schema/aop"
   xmlns:tx="http://www.springframework.org/schema/tx"
   xmlns:mvc="http://www.springframework.org/schema/mvc"
  xsi:schemaLocation="http://www.springframework.org/schema/beans
   http://www.springframework.org/schema/beans/spring-beans.xsd
   http://www.springframework.org/schema/context
   http://www.springframework.org/schema/context/spring-context.xsd
   http://www.springframework.org/schema/aop
   http://www.springframework.org/schema/aop/spring-aop.xsd
   http://www.springframework.org/schema/tx
   http://www.springframework.org/schema/tx/spring-tx.xsd
   http://www.springframework.org/schema/mvc
   http://www.springframework.org/schema/mvc/spring-mvc.xsd">
   <!-- 扫描加载handler -->
   <context:component-scan base-package="cn.haohan.ssm.controller"></context:component-scan>
 <!-- 注解映射器 -->
   <!--<bean class="org.springframework.web.servlet.mvc.method.annotation.RequestMappingHandlerMapping"></bean>
   注解适配器
   <bean class="org.springframework.web.servlet.mvc.method.annotation.RequestMappingHandlerAdapter"></bean> -->
   <!-- 使用mvc:annotation-driven可代替上面的注解映射器和注解适配器mvc:annotation-driven默认加载许多参数绑定,比如json转换解析器,实际开发用mvc:annotation-driven-->
   <mvc:annotation-driven>
   </mvc:annotation-driven>

   <!-- 视图解析器
   解析jsp,默认使用jstl标签,-->
   <bean class="org.springframework.web.servlet.view.InternalResourceViewResolver">
      <property name="prefix" value="/WEB-INF/jsp/"></property>
      <property name="suffix" value=".jsp"></property>
   </bean>
</beans>
6.2 配置前端控制器(web.xml)
<!-- 配置springmvc前端控制器 -->
 <servlet>
  <servlet-name>springmvc</servlet-name>
  <servlet-class>org.springframework.web.servlet.DispatcherServlet</servlet-class>
  <init-param>
  <!-- contextConfigLocation:加载springmvc的配置文件(配置处理器适配器、映射器、视图解析器
      默认加载的是/WEB-INF/servlet名称-servlet.xml( springmvc-servlet.xml)
  -->
      <param-name>contextConfigLocation</param-name>
      <param-value>classpath:spring/springmvc.xml</param-value>
  </init-param>
  </servlet>
  <servlet-mapping>
  <!--第一种:*.action ,访问以.action结尾的,由DispatcherServlet解析。
      第二种:/ ,所有访问的地址都由DispatcherServlet解析,对于静态文件需要配置不让DispatcherServlet解析。
     可以实现Restful风格。
     -->
  <servlet-name>springmvc</servlet-name>
  <url-pattern>*.action</url-pattern>
  </servlet-mapping>
6.3 编写controller
@Controller
public class CustomController {

   @Autowired
   CustomService customService;

 //模糊查询客户
   @RequestMapping("/findAllCustom")
   public ModelAndView findAllCustom(HhCustomVo hhCustomVo) throws Exception {
      List<HhCustom> customlist = customService.findAllCustom(hhCustomVo);
      ModelAndView modelAndView = new ModelAndView();
      modelAndView.addObject("customlist", customlist);
      modelAndView.setViewName("customlist");
      return modelAndView;
   }

   //根据客户id查询
      public ModelAndView findCustomByid(Integer id) throws Exception {
         HhCustom hhCustom = customService.findCustomById(id);
         ModelAndView modelAndView = new ModelAndView();
         modelAndView.addObject("hhCustom", hhCustom);
         modelAndView.setViewName("customlist");
         return modelAndView;
      }
}
6.4 编写jsp
<%@ page language="java" contentType="text/html; charset=UTF-8"
   pageEncoding="UTF-8"%>
<%@ taglib uri="http://java.sun.com/jsp/jstl/core" prefix="c"%>
<%@ taglib uri="http://java.sun.com/jsp/jstl/fmt" prefix="fmt"%>
<!DOCTYPE html PUBLIC "-//W3C//DTD HTML 4.01 Transitional//EN" "http://www.w3.org/TR/html4/loose.dtd">
<html>
<head>
<meta http-equiv="Content-Type" content="text/html; charset=UTF-8">
<title>客戶列表</title>
</head>
<body>
   <form name="customForm"
  action="${pageContext.request.contextPath}/findAllCustom.action"
      method="post">
      查询条件:
      <table width="100%" border=1>
         <tr>
            <td>客戶名称:<input name="hhCustom.name" />
            </td>
            <%-- <td>客戶类型: <select name="customType">
                   <c:forEach items="${customType}" var="customType">
                      <option value="${customType.key }">${customType.value}</option>
                   </c:forEach>
            </select>
            </td> --%>
            <td><button type="submit" value="查询" >查询</button></td>
         </tr>
      </table>
      客戶列表:
      <table width="100%" border=1>
         <tr>
            <th>选择</th>
            <th>客戶名称</th>
            <th>客戶邮箱</th>
            <th>客戶电话</th>
            <th>客户类型</th>
           <!-- <th>操作</th> -->
         </tr>
         <c:forEach items="${customlist}" var="custom">
            <tr>
                <td><input type="checkbox" name="custom_id" value="${custom.id}" /></td>
                <td>${custom.name }</td>
                <td>${custom.mail }</td>
                <td>${custom.phoneNumber }</td>
                <td>${custom.category }</td>
                <%--<td><fmt:formatDate value="${custom.birthday }" pattern="yyyy-MM-dd HH:mm:ss"/></td>
    <td><a href="${pageContext.request.contextPath }/items/editItems.action?id=${item.id }">修改</a></td> --%>
            </tr>
        </c:forEach>
      </table>
   </form>
</body>
</html>
7 加载spring容器(web.xml)
<!-- 加载spring容器 -->
  <context-param>
  <param-name>contextConfigLocation</param-name>
  <param-value>classpath:spring/applicationContext-*.xml</param-value>
  </context-param>
  <listener>
  <listener-class>org.springframework.web.context.ContextLoaderListener</listener-class>
  </listener>
8 Post方法中文乱码(web.xml)
<!-- post中文乱码 -->
  <filter>
        <filter-name>CharacterEncodingFilter</filter-name>
        <filter-class>org.springframework.web.filter.CharacterEncodingFilter</filter-class>
        <init-param>
            <param-name>encoding</param-name>
            <param-value>UTF-8</param-value>
        </init-param>
    </filter>
    <filter-mapping>
        <filter-name>CharacterEncodingFilter</filter-name>
        <url-pattern>/*</url-pattern>
</filter-mapping>
9 结果
9.1 客户查询列表

9.2 根据模糊
