写在前面的实验要求
- 找一个系统调用,系统调用号为学号最后2位相同的系统调用。【学号末尾是94,故采用194号系统调用 listxattr 】
- 通过汇编指令触发该系统调用
- 通过gdb跟踪该系统调用的内核处理过程
- 重点阅读分析系统调用入口的保存现场、恢复现场和系统调用返回,以及重点关注系统调用过程中内核堆栈状态的变化
一、系统调用概述
1、我们知道,宏观上 Linux 操作系统的体系架构分为⽤户态和内核态。
从用户态进入内核态的方式有
- 外部中断(硬件中断)
- 内部中断(异常):故障(fault)和陷阱(trap)
系统调⽤就是利⽤陷阱(trap)这种软件中断⽅式主动从⽤户态进⼊内核态的。
2、系统调⽤的意义是操作系统为⽤户态进程与硬件设备进⾏交互提供了⼀组接⼝。
系统调⽤的库函数就是我们使⽤的操作系统提供的 API(应⽤程序编程接⼝),API 只是函数定义。系统调⽤是通过特定的软件中断(陷阱 trap)向内核发出服务请求,int $0x80和syscall指令的执⾏就会触发⼀个系统调⽤。C库函数内部使⽤了系统调⽤的封装例程,其主要⽬的是发布系统调⽤,使程序员在写代码时不需要⽤汇编指令和寄存器传递参数来触发系统调⽤。⼀般每个系统调⽤对应⼀个系统调⽤的封装例程,函数库再⽤这些封装例程定义出给程序员调⽤的 API,这样把系统调⽤最终封装成⽅便程序员使⽤的C库函数。
二、环境准备
1、安装开发工具
1 sudo apt install build-essential
2 sudo apt install qemu
3 sudo apt install libncurses5-dev bison flex libssl-dev libelf-dev
4 sudo apt install axel
2、下载内核源码
1 axel -n 20 https://mirrors.edge.kernel.org/pub/linux/kernel/v5.x/linux-5.4.34.tar.xz
2 xz -d linux-5.4.34.tar.xz
3 tar -xvf linux-5.4.34.tar cd linux-5.4.34
3、配置内核选项
 1 make defconfig #Default configuration is based on 'x86_64_defconfig'
 2 make menuconfig
 3 //打开debug相关选项
 4 Kernel hacking --->
 5     Compile-time checks and compiler options --->
 6         [*] Compile the kernel with debug info
 7         [*] Provide GDB scripts for kernel debugging [*] Kernel debugging
 8 //关闭KASLR,否则会导致打断点失败
 9 Processor type and features ---->
10     [] Randomize the address of the kernel image (KASLR)
4、编译和运行内核
1 make -j$(nproc)
2 //测试一下内核能不能正常加载运行,因为没有文件系统最终会kernel panic
3 qemu-system-x86_64 -kernel arch/x86/boot/bzImage //此时应该无法正常运行
5、制作根文件系统
下载 busybox源代码解压
1 axel -n 20 https://busybox.net/downloads/busybox-1.31.1.tar.bz2
2 tar -jxvf busybox-1.31.1.tar.bz2
3 cd busybox-1.31.1
配置编译 并安装
1 make menuconfig
2 记得要编译成静态链接,不用动态链接库。
3 Settings --->
4     [*] Build static binary (no shared libs)
5 然后编译安装,默认会安装到源码目录下的 _install 目录中。
6 make -j$(nproc) && make install
6、制作内存根文件系统镜像
1 mkdir rootfs
2 cd rootfs
3 cp ../busybox-1.31.1/_install/* ./ -rf
4 mkdir dev proc sys home
5 sudo cp -a /dev/{null,console,tty,tty1,tty2,tty3,tty4} dev/
7、 准备init脚本文件放在根文件系统跟目录下(rootfs/init),添加如下内容到init文件。
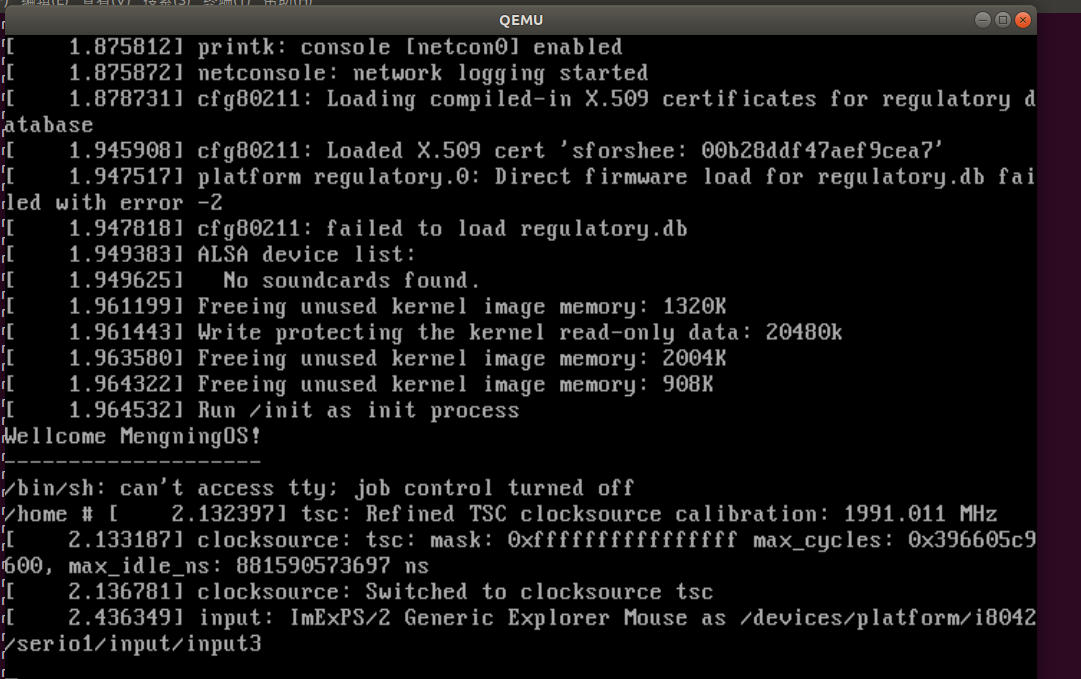
1 #!/bin/sh
2 mount -t proc none /proc mount -t sysfs none /sys
3 echo "Wellcome MengningOS!" echo "--------------------"
4 cd home
5 /bin/sh
1 chmod +x init
1 find . -print0 | cpio --null -ov --format=newc | gzip -9 > ../rootfs.cpio.gz
1 qemu-system-x86_64 -kernel linux-5.4.34/arch/x86/boot/bzImage -initrd rootfs.cpio.gz
三、查看系统调用并编写调用汇编代码
1、打开/linux-5.4.34/arch/x86/entry/syscalls/syscall_64.tbl,查看要选择进行实验的系统调用。

2、下面,我们先看一个 listxattr.c函数来熟悉一下这个系统调用的功能
ssize_t listxattr(const char *path, char *list, size_t size); 返回值是path路径下,扩展属性值的大小,包括�;
在rootfs/home目录下新建listxattr1.c文件;
1 #include <stdio.h> 2 #include <string.h> 3 #include <sys/xattr.h> 4 #include <sys/types.h> 5 6 //先在test目录下设置扩展属性 7 void testset(){ 8 char key[7] = {'u','s','e','r','.','#','�'}; 9 char value[2] = {'#','�'}; 10 int i, ret; 11 12 for(i = 0; i < 10; i++){ 13 key[5] = value[0] = '0'+i; 14 ret = setxattr("test", key, value, 2, 0); 15 } 16 } 17 18 //然后再列出相应路径下的扩展属性,并打印扩展属性值的大小 19 void testlist(){ 20 char buf[1000]; 21 int ret, i=0, j = 0; 22 printf("The key on test are: "); 23 ret = listxattr("test", buf, 1000); 24 while(i < ret){ 25 printf("%s ", buf+i); 26 i += strlen(buf+i); 27 i++; 28 } 29 printf("the size of key on test: "); 30 printf("%d ",ret); 31 } 32 33 int main(){ 34 testset(); 35 testlist(); 36 return 0; 37 }
1 gcc -o listxattr1 listxattr1.c -static
2 ./listxattr1
运行结果如下所示:

3、编写内嵌汇编代码,手动触发系统调用
1 #include <stdio.h> 2 #include <string.h> 3 #include <sys/xattr.h> 4 #include <sys/types.h> 5 6 void testset(){ 7 char key[7] = {'u','s','e','r','.','#','�'}; 8 char value[2] = {'#','�'}; 9 int i, ret; 10 11 for(i = 0; i < 10; i++){ 12 key[5] = value[0] = '0'+i; 13 ret = setxattr("test", key, value, 2, 0); 14 } 15 } 16 17 18 void testlist(){ 19 char buf[1000]; 20 char *path = "test"; 21 int size = 1000; 22 int ret, i=0, j = 0; 23 printf("The key on test are: "); 24 //ret = listxattr("test", buf, 1000); 25 26 asm volatile( 27 "movl %3, %%edx " //参数3 28 "movq %2, %%rsi " //参数2 29 "movq %1, %%rdi " //参数1 30 "movl $0xC2, %%eax " //传递系统调用号 31 "syscall " //系统调用 32 "movq %%rax,%0 " //结果存到%0 就是ret中 33 :"=m"(ret) //输出 34 :"a"(path),"b"(buf),"c"(1000) //输入 35 36 ); 37 38 while(i < ret){ 39 printf("%s ", buf+i); 40 i += strlen(buf+i); 41 i++; 42 } 43 printf("the size of key on test: "); 44 printf("%d ",ret); 45 } 46 47 int main(){ 48 testset(); 49 testlist(); 50 return 0; 51 }
执行过程和运行结果如下:

4、重新制作根文件系统
1 find . -print0 | cpio --null -ov --format=newc | gzip -9 > ../rootfs.cpio.gz
四、gdb调试与分析
1. 纯命令行下启动qemu
1 qemu-system-x86_64 -kernel linux-5.4.34/arch/x86/boot/bzImage -initrd rootfs.cpio.gz -S -s -nographic -append "console=ttyS0"
此时虚拟机一启动就会暂停

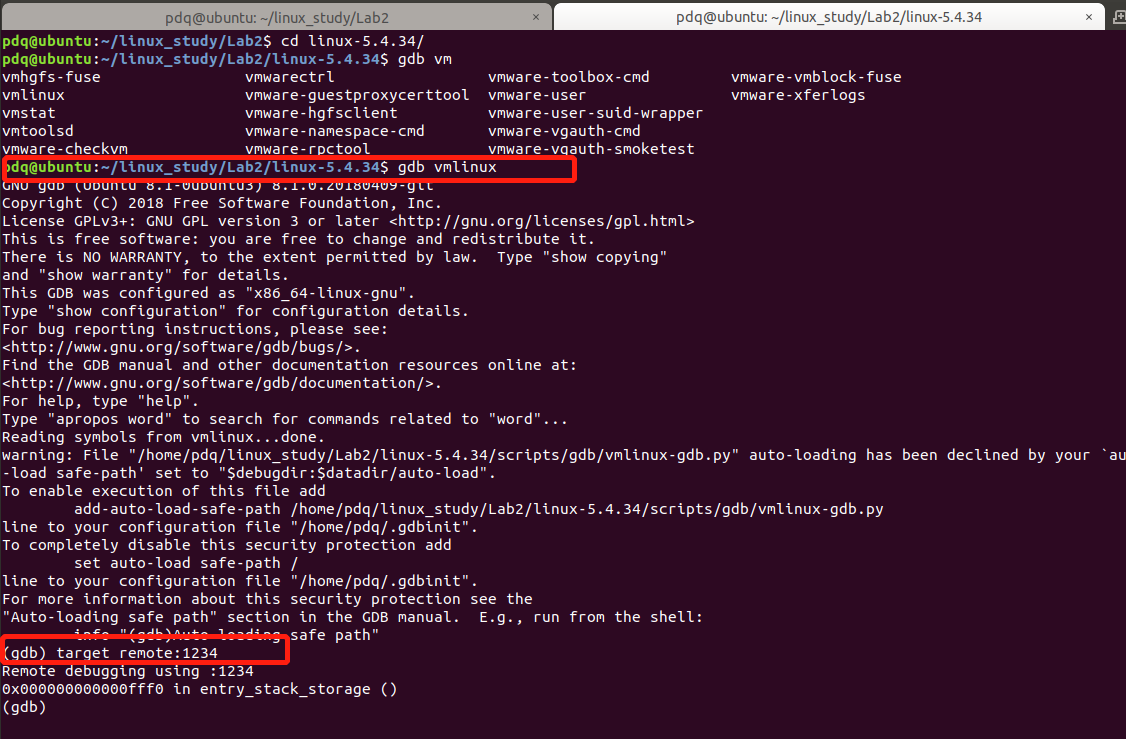
然后再打开一个终端窗口,在linux源码目录下启动gdb gdb vmlinux ,把内核符号表加载进来,建⽴连接 target remote:1234
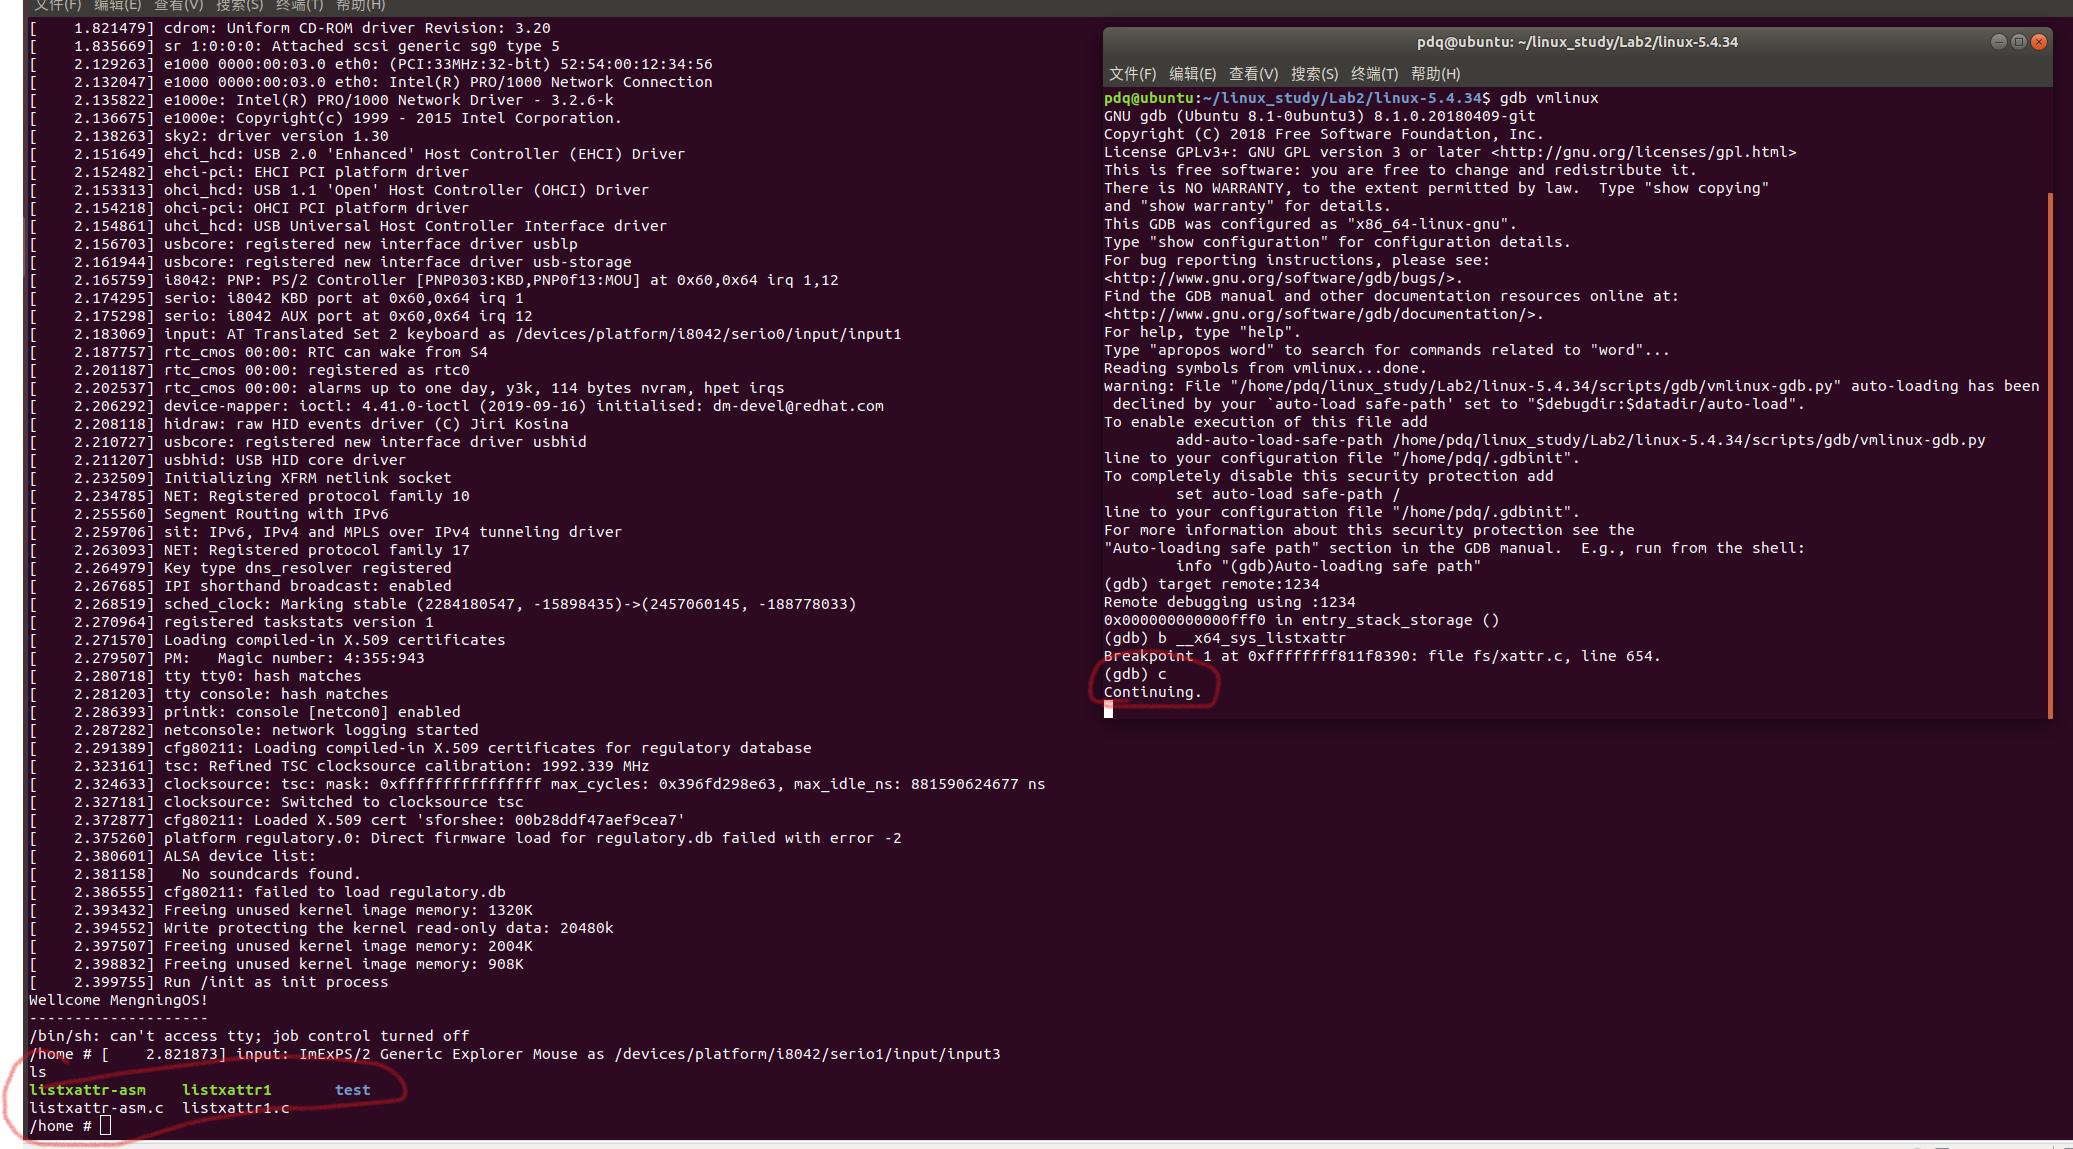
2、给相应的系统调用打上断点:

3、 gdb输入命令c,继续执行直到断点处,可以将两个终端分离,这样便于观察gdb输入命令后,程序的执行过程:
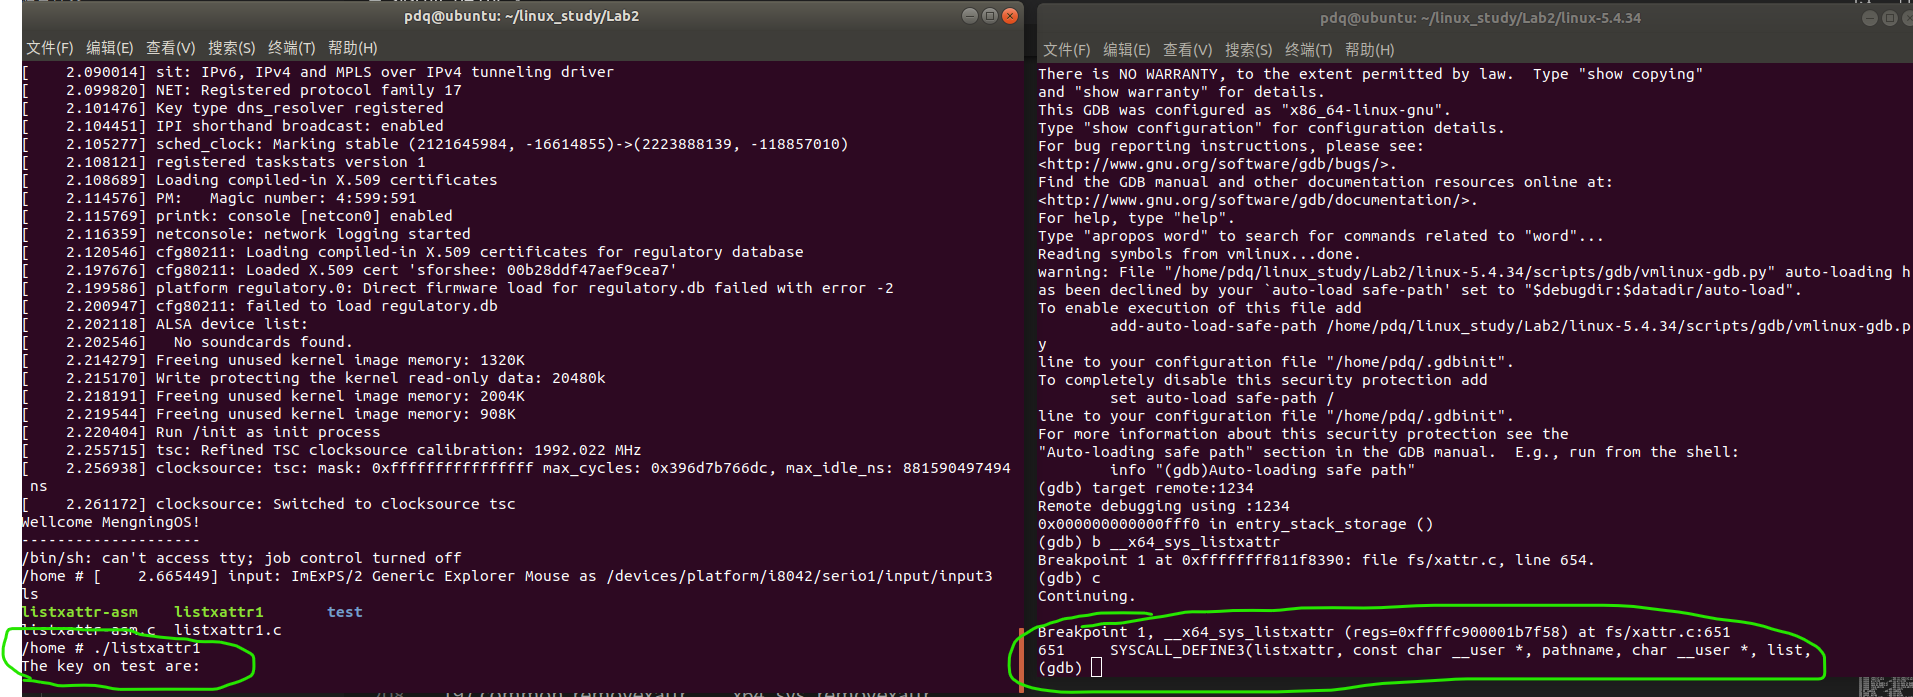
4、 执行 ./listxattr1
可以看到程序的执行卡住了,同时gdb窗口显示了断点信息
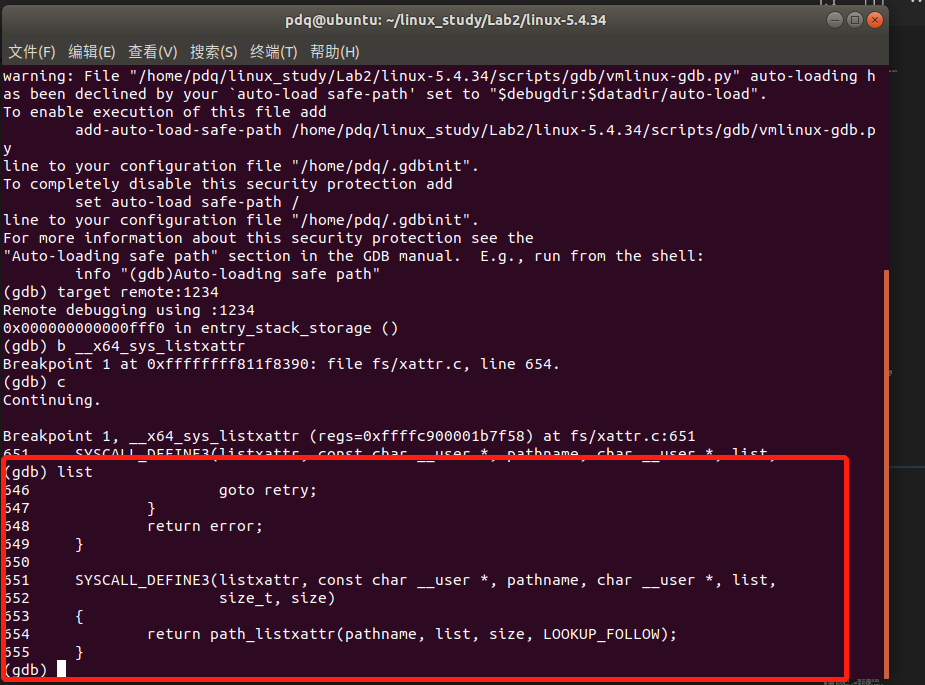
5、在gdb窗口中使用命令list列出listxattr的相关代码,
6、gdb单步调试过程如下所示:
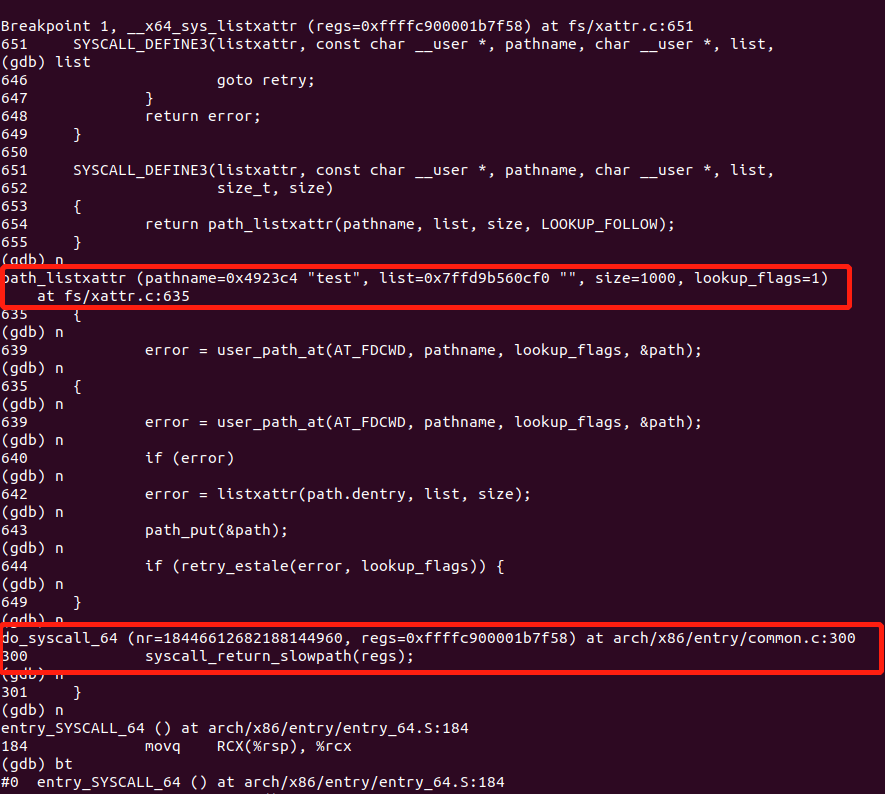

7、接下来根据gdb窗口提示信息对系统调用过程进行详细分析:
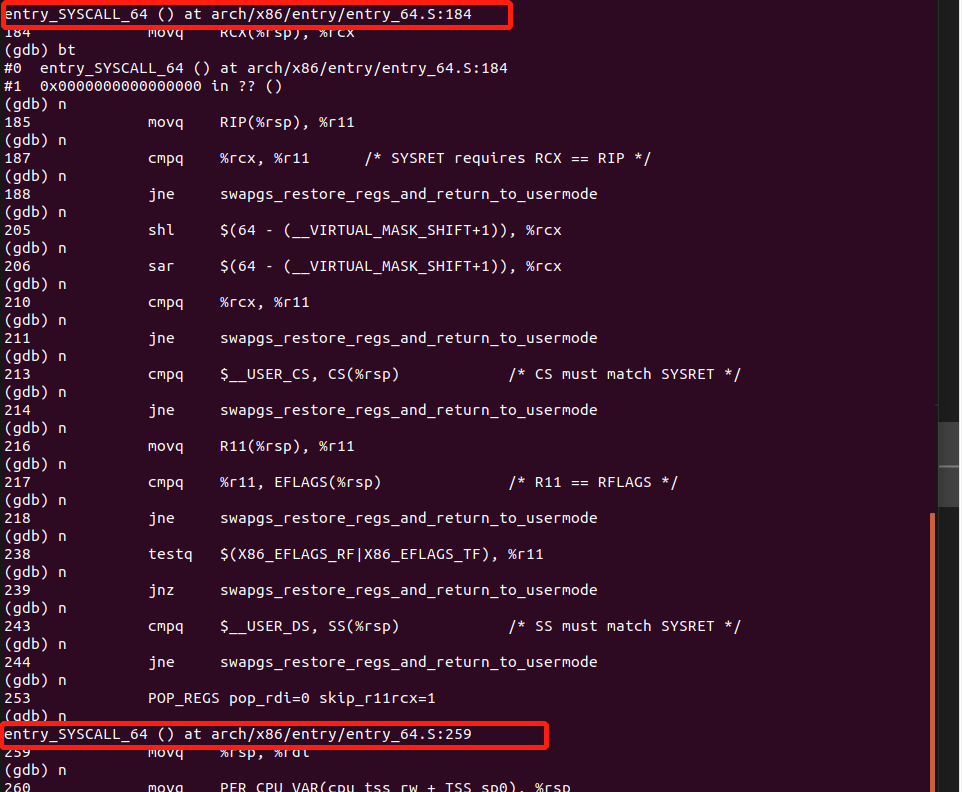
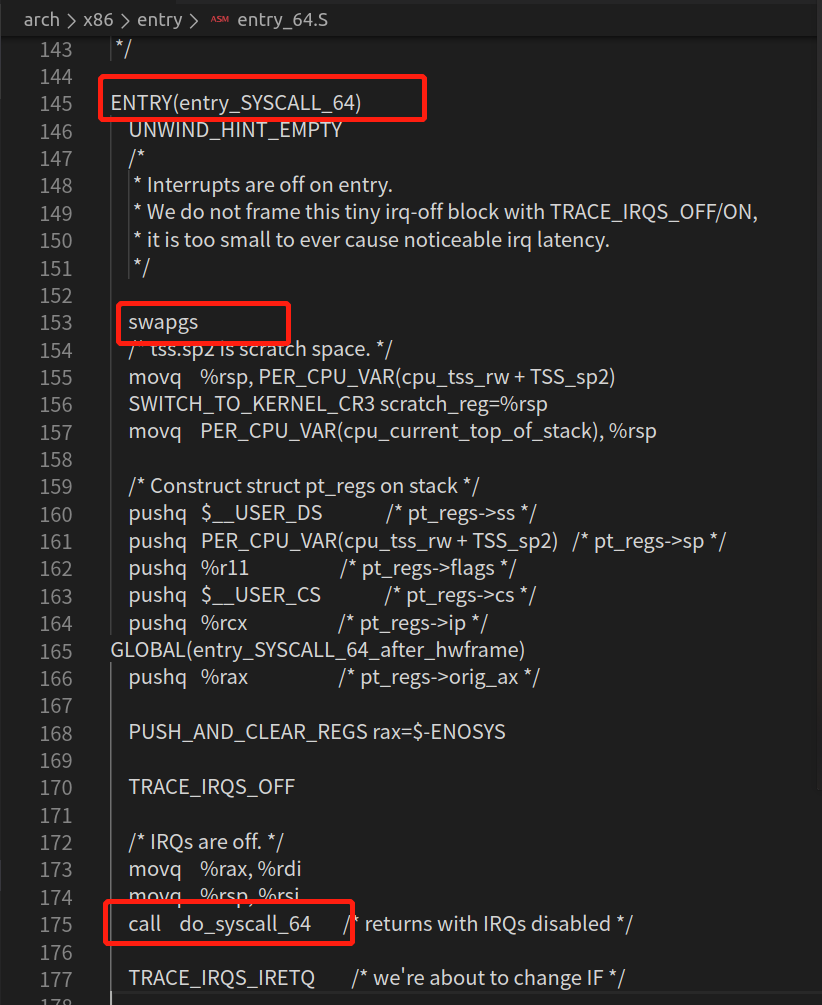
1)汇编指令syscall 触发系统调用,通过MSR寄存器找到了中断函数入口,使用bt查看汇编代码:

entry_SYSCALL_64这段汇编代码中调用了do_syscall_64这个函数,
2)跳转到 /linux-5.4.34/arch/x86/entry/common.c 目录下,执行 do_syscall_64 ,这个函数获得系统调用号,并保护现场
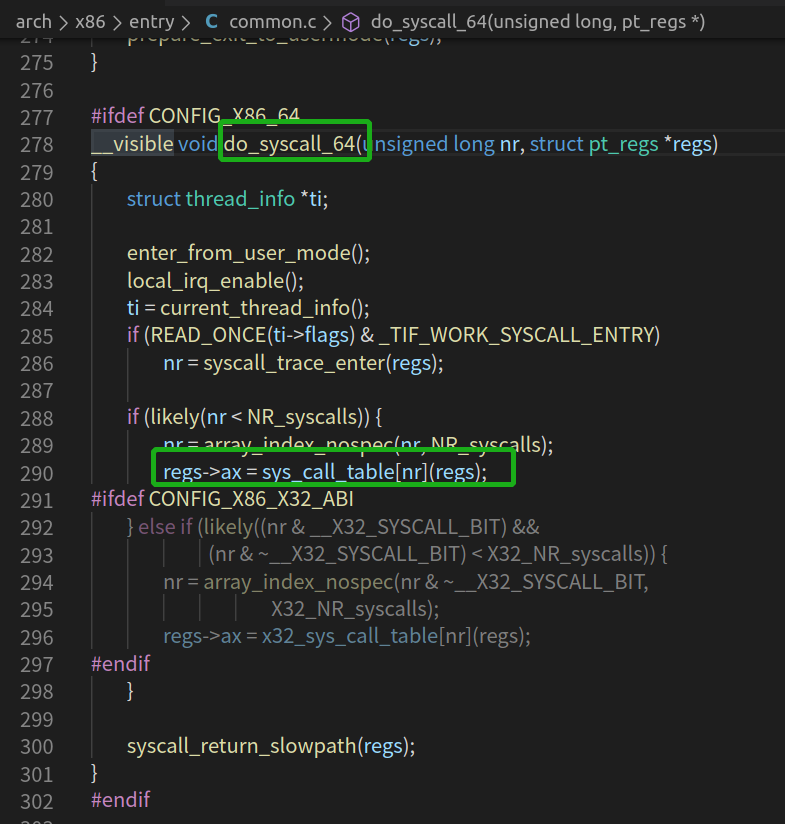
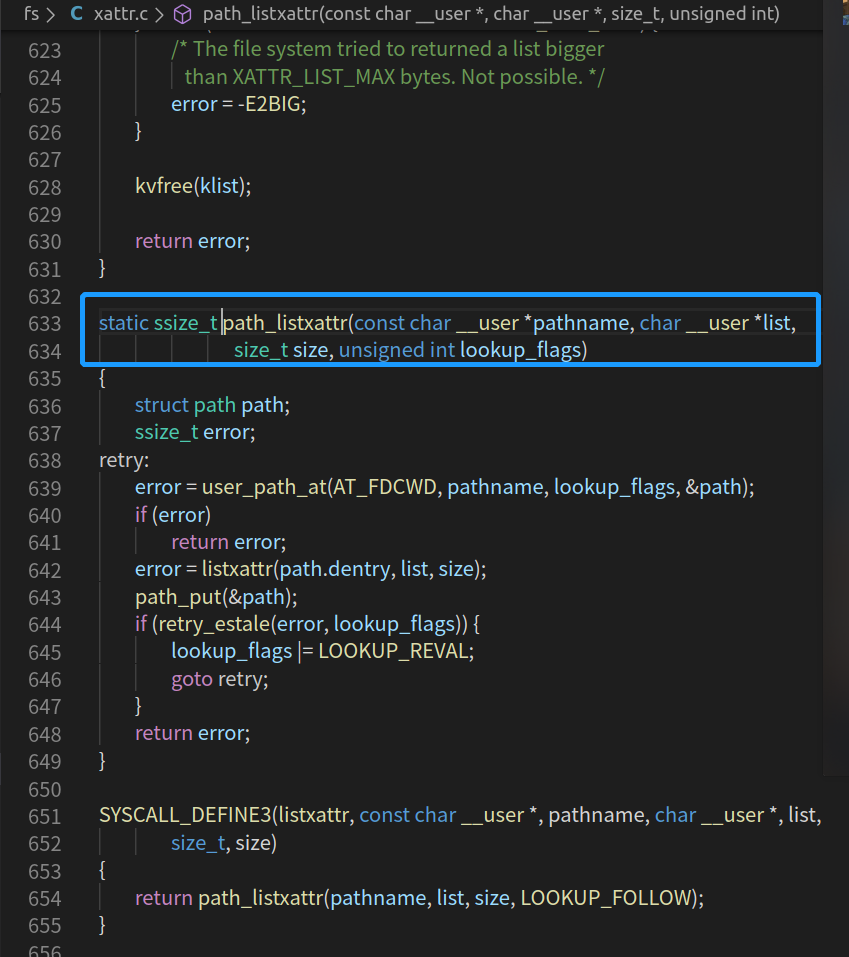
3) 通过系统调用号在系统调用表中找到相应的系统调用内核处理函数,例如此处在 fs/xattr.c 文件下查看 path_listxattr 函数;
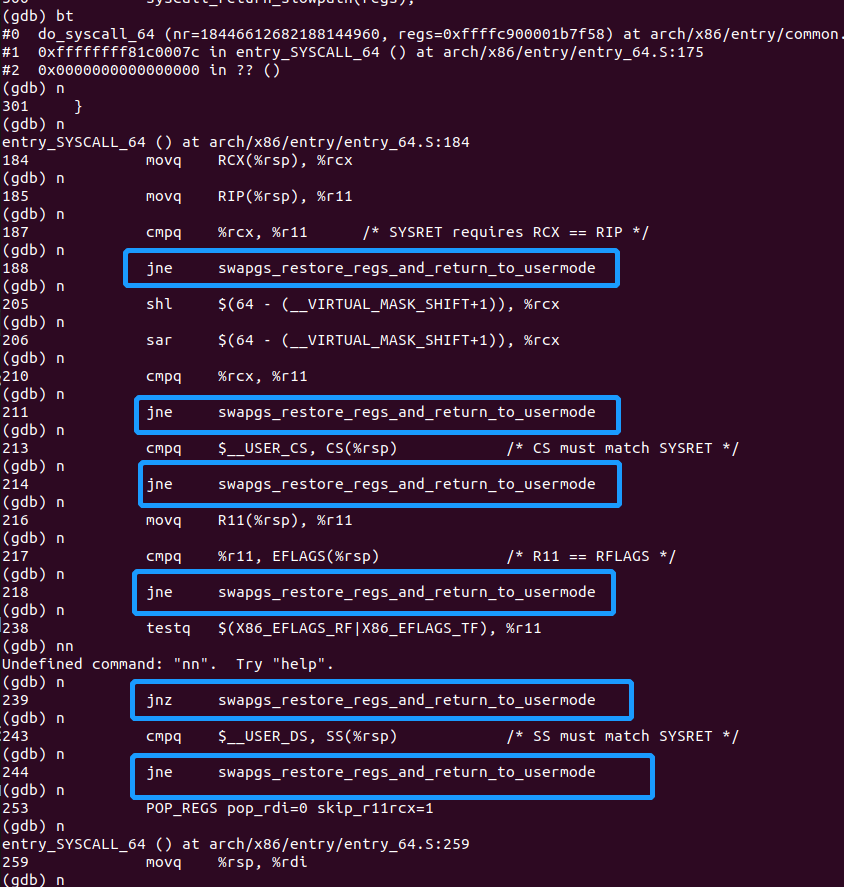
4)调用结束,开始恢复现场,程序执行 arch/x86/entry/common.c 里面的 syscall_return_slowpath(regs);
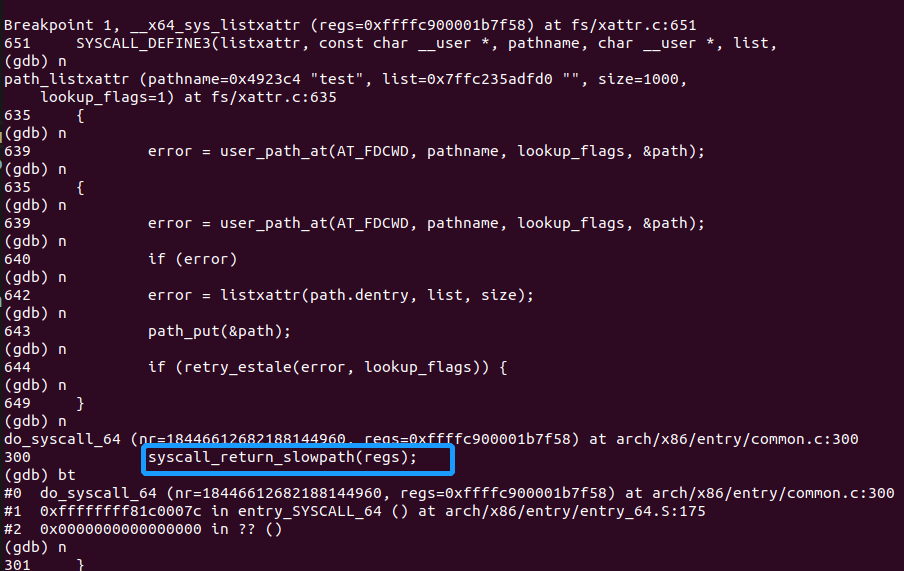
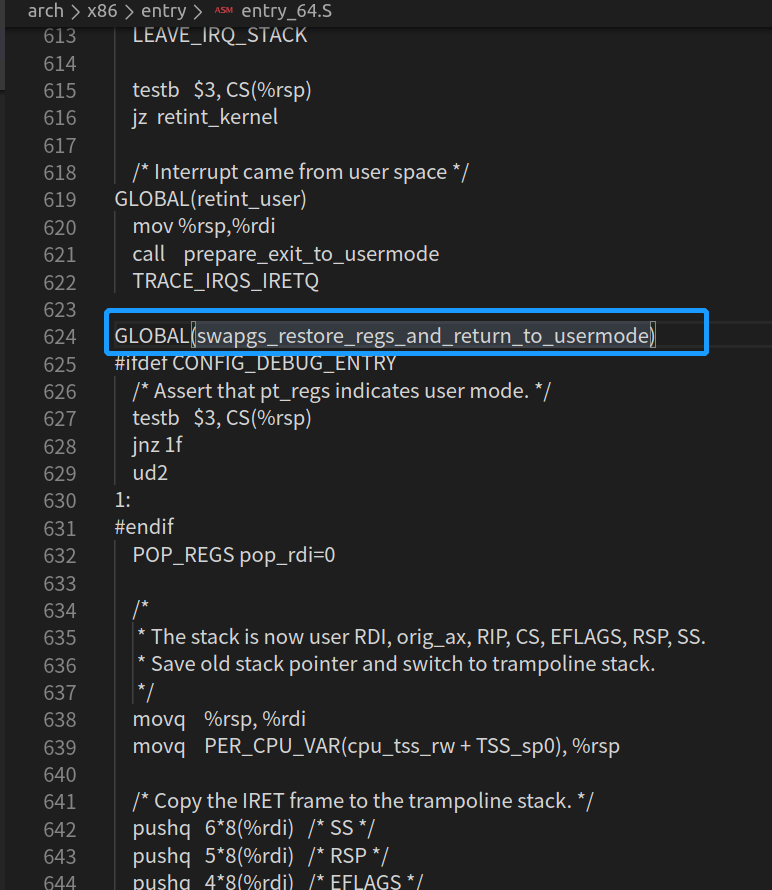
接着程序接着执行 arch/x86/entry/entry_64.S ,进行现场恢复,完成堆栈切换;