01-webpack介绍
官方文档:https://www.webpackjs.com/concepts/
本质上,webpack 是一个现代 JavaScript 应用程序的静态模块打包器(module bundler)。当 webpack 处理应用程序时,它会递归地构建一个依赖关系图(dependency graph),其中包含应用程序需要的每个模块,然后将所有这些模块打包成一个或多个 bundle。
# 全局下载webpack的3.12.0版本
npm install webpack@3.12.0 -g

# 查看版本
webpack -v
02-webpack的使用
# 把main.js 打包成 bundle.js
webpack ./main.js ./bundle.js


<!DOCTYPE html>
<html lang="en">
<head>
    <meta charset="UTF-8">
    <title></title>
</head>
<body>
    <div id="app"></div>
    <!-- bundle.js是通过webpack编译打包输出的js文件 -->
    <script type="text/javascript" src="./bundle.js"></script>

    <!-- webpack  ./main.js   ./bundle.js -->

    <!-- 这种语法浏览器不兼容 -->
    <!-- <script type="text/javascript">
        import Vue from './vue.js'
    </script>
    -->
</body>
</html>
// 声明入口的组件
var App = {
    template:`<div>我是入口组件</div>`
};

// 声明并导出
export var num = 2; //作为一整个对象的key抛出

// 声明在导出
var num2 = 4;
export {num2}

// 抛出一个函数
export function add(x,y) {
    return console.log(x+y);
}
// 先抛出
export default App;
// 整个程序的入口

// 引入第三方的库  es6Module模块导入方法
import Vue from './vue.js'

//再导入
// import App from './App.js'

// 对象的解构
// import {num,num2,add} from './App.js'


import * as  object from './App.js'
console.log(object);

// console.log(num);
// console.log(num2);
// add(3,5)

new Vue({
    el:"#app",
    data(){
        return {

        }
    },
    components:{
        App:object.default
    },
    template:`<App />`
});
// 引入第三方的库  es6Module模块导入方法
import Vue from './vue.js'
new Vue({
   el:"#app",
   data(){
      return {

      }
   },
   components:{
      App:object.default
   },
   template:`<App />`
});
# 进入当前的根目录下,执行
npm init --yes

# 下载webpack为项目开发依赖
npm install webpack@3.12.0 -D

# 创建webpack.config.js
module.exports = {
    // entry 入口
    // output 出口
    entry:{
        main: './main.js'
    },
    output:{
        filename: './bundle.js'
    },
    // 在开发环境下,每次更改代码,都会重新进行编译
    watch: true,
}

# 直接执行 webpack 就可以了
webpack

# 或者在 package.json里配置
"scripts": {
    "dev": "webpack"
  },

# 在终端执行,也可以获得结果
npm run dev
{
  "name": "code",
  "version": "1.0.0",
  "description": "",
  "main": "index.js",
  "scripts": {
    "test": "echo "Error: no test specified" && exit 1",
    "dev": "webpack"
  },
  "keywords": [],
  "author": "",
  "license": "ISC",
  "dependencies": {
    "axios": "^0.18.0",
    "vue": "^2.5.17"
  }
}
module.exports = {
    // entry 入口
    // output 出口
    entry:{
        main: './main.js'
    },
    output:{
        filename: './bundle.js'
    },
    // 在开发环境下,每次更改代码,都会重新进行编译
    watch: true,
}
2.1 模块
    在模块化编程中,开发者将程序分解成离散功能块(discrete chunks of functionality),并称之为模块。

    每个模块具有比完整程序更小的接触面,使得校验、调试、测试轻而易举。 精心编写的模块提供了可靠的抽象和封装界限,使得应用程序中每个模块都具有条理清楚的设计和明确的目的。

    Node.js 从最一开始就支持模块化编程。然而,在 web,模块化的支持正缓慢到来。在 web 存在多种支持 JavaScript 模块化的工具,这些工具各有优势和限制。webpack 基于从这些系统获得的经验教训,并将模块的概念应用于项目中的任何文件。
2.2 什么是webpack模块
webpack 模块能够以各种方式表达它们的依赖关系。
03-webpack的配置修改
//自带nodejs环境  cmd规范
// module.exports = {}
// var a = require('./webpack.config.js')


// 如果在项目中配置了webpack.config.js 那么在终端中直接输入webpack,默认识别webpack.config.js项目配置文件
module.exports = {
    // 入口
    entry:{
        "main":'./main.js'
    },
    // 出口
    output:{
        filename:'./bundle.js'
    },
    watch:true

}
// 上线环境下
module.exports = {
    // 入口
    entry:{
        "main":'./main.js'
    },
    output:{
        filename:'./bundle.js'
    }

};
开发环境:webpack.dev.config.js ,上线环境下:webpack.prod.config.js ,在 package.json 里配置:
{
  "name": "code",
  "version": "1.0.0",
  "description": "",
  "main": "index.js",
  "scripts": {
    "test": "echo "Error: no test specified" && exit 1",
    "dev": "webpack --config ./webpack.dev.config.js",
    "build": "webpack --config ./webpack.prod.config.js"
  },
  "keywords": [],
  "author": "",
  "license": "ISC",
  "dependencies": {
    "axios": "^0.18.0",
    "vue": "^2.5.17"
  }
}
04-css-loader介绍
// 导入css文件
import './main.css'

# 下载 css-loader和style-loader
npm install css-loader -D;npm install style-loader -D

# 配置loader,在webapck.config.js中
module.exports = {
    // 入口
    entry:{
        "main":'./main.js'
    },
    // 出口
    output:{
        filename:'./bundle.js'
    },
    watch:true,
    // 模块中的loader
    module: {
        loaders:[
            {
                test: /.css$/,
                // 先识别css-loader 再识别style-loader
                loader: 'style-loader!css-loader'
            }
        ]
    }
};
05-webpack插件-plugins
插件是 webpack 的支柱功能。webpack 自身也是构建于,你在 webpack 配置中用到的相同的插件系统之上!插件目的在于解决loader无法实现的其他事。
5.1 剖析
webpack 插件是一个具有apply属性的 JavaScript 对象。apply属性会被webpack compiler调用,并且 compiler 对象可在整个编译生命周期访问。
5.2 用法
由于插件可以携带参数/选项,你必须在 webpack 配置中,向 plugins 属性传入 new 实例。根据你的 webpack 用法,这里有多种方式使用插件。
# 安装插件 html-webpack-plugin
npm install html-webpack-plugin -D

# 配置webpack.prod.config.js
var HtmlWebpackPlugin = require('html-webpack-plugin');

// 插件
plugins:[
    new HtmlWebpackPlugin({
        template:'./index.html',//参照物
    })
]
// nodejs中内置模块path
var path = require('path');

var HtmlWebpackPlugin = require('html-webpack-plugin');
// html-webpack-plugin
// 如果在项目中配置了webpack.config.js 那么在终端中直接输入webpack,默认识别webpack.config.js项目配置文件
module.exports = {
    // 入口
    entry:{
        "main":'./src/main.js'
    },
    // 出口
    output:{
        //相对转绝对
        path:path.resolve('./dist'),
        filename:'./bundle.js'
    },
    // 模块中的loader  loader加载器 它能对css、json png jpg mp3 mp4 es6的js代码
    module:{
        loaders:[
            {
                test:/.css$/,
                loader:'style-loader!css-loader'
            }
        ]
    },
    // 插件
    plugins:[
        new HtmlWebpackPlugin({
            template:'./index.html',//参照物
        })
    ]
};
npm install -g http-server

# 上线测试命令
hs -o -p 9999
06-webpack-dev-server介绍
# 下载
npm install webpack-dev-server@2.9.0 -D

# 配置package.json
"scripts": {
  "dev": "webpack-dev-server  --open --hot --inline   --config  ./webpack.dev.config.js",
  "build": "webpack --config  ./webpack.prod.config.js"
}

# 执行完,代码更新时,会自动变化
npm run dev
{
  "name": "02-module_deep",
  "version": "1.0.0",
  "description": "",
  "main": "index.js",
  "scripts": {
    "dev": "webpack-dev-server  --open --hot --inline   --config  ./webpack.dev.config.js",
    "build": "webpack --config  ./webpack.prod.config.js"
  },
  "keywords": [],
  "author": "",
  "license": "ISC",
  "devDependencies": {
    "css-loader": "^1.0.0",
    "html-webpack-plugin": "^3.2.0",
    "style-loader": "^0.23.1",
    "webpack": "^3.12.0",
    "webpack-dev-server": "^2.9.0"
  },
  "dependencies": {
    "vue": "^2.5.17"
  }
}
07-vue-loader和单页面组件的介绍
# 下载
npm install vue-loader@14.1.1 -D  vue-template-compiler@2.5.27 -D
// nodejs中内容模块
var path = require('path');
var HtmlWebpackPlugin = require('html-webpack-plugin');
// html-webpack-plugin
// 如果在项目中配置了webpack.config.js 那么在终端中直接输入webpack,默认识别webpack.config.js项目配置文件
module.exports = {
    // 入口
    entry:{
        "main":'./src/main.js'
    },
    // 出口
    output:{
        path:path.resolve('./dist'),//相对转绝对
        filename:'./bundle.js'
    },
    // 模块中的loader  loader加载器 它能对css、json png jpg mp3 mp4 es6的js代码
    module:{
        loaders:[
            {
                test:/.css$/,
                loader:'style-loader!css-loader'
            },
            {
                test:/.vue$/,
                loader:'vue-loader'
            }
        ]
    },
    watch:true,
    // 插件
    plugins:[
        new HtmlWebpackPlugin({
            template:'./index.html',//参照物
        })
    ]
};
<!--  组件结构 html
      业务逻辑 js
      组件样式 css
 -->
 <template>
     <!-- 一定是闭合标签 -->
     <div class="app">

         <h3>{{msg}}</h3>
         <ul>
             <li>1</li>
             <li>2</li>
             <li>3</li>
             <li>4</li>
             <li>5</li>
         </ul>
         <Header />
     </div>

 </template>
 <script>
 import Header from './Header.vue'
     export default{
         data(){
             return {
                 msg:'学习单页组件'
             }
         },
         methods:{

         },
         computed:{

         },
        // 挂载
         components:{
             Header
         }
     }
 </script>
 <!-- scoped 它表示只对当前组件的样式起作用 -->
 <style scoped>
 /*全局的*/
 h3{
     color: yellow;
 }
 </style>
<template>
    <div>

        <h3>{{att}}</h3>
    </div>
</template>

<script>
export default {

  name: 'Header',

  data() {
    return {
        att:"alex"
    };
  },
};
</script>

<!-- scoped 它表示只对当前组件的样式起作用 -->
<style scoped>
h3{
    color: green;
}

</style>
 <!-- scoped 它表示只对当前组件的样式起作用 -->
 <style scoped>
 /*全局的*/
 h3{
     color: yellow;
 }
 </style>
08-前端脚手架 vue-cli
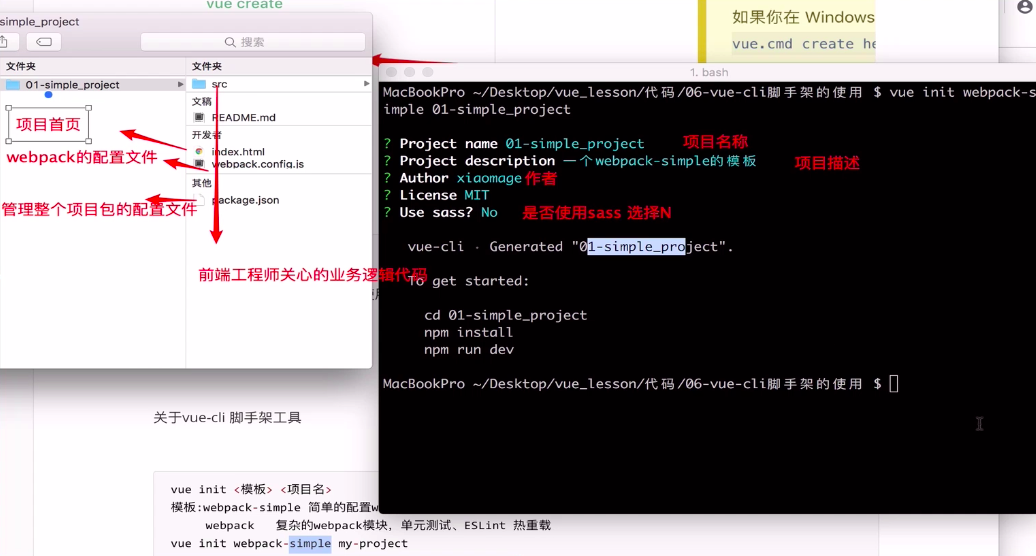
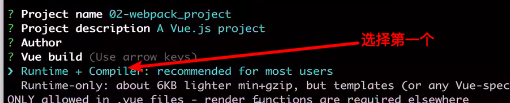
# 下载安装vue-cli
官网:https://cli.vuejs.org/zh/

# 下载,版本是3.x
npm install -g @vue/cli

# 检查版本
vue -V

# 下载旧版本2.x
npm install -g @vue/cli-init
# `vue init` 的运行效果将会跟 `vue-cli@2.x` 相同
vue init webpack my-project

Vue CLI 3 和旧版使用了相同的 vue 命令,所以 Vue CLI 2 (vue-cli) 被覆盖了。如果你仍然需要使用旧版本的 vue init 功能,你可以全局安装一个桥接工具。

# 此时电脑上既可以使用2.x和3.x版本的脚手架工具

# 关于vue-cli 2.x版本的脚手架工具-命令
vue init <模板> <项目名>

# 模板:
    webpack-simple  简单配置webpack模板
    webpack  复杂的webpack模块,单元测试、ESlint、热重载

# 1. 切换到指定的文件夹,执行,生成项目
vue init webpack-simple my-project

# Use sass ? No

# dependencies 当前项目依赖的模块,devDependcies 通过脚手架搭建之后必须要以来的包,开发环境依赖

# 2. 然后执行 npm install 安装所有依赖
npm install

# 3. 执行
npm run dev
09-项目各目录文件详解

vue的生态圈vue-awesome 参考链接:https://segmentfault.com/p/1210000008583242/read?from=timeline
// main.js是整个项目的入口启动文件

// 导入npm下载的模块
import Vue from 'vue'
// 导入自己编写的模块
// 不同在于 如果是npm下载的 from '名称'  自己编写的模块  from '路径引入'
import App from './App.vue'


// 1.引入全局的组件
import Header from './components/Common/Header.vue'
// 2.注册全局组件
Vue.component(Header.name,Header);


new Vue({
  el: '#app',
  // DOM直接渲染
  // appendChild()
  render: h => h(App)
});
<template>
  <!-- 组件的页面结构 -->
  <div id="app">
    <Header />
  <h3>{{msg}}</h3>
    <div v-html = 'title'></div>
    <ul>
      <!-- key绑定key的时候 如果数据中有id 就绑定id,没有id 绑定index -->
      <li v-for = '(item,index) in datas' :key = 'index'>
        {{ item }}
      </li>
    </ul>

    <Home  :text = 'text' @add = 'addHandler'/>

  </div>
</template>

<script>
//导入
import Home from './components/Home/Home.vue'

// 组件内部的业务逻辑
export default {
  name: 'app',
  data () {
    return {
      msg: '我们来学习vue-cli脚手架项目',
      title:"<h3>alex</h3>",
      datas:['抽烟','喝酒','烫头'],
      text:"我是父组件的内容"
    }
  },
  components:{
    Home
  },
  methods:{
    addHandler(data){
      console.log(data);
    }
  }
}
</script>

<style>
/*组件的样式*/
#app {
  font-family: 'Avenir', Helvetica, Arial, sans-serif;
  -webkit-font-smoothing: antialiased;
  -moz-osx-font-smoothing: grayscale;
  text-align: center;
  color: #2c3e50;
  margin-top: 60px;
}

h1, h2 {
  font-weight: normal;
}

ul {
  list-style-type: none;
  padding: 0;
}

li {
  display: inline-block;
  margin: 0 10px;
}

a {
  color: #42b983;
}
</style>

10-项目中使用vue的API
11-公共组件的创建和使用
// 1.引入全局的组件
import Header from './components/Common/Header.vue'
// 2.注册全局组件
Vue.component(Header.name,Header);
12-vue-cli的webpack模板项目
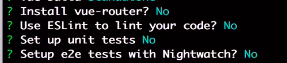
# 1. 创建webpack模板的项目
vue init webpack my-project-webpack

# 2. 执行
cd my-project-webpack

# 3. 运行
npm run dev 或者 npm run start
13-项目中集成插件vue-router
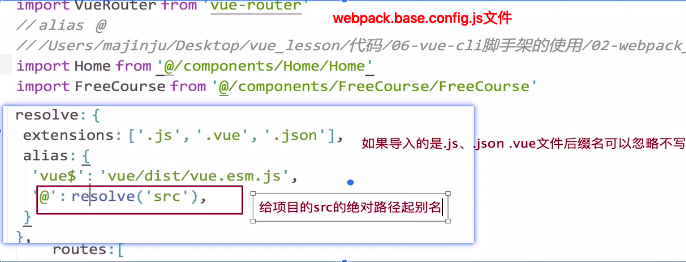
// 整个路由的配置文件

import Vue from 'vue'
import VueRouter from 'vue-router'
// alias   @
// /Users/majinju/Desktop/vue_lesson/代码/06-vue-cli脚手架的使用/02-webpack_project/src
import Home from '@/components/Home/Home'
import FreeCourse from '@/components/FreeCourse/FreeCourse'

// 让vue使用此插件
Vue.use(VueRouter);
// 相当于
// Vue.protoype.$router = VueRouter

var router = new VueRouter({
    routes:[
        {
            path:'/',
            name:'Home',
            component:Home
        },
        {
            path:'/free',
            name:'FreeCourse',
            component:FreeCourse
        }

    ]
});
export default router;
// The Vue build version to load with the `import` command
// (runtime-only or standalone) has been set in webpack.base.conf with an alias.
import Vue from 'vue'
import App from './App'
import router from './router/index.js'


Vue.config.productionTip = true;

/* eslint-disable no-new */
new Vue({
  el: '#app',
  router,
  components: { App },
  template: '<App/>'
});
<template>
  <div id="app">

    <router-link to = '/'>首页</router-link>
    <router-link to = '/free'>免费课程</router-link>

    <router-view />
  </div>
</template>

<script>


export default {
  name: 'App'
}
</script>

<style>
#app {
  font-family: 'Avenir', Helvetica, Arial, sans-serif;
  -webkit-font-smoothing: antialiased;
  -moz-osx-font-smoothing: grayscale;
  text-align: center;
  color: #2c3e50;
  margin-top: 60px;
}
</style>
# 下载 vue-router
npm install vue-router -S

npm run dev

# 1. 先在main.js 导入vue-router
index.js ---> import VueRouter from 'vue-router'
main.js   ---> import router from './router/index.js'

# 2.