1. 使用git下载GitHub项目中指定分支代码
一般来讲
git clone -b <branch> <remote_repo>
以下面的内容为例
git clone -b release https://github.com/OpenImageIO/oiio.git
此处的 -b 表示要从branch上git clone,release 表示具体的分支名称,https://github.com/OpenImageIO/oiio.git 是code所在源码的git仓库地址,是所有该项目中分支共用的地址(不存在某个branch仓库地址的说法)。
根据说明:
The release branch is very stable and promises to never break back-compatibility with APIs or linkage within that release. The master branch is where new development happens; it tends to be very solid code but its APIs may change at any time.
我找到自己想下载的代码该代码位于 <>Code 下面的 Branch: release 中,如下图所示,前面有 √ 标志的即是当前选择的分支。
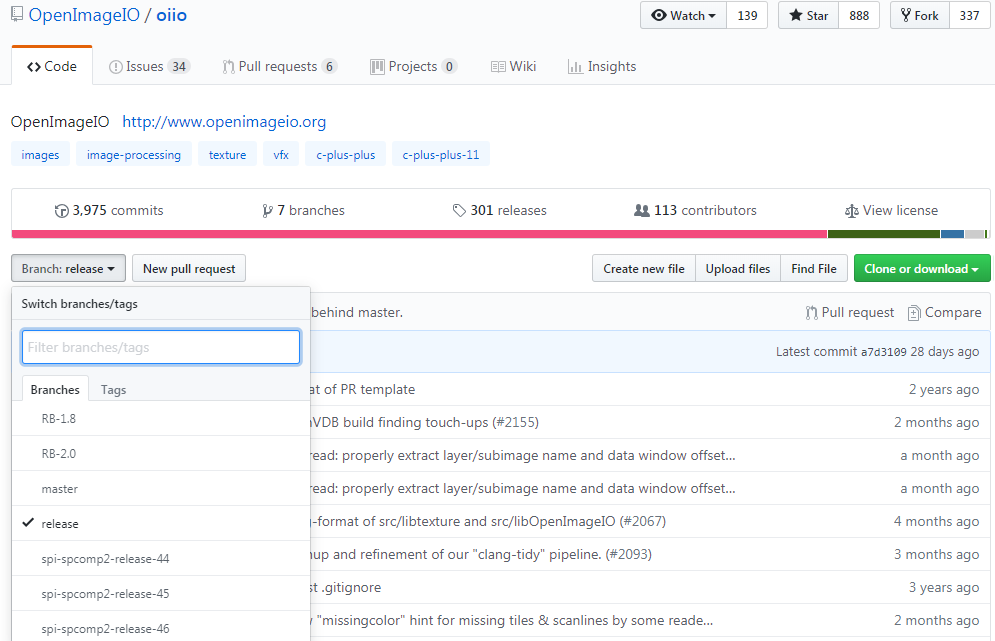
然后复制git仓库地址,如下图所示。

最后在终端输入 git clone -b release https://github.com/OpenImageIO/oiio.git 回车即可得到所需分支。
(:1 其实下载的时候还是会把整个项目文件给下载下来,只是下载结束后位于你所指定的分支上……话说这好像不是我们想要的那种只下载单个分支代码的结果,要怎么做才对呢
2. 使用git将下载的源码保存成指定文件名
git clone https://github.com/YoYo000/MVSNet.git mvsnet
在 git 远程仓库的后面直接添加保存到本地之后的文件名即可。比如上面我将 MVSNet 源码保存成 mvsnet 源码,下载之后查看效果,就相当于 git clone https://github.com/YoYo000/MVSNet.git ,然后再 mv MVSNet mvsnet 。
3. 本地初始化项目并推送到远程仓库
1 echo "# hello" >> README.md
2 git init
3 git add README.md
4 git commit -m "first commit"
5 git remote add origin https://github.com/username/reponame.git
6 git push -u origin master
其中,对于每一条命令解释如下:
3.1 新建文件夹,创建自定义源文件,然后进入需要建仓库的文件夹路径,输入下面的命令
$ git init
该命令会在工作目录创建一个 .git 目录用于存放项目的版本历史、配置文件等。
如果创建仓库时需要指定项目名称,该命令可以添加可选字段
$ git init [git_name]
此时将在工作目录下创建一个名为 git_name 的文件夹,而将 .git 目录存放在该文件夹下。
3.2 自定义添加文件
$ git add [options] [files]
1 .                匹配所有文件
2 -v, --verbose        be verbose 显式详细过程
3 -i, --interactive    interactive picking 交互式选择要添加的对象
4 -f, --force        allow adding otherwise ignored files 强制允许将其他忽略的文件也包含进来
5 -u, --update       update tracked files 更新所有改变的文件,即提交所有变化的文件
6 -A, --all          add changes from all tracked and untracked files 提交已经修改和被删除的文件,不包括新的文件
3.3 对要提交的文件添加注释
git commit
主要是将暂存区里的改动提交到本地版本库。每次使用 git commit 命令都会在本地版本库生成一个40位的哈希值,这个哈希值也叫 commit-id,在版本回退时非常有用,它相当于一个快照,可以在未来的任何时候通过与 git reset 的组合命令回到这里。
git commit -m ‘message’
-m 参数表示可以直接输入后面的 “message”,不加此参数不能直接输入 “message”,而是调用一个编辑器(一般是 vim)来让你输入。 message 即是我们用来简要说明这次提交的语句。
git commit -am ‘message’
-a 参数可以将所有已跟踪文件中的执行修改或删除操作的文件都提交到本地仓库,即使它们没有经过 git add 添加到暂存区。注意:新加的文件是不能被提交到本地仓库的。
3.4 添加远程仓库
git remote add origin https://github.com/username/reponame.git
在本地仓库添加一个远程仓库,并将本地的 master 分支跟踪到远程仓库分支。(也就是说在我们往远程仓库推送代码之前,要保证该仓库已经存在,一般是在github网站上手动新建一个,当然也有直接从终端新建的操作,下文有介绍。)
在 GitHub 上 git 仓库建立之初会有一个默认的 master 分支,当然如果我们建立了其他分支,也可以用同样的方法进行跟踪。
此外
git remote
不带参数时,会列出已经存在的远程分支。
git remote -v
v是 verbose 的缩写,此时会列出详细信息,在每一个名字后面列出其远程 url ,对应其克隆地址。
3.5 推送本地分支到远程仓库
git push origin master
如果远程分支被省略,则表示将本地分支推送到与之存在追踪关系的远程分支(通常两者同名),如果该远程分支不存在,则会被新建。
4. Ubuntu Terminal命令行新建仓库并推送到远程
下面以一个示例进行阐述。
>>> mkdir gittest

>>> cd gittest

>>> touch README.md

>>> echo "# git test" >> README.md

>>> tree .

.
└── README.md
以上是此次实验新建的本地仓库 gittest 以及新建本地文件 README.md 并向此文件写入 # git test 的内容,当前文件夹目录结构为 tree 指令结果所示。
>>> git init

>>> git add README.md

>>> git commit -m "update README"
对本地仓库进行初始化,如本文第3条的步骤那样。而当进行到提交这一步时,如果出现下面的错误提示
*** Please tell me who you are.

Run
git config --global user.email "you@example.com"
git config --global user.name "Your Name"

to set your account's default identity.
Omit --global to set the identity only in this repository.
表示我们需要首先认证自己的身份,以向项目表明是谁在提交修改,这样就不会有错误提示了。注意将引号内的邮箱和用户名改成自己的信息。
git config --global user.email "phillee2016@163.com"

git config --global user.name "philleer"

git commit -m "update README"
此时,本地仓库已经建立,并且修改保存到stage当中。
正常的流程是登陆GitHub,在左上角点击New,新建一个远程仓库,然后再本地通过git remote add origin https://github.com/philleer/gittest.git将已有的本地仓库与之关联,然后将本地仓库内容推送到GitHub上。
如果我们想要在不打开GitHub网页的情况下降本地仓库推送到远程,该怎么做呢?
下面就是见证奇迹的时刻。
>>> curl -u 'philleer' https://api.github.com/user/repos -d '{"name":"gittest"}'
在你使用时,只需要把上面命令行中的philleer改成自己的用户名,gittest改成自己的新建仓库名。此时会让你输入登陆密码,按指示输入即可。
Enter host password for user 'philleer':
输入之后回车确认,出现下面的结果表示已经新建成功。


{
  "id": 183884632,
  "node_id": "MDEwOlJlcG9zaXRvcnkxODM4ODQ2MzI=",
  "name": "gittest",
  "full_name": "philleer/gittest",
  "private": false,
  "owner": {
    "login": "philleer",
    "id": 22950478,
    "node_id": "MDQ6VXNlcjIyOTUwNDc4",
    "avatar_url": "https://avatars1.githubusercontent.com/u/22950478?v=4",
    "gravatar_id": "",
    "url": "https://api.github.com/users/philleer",
    "html_url": "https://github.com/philleer",
    "followers_url": "https://api.github.com/users/philleer/followers",
    "following_url": "https://api.github.com/users/philleer/following{/other_user}",
    "gists_url": "https://api.github.com/users/philleer/gists{/gist_id}",
    "starred_url": "https://api.github.com/users/philleer/starred{/owner}{/repo}",
    "subscriptions_url": "https://api.github.com/users/philleer/subscriptions",
    "organizations_url": "https://api.github.com/users/philleer/orgs",
    "repos_url": "https://api.github.com/users/philleer/repos",
    "events_url": "https://api.github.com/users/philleer/events{/privacy}",
    "received_events_url": "https://api.github.com/users/philleer/received_events",
    "type": "User",
    "site_admin": false
  },
  "html_url": "https://github.com/philleer/gittest",
  "description": null,
  "fork": false,
  "url": "https://api.github.com/repos/philleer/gittest",
  "forks_url": "https://api.github.com/repos/philleer/gittest/forks",
  "keys_url": "https://api.github.com/repos/philleer/gittest/keys{/key_id}",
  "collaborators_url": "https://api.github.com/repos/philleer/gittest/collaborators{/collaborator}",
  "teams_url": "https://api.github.com/repos/philleer/gittest/teams",
  "hooks_url": "https://api.github.com/repos/philleer/gittest/hooks",
  "issue_events_url": "https://api.github.com/repos/philleer/gittest/issues/events{/number}",
  "events_url": "https://api.github.com/repos/philleer/gittest/events",
  "assignees_url": "https://api.github.com/repos/philleer/gittest/assignees{/user}",
  "branches_url": "https://api.github.com/repos/philleer/gittest/branches{/branch}",
  "tags_url": "https://api.github.com/repos/philleer/gittest/tags",
  "blobs_url": "https://api.github.com/repos/philleer/gittest/git/blobs{/sha}",
  "git_tags_url": "https://api.github.com/repos/philleer/gittest/git/tags{/sha}",
  "git_refs_url": "https://api.github.com/repos/philleer/gittest/git/refs{/sha}",
  "trees_url": "https://api.github.com/repos/philleer/gittest/git/trees{/sha}",
  "statuses_url": "https://api.github.com/repos/philleer/gittest/statuses/{sha}",
  "languages_url": "https://api.github.com/repos/philleer/gittest/languages",
  "stargazers_url": "https://api.github.com/repos/philleer/gittest/stargazers",
  "contributors_url": "https://api.github.com/repos/philleer/gittest/contributors",
  "subscribers_url": "https://api.github.com/repos/philleer/gittest/subscribers",
  "subscription_url": "https://api.github.com/repos/philleer/gittest/subscription",
  "commits_url": "https://api.github.com/repos/philleer/gittest/commits{/sha}",
  "git_commits_url": "https://api.github.com/repos/philleer/gittest/git/commits{/sha}",
  "comments_url": "https://api.github.com/repos/philleer/gittest/comments{/number}",
  "issue_comment_url": "https://api.github.com/repos/philleer/gittest/issues/comments{/number}",
  "contents_url": "https://api.github.com/repos/philleer/gittest/contents/{+path}",
  "compare_url": "https://api.github.com/repos/philleer/gittest/compare/{base}...{head}",
  "merges_url": "https://api.github.com/repos/philleer/gittest/merges",
  "archive_url": "https://api.github.com/repos/philleer/gittest/{archive_format}{/ref}",
  "downloads_url": "https://api.github.com/repos/philleer/gittest/downloads",
  "issues_url": "https://api.github.com/repos/philleer/gittest/issues{/number}",
  "pulls_url": "https://api.github.com/repos/philleer/gittest/pulls{/number}",
  "milestones_url": "https://api.github.com/repos/philleer/gittest/milestones{/number}",
  "notifications_url": "https://api.github.com/repos/philleer/gittest/notifications{?since,all,participating}",
  "labels_url": "https://api.github.com/repos/philleer/gittest/labels{/name}",
  "releases_url": "https://api.github.com/repos/philleer/gittest/releases{/id}",
  "deployments_url": "https://api.github.com/repos/philleer/gittest/deployments",
  "created_at": "2019-04-28T09:10:16Z",
  "updated_at": "2019-04-28T09:10:16Z",
  "pushed_at": "2019-04-28T09:10:17Z",
  "git_url": "git://github.com/philleer/gittest.git",
  "ssh_url": "git@github.com:philleer/gittest.git",
  "clone_url": "https://github.com/philleer/gittest.git",
  "svn_url": "https://github.com/philleer/gittest",
  "homepage": null,
  "size": 0,
  "stargazers_count": 0,
  "watchers_count": 0,
  "language": null,
  "has_issues": true,
  "has_projects": true,
  "has_downloads": true,
  "has_wiki": true,
  "has_pages": false,
  "forks_count": 0,
  "mirror_url": null,
  "archived": false,
  "disabled": false,
  "open_issues_count": 0,
  "license": null,
  "forks": 0,
  "open_issues": 0,
  "watchers": 0,
  "default_branch": "master",
  "permissions": {
    "admin": true,
    "push": true,
    "pull": true
  },
  "allow_squash_merge": true,
  "allow_merge_commit": true,
  "allow_rebase_merge": true,
  "network_count": 0,
  "subscribers_count": 0
}
然后将本地仓库与之关联,并推送本地仓库内容。按指示输入账户密码即可。
>>> git remote add origin https://github.com/philleer/gittest.git

>>> git push -u origin master
Username for 'https://github.com': philleer
Password for 'https://philleer@github.com':
Counting objects: 3, done.
Delta compression using up to 4 threads.
Compressing objects: 100% (2/2), done.
Writing objects: 100% (3/3), 264 bytes | 0 bytes/s, done.
Total 3 (delta 0), reused 0 (delta 0)
To https://github.com/philleer/gittest.git
 * [new branch]      master -> master
Branch master set up to track remote branch master from origin.
大功告成!再也不用每次都打开网页新建仓库,让后再回到本地进行关联了,本地一条龙,全程无切换。
5. git 使用过程出现如下问题
Please make sure you have the correct access rights and the repository exists.
解决方法如下:
① 重新设置用户名和邮箱
$ git config --global user.name philleer
$ git config --global user.email phillee2016@163.com
② 删除 .ssh文件夹下的 know_hosts
搜索C盘,找到.ssh文件夹(C:UsersPhilLee),进入文件夹,删除know_hosts文件。一般会在C盘用户用户名文件夹下。
③ 重新生成密钥
$ ssh-keygen -t rsa -C philee2016@163.com
这时系统会自动在.ssh文件夹下生成两个文件:id_rsa 和 id_rsa.pub,用记事本打开id_rsa.pub,复制全部内容
④ 在GitHub上登录账户,进入设置
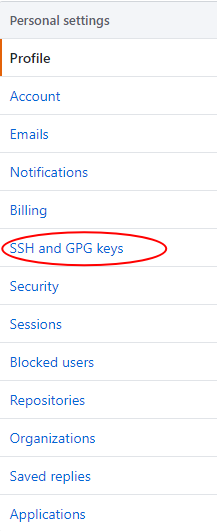

将复制的内容粘贴到Key那一栏,点击Add SSH key。
⑤ 此时输入下面的命令
$ ssh -T git@github.com
会出现下面的结果
The authenticity of host 'github.com (13.229.188.59)' can't be established.
RSA key fingerprint is SHA256:nThbg6kXUpJWGl7E1IGOCspRomTxdCARLviKw6E5SY8.
Are you sure you want to continue connecting (yes/no)? yes
Warning: Permanently added 'github.com,13.229.188.59' (RSA) to the list of known hosts.
Hi philleer! You've successfully authenticated, but GitHub does not provide shell access.
至此就算成功了,可以正常使用了。
实验效果如下
$ git push -u origin master
Warning: Permanently added the RSA host key for IP address '52.74.223.119' to the list of known hosts.
Enumerating objects: 7, done.
Counting objects: 100% (7/7), done.
Delta compression using up to 4 threads.
Compressing objects: 100% (5/5), done.
Writing objects: 100% (7/7), 2.04 KiB | 521.00 KiB/s, done.
Total 7 (delta 0), reused 0 (delta 0)
To github.com:philleer/coding.git
* [new branch] master -> master
Branch 'master' set up to track remote branch 'master' from 'origin'.
6. Simple guide
6.1 创建新仓库
创建新文件夹,打开,然后执行下面的命令以创建新的git仓库。
git init
6.2 检出仓库
执行如下命令以创建一个本地仓库的克隆版本
git clone /path/to/repository
如果是远端服务器上的仓库,则执行下面的命令
git clone username@host:/path/to/repository
6.3 工作流
你的本地仓库由 git 维护的三棵“树”组成。
第一个是你的工作目录,它持有实际文件;
第二个是暂存区(Index),它像个缓存区域,临时保存你的改动;
最后是HEAD,它指向你最后一次提交的结果。
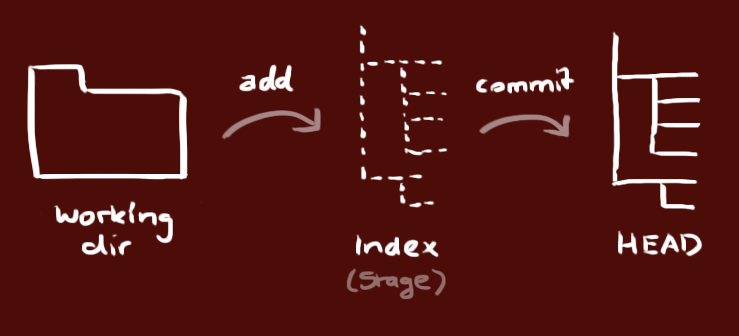
6.4 添加和提交
你可以使用如下命令提出更改(把它们添加到暂存区)
git add <filename>

git add *
这是 git 基本工作流程的第一步;使用如下命令以实际提交改动
git commit -m "comment for the commit"
现在,你的改动已经提交到了 HEAD ,但是还没到你的远端仓库。
6.5 推送改动
你的改动现在已经在本地仓库的 HEAD 中了。执行如下命令以将这些改动提交到远端仓库
git push origin master
你可以把上述命令中的 master 换成你想要推送的任何分支。
如果你还没有克隆现有仓库,并欲将你的仓库连接到某个远程服务器,你可以使用如下命令添加,这样你就能够将你的改动推送到所添加的服务器上去了。
git remote add origin <server>
6.6 分支
分支是用来将特性开发绝缘开来的。在你创建仓库的时候, master 是“默认的”分支。在其他分支上进行开发,完成后再将它们合并到主分支上。
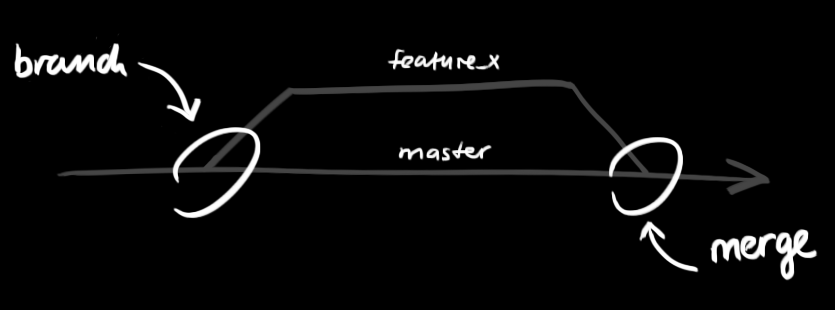
使用下面的命令可以创建一个叫做 “feature_x” 的分支,并切换过去。
git checkout -b feature_x
现在切换回主分支并把刚刚新建的分支删掉。
git checkout master

git branch -d feature_x
除非你将分支推送到远端仓库,不然该分支就是不为他人所见的。使用如下所示命令可以推送到远端
git push origin <branch>
上面讲的是如何删除本地分支,如果要删除远程分支
git push origin --delete branch-name
6.7 更新与合并
要更新你的本地仓库至最新改动,执行如下命令以在你的工作目录中获取 (fetch) 并合并 (merge) 远端的改动
git pull
要合并其他分支到你的当前分支(例如 master ),执行
git merge <branch>
在这两种情况下, git 都会尝试去自动合并改动。遗憾的是并非每次都成功,并可能出现冲突 (conflicts) 。这时就需要你修改这些文件来手动合并这些冲突 (conflicts) 。改完之后,你需要执行如下命令以将它们标记为合并成功
git add <filename>
在合并改动之前,你可以使用如下命令预览差异
git diff <source_branch> <target_branch>
6.8 标签
为软件发布创建标签是推荐的。这个概念早已存在,例如你可以执行如下命令创建一个叫做 1.0.0 的标签
git tag 1.0.0 1b2e1d63ff
其中 1b2e1d63ff 是你想要标记的提交 ID 的前 10 位字符。可以使用下列命令获取提交 ID
git log
你也可以使用少一点的提交 ID 前几位,只要它的指向具有唯一性。
6.9 LOG
如果你想了解本地仓库的历史记录,最简单的命令就是使用
git log
你可以添加一些参数来修改他的输出,从而得到自己想要的结果。 只看某一个人的提交记录
git log --author=bob
一个压缩后的每一条提交记录只占一行的输出
git log --pretty=oneline
或者你想通过 ASCII 艺术的树形结构来展示所有的分支, 每个分支都标示了他的名字和标签
git log --graph --oneline --decorate --all
看看哪些文件改变了
git log --name-status
这些只是我们可以使用的参数中很小的一部分,更多的信息,可以参考
git log --help
6.10 替换本地改动
假如你操作失误(当然,这最好永远不要发生),你可以使用如下命令替换掉本地改动
git checkout -- <filename>
此命令会使用 HEAD 中的最新内容替换掉你的工作目录中的文件。已添加到暂存区的改动以及新文件都不会受到影响。
假如你想丢弃你在本地的所有改动与提交,可以到服务器上获取最新的版本历史,并将你本地主分支指向它
git fetch origin

git reset --hard origin/master
Reference
[1] git下载代码遇到的‘Please make sure you have the correct access rights and the repository exists’问题
[3] 廖雪峰的官方网站——添加远程库
[4] git - 简明指南