1,什么是分布式配置中心
项目中配置文件比较繁杂,而且不同环境的不同配置修改相对频繁,每次发布都需要对应修改配置,如果配置出现错误,需要重新打包发布,时间成本较高,因此需要做统一的分布式注册中心,能做到自动更新配置文件信息,解决以上问题
常用分布式配置中心框架
Disconf(依赖于zookpeer)、Zookpeer()、diamond、携程(阿波罗)、Redis、xxl-conf
Zookpeer保证配置文件信息实时更新 (事件通知)
大型互联网公司自己内部都有自己独立分布式配置中心
独立RPC、独立分布式各种解决方案
注册中心解决 rpc服务治理
分布式配置中心 解决分布式配置文件管理
Apollo阿波罗简介
Apollo(阿波罗)是携程框架部门研发的分布式配置中心,能够集中化管理应用不同环境、不同集群的配置,配置修改后能够实时推送到应用端,并且具备规范的权限、流程治理等特性,适用于微服务配置管理场景。
Apollo阿波罗特点
用户在Apollo修改完配置并发布后,客户端能实时(1秒)接收到最新的配置,并通知到应用程序。
统一管理不同环境、不同集群的配置
所有的配置发布都有版本概念,从而可以方便的支持配置的回滚。
配置修改实时生效(热发布)
用户在Apollo修改完配置并发布后,客户端能实时(1秒)接收到最新的配置,并通知到应用程序
版本发布管理
所有的配置发布都有版本概念,从而可以方便的支持配置的回滚
灰度发布
支持配置的灰度发布,比如点了发布后,只对部分应用实例生效,等观察一段时间没问题后再推给所有应用实例。
权限管理、发布审核、操作审计
应用和配置的管理都有完善的权限管理机制,对配置的管理还分为了编辑和发布两个环节,从而减少人为的错误。
所有的操作都有审计日志,可以方便的追踪问题。
客户端配置信息监控
可以方便的看到配置在被哪些实例使用
提供Java和.Net原生客户端
提供了Java和.Net的原生客户端,方便应用集成
支持Spring Placeholder, Annotation和Spring Boot的ConfigurationProperties,方便应用使用(需要Spring 3.1.1+)
同时提供了Http接口,非Java和.Net应用也可以方便的使用
提供开放平台API
Apollo自身提供了比较完善的统一配置管理界面,支持多环境、多数据中心配置管理、权限、流程治理等特性。
不过Apollo出于通用性考虑,对配置的修改不会做过多限制,只要符合基本的格式就能够保存。
在我们的调研中发现,对于有些使用方,它们的配置可能会有比较复杂的格式,如xml, json,需要对格式做校验。
还有一些使用方如DAL,不仅有特定的格式,而且对输入的值也需要进行校验后方可保存,如检查数据库、用户名和密码是否匹配。
对于这类应用,Apollo支持应用方通过开放接口在Apollo进行配置的修改和发布,并且具备完善的授权和权限控制
部署简单
配置中心作为基础服务,可用性要求非常高,这就要求Apollo对外部依赖尽可能地少
目前唯一的外部依赖是MySQL,所以部署非常简单,只要安装好Java和MySQL就可以让Apollo跑起来
Apollo还提供了打包脚本,一键就可以生成所有需要的安装包,并且支持自定义运行时参数
Apollo整体架构原理

上图简要描述了Apollo客户端的实现原理:
- 客户端和服务端保持了一个长连接,从而能第一时间获得配置更新的推送。(通过Http Long Polling实现)
- 客户端还会定时从Apollo配置中心服务端拉取应用的最新配置。
- 这是一个fallback机制,为了防止推送机制失效导致配置不更新
- 客户端定时拉取会上报本地版本,所以一般情况下,对于定时拉取的操作,服务端都会返回304 - Not Modified
- 定时频率默认为每5分钟拉取一次,客户端也可以通过在运行时指定System Property:
apollo.refreshInterval来覆盖,单位为分钟。
- 客户端从Apollo配置中心服务端获取到应用的最新配置后,会保存在内存中
- 客户端会把从服务端获取到的配置在本地文件系统缓存一份
- 在遇到服务不可用,或网络不通的时候,依然能从本地恢复配置
- 应用程序可以从Apollo客户端获取最新的配置、订阅配置更新通知
2, Apollo 框架下载路径github
https://github.com/ctripcorp/apollo
里面有开发,设计思想问文档
3,下载完成,解压

appollo-master 相当于是源码,apollo-build-scripts-master相当于将好几个服务集成到一块,用shell 脚本demo.sh 一键启动
4,将apollo-build-scripts-master 文件夹发送到虚拟机192.168.178.110 /usr/local 的路径下、
5,打开apollo-build-scripts-master/sql 下两个sql 文件,并且将他们刷入到数据库,注意mysql 数据库版本是要5.7 以上
6,配置demo.sh
#!/bin/bash

# apollo config db info
apollo_config_db_url=jdbc:mysql://192.168.178.110:3306/ApolloConfigDB?characterEncoding=utf8
apollo_config_db_username=root
apollo_config_db_password=12345678

# apollo portal db info
apollo_portal_db_url=jdbc:mysql://192.168.178.110:3306/ApolloPortalDB?characterEncoding=utf8
apollo_portal_db_username=root
apollo_portal_db_password=12345678

# =============== Please do not modify the following content =============== #

if [ "$(uname)" == "Darwin" ]; then
    windows="0"
elif [ "$(expr substr $(uname -s) 1 5)" == "Linux" ]; then
    windows="0"
elif [ "$(expr substr $(uname -s) 1 5)" == "MINGW" ]; then
    windows="1"
else
    windows="0"
fi

# meta server url
config_server_url=http://192.168.178.110:8080
admin_server_url=http://192.168.178.110:8090
eureka_service_url=$config_server_url/eureka/
portal_url=http://192.168.178.110:8070
需要修改的点,已经标注出来了,
数据库,本来是安装在了windows 系统上,也设置了可以远程登陆,但是启动的适合都连不上,所以直接在本机,安装了linux版本的数据库
配置完成,开始启动
进入到//usr/local/apollo-build-scripts-master 输入命令:
./demo.sh start
出现以下界面,则配置成功:

4,url 路径所代表的意思:
从上图中,可以看出几个服务:
Config service:http://192.168.178.110:8080 给应用端调用
Portal service:http://192.168.178.110:8070
Admin Service:为了给Portal service 调用
Config service: 就是Eureka 注册中心,将服务注册到Eureka 上进行管理
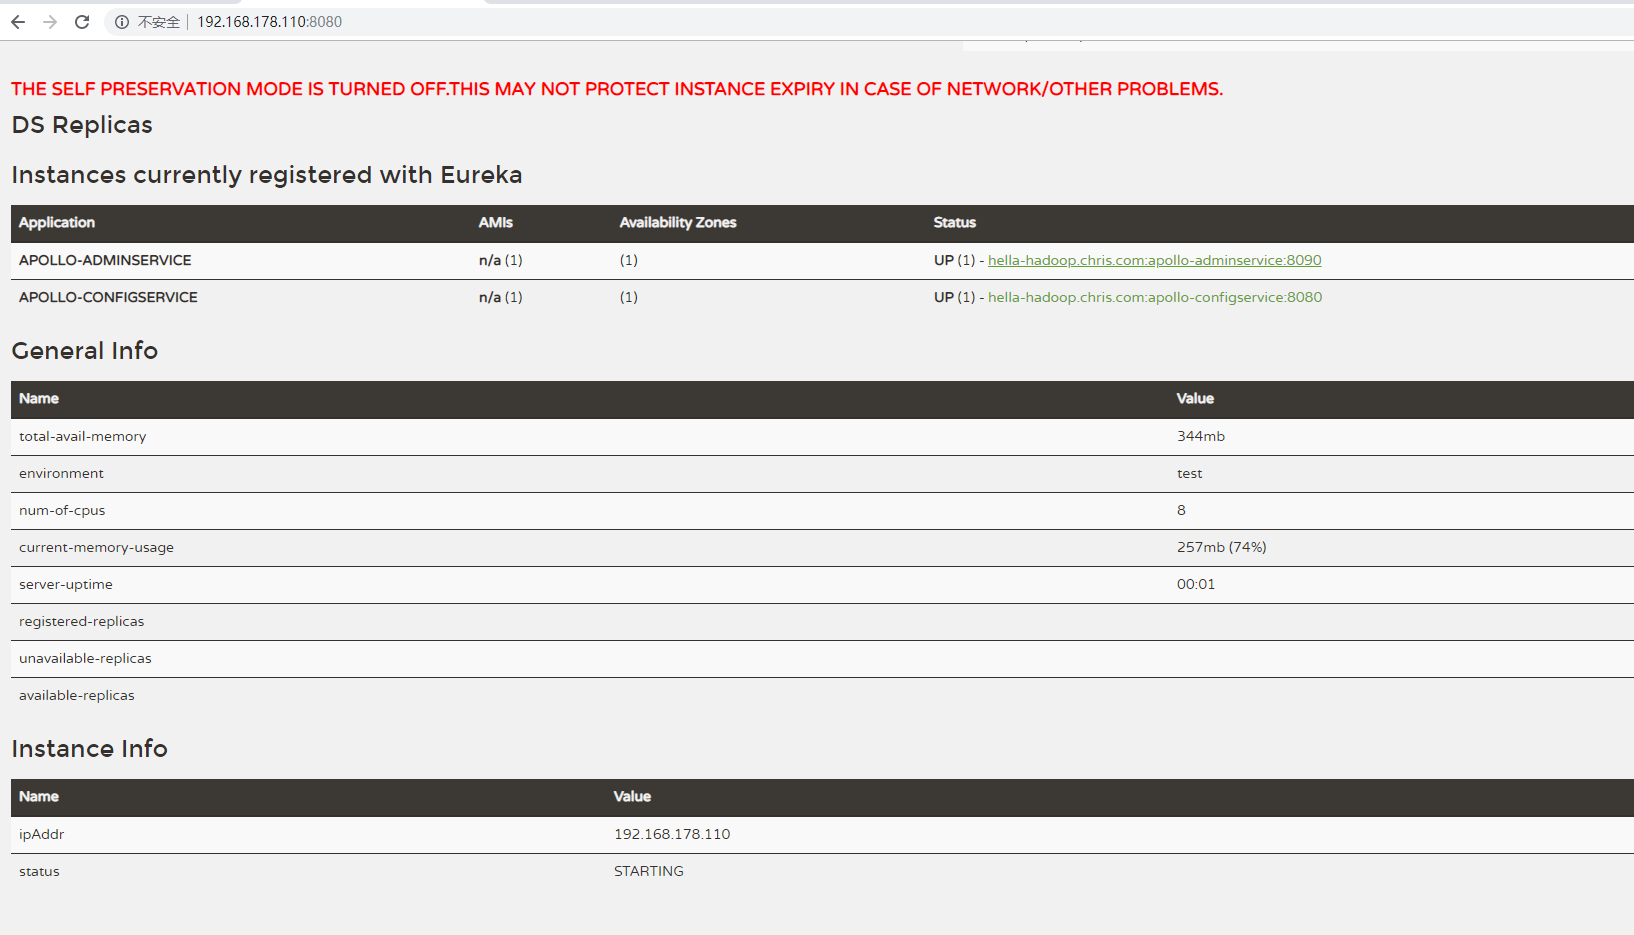
Portal service:用户名apollo 密码admin 进入到了分布式配置中心web 界面

进入之后:

5,springboot 项目集成apollo
创建Java workding set,名称分布式配置中心,在里面创建springboot 项目,导入maven
<parent>
        <groupId>org.springframework.boot</groupId>
        <artifactId>spring-boot-starter-parent</artifactId>
        <version>2.0.1.RELEASE</version>
        <relativePath /> <!-- lookup parent from repository -->
    </parent>

    <properties>
        <project.build.sourceEncoding>UTF-8</project.build.sourceEncoding>
        <project.reporting.outputEncoding>UTF-8</project.reporting.outputEncoding>
        <java.version>1.8</java.version>
        <spring-cloud.version>Finchley.RC1</spring-cloud.version>
    </properties>
    <dependencies>
        <dependency>
            <groupId>org.springframework.boot</groupId>
            <artifactId>spring-boot-starter</artifactId>
        </dependency>
        <dependency>
            <groupId>org.springframework.cloud</groupId>
            <artifactId>spring-cloud-starter-netflix-eureka-client</artifactId>
        </dependency>
        <dependency>
            <groupId>org.springframework.boot</groupId>
            <artifactId>spring-boot-starter-web</artifactId>
            <!-- <exclusions> <exclusion> <groupId>com.fasterxml.jackson.core</groupId>
                <artifactId>jackson-databind</artifactId> </exclusion> </exclusions> -->
        </dependency>

        <!-- apollo 携程apollo配置中心框架 -->
        <dependency>
            <groupId>com.ctrip.framework.apollo</groupId>
            <artifactId>apollo-client</artifactId>
            <version>1.0.0</version>
        </dependency>
        <dependency>
            <groupId>com.ctrip.framework.apollo</groupId>
            <artifactId>apollo-core</artifactId>
            <version>1.0.0</version>
        </dependency>


        <dependency>
            <groupId>org.projectlombok</groupId>
            <artifactId>lombok</artifactId>
            <optional>true</optional>
        </dependency>
        <dependency>
            <groupId>com.alibaba</groupId>
            <artifactId>fastjson</artifactId>
            <version>1.2.3</version>
        </dependency>
        <dependency>
            <groupId>org.springframework.boot</groupId>
            <artifactId>spring-boot-starter-test</artifactId>
            <scope>test</scope>
        </dependency>
    </dependencies>

    <dependencyManagement>
        <dependencies>
            <dependency>
                <groupId>org.springframework.cloud</groupId>
                <artifactId>spring-cloud-dependencies</artifactId>
                <version>${spring-cloud.version}</version>
                <type>pom</type>
                <scope>import</scope>
            </dependency>
        </dependencies>
    </dependencyManagement>

    <build>
        <plugins>
            <plugin>
                <groupId>org.springframework.boot</groupId>
                <artifactId>spring-boot-maven-plugin</artifactId>
            </plugin>
            <plugin>
                <groupId>org.apache.maven.plugins</groupId>
                <artifactId>maven-compiler-plugin</artifactId>
                <configuration>
                    <source>1.8</source>
                    <target>1.8</target>
                </configuration>
            </plugin>
            <plugin>
                <groupId>org.apache.maven.plugins</groupId>
                <artifactId>maven-resources-plugin</artifactId>
                <version>3.0.1</version>
                <executions>
                    <execution>
                        <id>copy-conf</id>
                        <phase>package</phase>
                        <goals>
                            <goal>copy-resources</goal>
                        </goals>
                        <configuration>
                            <encoding>UTF-8</encoding>
                            <outputDirectory>${project.build.directory}/ext/conf</outputDirectory>
                            <resources>
                                <resource>
                                    <directory>ext/conf</directory>
                                    <includes>
                                        <include>logback.xml</include>
                                    </includes>
                                    <filtering>true</filtering>
                                </resource>
                            </resources>
                        </configuration>
                    </execution>
                </executions>
            </plugin>
            <plugin>
                <groupId>org.jacoco</groupId>
                <artifactId>jacoco-maven-plugin</artifactId>
                <version>0.7.5.201505241946</version>
                <executions>
                    <execution>
                        <id>default-prepare-agent</id>
                        <goals>
                            <goal>prepare-agent</goal>
                        </goals>
                    </execution>
                    <execution>
                        <id>default-prepare-agent-integration</id>
                        <goals>
                            <goal>prepare-agent-integration</goal>
                        </goals>
                    </execution>
                </executions>
            </plugin>
            <plugin>
                <groupId>com.spotify</groupId>
                <artifactId>docker-maven-plugin</artifactId>
                <version>0.4.3</version>
                <configuration>
                    <imageName>hy_uav_gateway</imageName>
                    <dockerDirectory>src/main/docker</dockerDirectory>
                    <resources>
                        <resource>
                            <targetPath>/</targetPath>
                            <directory>${project.build.directory}</directory>
                            <include>${project.build.finalName}.jar</include>
                            <include>ext/conf/logback.xml</include>
                        </resource>
                    </resources>
                </configuration>
            </plugin>
        </plugins>
    </build>

    <repositories>
        <repository>
            <id>spring-milestones</id>
            <name>Spring Milestones</name>
            <url>https://repo.spring.io/milestone</url>
            <snapshots>
                <enabled>false</enabled>
            </snapshots>
        </repository>
    </repositories>
6,将阿波罗build 到本地仓库
因为以下这两个包是需要引用Apollo 的包的,也就是之前Apollo-master 的源码的包
 <!-- apollo 携程apollo配置中心框架 -->
        <dependency>
            <groupId>com.ctrip.framework.apollo</groupId>
            <artifactId>apollo-client</artifactId>
            <version>1.0.0</version>
        </dependency>
        <dependency>
            <groupId>com.ctrip.framework.apollo</groupId>
            <artifactId>apollo-core</artifactId>
            <version>1.0.0</version>
        </dependency>
2中方式可以将源码打入本地maven 仓库,第一种,是将源码导入到eclipse中,利用mvn -install 下
第二种方式就是在Apollo-master/scripts 下的build.bat 文件双击,就会自动将包build

build 完成之后,maven 仓库就生成了Apollo的包

7,现在在将springboot 项目update ,就可以引用了。
8,创建 apollo-env.properties 去连接apollo 分布式配置中心
local.meta=http://192.168.178.110:8080
dev.meta=http://192.168.178.110:8080
fat.meta=${fat_meta}
uat.meta=${uat_meta}
lpt.meta=${lpt_meta}
pro.meta=${pro_meta}
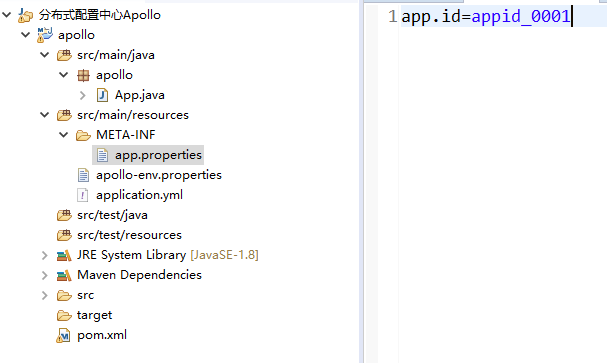
9,在resources 文件夹下,建立appid ,一个appid,代表一个应用
10,因为项目有好几种环境,有开发,测试,预生产,生产等,怎么区分apollo 分布式配置中心连的是那种环境呢
修改/opt/settings/server.properties(Mac/Linux)或C:optsettingsserver.properties(Windows)文件,设置env为DEV:

env=DEV
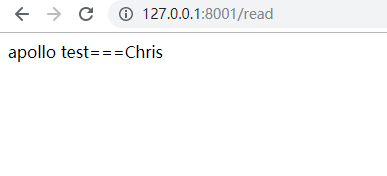
11,springboot 测试,能否获得配置中心的值
@RestController
public class IndexController {

    @Value("${projectName:default}")
    private String projectName;

    @Value("${projectLeader:default}")
    private String projectLeader;

    @RequestMapping("/read")
    public String read() {
        return projectName + "===" + projectLeader;
    }

}
启动类:
@Configuration
@EnableApolloConfig
@SpringBootApplication
@EnableAutoConfiguration
public class App {
    public static void main(String[] args) {
        SpringApplication.run(App.class, args);
    }

}
12,项目启动之后,还需要在Apollo 配置中心上把projectName,projectLeader 这两个key的value 添加,apllo 如何知道是哪个项目,就是根据appid
创建项目:
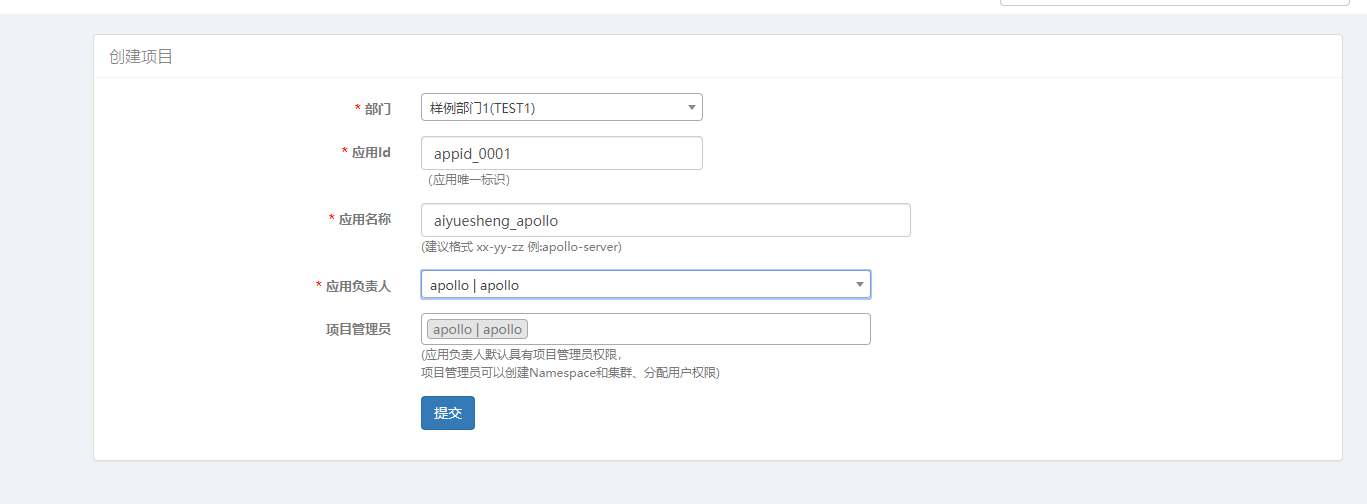
在项目上添加配置的值,支持回滚

13,测试成功