请允许我模仿各路coding大神的习惯写法,使用“Working with MapKit”这样的装逼语句来说明本文要阐述的内容。没错,本文就是要将我之前学习使用MapKit Framework的过程、心得做一个总结。利用一个简单的栗子demo,来展现如何使用MapKit进行:1,标记若干个坐标,自定义MKAnnotation,显示附加信息;2,画出坐标点之间的线路图。
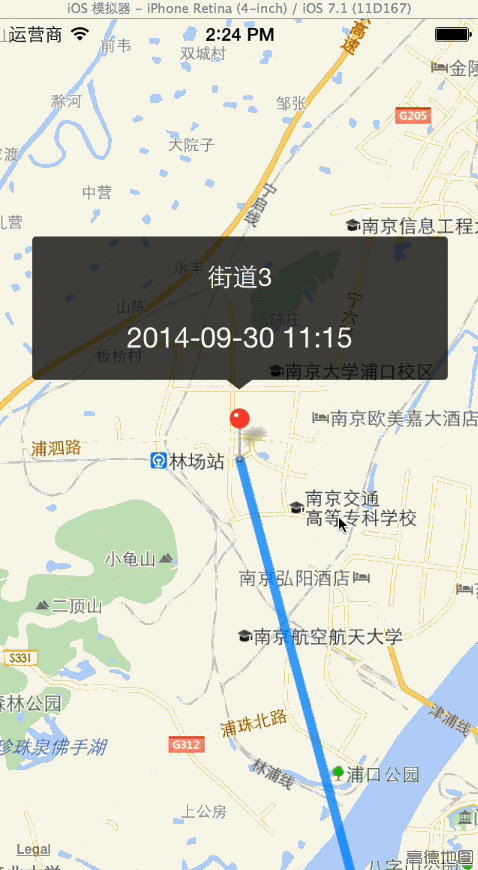
先来看一下效果:
demo我已经放在了这里:https://github.com/pigpigdaddy/MapDemo
使用MapKit进行地图标记和路径绘制,最重要的就是为需要标记的坐标设置正确的经纬度。项目开始时,我们需要加入MapKit.Framework,并在响应的文件内#import这个framework的接口文件。
1,MKMapView
1.1,MKMapView是一个继承自UIView的类,你可以直接使用initWithFrame来初始化这个地图视图,然后记得将它的实例的delegate属性设置好。MKMapView的实例有一个showsUserLocation属性,这个属性默认是NO,如果我将它设置为YES,那么地图上就会标注出我的设备的当前位置。
当我初始化好,设置好一切了后,就可以将它addSubView到我的视图上了。
1     self.mapView = [[MKMapView alloc] initWithFrame:CGRectMake(0, 0, self.frame.size.width, self.frame.size.height)];
2     self.mapView.delegate = self;
3     self.mapView.showsUserLocation = YES;
4     [self addSubview:self.mapView];
就是这么简单。
1.2,地图交互
地图中的各类行为,比如定位当前位置、开始渲染地图、地图标记显示、地图标记选中、线路的绘画等等,都是由MKMapViewDelegate,给出的回调来定义的。根据我的demo,我将选取其中有关地图标记和线路绘画相关的几个回调,来实现他们,从而实现我在文章开始写出的两个功能。
主要用到的回调:
1 - (MKAnnotationView *)mapView:(MKMapView *)mapView viewForAnnotation:(id <MKAnnotation>)annotation;
1 - (void)mapView:(MKMapView *)mapView didSelectAnnotationView:(MKAnnotationView *)view NS_AVAILABLE(10_9, 4_0);
2 - (void)mapView:(MKMapView *)mapView didDeselectAnnotationView:(MKAnnotationView *)view NS_AVAILABLE(10_9, 4_0);
1 - (MKOverlayView *)mapView:(MKMapView *)mapView viewForOverlay:(id <MKOverlay>)overlay NS_DEPRECATED_IOS(4_0, 7_0);
2,地图标记<MKAnnotation>
2.1,MKAnnotation其实并不是一个类,而是一个协议。任何一个NSObject子类,如果想作为一个“地图标记”被加到地图(MKMapView)中,必须实现这个<MKAnnotation>协议。让我们来看看这个协议里面有些什么:
 1 @protocol MKAnnotation <NSObject>
 2
 3 // Center latitude and longitude of the annotion view.
 4 // The implementation of this property must be KVO compliant.
 5 @property (nonatomic, readonly) CLLocationCoordinate2D coordinate;
 6
 7 @optional
 8
 9 // Title and subtitle for use by selection UI.
10 @property (nonatomic, readonly, copy) NSString *title;
11 @property (nonatomic, readonly, copy) NSString *subtitle;
12
13 // Called as a result of dragging an annotation view.
14 - (void)setCoordinate:(CLLocationCoordinate2D)newCoordinate NS_AVAILABLE(10_9, 4_0);
15
16 @end
说白了就是,你必须实现
1 @property (nonatomic, readonly) CLLocationCoordinate2D coordinate;
也就是地图标记的坐标!这样,你才能把该实例作为“Annotation”加到地图中去。
注意:1,你可以在同一个坐标点(经纬度)添加多个Annotation,这也是我的这个demo中用到的一个技巧;2,实现<MKAnnotation>的类,只是一个地图标记的“数据”,负责管理标记的“坐标”、“标题”等,而不管理标记“视图”,“视图”则由下面要介绍的MKAnnotationView来管理。
2.2,MKAnnotationView
MKAnnotationView是地图标记的“表现视图”,因为仅仅拥有<MKAnnotation>数据还不行,用户需要在地图中看到各式各样的“地图标记视图”。为此我创建了一个继承自MKAnnotationView的自定义视图用于弹出的界面:
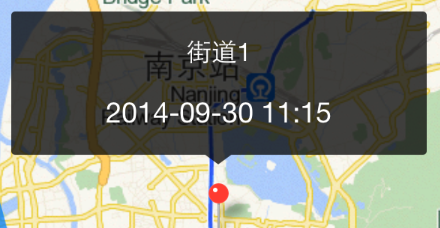
这样,当用户点击地图上某个“标记Annotation”时,我会在此坐标处额外再次创建一个“Annotation”加到地图上,然后用我自定义的MKAnnotationView当做这个额外创建的“Annotation”的View。显示出来,就是上图中灰色半透明的界面。
所以你会发现,其实对于demo中的地图,任意一个时候是同时有四个Annotation的,分别是三个红色大头针的MKPinAnnotationView和一个当前选中的自定义MKAnnotationView。而当前选中的自定义MKAnnotationView和此大头针的MKPinAnnotationView其实是位于地图上同一个坐标的。
3,demo中的原始数据存储
我创建了一个叫LocationNode的节点类,用于存储原始数据。
 1 // 主键
 2 @property (nonatomic, assign) int index;
 3 // 定位时间
 4 @property (nonatomic, assign) int time;
 5 // 位置经度
 6 @property (nonatomic, assign) double lng;
 7 // 位置纬度
 8 @property (nonatomic, assign) double lat;
 9 // 位置名称
10 @property (nonatomic, strong) NSString *street;
4,绘制路径
这在MapKit中其实是一个非常简单操作,只需要将每个坐标依次存于数组中,然后用此坐标数组初始化一个MKPolyline类的实例,最后用mapView的addOverlay方法,添加这个MKPolyline。然后在:
1 - (MKOverlayView *)mapView:(MKMapView *)mapView viewForOverlay:(id <MKOverlay>)overlay
回调中,配置绘制的路径的参数即可。
下面具体来看一下代码实现:
我创建了如下几个类:
PlaceMark:用于所有的Annotation,实现MKAnnotation协议;
CalloutMapAnnotation:用于当前选中时弹出的Annotation,在地图中,只保留一个实例,用于当前选中后额外创建的一个Annotation。
LocationNode:存储原始数据;
CallOutAnnotationView:继承自MKAnnotationView,用于上面所说的灰色半透明界面;
CustomCalloutView:一个自定义UIView,用于管理CallOutAnnotationView的实际内容;
LocationInfoMapView:地图创建在这个View中。
在LocationInfoMapView中,我们需要做下面的工作:
 1 /**
 2  TODO:显示地图标记
 3
 4  @param annotations 地图标记注释数组
 5
 6  @author pigpigdaddy
 7  @since 3.0
 8  */
 9 -(void)showAnnotation:(NSArray *)annotations{
10     // 清除上一次地图标记
11     for (id annotation in self.mapView.annotations) {
12         if ([annotation isKindOfClass:[PlaceMark class]]) {
13             [self.mapView removeAnnotation:annotation];
14         }
15     }
16
17     NSMutableArray *routes = [[NSMutableArray alloc] init];
18     for (LocationNode *detailBean in annotations) {
19         // 添加每一个坐标到地图
20         PlaceMark *mark = [[PlaceMark alloc] initWithPlace:detailBean];
21         [self.mapView addAnnotation:mark];
22
23         // 创建一个数组,用于依次存储所有的坐标
24         CLLocation *location = [[CLLocation alloc] initWithLatitude:mark.coordinate.latitude longitude:mark.coordinate.longitude];
25         [routes addObject:location];
26     }
27     self.routes = routes;
28
29     // 将地图当前位置居中显示
30     [self centerMap];
31     // 绘制路径
32     [self updateRouteView];
33 }
 1 /**
 2  TODO:重新绘制导航视图
 3
 4  @author pigpigdaddy
 5  @since 3.0
 6  */
 7 - (void)updateRouteView{
 8     [self.mapView removeOverlays:self.mapView.overlays];
 9
10     CLLocationCoordinate2D pointsToUse[[self.routes count]];
11     for (int i = 0; i < [self.routes count]; i++) {
12         CLLocationCoordinate2D coords;
13         CLLocation *loc = [self.routes objectAtIndex:i];
14         coords.latitude = loc.coordinate.latitude;
15         coords.longitude = loc.coordinate.longitude;
16         pointsToUse[i] = coords;
17     }
18     MKPolyline *lineOne = [MKPolyline polylineWithCoordinates:pointsToUse count:[self.routes count]];
19     [self.mapView addOverlay:lineOne];
20 }
 1 - (MKOverlayView *)mapView:(MKMapView *)mapView viewForOverlay:(id <MKOverlay>)overlay{
 2     if ([overlay isKindOfClass:[MKPolyline class]]){
 3         MKPolylineView *lineview = [[MKPolylineView alloc] initWithOverlay:overlay];
 4         // 路线颜色
 5         lineview.strokeColor = [UIColor colorWithRed:0.0 green:126.0/255 blue:1.0 alpha:.75];
 6         // 宽度
 7         lineview.lineWidth = 12.0;
 8         return lineview;
 9     }
10     return nil;
11 }
12
13 - (MKAnnotationView *) mapView:(MKMapView *)mapView viewForAnnotation:(id <MKAnnotation>) annotation {
14     if ([annotation isKindOfClass:[PlaceMark class]]) {
15         // 对于每一个坐标点,不论是否被选中,都用一个MKPinAnnotationView来显示标记
16         MKPinAnnotationView *annotationView = (MKPinAnnotationView *)[mapView dequeueReusableAnnotationViewWithIdentifier:@"PlaceMark"];
17         if(annotationView == nil) {
18             annotationView = [[MKPinAnnotationView alloc] initWithAnnotation:annotation
19                                                              reuseIdentifier:@"PlaceMark"];
20         }
21         PlaceMark *mark = (PlaceMark *)annotation;
22         annotationView.pinColor = mark.pinColor;
23         annotationView.animatesDrop = NO;
24         annotationView.canShowCallout = NO;
25         return annotationView;
26     }else if ([annotation isKindOfClass:[CalloutMapAnnotation class]]){
27         // 如果是当前选中的坐标点,那么会添加一个CalloutMapAnnotation,则此时用CallOutAnnotationView来显示标记
28         CallOutAnnotationView *annotationView = (CallOutAnnotationView *)[mapView dequeueReusableAnnotationViewWithIdentifier:@"CalloutView"];
29         if (!annotationView) {
30             annotationView = [[CallOutAnnotationView alloc] initWithAnnotation:annotation reuseIdentifier:@"CalloutView"];
31             CustomCalloutView  *cell = [[[NSBundle mainBundle] loadNibNamed:@"CustomCalloutView" owner:self options:nil] objectAtIndex:0];
32             [annotationView.contentView addSubview:cell];
33         }
34         for (id subView in annotationView.contentView.subviews) {
35             if ([subView isKindOfClass:[CustomCalloutView class]]) {
36                 CustomCalloutView *callout = (CustomCalloutView *)subView;
37                 CalloutMapAnnotation *mapMark = (CalloutMapAnnotation *)annotation;
38                 callout.addressLabel.text = mapMark.addr;
39                 callout.addressTimeLabel.text = mapMark.time;
40             }
41         }
42         [annotationView showWithAnimation:YES];
43         return annotationView;
44     }
45     return nil;
46 }
47
48 - (void)mapView:(MKMapView *)mapView didSelectAnnotationView:(MKAnnotationView *)view{
49     if ([view.annotation isKindOfClass:[PlaceMark class]]) {
50         // 只响应大头针类型的 PlaceMark 标记的选中事件
51         PlaceMark *placeMark = (PlaceMark *)view.annotation;
52         self.calloutAnnotation = [[CalloutMapAnnotation alloc]
53                                   initWithLatitude:view.annotation.coordinate.latitude
54                                   andLongitude:view.annotation.coordinate.longitude];
55         self.calloutAnnotation.addr = placeMark.locationDetailBean.street;
56         if (placeMark.locationDetailBean.time) {
57             NSDateFormatter *formatter = [[NSDateFormatter alloc] init];
58             [formatter setDateFormat:@"yyyy-MM-dd HH:mm"];
59             self.calloutAnnotation.time = [formatter stringFromDate:[NSDate dateWithTimeIntervalSince1970:placeMark.locationDetailBean.time]];
60         }
61
62         // 创建并添加self.calloutAnnotation到地图
63         [mapView addAnnotation:self.calloutAnnotation];
64         // 当前点居中
65         [mapView setCenterCoordinate:self.calloutAnnotation.coordinate animated:YES];
66
67         // 点击回调,用于通知上层点击的事件
68         if (self.delegate && [self.delegate respondsToSelector:@selector(mapView:didShowCallOutViewWithDetailBean:)]) {
69             [self.delegate mapView:self didShowCallOutViewWithDetailBean:placeMark.locationDetailBean];
70         }
71     }
72 }
73
74 - (void)mapView:(MKMapView *)mapView didDeselectAnnotationView:(MKAnnotationView *)view {
75     // 取消选中,删除这个Annotation标记
76     if (self.calloutAnnotation && ![view isKindOfClass:[CalloutMapAnnotation class]]) {
77         if (self.calloutAnnotation.coordinate.latitude == view.annotation.coordinate.latitude&&
78             self.calloutAnnotation.coordinate.longitude == view.annotation.coordinate.longitude) {
79             [mapView removeAnnotation:self.calloutAnnotation];
80         }
81     }
82 }
别忘了在创建LocationInfoMapView的时候,先制作好原始数据,用于给LocationInfoMapView的showAnnotation:方法调用:
 1 - (void)initData
 2 {
 3     self.locationArray = [[NSMutableArray alloc] init];
 4     LocationNode *node1 = [[LocationNode alloc] init];
 5     node1.index = 1;
 6     node1.lng = 118.7862;
 7     node1.lat = 32.05465;
 8     node1.time = 1412046912;
 9     node1.street = @"街道1";
10
11     LocationNode *node2 = [[LocationNode alloc] init];
12     node2.index = 2;
13     node2.lng = 118.7392;
14     node2.lat = 32.03229;
15     node2.time = 1412046912;
16     node2.street = @"街道2";
17
18     LocationNode *node3 = [[LocationNode alloc] init];
19     node3.index = 3;
20     node3.lng = 118.6984;
21     node3.lat = 32.16065;
22     node3.time = 1412046912;
23     node3.street = @"街道3";
24     [self.locationArray addObject:node1];
25     [self.locationArray addObject:node2];
26     [self.locationArray addObject:node3];
27 }
注释都写得很详尽,正如前面所说的,实现地图标记和路径绘制两个功能,非常关键的就是做好响应回调的实现。具体代码参考demo:
https://github.com/pigpigdaddy/MapDemo