Vue-Router ---> 实现跳转时不需要刷新页面
1 路由原理:window下的hashchange事件
- 允许通过不同的url访问不同的内容,可以实现多视图的单页面web应用。
* 001 多页面应用MPA(Multiple Page Application)
* 002 单页面应用SPA(Single Page Application)
- vue-router是通过插件的形式来扩展vue的功能,必须通过vue.use()方法安装路由功能。
2 使用步骤
2.1 引入vue-router
import Vue from 'vue';
import VueRouter from 'vue-router';
2.2 使用(安装)vue-router
Vue.use(VueRouter)
2.3 实例化vue-router并配置参数routes
const router = new VueRouter({
  // 配置参数
  routes: [{
    // 当浏览器地址为/home时,显示Home组件的内容(显示在<router-view/> 组件中)
    name: 'home',
    path: '/home',
    component: Home
  }]
})
2.4 导出router实例,并把router实例注入到vue实例中
export default router;
import router from './router';
new Vue({
  router,
  render: h=>h(App),
}).$mount('#app')
2.5 在组件中使用,显示组件内容
为什么页面没刷新但内容更新?
3 参数配置
3.1 window.location.hash
3.1.1 mode 路由模式
- hash路由(哈希路由--默认)
- 原理:window下的hashchange事件
window.onhashchange
- history路由
- tip:路由重定向redirect
如何实现用户点击自动跳转,而不是自行修改路径?
3.2 路由导航
3.2.1 声明式导航<router-link>
-
可以实现点击跳转,点击即修改hash路由
-
属性参数
- to:点击跳转
- active-class | exact-active-class:适用范围--> 嵌套路由|精确匹配路由
- tag:渲染标签名
<router-link :to="item.path" tag="span" active-class="active">
  {{item.text}}
</router-link>
路由导航会生成嵌套标签,改进方法?
3.2.2 编程式导航:通过js代码实现跳转
-
添加自定义事件
goto(path){ } -
router:用来跳转页面-->通过路径跳转|通过路由名称跳转
<li v-for="item in menu" :key="item.name" @click="goto(item.path)"></li>
<li v-for="item in menu" :key="item.name" @click="goto(item.name)"></li>
- router.push() 跳转页面并留下浏览记录
this.$router.push({name}) // 通过路由名称跳转-> 参数只能用对象类型
this.$router.push({path}) // 通过路径跳转
this.$router.push(path)
* router.replace() 跳转页面,没有留下浏览记录
* router.go() | router.back() | router.forward()
3.3 路由传参
3.3.1 跳转时传参
1 params:页面刷新会丢失 -- params参数作为动态路由时则不会,只有写入url的参数才不会丢失
- params传参只能通过name方式跳转
this.$router.push({ path: '.goods', params: { id }}); // 不支持
this.$router.push({ name: 'goods', params: { id }});
- 动态路由传入
{
  name: 'goods',
  path: '/goods/:id',
  // 因为把参数写入到url中,所以刷新params参数不会丢失
  component: Goods
}
2 query:属性成为url参数,刷新页面仍然存在
this.$router.push({ path: '/goods', query: { id }})
3.3.2 怎样在新打开的vue接收参数?
- route:保存当前路由信息的对象
this.$route
3.3.3 如何获取router & route对象?
-
this.$router -
this.$route -
任何一个组件都可以拿到
-
实例化后,会把router注入到vue根实例,可通过$router访问router实例
3.4 使用动态路由,在详情页点击推荐的商品信息,地址的id改变了,但是路由没有跳转?
- 因为在动态路由中切换,使用的是同一组件,默认采用复用原则,意味着组件不会重建和销毁,导致生命周期函数不会执行毛巾而导致无法发送请求。
3.4.1 解决方案一:配置参数watch
1 watch -> 监听实例下属性的修改 -> 监听的值被修改时自动调用函数
watch: {
  $route: function(newVal, oldVal) {
    this.getData();
  }
}
2 内置方法: this.$watch(监听的数据,回调函数)
this.$watch('$route', ()=>this.getData())
3.4.2 解决方案二:使用路由守卫 beforeRouteUpdate(to, from, next) { }
beforeRouteUpdate(to, form, next) {
  // to:目标路由
  // from:当前路由
  // 一定要调用next() 方法才可以进入目标路由
  if(to.params.id != from.params.id) {
    this.getData();
  }
  next();
}
4 路由守卫
4.1 全局守卫 ---【所有的路由切换都会执行,一般会写在路由配置文件中】
4.1.1 router.beforeEach(fn) to, from, next()
4.1.2 router.afterEach(fn) to, from
4.2 路由独享守卫 --- 【写在路由配置中】
4.2.1 beforeEnter(fn) to, from, next()
{
  name: 'goods',
  path: '/goods/:id',
  component: Goods,
  beforeEnter(to, from, next) {
    console.log(111)
    next();
  }
}
4.3 组件内守卫
4.3.1 beforeRouteEnter(fn) to, from, next()
- 此时组件实例还没有被创建,因此无法访问this
4.3.2 beforeRouteUpdate(fn) to, from, next()
4.3.3 beforeRouteLeave(fn) to, from, next()
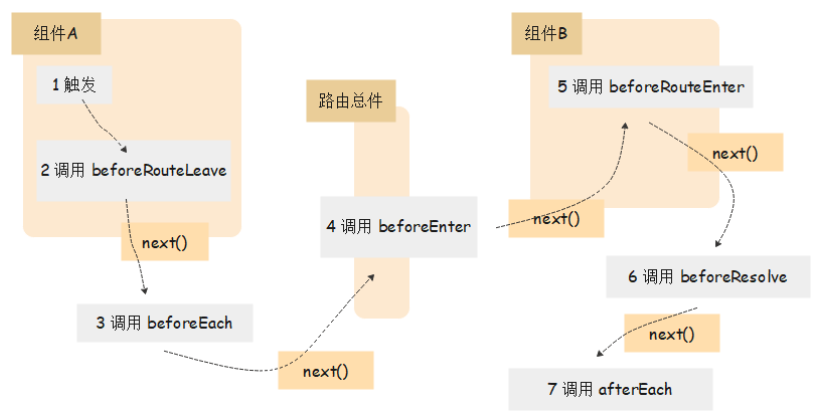
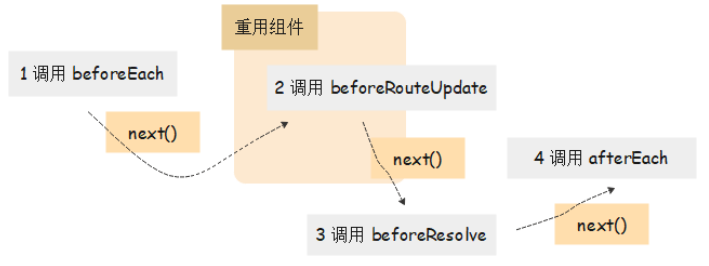
5 路由跳转的过程
5.1 跨组件跳转
5.2 组件重用
5.3 路由守卫应用 --- 权限控制
5.3.1 第一次用户登录,后端检验通过则生成一个token,并返回给客户端;
5.3.2 客户端收到token,保存到本地;
// login.vue
let token = res.data.data;
sessionStorage.setItem('token', token);
5.3.3 在需要登录权限的页面,自动发送token到后端校验;
-
如何限制要登录之后才能访问:路由元信息
-
如何控制路由权限:用路由守卫 -- next()可以控制组件是否可以被访问
1 定义路由元信息,确认哪个路由需要登录权限
// router.js
{
  name: 'cart',
  path: '/cart',
  component: Cart,
  meta: { requiresAuth: true}
}
2 进入路由后,确认用户是否登录
// 全局路由中做判断 query&this.$router
// router.js
router.beforeEach((to, from, next) => {
  if(to.meta.requiresAuth) {
    let token = sessionStorage.getItem('token');
    if(token) {
      next();
    } else {
       next({
         path: '/login',
         query: {
           redirectUrl: to.fullPath
         }
      });
    }
  } else {
     next();
  }
})
// login.vue
let {redirectUrl} = this.$route.query;
this.$router.replace(redirectUrl);
3 检验token的有效性
// 发送校验请求
// router.js
router.beforeEach((to, from, next) => {
  if(to.meta.requiresAuth) {
    let token = sessionStorage.getItem('token');
    if(token) {
      next(); // 先放行,后期校验不通过再返回
      // 发送校验请求
      axios.get(url, {headers: {Authorization: `bearer ${token}`}}).then({data} => {
        if(data.status == 0) {
          next({
            path: '/login',
            query: {
                redirectUrl: to.fullPath
            }
          })
        }
      })
    } else {
       next({
         path: '/login',
         query: {
           redirectUrl: to.fullPath
         }
      });
    }
  } else {
     next();
  }
})