花了差不多一天多的时间,重新撸了一遍webpack4.x的常用配置。
github详细代码地址,如有帮助,请赐我一颗小星星。 https://github.com/pomelott/webpack-multi-page-cli
基本上常用的配置都熟悉了一遍,总体上来讲,为了对parcel进行反击,webpack从4.x开始,正在朝着尽可能的简化配置文件的方向发展。
一、首先来看下,webpack4的新特性。
1.webpack不在单独使用,4.x版本将很多命令移动到了webpack-cli包中。若想要本地安装使用webpack,一般需要以下两步
(1)全局安装webpack,webpack-cli
(2)局部安装webpack,weback-cli
2.增加了模式区分(development,production):
开发者可通过webpack --mode development/production 进行模式切换,也可以通过在配置文件中添加mode配置项进行模式选择。
development:开发模式,打包默认不压缩代码,默认开启代码调试
production:生产模式,上线时使用,打包压缩代码,不开启代码调试。
***若要开启代码调试可在配置文件中增加devtool配置项
devtool: "source-map"
3.固定入口目录为src,与入口默认文件index.js(webpack4.x向简化配置方向发展的第一步)。
当只有src目录与src目录下的index.js时,无需增加webpack.config.js,4.x版本也会将打包后文件放至新增的dist目录下。
4. js代码抽离时,需在config中新增optimization配置项(下面会详细说拆分代码的规则)
  optimization: {
        splitChunks: {
            cacheGroups: {
                vendor: {
                    chunks: "initial",
                    name: "jquery",
                    enforce: true
                }
            }
        }
    }
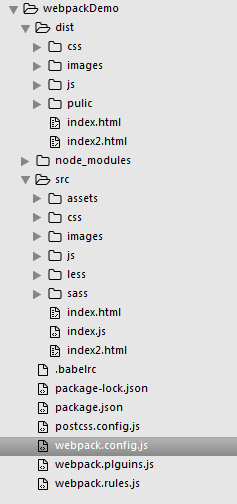
二、4.x版本个人习惯的项目目录结构如下图,整个目录完全为动手搭建,并非用脚手架修改而成。
三、配置文件核心要点
(1)当项目需要多文件入口时,入口项需要以json的格式添加
    entry: {
        // 多入口文件
        a: './src/js/index.js',
        b: './src/js/index2.js',
        jquery: 'jquery'
    }
(2)当多入口文件对应多出口文件时,出口文件的name需要与入口项的key相对应
    output: {
        path:path.resolve(__dirname, 'dist'),
        // 打包多出口文件
        // 生成 a.bundle.js  b.bundle.js  jquery.bundle.js
        filename: './js/[name].bundle.js'
    }
(3)多html文件需要new多个htmlWebpackPlugin实例
         // 自动生成html模板
        new htmlWebpackPlugin({
            filename: "index.html",
            title: "xxxx",
            chunks: ['a',"jquery"],  // 按需引入对应名字的js文件
            template: "./src/index.html"
        }),
        new htmlWebpackPlugin({
            chunks: ['b'],
            filename: "index2.html",
            title: "page2",
            template: "./src/index2.html"
        })
(4)按依赖提取js时,4.x版本写法与之前完全不同
    // 提取js,lib1名字可改
    optimization: {
        splitChunks: {
            cacheGroups: {
                lib1: {
                    chunks: "initial",
                    name: "jquery",
                    enforce: true
                }
            }
        }
    }
在多页使用webpack时,其实我们最头疼的或者需求最大的就是代码拆分问题。代码是否拆分,怎么拆,什么情况下拆。最新的splitChunksPlugin基本能满足我们的所有需求。
我在 webpack4.x版本splitChunksPlugin的配置项详解与实际应用场景 中提到过,最重要的就是priority这个属性。下面具体说下我们的实际需要:
首先需要确定的是你是想优先匹配自己定义的拆分规则还是想优先匹配webpack默认的拆分规则,若相匹配自己定义的拆分规则,则priority需要设置为正数,优先匹配默认拆分规则就设置为负数。
最终webpack会根据优先级进行打包(从大到小,从正数到负数)。
(5)引入第三方库时,建议全局暴露。这样在打包时,4.x会按需打包。
        // 全局暴露统一入口,其他文件直接用就可以
        new webpack.ProvidePlugin({
            $: "jquery"
        }),
四、下面附上三个主要的配置文件
1.webpack.config.js
const path = require('path');
const pluginsConfig = require("./webpack.plguins.js");
const rulesConfig = require("./webpack.rules.js");

module.exports = {
    entry: {
        // 多入口文件
        a: './src/js/index.js',
        b: './src/js/index2.js',
        jquery: 'jquery'
    },
    output: {
        path:path.resolve(__dirname, 'dist'),
        // 打包多出口文件
        // 生成 a.bundle.js  b.bundle.js  jquery.bundle.js
        filename: './js/[name].bundle.js'
    },
    plugins: pluginsConfig,
    devServer: {
        contentBase: path.resolve(__dirname, "dist"),
        host: "localhost",
        port: "8090",
        open: true, // 开启浏览器
        hot: true   // 开启热更新
    },
    // devtool: "source-map",  // 开启调试模式
    module:{
        rules: rulesConfig
    },
    // 提取js,lib1名字可改
    optimization: {
        splitChunks: {
            cacheGroups: {
                lib1: {
                    chunks: "initial",
                    name: "jquery",
                    enforce: true
                }
            }
        }
    }

}
2.webpack.plugins.js
const webpack = require("webpack");
const path = require('path');
const glob = require("glob");
//消除冗余的css
const purifyCssWebpack = require("purifycss-webpack");
// html模板
const htmlWebpackPlugin = require("html-webpack-plugin");
// 清除目录等
const cleanWebpackPlugin = require("clean-webpack-plugin");
//4.x之前用以压缩
const uglifyjsWebpackPlugin = require("uglifyjs-webpack-plugin");
// 分离css
const extractTextPlugin = require("extract-text-webpack-plugin");
//静态资源输出
const copyWebpackPlugin = require("copy-webpack-plugin");
module.exports = [
        new webpack.HotModuleReplacementPlugin(),
        // 调用之前先清除
        new cleanWebpackPlugin(["dist"]),
        // 4.x之前可用uglifyjs-webpack-plugin用以压缩文件,4.x可用--mode更改模式为production来压缩文件
        // new uglifyjsWebpackPlugin(),
        new copyWebpackPlugin([{
            from: path.resolve(__dirname,"src/assets"),
            to: './pulic'
        }]),
        // 分离css插件参数为提取出去的路径
        new extractTextPlugin("css/index.css"),
        // 消除冗余的css代码
        new purifyCssWebpack({
            // glob为扫描模块,使用其同步方法
            paths: glob.sync(path.join(__dirname, "src/*.html"))
        }),
        // 全局暴露统一入口
        new webpack.ProvidePlugin({
            $: "jquery"
        }),
        // 自动生成html模板
        new htmlWebpackPlugin({
            filename: "index.html",
            title: "xxxx",
            chunks: ['a',"jquery"],  // 按需引入对应名字的js文件
            template: "./src/index.html"
        }),
        new htmlWebpackPlugin({
            chunks: ['b'],
            filename: "index2.html",
            title: "page2",
            template: "./src/index2.html"
        })
]
3.webpack.rules.js
const extractTextPlugin = require("extract-text-webpack-plugin");
module.exports = [
            {
                test: /.css$/,
                // 不分离的写法
                // use: ["style-loader", "css-loader"]
                // 使用postcss不分离的写法
                // use: ["style-loader", "css-loader", "postcss-loader"]
                // 此处为分离css的写法
                /*use: extractTextPlugin.extract({
                    fallback: "style-loader",
                    use: "css-loader",
                    // css中的基础路径
                    publicPath: "../"

                })*/
                // 此处为使用postcss分离css的写法
                use: extractTextPlugin.extract({
                    fallback: "style-loader",
                    use: ["css-loader", "postcss-loader"],
                    // css中的基础路径
                    publicPath: "../"

                })
            },
            {
                test: /.js$/,
                use: ["babel-loader"],
                // 不检查node_modules下的js文件
                exclude: "/node_modules/"
            },
            {
                test: /.(png|jpg|gif)$/,
                use: [{
                        // 需要下载file-loader和url-loader
                        loader: "url-loader",
                        options: {
                            limit: 50,
                            // 图片文件输出的文件夹
                            outputPath: "images"
                        }
                    }
                ]
            },
            {
                test: /.html$/,
                // html中的img标签
                use: ["html-withimg-loader"]
            },
            {
                test: /.less$/,
                // 三个loader的顺序不能变
                // 不分离的写法
                // use: ["style-loader", "css-loader", "less-loader"]
                // 分离的写法
                use: extractTextPlugin.extract({
                    fallback:"style-loader",
                    use: ["css-loader", "less-loader"]
                })
            },
            {
                test: /.(scss|sass)$/,
                // sass不分离的写法,顺序不能变
                // use: ["style-loader", "css-loader", "sass-loader"]
                // 分离的写法
                use: extractTextPlugin.extract({
                    fallback:"style-loader",
                    use: ["css-loader", "sass-loader"]
                })
            }
        ]
***习惯用webpack之后,会很方便。不要怕出问题,解决问题后的成就感会让你更加强大。github上有本次4.x版本的demo,欢迎小伙伴提问题,如果觉得还不错,请给星!!