Docker+K8s基础篇(二)
-
docker的资源控制
- A:docker的资源限制
-
Kubernetes的基础篇
- A:DevOps的介绍
- B:Kubernetes的架构概述
- C:Kubernetes的集群安装
-
Kubernetes的简单应用
-
A:Kubernetes命令的介绍和使用
-
B:Kubernetes的增删改查:
-
C:service资源的增删改查:
-
D:pods资源的滚动部署,升级,回滚:
-
♣一:docker的资源控制
A:docker的资源限制
在之前我们提到过容器有6大基本功能组成,其中就包含系统系统资源的控制组,在默认情况下,docker中的容器对资源默认利用是没有任何限制的,因此它可以耗尽docker主机之上内核可以分配给当前容器的所有资源。为了避免出现容器对资源无限制的消耗导致的问题,在此之上,docker提供了一个途径用于控制内存,cpu,io。之前我们也提到过内存本身是一种非可压缩性资源,cpu是一种和压缩性资源,这就会涉及到oome的问题,当linux内核探测到当前宿主机没有足够的内存用来执行某些重要的命令的时候就会抛出oome,一旦发生oome,任何进程都是可能被杀死的,包括docker daemon在内,因此,docker本身特地调整了docker daemon的oome优先级,避免被内核杀死,但是容器优先级是没有被调整的,而这个优先级也是通过oom_adj调整权重来实现优先级策略的。
docker可以在run的时候通过以下参数来调整限制容器的内存和cpu资源
内存相关设置:
-m 物理内存,可以设置kb,m,GB为单位的内存
--menory-swap 设置交换分区的大小,(注:设置交换分区的时候前提是设置了物理内存的大小,交换分区不能单独设置)
除了swap不能单独设置之外,swap和物理内存的设置关系也比较复杂。
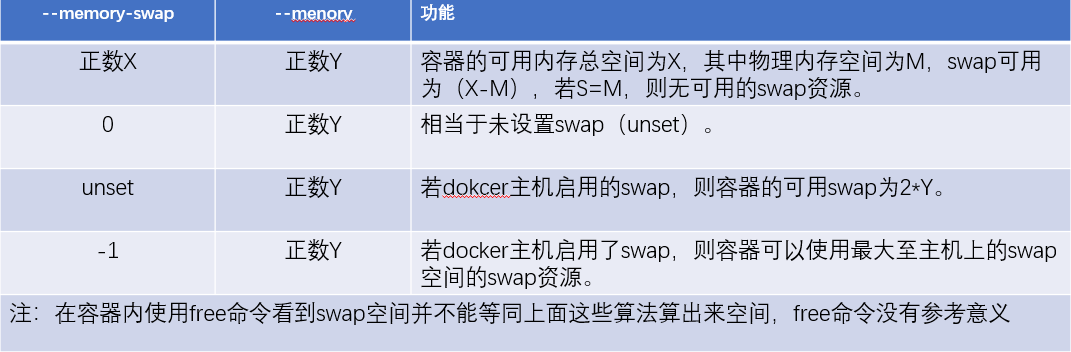
如果要禁用swap,就可以把swap设置和物理内存一样大小。
--memory-swappiness设置内存倾向性的,设置的值是0或100,0代表能不用swap就不用,100如果需要使用swap的时候就使用。
--menory-reservation 预留的内存空间
--oom-kill-disable 这项比较重要,假如我们不希望出现内存耗尽容器被kill掉的情况,就可以使用这个参数设置下。
以上的参数都需要在明确指定内存之后才能使用的吗,也就是需要在-m之后使用。
cpu相关设置:
在默认情况下每一个容器可以使用宿主机的所有cpu资源,
在大多数系统在进程调度的时候都是使用CFS(完全公平调度器)算法,当我们的机器上跑的进程个数大于cpu的核心数的时候,这个时候由什么来判断哪个进程可以优先使用cpu资源,这个就取决于内核里面的调度器,在docker1.13之后就支持了实时调度器,之前都是CFS。
--cpus=value(核心数)
--cpu-period=value(限制使用多长时间)
--cpu-quota=value
--cpuset-cpus 限制在哪个cpu核心上运行,假如有4核心,用0-3来代表核心数,这样就可以控制运行在哪个核心上,如果没有设置此项,设置了--cpus=2,那么只要满足2颗核心即可,不需要关心在那颗cpu上运行。
--cpu-shares 共享式cpu资源,按照比例去分配,不过后续会去掉。
我们通过dockerhub上的stress压测镜像来去测试资源限制分配的过程


[root@www ~]# free -m
              total        used        free      shared  buff/cache   available
Mem:           3771         631        2295          22         844        2753
Swap:          2047           0        2047
[root@www ~]#可以看到宿主机接近4G的内存,我们先对内存进行压力测试。
[root@www ~]# docker run --name stress --rm -it -m 521m polinux/stress stress --vm 2
分配512M的内存空间并且分配两个进程
stress: info: [1] dispatching hogs: 0 cpu, 0 io, 2 vm, 0 hdd

[root@www ~]# docker top stress
UID                 PID                 PPID                C                   STIME               TTY                 TIME                CMD
root                70239               70219               1                   14:21               pts/0               00:00:00            stress --vm 2
root                70271               70239               91                  14:21               pts/0               00:00:02            stress --vm 2
root                70272               70239               91                  14:21               pts/0               00:00:02            stress --vm 2
[root@www ~]# docker stats使用tsats能实时查看内存的变化,可以看到内存始终都是在512M一下的。
CONTAINER ID        NAME                CPU %               MEM USAGE / LIMIT   MEM %               NET I/O             BLOCK I/O           PIDS
322adebdbe41        stress              200.51%             368.8MiB / 521MiB   70.78%              656B / 0B           0B / 0B             3
CONTAINER ID        NAME                CPU %               MEM USAGE / LIMIT   MEM %               NET I/O             BLOCK I/O           PIDS
322adebdbe41        stress              201.17%             462.8MiB / 521MiB   88.82%              656B / 0B           0B / 0B             3
CONTAINER ID        NAME                CPU %               MEM USAGE / LIMIT   MEM %               NET I/O             BLOCK I/O           PIDS
322adebdbe41        stress              201.17%             462.8MiB / 521MiB   88.82%              656B / 0B           0B / 0B             3
CONTAINER ID        NAME                CPU %               MEM USAGE / LIMIT   MEM %               NET I/O             BLOCK I/O           PIDS
[root@www ~]# docker run --name stress --rm -it --cpus 1 polinux/stress stress --vm 2 --cpu 3
我只给1颗核心,启动3个进程
stress: info: [1] dispatching hogs: 3 cpu, 0 io, 2 vm, 0 hdd

[root@www ~]# docker top stress
UID                 PID                 PPID                C                   STIME               TTY                 TIME                CMD
root                70444               70422               0                   14:28               pts/0               00:00:00            stress --vm 2 --cpu 3
root                70475               70444               15                  14:28               pts/0               00:00:01            stress --vm 2 --cpu 3
root                70476               70444               19                  14:28               pts/0               00:00:01            stress --vm 2 --cpu 3
root                70477               70444               24                  14:28               pts/0               00:00:01            stress --vm 2 --cpu 3
root                70478               70444               15                  14:28               pts/0               00:00:01            stress --vm 2 --cpu 3
root                70479               70444               25                  14:28               pts/0               00:00:01            stress --vm 2 --cpu 3
[root@www ~]# docker stats
CONTAINER ID        NAME                CPU %               MEM USAGE / LIMIT     MEM %               NET I/O             BLOCK I/O           PIDS
74847e640f45        stress              1.07%               483.5MiB / 3.683GiB   12.82%              656B / 0B           0B / 0B             6
CONTAINER ID        NAME                CPU %               MEM USAGE / LIMIT     MEM %               NET I/O             BLOCK I/O           PIDS
74847e640f45        stress              1.07%               483.5MiB / 3.683GiB   12.82%              656B / 0B           0B / 0B             6
CONTAINER ID        NAME                CPU %               MEM USAGE / LIMIT     MEM %               NET I/O             BLOCK I/O           PIDS
74847e640f45        stress              100.33%             451.5MiB / 3.683GiB   11.97%              656B / 0B           0B / 0B             6
CONTAINER ID        NAME                CPU %               MEM USAGE / LIMIT     MEM %               NET I/O             BLOCK I/O           PIDS
74847e640f45        stress              100.33%             451.5MiB / 3.683GiB   11.97%              656B / 0B           0B / 0B             6
CONTAINER ID        NAME                CPU %               MEM USAGE / LIMIT     MEM %               NET I/O             BLOCK I/O           PIDS
74847e640f45        stress              102.15%             153.5MiB / 3.683GiB   4.07%               656B / 0B           0B / 0B             6
CONTAINER ID        NAME                CPU %               MEM USAGE / LIMIT     MEM %               NET I/O             BLOCK I/O           PIDS
74847e640f45        stress              102.15%             153.5MiB / 3.683GiB   4.07%               656B / 0B           0B / 0B             6
可以看到cpu即使已经到100%了,但是也不会超过我们的限制,当然超出一点这个是计算的不准导致的
♣二:Kubernetes的基础篇
A:DevOps的介绍:
在以往的运维工作中,我们需要部署例如lnmp的环境的时候会比较繁琐,如果是大量部署的时候这种操作重复会给运维工作人员带来巨大的工作量,所以我们便有了的ansible等部署编排工具,依赖于playbook实现编排好程序的安装,修改配置文件并启动程序,从而避免大量的重复操作。当然还有最老得做法就是编写自动部署脚本,当我们的环境更改为容器的时候,同理我们也得为容器进行预先设定下载镜像,启动顺序等工作,这个时候就需要借助k8s等工具来完成容器的编排工作了。
在docker功能不断完善随之而来的就是容器的应用程序的编排了,docker也提供自己的编排工具docker compose,但是docker compose只适合单机容器的编排,很多情况下我们希望能对多主机的docker host来进行编排,来完成资源调度的效果,整体偏向集群化,docker面对这种场景就提供了docker swarm,直接由docker swarm将众多dokcer host整合成一个资源池,让docker compose编排的时候不在关心docker主机是那台,是什么dokcer host。如果是新的机器要加入到docker swarm资源池,docker也提供了docker mackine工具,docker mackine可以将一台主机迅速初始化为满足加入docker swarm资源池的一份子。
除了docker可以提供容器的编排工具之外,还有mesos,这个不算是完整的编排工具,它所面向的上层接口不是容器接口,所以也只适用于资源的调度分配,marathon就弥补了mesos不能编排容器的缺点吗,mesos和marthon组成了第二种的容器编排工具,后面就出现了kubernetes(k8s)。
以往的互联网公司的架构是大家合力开发一个应用,但是这种应用会带来未来随着业务扩展导致的瓶颈,所以后面就出现了微服务(MicroServices)的概念,将一个大的应用服务拆成若干个微型服务,这样后续横向扩展就会变得方便,由此微服务的形式和容器之间就天然形成了良好的场景并且能实现。
在互联网不断发展已经覆盖了我们方方面面,面对用户群体的增大,新功能需求的不断扩展,开发模式也在不断的发生变化,例如早期的瀑布式开发模式到后来的敏捷开发模式,精益开发等,直到现在的DevOps,都在不断随着基数的变大儿变化,服务的架构传统从最开始的单体架构到分层架构,再到现在的微服务架构,从最开始的单机到现在的集群,无一不随着基数,场景,硬件等迭代更新儿变化。
在新的服务架构时代,人们把一个每一个应用拆解成N个微小的应用,而这个微小的应用只做一件事情,那么这N个微服务彼此各个微服务之间的调用关系就会变的极其复杂,而且怎么去保证一个微服务启动必要的服务变的尤为重要。
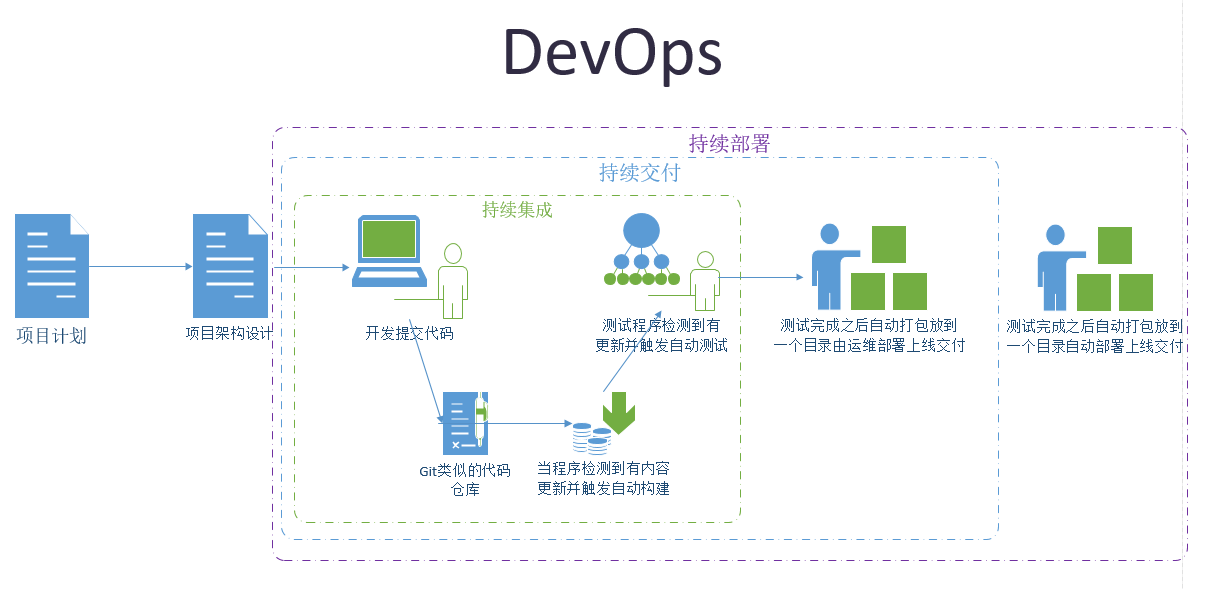
提到微服务就需要说明下DevOps,在DevOps之下必须要要了解到的三个词:
CI:持续集成
CD:持续交付
CD:持续部署
在以往的环境中,DevOps没有大面积实现的情况是因为你无法控制未来用户的环境的复杂性,(比如有的是windows,有的linux系统等等)这样异构的环境中极为容易出现问题,那么使用了容器,DevOps里面的持续部署问题将变得迎刃而解。
微服务架构:https://mp.weixin.qq.com/s/wCvNSNKfgqN35R41gcur9A
DevOps中的持续是有解决方案了,但是容器之间的相互依赖,容器之间的相互通信等等,没有事先的编排工具来协助指定好规则,全靠人为去控制是几乎不可能的事情,所以就需要借助k8s这样的容器编排工具来完成规则的指定。
B:Kubernetes的架构概述:
kubernetes是深受谷歌内部的borg系统的影响,由go语言开发。
kubernetes的功能:
1:自动装箱(基于依赖来自动完成容器的部署)
2:自我修复(因为容器过多,当单个容器出现故障,人为干预去启动可能耗费的时间过长,直接kill掉这个容器,重启一个,用新的容器替代来完成修复)
3:自动实现水平扩展(一个容器不能支撑业务平台了,直接自动横向启动容器,直到满足业务平台所需的容器,但是得保证底层的物理平台的数量足够)
4:自动实现服务发现和负载均衡(如果一个服务的启动依赖另外一个服务,k8s能自动找到被依赖的服务,而且如果是同样的服务起了很多,k8s也能完成自动的负载均衡)
5:自动发布和回滚
6:密钥和配置管理
7:存储编排(可以实现按照实际的需要来创建能满足容器自身需要的存储卷)
8:批量处理运行
kubernetes的环境架构:
kubernetes简单意义上来说就是一个集群,能组合多台机器整合成一个资源池,并能持续对外提供资源服务等能力的集群,那么关于kubernetes的实现就是找多台主机都安装上kubernetes的相关组件,把多台主机当一台主机来使用。
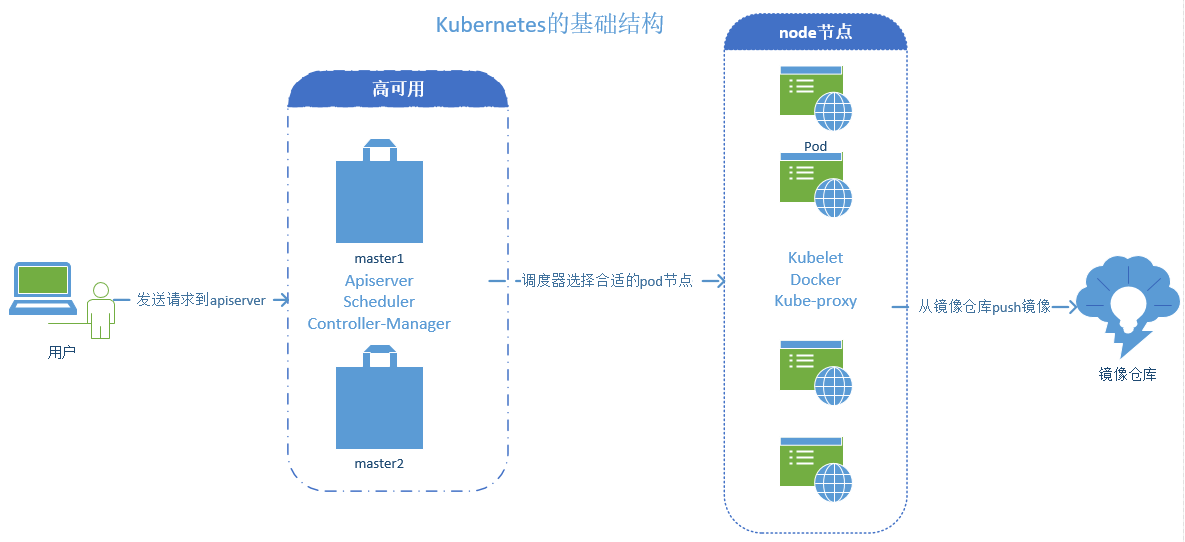
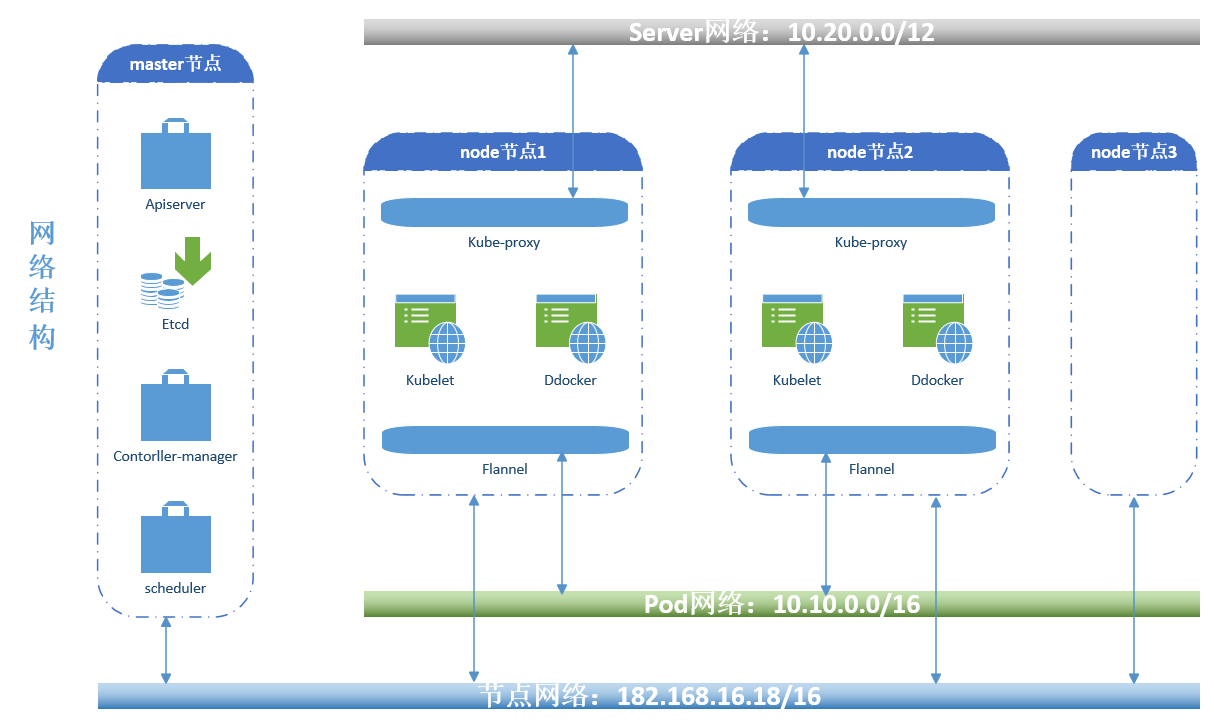
在kubernetes上是一种存在中心节点的集群架构,是由master和nodes来组成,master节点一般指需要做冗余或者高可用即可,nodes才是真正提供工作的节点(运行容器),用户通过发送请求给到节点的master,master内部有一个调度器,去分析各node节点的资源状态,挑选出一个最佳适配的用户请求的node节点,再由node节点本地的docker容器引擎(或者其它)负责吧这个容器启动起来,如果需要启动的镜像本地没有的话,node节点将从dockhub或者本地的自建的镜像仓库push镜像下来并启动为容器,而且kubernetes还能自托管在kubernetes之上。
kubernetes接收用户请求也是通过api的形式来完成的,在kubernetes上这个接收用请求的组件就叫做apiserice,当一个用户请求进来,这个请求是创建一个容器,那么这个请求会被master之上的调度器(Scheduler)调度到符合实际需求的node节点上来启动,在kubernetes上设计了一个两级调度的方式来完成调度,第一步先做预选(查看到底有多少容器是符预选要求的),第二部进行优选(例如预选选出来6个node节点是符合要求的,那么优选就是通过优选算法来选择一个最佳的node节点来启动容器)。
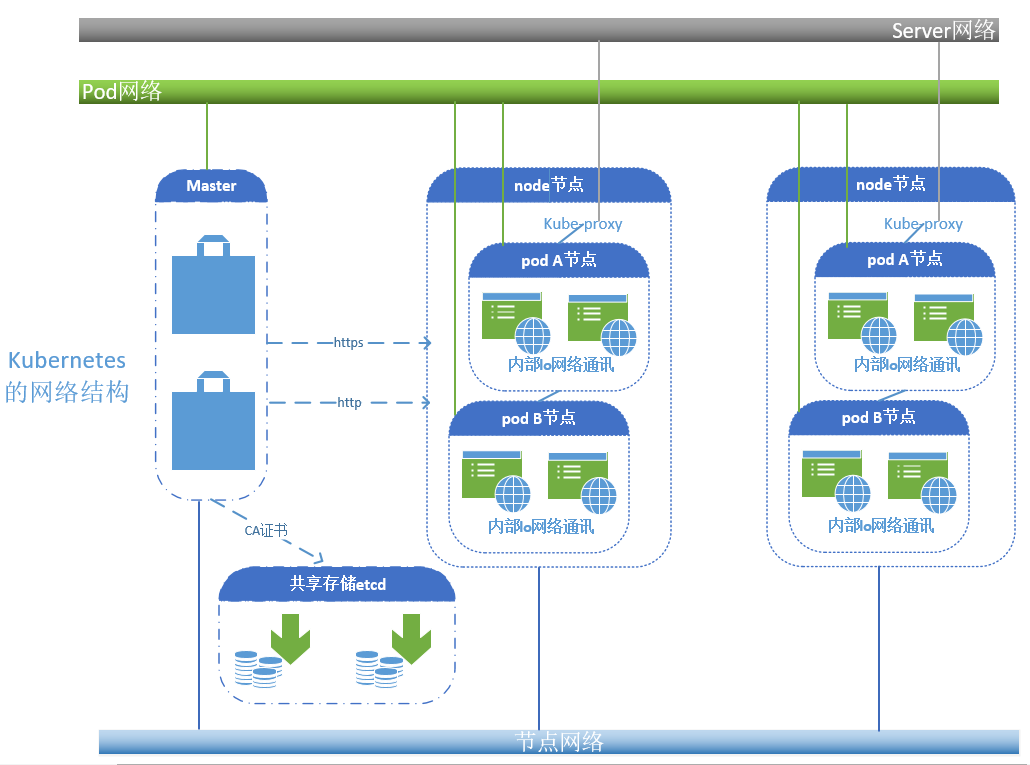
各node节点负责提供真正的服务,但是容器免不了会出现各问题导致不可用,那么就需要在master节点上有一个组件实时的来监控各node节点状态是否健康,一旦node节点出现故障,监控组件就会向apiservice组件发起请求到调度器启动一个和之前节点一模一样环境的node节点来提供服务,这个组件就是控制器,而且这个控制器需要不停在本地循环,不断的去检测来判断容器是否是健康的。如果是用于监控node节点的控制器出现的故障怎么办,那么node节点的健康状态将无法得以保障,那么在kubernetes的master节点之上还有一个控制器管理器,用于监控控制器的健康状态,那么这种情况下控制器管理器(contorller-Manager)就需要做冗余。(kubernetes支持多种类型的控制器控制容器的只是其中一种)
node节点的工作特点:
node是kubernetes的工作节点,负责运行master节点分配的各项任务,而众多的node组合在一起就是一个资源池,由kube_Cluster来统一管理,那如果是我们想删除资源池内的某一个没有用的容器怎么办,这个时候我们需要精准的找到这个容器,就必须使用标签一类的kv数据加以标记,这个标签还是有区别于容器的标签,这个标签内容还得考虑到方便我们批量筛选的需求,那这个筛选的机制需要通过另外一个组件叫标签选择器(selector),而且这个标签选择器不单单只是用于筛选标签,还能用于其它的内容筛选。
在node节点之上有用于负责和master节点通讯的集群代理服务(kubelet),上游的调度器调度之后由kubele来负责执行来让容器引擎启动容器
在整个kubernetes架构中最小的单元其实是容器,而在kubernetes上最小的单元节点被称作为pod,pod不直接指容器,而是对容器做了一层封装,做了一层外壳而已。
pod的工作特点:
pod其实也就是模拟了虚拟机的形式,在一个pod里面可以运行多个程序,而且它们使用同一组网络对外通讯,内部则使用环形接口进行通讯,pod里面的程序还共享了存储卷资源,那么就形成了这样的一个结构,kubernetes是通过master节点来控制node节点的,node节点是用于运行pod节点的,pod节点里面跑的就是容器,因为pod节点微小,一般一个pod就跑一个容器,除非容器之间的关系很紧密,考虑到之间的关系需要放在一个pod之中,那么在这个运行了多个容器的pod之中,其中一个程序是主程序,其它的程序则是为主程序提供更多功能所存在的容器,但是一个node只能运行一个pod。
pod的分类:
1:自主式pod
2:控制器管理的pod
老版本replicationcontroller(副本控制器),当我们一旦定义了副本的数量,副本控制器就会实时的去监控副本的数量,当数量不满足我们的条件的时候会自动补齐副本数量到我们预设的数量,当然如果出现副本数量大于我们的预设值的时候,副本控制器也是要删除多余的副本以便服务我们的预设值。
副本控制器还能完成滚动更新的功能,当容器是基于1.1版本的镜像完成启动的,那么当我们升级的镜像并启动为容器之后,副本控制器会多启动一个副本并自动升级为新版本的镜像,然后关闭老的镜像,来完成滚动更新。
新版本:
replicaset(副本控制集)
Deploymet(声明式控制器),只能管理无状态的应用
statefulset(有状态副本集)
Daemonset(指定副本的运行个数)
job(作业)cronjob(周期性作业)
HPA(horizontal pod autosacler)水平伸缩控制器
当某个pod终止工作,需要创建一个一模一样的pod的时候,用户怎么访问到了,这个就需要在用户和pod之间加一个中间层,这个中间层就是一个iptables防火墙的规则,在kubernetes上不是以服务的形式存在,但是是一个重要的组成部分,用户访问的是这个中间层,这样用户的请求就会被这个中间层调度到新pod之上。而且在kubernetes之后的版本并将iptables的规则升级成了ipvs规则,支持lvs的调度算法和自定义的算法。
我们知道解析的过程需要dns参与的,需要设定主机名等信息,kubernetes的这个中间层也不例外,也是基于(动态)dns来完成解析过程的。
在kubernetes上这种附件(附加组件)我们叫addons。
在整个kubernetes的搭建做复杂的就是网络的设置了,至此kubernetes支持了外部(第三方)的网络解决方案,统称为CNI,在CNI里面最常用的两个工具就是flannel(只支持网络配置,不支持网络策略,但是使用简单),calico(支持网络配置和网络策略,使用较为复杂,实现了BGP的协议来实现路由直通模型来通讯),后续就出现了江两者结合的工具叫canel,网络配置使用flannel,网络策略上使用calico,这些第三方的工具可以在kubernetes托管以附件来运行。
C:Kubernetes的集群安装:
从上面的的介绍来看,要自行一步步的安装kubernetes很困难,光ca证书我们就前前后后需要准备5套,这么困难的部署方式肯定是不可取的,网络上有大量关于kubernetes的playbook(ansible),你只需要指定master和node节点就可以轻松完成部署。但是即使有了playbook也会出现因环境导致的问题,一旦出现部署的问题,部署将变的更加麻烦,所以现在有另外的项目kubeadm,但是kubeadm会将所有能运行为容器的全部运行为容器,除了kubenet是要跑在主机之上的。有时候我们并不想我们的环境如此复杂,那还有minikube,这个只需要一个节点就可以跑起来kubernetes的整个环境,但是这个部署的环境过于简单,很多组件运行逻辑我们是看不到的。
kubernetes在github的项目托管站点和项目部署简要文档:
https://github.com/kubernetes
https://github.com/kubernetes/kubeadm/blob/master/docs/design/design_v1.10.md
kubernetes的官方文档站点:
https://kubernetes.io/docs/home/
kubeadm的官方文档站点
https://kubernetes.io/docs/setup/independent/install-kubeadm/
kubernetes集群的部署方式:
1:通过手动将k8s集群节点的各个组件部署为主机应用,通过systemctl来启动和关闭各组件,并将其添加到开机自启。(过程繁琐复杂)
2:通过kubeadm这样的工具(由k8s官方提供的部署工具),这个方式是将各个组件运行为pod(静态pod),也需要各节点部署kubellet和docker,并将其运行起来且加入开机自启,然后将其中一个节点(安装了kubeadm,kubectl,kubelet,docker)的节点初始化为master,余下的节点初始化为node,并且master和node节点需要部署flannel,以便为pod提供网络功能。flannel这种就是我们之前提到的附件,而且都是动态的pod,由k8s自身来管理的。
kubeadm还能支持同时安装多个master节点来做冗余。
master节点的部署:
通过配置机器的/etc/hosts文件指明机器的主机名和ip即可,还需要改主机名
    [root@www kubeadm]# cat /etc/hosts
    127.0.0.1   localhost localhost.localdomain localhost4 localhost4.localdomain4
    ::1         localhost localhost.localdomain localhost6 localhost6.localdomain6
    192.168.181.139 www.kubernetes.master1.com master
    192.168.181.140 www.kubernetes.node1.com node1
    [root@www kubeadm]# cat /etc/hostname
    www.kubernetes.master1.com
    [root@www kubeadm]#
2:配置好集群节点时间同步服务,让集群节点时间保持同步;
3:关闭firewalld(防火墙)并加入开机不自起,因为一旦部署k8s之后,k8s会自己生成很多iptables的规则。
[root@www sysctl.d]# pwd
    /etc/sysctl.d
    [root@www sysctl.d]# cat k8s.conf
    net.bridge.bridge-nf-call-ip6tables = 1
    net.bridge.bridge-nf-call-iptables = 1
    net.ipv4.ip_forward = 1
    并执行modprobe br_netfilter && sysctl -p /etc/sysctl.d/k8s.conf让其生效
    [root@www bridge]# cat bridge-nf-call-ip6tables
    1
    [root@www bridge]# cat bridge-nf-call-iptables
    1
    [root@www bridge]# pwd
    /proc/sys/net/bridge
    查看/proc/sys/net/bridge两个文件值是否修改成功,如果这两个值不是1,会导致iptables被绕过而导致流量路由不正确的问题
swapoff -a
sed -i 's/.*swap.*/#&/' /etc/fstab  将文件里面的swap行也注释掉
在/etc/sysctl.d/k8s.conf末尾再加上一行
vm.swappiness=0
sysctl -p /etc/sysctl.d/k8s.conf 让其生效
free -m确认swap分区已经为0
此步骤不单独介绍了,请参照https://www.cnblogs.com/ppc-srever/p/10500961.html的docker安装步骤
    docker安装之后需要启动并加入开机自启动
    配置docker配置文件来获取所需的各组件的镜像文件:
    cd /usr/lib/systemd/system
    对docker.service增加配置行
    [service]下增加
    Environment="HTTP_PROXY=http://www.ik8s.io:10080"  (这个站点是kubernetes的镜像站点,是需要FQ的,如果不能FQ,请自己找所需要的版本资源)
    Environment="NO_PROXY=127.0.0.0/8,172.20.0.0/16"
    保存之后加载配置文件重启docker服务
    systemctl daemon-reload
    systemctl restart docker
    docker info查看刚才我们配置的信息是否加载成功
    .......
    Debug Mode (server): false
    No Proxy: 127.0.0.0/8,172.20.0.0/16  (我本地没有配置站点信息)
    Registry: https://index.docker.io/v1/
    Labels:
    Experimental: false
    Insecure Registries:
     127.0.0.0/8
    Live Restore Enabled: false
    Product License: Community Engine

    [root@www ~]#
    我本地安装的1.14.1的版本,下载地址镜像如下:
[root@www kubeadm]# cat pull_images.sh
#/bin/bash
docker pull mirrorgooglecontainers/kube-apiserver:v1.14.1
docker pull mirrorgooglecontainers/kube-controller-manager:v1.14.1
docker pull mirrorgooglecontainers/kube-scheduler:v1.14.1
docker pull mirrorgooglecontainers/kube-proxy:v1.14.1
docker pull mirrorgooglecontainers/pause:3.1
docker pull mirrorgooglecontainers/etcd:3.3.10
docker pull coredns/coredns:1.3.1
docker pull quay.io/coreos/flannel:v0.11.0-amd64

docker tag mirrorgooglecontainers/kube-apiserver:v1.14.1 k8s.gcr.io/kube-apiserver:v1.14.1
    docker tag mirrorgooglecontainers/kube-controller-manager:v1.14.1 k8s.gcr.io/kube-controller-manager:v1.14.1
    docker tag mirrorgooglecontainers/kube-scheduler:v1.14.1 k8s.gcr.io/kube-scheduler:v1.14.1
    docker tag mirrorgooglecontainers/kube-proxy:v1.14.1 k8s.gcr.io/kube-proxy:v1.14.1
docker tag mirrorgooglecontainers/pause:3.1 k8s.gcr.io/pause:3.1
docker tag mirrorgooglecontainers/etcd:3.3.10 k8s.gcr.io/etcd:3.3.10
docker tag coredns/coredns:1.3.1 k8s.gcr.io/coredns:1.3.1

docker rmi mirrorgooglecontainers/kube-apiserver:v1.14.1
docker rmi mirrorgooglecontainers/kube-controller-manager:v1.14.1
docker rmi mirrorgooglecontainers/kube-scheduler:v1.14.1
docker rmi mirrorgooglecontainers/kube-proxy:v1.14.1
docker rmi mirrorgooglecontainers/pause:3.1 (这个镜像是用于后面有容器要加入集群中来,可以复用pause提供的基础网络,这种镜像我们叫基础架构镜像)
docker rmi mirrorgooglecontainers/etcd:3.3.10
docker rmi coredns/coredns:1.3.1
执行脚本pull镜像到本地,如果中间有中断的更换网络重新pull
可以通过阿里云镜像站点或者其它站点的yum源来进行安装,我本地使用的阿里云。
    https://mirrors.aliyun.com/kubernetes/yum/repos/kubernetes-el7-x86_64/
    编写yum仓库文件,将url指向阿里云镜像仓库
    [root@www yum.repos.d]# cat kubernetes.repo
    [kubernetes]
    name=Kubernetes REPO
    baseurl=https://mirrors.aliyun.com/kubernetes/yum/repos/kubernetes-el7-x86_64
    enabled=1
    gpgcheck=0
    gpgkey=https://mirrors.aliyun.com/kubernetes/yum/doc/yum-key.gpg
    我没有做key验证,如果需要请将key下载到本地import下即可
    wget https://mirrors.aliyun.com/kubernetes/yum/doc/yum-key.gpg
    执行:在下载yum-key.gpg的文件路径下执行rpm -import yum-key.gpg
    刷新下镜像仓库
    yum repolist
    yum -y install kubeadm kubectl kubelet
    安装完成之后将kubelet加入开机自启
    [root@www ~]# rpm -ql kubelet
    /etc/kubernetes/manifests
    /etc/sysconfig/kubelet
    /usr/bin/kubelet
    /usr/lib/systemd/system/kubelet.service
    [root@www ~]# rpm -ql kubeadm
    /usr/bin/kubeadm
    /usr/lib/systemd/system/kubelet.service.d/10-kubeadm.conf
    [root@www ~]# rpm -ql kubectl
    /usr/bin/kubectl
    [root@www ~]#
    编辑kubelet文件,增加参数,屏蔽swap
    [root@www sysconfig]# cat kubelet
    KUBELET_EXTRA_ARGS="--fail-swap-on=false"
    [root@www sysconfig]# pwd
    /etc/sysconfig
[root@www ~]# kubeadm init --help(先查看相关帮助)
Run this command in order to set up the Kubernetes control plane.

The "init" command executes the following phases:
```
preflight                  Run pre-flight checks
kubelet-start              Writes kubelet settings and (re)starts the kubelet
certs                      Certificate generation
  /front-proxy-ca            Generates the self-signed CA to provision identities for front proxy
  /front-proxy-client        Generates the client for the front proxy
  /etcd-ca                   Generates the self-signed CA to provision identities for etcd
  /etcd-server               Generates the certificate for serving etcd
  /etcd-healthcheck-client   Generates the client certificate for liveness probes to healtcheck etcd
  /apiserver-etcd-client     Generates the client apiserver uses to access etcd
  /etcd-peer                 Generates the credentials for etcd nodes to communicate with each other
  /ca                        Generates the self-signed Kubernetes CA to provision identities for other Kubernetes components
  /apiserver-kubelet-client  Generates the Client certificate for the API server to connect to kubelet
  /apiserver                 Generates the certificate for serving the Kubernetes API
  /sa                        Generates a private key for signing service account tokens along with its public key
kubeconfig                 Generates all kubeconfig files necessary to establish the control plane and the admin kubeconfig file
  /admin                     Generates a kubeconfig file for the admin to use and for kubeadm itself
  /kubelet                   Generates a kubeconfig file for the kubelet to use *only* for cluster bootstrapping purposes
  /controller-manager        Generates a kubeconfig file for the controller manager to use
  /scheduler                 Generates a kubeconfig file for the scheduler to use
control-plane              Generates all static Pod manifest files necessary to establish the control plane
  /apiserver                 Generates the kube-apiserver static Pod manifest
  /controller-manager        Generates the kube-controller-manager static Pod manifest
  /scheduler                 Generates the kube-scheduler static Pod manifest
etcd                       Generates static Pod manifest file for local etcd.
  /local                     Generates the static Pod manifest file for a local, single-node local etcd instance.
upload-config              Uploads the kubeadm and kubelet configuration to a ConfigMap
  /kubeadm                   Uploads the kubeadm ClusterConfiguration to a ConfigMap
  /kubelet                   Uploads the kubelet component config to a ConfigMap
upload-certs               Upload certificates to kubeadm-certs
mark-control-plane         Mark a node as a control-plane
bootstrap-token            Generates bootstrap tokens used to join a node to a cluster
addon                      Installs required addons for passing Conformance tests
  /coredns                   Installs the CoreDNS addon to a Kubernetes cluster
  /kube-proxy                Installs the kube-proxy addon to a Kubernetes cluster
```

Usage:
  kubeadm init [flags]
  kubeadm init [command]

Available Commands:
  phase       use this command to invoke single phase of the init workflow

Flags:
      --apiserver-advertise-address string   The IP address the API Server will advertise it's listening on. If not set the default network interface will be used.(api服务监听的ip,没有设置就是默认的网络接口)
      --apiserver-bind-port int32            Port for the API Server to bind to. (default 6443)(默认端口是6443)
      --apiserver-cert-extra-sans strings    Optional extra Subject Alternative Names (SANs) to use for the API Server serving certificate. Can be both IP addresses and DNS names.
      --cert-dir string                      The path where to save and store the certificates. (default "/etc/kubernetes/pki")
      --certificate-key string               Key used to encrypt the control-plane certificates in the kubeadm-certs Secret.
      --config string                        Path to a kubeadm configuration file.
      --cri-socket string                    Path to the CRI socket to connect. If empty kubeadm will try to auto-detect this value; use this option only if you have more than one CRI installed or if you have non-standard CRI socket.
      --dry-run                              Don't apply any changes; just output what would be done.
      --experimental-upload-certs            Upload control-plane certificates to the kubeadm-certs Secret.
      --feature-gates string                 A set of key=value pairs that describe feature gates for various features. Options are:

  -h, --help                                 help for init
      --ignore-preflight-errors strings      A list of checks whose errors will be shown as warnings. Example: 'IsPrivilegedUser,Swap'. Value 'all' ignores errors from all checks.(在做预检查的时候需要忽略什么,例如Swap等)
      --image-repository string              Choose a container registry to pull control plane images from (default "k8s.gcr.io")(指定kubernetes的版本)
      --kubernetes-version string            Choose a specific Kubernetes version for the control plane. (default "stable-1")
      --node-name string                     Specify the node name.
      --pod-network-cidr string              Specify range of IP addresses for the pod network. If set, the control plane will automatically allocate CIDRs for every node.(pod使用的网络可以指定一个范围,然后kubernetes会自行在范围里面进行分配)
      --service-cidr string                  Use alternative range of IP address for service VIPs. (default "10.96.0.0/12")(指定service的ip,可以看到后面有示例)
      --service-dns-domain string            Use alternative domain for services, e.g. "myorg.internal". (default "cluster.local")
      --skip-certificate-key-print           Don't print the key used to encrypt the control-plane certificates.
      --skip-phases strings                  List of phases to be skipped
      --skip-token-print                     Skip printing of the default bootstrap token generated by 'kubeadm init'.
      --token string                         The token to use for establishing bidirectional trust between nodes and control-plane nodes. The format is [a-z0-9]{6}.[a-z0-9]{16} - e.g. abcdef.0123456789abcdef
      --token-ttl duration                   The duration before the token is automatically deleted (e.g. 1s, 2m, 3h). If set to '0', the token will never expire (default 24h0m0s)

Global Flags:
      --log-file string   If non-empty, use this log file
      --rootfs string     [EXPERIMENTAL] The path to the 'real' host root filesystem.
      --skip-headers      If true, avoid header prefixes in the log messages
  -v, --v Level           number for the log level verbosity

Use "kubeadm init [command] --help" for more information about a command.
[root@www kubeadm]# kubeadm init --kubernetes-version=v1.14.1 --pod-network-cidr=10.244.0.0/16 --service-cidr=10.96.0.0/12 --ignore-preflight-errors=Swap
                    我们使用init来初始化master节点,需要指明kubernetes的版本(也可以不用指定,不指定就是默认的版本)pod的网路,service的网络,忽略swap(虽然我们已经禁用了,当然也不可以加后面的参数)
[init] Using Kubernetes version: v1.14.1
[preflight] Running pre-flight checks
        [WARNING IsDockerSystemdCheck]: detected "cgroupfs" as the Docker cgroup driver. The recommended driver is "systemd". Please follow the guide at https://kubernetes.io/docs/setup/cri/
        (检测到我们本地是用的“cGroupfs”作为Docker cGroup驱动程序。推荐的驱动程序是“systemd”,并让我们参照给出的地址进行设置,也可以忽略
[preflight] Pulling images required for setting up a Kubernetes cluster(把kubernetes所需要的镜像拉下来)
[preflight] This might take a minute or two, depending on the speed of your internet connection
[preflight] You can also perform this action in beforehand using 'kubeadm config images pull'(如果你本地网络较慢或者不能连接互联网,可以提前pull到你的私有仓库之后在pull到kubernetes本地)
[kubelet-start] Writing kubelet environment file with flags to file "/var/lib/kubelet/kubeadm-flags.env"将kubelet的环境配置写到/var/lib/kubelet/kubeadm-flags.env
[kubelet-start] Writing kubelet configuration to file "/var/lib/kubelet/config.yaml"
[kubelet-start] Activating the kubelet service(启动kubelet服务)
[certs] Using certificateDir folder "/etc/kubernetes/pki"
[certs] Generating "front-proxy-ca" certificate and key
[certs] Generating "front-proxy-client" certificate and key
[certs] Generating "etcd/ca" certificate and key
[certs] Generating "etcd/healthcheck-client" certificate and key
[certs] Generating "etcd/server" certificate and key
[certs] etcd/server serving cert is signed for DNS names [www.kubernetes.master1.com localhost] and IPs [192.168.181.139 127.0.0.1 ::1]
[certs] Generating "apiserver-etcd-client" certificate and key
[certs] Generating "etcd/peer" certificate and key
[certs] etcd/peer serving cert is signed for DNS names [www.kubernetes.master1.com localhost] and IPs [192.168.181.139 127.0.0.1 ::1]
[certs] Generating "ca" certificate and key
[certs] Generating "apiserver" certificate and key
[certs] apiserver serving cert is signed for DNS names [www.kubernetes.master1.com kubernetes kubernetes.default kubernetes.default.svc kubernetes.default.svc.cluster.local] and IPs [10.96.0.1 192.168.181.139]
[certs] Generating "apiserver-kubelet-client" certificate and key
[certs] Generating "sa" key and public key
启动服务之后又生成了一堆的证书和秘钥文件
[kubeconfig] Using kubeconfig folder "/etc/kubernetes"
[kubeconfig] Writing "admin.conf" kubeconfig file
[kubeconfig] Writing "kubelet.conf" kubeconfig file
[kubeconfig] Writing "controller-manager.conf" kubeconfig file
[kubeconfig] Writing "scheduler.conf" kubeconfig file
[control-plane] Using manifest folder "/etc/kubernetes/manifests"
[control-plane] Creating static Pod manifest for "kube-apiserver"
[control-plane] Creating static Pod manifest for "kube-controller-manager"
[control-plane] Creating static Pod manifest for "kube-scheduler"
创建静态pod清单
[etcd] Creating static Pod manifest for local etcd in "/etc/kubernetes/manifests"
[wait-control-plane] Waiting for the kubelet to boot up the control plane as static Pods from directory "/etc/kubernetes/manifests". This can take up to 4m0s
[apiclient] All control plane components are healthy after 25.041320 seconds
[upload-config] storing the configuration used in ConfigMap "kubeadm-config" in the "kube-system" Namespace
[kubelet] Creating a ConfigMap "kubelet-config-1.14" in namespace kube-system with the configuration for the kubelets in the cluster
[upload-certs] Skipping phase. Please see --experimental-upload-certs
[mark-control-plane] Marking the node www.kubernetes.master1.com as control-plane by adding the label "node-role.kubernetes.io/master=''"将www.kubernetes.master1.com声明成master节点
[mark-control-plane] Marking the node www.kubernetes.master1.com as control-plane by adding the taints [node-role.kubernetes.io/master:NoSchedule]
[bootstrap-token] Using token: wgl512.9pn3vjcdrvlz03hx
生成令牌认证信息,这个令牌认证信息是后续node节点要加入集群内的参数,而且这个令牌是变动的(这个令牌其实是一个域共享秘钥,只有声明了有这个秘钥的节点才能加入集群中来)
[bootstrap-token] Configuring bootstrap tokens, cluster-info ConfigMap, RBAC Roles
[bootstrap-token] configured RBAC rules to allow Node Bootstrap tokens to post CSRs in order for nodes to get long term certificate credentials
[bootstrap-token] configured RBAC rules to allow the csrapprover controller automatically approve CSRs from a Node Bootstrap Token
[bootstrap-token] configured RBAC rules to allow certificate rotation for all node client certificates in the cluster
[bootstrap-token] creating the "cluster-info" ConfigMap in the "kube-public" namespace
[addons] Applied essential addon: CoreDNS(这个就是我们上面提到的dns组合)
[addons] Applied essential addon: kube-proxy
加载了两个附件CoreDNS和 kube-proxy,而且在1.11版本之后系统默认支持ipvs

Your Kubernetes control-plane has initialized successfully! kubernetes初始化成功

To start using your cluster, you need to run the following as a regular user:
kubernetes初始化成功了,但是要想使用kubernetes集群的话还需要完成以下操作

  mkdir -p $HOME/.kube
  sudo cp -i /etc/kubernetes/admin.conf $HOME/.kube/config(这里产生了一个admin.conf的配置文件,这个是用于连接apiserver来做认证的配置文件)
  sudo chown $(id -u):$(id -g) $HOME/.kube/config(如果你是普通用户还需要将文件加入属主和属组)

You should now deploy a pod network to the cluster.
Run "kubectl apply -f [podnetwork].yaml" with one of the options listed at:
  https://kubernetes.io/docs/concepts/cluster-administration/addons/

Then you can join any number of worker nodes by running the following on each as root:

kubeadm join 192.168.181.139:6443 --token wgl512.9pn3vjcdrvlz03hx
    --discovery-token-ca-cert-hash sha256:bddabff041e198879cb9c7bffefc1cd0c44375589fcc4e209bc1535e58ab7fa6(此信息需要保存出来,因为这个是各node节点加入集群使用的命令和参数)
[root@www kubeadm]# mkdir -p $HOME/.kube
[root@www home]# cp -i /etc/kubernetes/admin.conf $HOME/.kube/config (注:如果该路径下之前产生过这个文件,再次cp的时候要么选择覆盖,要么删除之前的重新cp,因为每初始化一次配置文件里面的内容可能就有变化)
[root@www home]# ss -tnl
.....
LISTEN     0      128                                              :::6443                                                         :::*
.....
可以看到6443端口也监听了
[root@www home]# kubectl get cs(cs是componenstatus,组件状态信息)
NAME                 STATUS    MESSAGE             ERROR
scheduler(调度器)            Healthy   ok
controller-manager(控制器管理器)   Healthy   ok
etcd-0               Healthy   {"health":"true"}
能看到这两个组件状态是健康的就说明apiserver状态也是健康的
[root@www home]# kubectl get nodes(我们使用kubectl命令看下node节点
NAME                         STATUS     ROLES    AGE   VERSION
www.kubernetes.master1.com   NotReady   master   54m   v1.14.1
可以看到节点是master,已经运行了多长时间了,但是状态还是未就绪的状态,之所以未就绪是因为缺少了一个重要的附件flannel(或其它)的网络组建,flannel是保证pod之间网络通讯的基本保障。
可以网络flannel项目托管的站点来查看手动部署flannel的方法:
https://github.com/coreos/flannel
Deploying flannel manually
Flannel can be added to any existing Kubernetes cluster though it's simplest to add flannel before any pods using the pod network have been started.

For Kubernetes v1.7+ kubectl apply -f https://raw.githubusercontent.com/coreos/flannel/master/Documentation/kube-flannel.yml
文档里面已经告诉吗使用什么命令取完成flannel的部署,指需要通过kubectl apply -f https://raw.githubusercontent.com/coreos/flannel/master/Documentation/kube-flannel.yml命令来完成flannel的部署
See Kubernetes for more details.
当然也可以将把文件wget下来到本地,然后使用kubectl apply -f来部署
[root@www kubeadm]# kubectl apply -f kube-flannel.yml
podsecuritypolicy.extensions/psp.flannel.unprivileged created
clusterrole.rbac.authorization.k8s.io/flannel created
clusterrolebinding.rbac.authorization.k8s.io/flannel created
serviceaccount/flannel created
configmap/kube-flannel-cfg created
daemonset.extensions/kube-flannel-ds-amd64 created
daemonset.extensions/kube-flannel-ds-arm64 created
daemonset.extensions/kube-flannel-ds-arm created
daemonset.extensions/kube-flannel-ds-ppc64le created
daemonset.extensions/kube-flannel-ds-s390x created
[root@www kubeadm]# kubectl get nodes
NAME                         STATUS   ROLES    AGE   VERSION
www.kubernetes.master1.com   Ready    master   18m   v1.14.1
[root@www kubeadm]# kubectl get pod -n kube-system(我们通过命令来查看当前master环境上运行的所有pod,而这些pod都运行在kube-system这个名称空间里面,在kubernetes里面不指定名称名称空间默认是default。我们可以通过kubectl get ns来查看我们节点的名称空间有多少个
NAME                                                 READY   STATUS    RESTARTS   AGE
coredns-fb8b8dccf-9tjpb                              1/1     Running   0          21m
coredns-fb8b8dccf-gp5jz                              1/1     Running   0          21m
etcd-www.kubernetes.master1.com                      1/1     Running   0          20m
kube-apiserver-www.kubernetes.master1.com            1/1     Running   0          20m
kube-controller-manager-www.kubernetes.master1.com   1/1     Running   0          20m
kube-flannel-ds-amd64-qhzwt                          1/1     Running   0          3m59s
kube-proxy-77npr                                     1/1     Running   0          21m
kube-scheduler-www.kubernetes.master1.com            1/1     Running   0          20m
[root@www kubeadm]# kubectl get ns
NAME              STATUS   AGE
default           Active   25m
kube-node-lease   Active   25m
kube-public       Active   25m
kube-system       Active   25m (负责系统级pod运行的名称空间)
[root@www kubeadm]#
过几秒之后再看下状态依然是就绪的状态了。至此master节点初始化完成。
如果初始化有问题,为了确保下次初始化不会受到上次未完成的影响,最好卸载下集群。
[root@www ~]# kubeadm reset(卸载集群)
[reset] Reading configuration from the cluster...
[reset] FYI: You can look at this config file with 'kubectl -n kube-system get cm kubeadm-config -oyaml'
[reset] WARNING: Changes made to this host by 'kubeadm init' or 'kubeadm join' will be reverted.
[reset] Are you sure you want to proceed? [y/N]: y
[preflight] Running pre-flight checks
[reset] Removing info for node "www.kubernetes.master1.com" from the ConfigMap "kubeadm-config" in the "kube-system" Namespace
W0509 10:04:26.257377   26573 reset.go:158] [reset] failed to remove etcd member: error syncing endpoints with etc: etcdclient: no available endpoints
.Please manually remove this etcd member using etcdctl
[reset] Stopping the kubelet service
[reset] unmounting mounted directories in "/var/lib/kubelet"
[reset] Deleting contents of stateful directories: [/var/lib/etcd /var/lib/kubelet /etc/cni/net.d /var/lib/dockershim /var/run/kubernetes]
[reset] Deleting contents of config directories: [/etc/kubernetes/manifests /etc/kubernetes/pki]
[reset] Deleting files: [/etc/kubernetes/admin.conf /etc/kubernetes/kubelet.conf /etc/kubernetes/bootstrap-kubelet.conf /etc/kubernetes/controller-manager.conf /etc/kubernetes/scheduler.conf]

The reset process does not reset or clean up iptables rules or IPVS tables.
If you wish to reset iptables, you must do so manually.
For example:
iptables -F && iptables -t nat -F && iptables -t mangle -F && iptables -X

If your cluster was setup to utilize IPVS, run ipvsadm --clear (or similar)
to reset your system's IPVS tables.
node节点的部署:
1:环境配置内容和master节点的1到5配置完全一致。
2:从主机将docker和kubernetes的yum源scp到node节点并安装docker-ce,kubeadm,kubelet
3:将master节点的/usr/lib/systemd/system的docker.service和/etc/sysconfig的kubelet拷贝到备机,执行systemctl daemon-reload && systemctl restart docker
将kubelet和docker加入开机自启
[root@www kubeadm]# cat kk.sh
#/bin/bash
docker pull mirrorgooglecontainers/kube-proxy:v1.14.1
docker pull mirrorgooglecontainers/pause:3.1
docker pull mirrorgooglecontainers/etcd:3.3.10
docker pull coredns/coredns:1.3.1
docker pull quay.io/coreos/flannel:v0.11.0-amd64

docker tag mirrorgooglecontainers/kube-proxy:v1.14.1 k8s.gcr.io/kube-proxy:v1.14.1
docker tag mirrorgooglecontainers/pause:3.1 k8s.gcr.io/pause:3.1
docker tag mirrorgooglecontainers/etcd:3.3.10 k8s.gcr.io/etcd:3.3.10
docker tag coredns/coredns:1.3.1 k8s.gcr.io/coredns:1.3.1

docker rmi mirrorgooglecontainers/kube-proxy:v1.14.1
docker rmi mirrorgooglecontainers/pause:3.1
docker rmi mirrorgooglecontainers/etcd:3.3.10
docker rmi coredns/coredns:1.3.1
[root@www kubeadm]#
因为node节点不需要apiserver等组件,不需要pull到node节点本地。
5:[root@www ~]# kubeadm join 192.168.181.139:6443 --token 2u6a93.eqyh6uj4btidtx1j --discovery-token-ca-cert-hash sha256:46e7088bf7294bc789fcb461e1a5cbce916e9dfb6fa7f634512b8e587ae165ba
执行kubeadm join命令将node节点加入到集群中,可以看到此条命令就是我们初始化master节点末尾的信息,而且我们是没有加忽略swap分区参数的,如果报错提示需要关闭swap分区就需要加忽略swap的参数。
[preflight] Running pre-flight checks
        [WARNING IsDockerSystemdCheck]: detected "cgroupfs" as the Docker cgroup driver. The recommended driver is "systemd". Please follow the guide at https://kubernetes.io/docs/setup/cri/
[preflight] Reading configuration from the cluster...
[preflight] FYI: You can look at this config file with 'kubectl -n kube-system get cm kubeadm-config -oyaml'
[kubelet-start] Downloading configuration for the kubelet from the "kubelet-config-1.14" ConfigMap in the kube-system namespace
[kubelet-start] Writing kubelet configuration to file "/var/lib/kubelet/config.yaml"
[kubelet-start] Writing kubelet environment file with flags to file "/var/lib/kubelet/kubeadm-flags.env"
[kubelet-start] Activating the kubelet service
[kubelet-start] Waiting for the kubelet to perform the TLS Bootstrap...

This node has joined the cluster:
* Certificate signing request was sent to apiserver and a response was received.
* The Kubelet was informed of the new secure connection details.

Run 'kubectl get nodes' on the control-plane to see this node join the cluster.

[root@www sysconfig]# kubectl get nodes(在master节点查看nodes信息,可以看到有一个node节点已经加入进来
NAME                         STATUS   ROLES    AGE     VERSION
www.kubernetes.master1.com   Ready    master   51m     v1.14.1
www.kubernetes.node1.com     Ready    <none>   3m37s   v1.14.1 node节点处于就绪状态
[root@www sysconfig]# kubectl get pod -n kube-system -o wide(在master节点查看node节点信息)
NAME                                                 READY   STATUS    RESTARTS   AGE     IP                NODE                         NOMINATED NODE   READINESS GATES
coredns-fb8b8dccf-9tjpb                              1/1     Running   0          55m     10.244.0.11       www.kubernetes.master1.com   <none>           <none>
coredns-fb8b8dccf-gp5jz                              1/1     Running   0          55m     10.244.0.10       www.kubernetes.master1.com   <none>           <none>
etcd-www.kubernetes.master1.com                      1/1     Running   0          54m     192.168.181.139   www.kubernetes.master1.com   <none>           <none>
kube-apiserver-www.kubernetes.master1.com            1/1     Running   0          54m     192.168.181.139   www.kubernetes.master1.com   <none>           <none>
kube-controller-manager-www.kubernetes.master1.com   1/1     Running   0          54m     192.168.181.139   www.kubernetes.master1.com   <none>           <none>
kube-flannel-ds-amd64-qhzwt                          1/1     Running   0          38m     192.168.181.139   www.kubernetes.master1.com   <none>           <none>
kube-flannel-ds-amd64-sp674                          1/1     Running   0          7m54s   192.168.181.140   www.kubernetes.node1.com     <none>           <none>
kube-proxy-77npr                                     1/1     Running   0          55m     192.168.181.139   www.kubernetes.master1.com   <none>           <none>
kube-proxy-z6vm8                                     1/1     Running   0          7m54s   192.168.181.140   www.kubernetes.node1.com     <none>           <none>
kube-scheduler-www.kubernetes.master1.com            1/1     Running   0          54m     192.168.181.139   www.kubernetes.master1.com   <none>           <none>
[root@www sysconfig]#
至此node节点也join完毕。
如果有多个node节点方法一致。
整体我们可以分为三步
1:环境初始化设置
2:安装服务包和组件
3:初始化master节点并将node节点加入到集群中来。
(如果失败想重来可以清理下环境,使用kubeadm reset或者kubeadm reset -f)
或者参照以下shell脚本:
[root@www shelltest]# vim kubeadm_join.sh #!/bin/bash #Writing time 2019-07-20 #start docker SHAN='E[31;5m' RES='E[0m' DOCKER_STATUS=`ps -aux | grep docker | grep -v grep | wc -l` NODES_STATUS=`kubectl get nodes | wc -l` KUBE_FLANNEL_FILS=/home/kubeadm KUBE_SH_PWD=/home/kubeadm #检查docker状态 function docker_status(){ if [ $DOCKER_STATUS -eq 0 ];then systemctl start docker if [ $DOCKER_STATUS -eq 0 ];then echo -e ${SHAN}"++++++++++++Start exception,Please check the service!++++++++++++"${RES} exit fi fi } docker_status if [ ! -d $KUBE_SH_PWD ];then mkdir -p $KUBE_SH_PWD fi menu(){ cat <<EOF 1.[Clear ] 2.[NoClear ] 3.signout EOF read -p "请选择是否清理:" choice } usage(){ echo -e ${SHAN}"请在$0 后面写入正确的选项(Clear|NoClear|signout)"${RES} echo "++++++++++++++++++++++++++++++++++++++" } Clear(){ iptables -F kubeadm reset -f echo -e ${SHAN}"�33[32m+++++++++++当前环境已经清理,重新初始化环境+++++++++++++"${RES} kubeadm init --kubernetes-version=v1.14.1 --pod-network-cidr=10.244.0.0/16 --service-cidr=10.96.0.0/12 > $KUBE_SH_PWD/kubeadm_join.txt iptables -F cd /root/.kube/ rm -rf config cp -i /etc/kubernetes/admin.conf $HOME/.kube/config cd ${KUBE_FLANNEL_FILS}/ && kubectl apply -f kube-flannel.yml tail -2 $KUBE_SH_PWD/kubeadm_join.txt | xargs echo -n | xargs echo > $KUBE_SH_PWD/join.sh ansible-playbook kubernetes.soft.yaml sleep 14 if [ $NODES_STATUS -eq 0 ];then echo -e ${SHAN}"�33[32m+++++++++++当前k8s环境初始化不成功,请检查当前环境+++++++++++++"${RES} else echo -e ${SHAN}"�33[32m+++++++++++当前k8s环境初始化成功+++++++++++++"${RES} kubectl get nodes fi } NoClear(){ echo -e "�33[32m+++++++++++当前环境容器个数:${DOCKER_STATUS}个+++++++++++++�33[0m" echo -e ${SHAN}"�33[32m+++++++++++当前环境不被清理+++++++++++++"${RES} kubectl get nodes } signout(){ echo -e ${SHAN}"�33[32m+++++++++++不做改变+++++++++++++"${RES} date && exit } main(){ case "$1" in Clear) Clear;; NoClear) NoClear;; signout) signout;; *)usage exit esac } main $1 [root@www kubeadm]# cat kubernetes.soft.yaml --- - hosts: all remote_user: root tasks: - name: startdocker shell: 'systemctl start docker' - name: stop iptables shell: 'iptables -F' - name: kubeadm reset shell: 'kubeadm reset -f' - name: copy jion.sh copy: src=/home/kubeadm/join.sh dest=/home/kubeadm/join.sh - name: kubeadm join shell: chmod + /home/kubeadm/join.sh - name: bash join.sh shell: /bin/bash /home/kubeadm/join.sh [root@www kubeadm]#
♣三:Kubernetes的简单应用
A:Kubernetes命令的介绍和使用
我们已经通过kubeadm对master节点进行了初始化,并成功的将子节点加入到集群中。
[root@www selinux]# kubectl get nodes(我们通过get命令来看到集群节点的信息)
NAME STATUS ROLES AGE VERSION
www.kubernetes.master.com Ready master 21m v1.14.1
www.kubernetes.node1.com Ready <none> 9m45s v1.14.2
kubectl就是apiservice的客户端程序,而get命令也是kubectl众多命令中的一个,kubectl通过连接至master节点上的apiservice来对各种k8s相关资源的增删改查。
[root@www selinux]# kubectl
kubectl controls the Kubernetes cluster manager.

 Find more information at: https://kubernetes.io/docs/reference/kubectl/overview/

Basic Commands (Beginner):基本命令
  create         Create a resource from a file or from stdin.
  expose         使用 replication controller, service, deployment 或者 pod 并暴露它作为一个 新的
Kubernetes Service
  run            在集群中运行一个指定的镜像
  set            为 objects 设置一个指定的特征

Basic Commands (Intermediate):
  explain        查看资源的文档
  get            显示一个或更多 resources
  edit           在服务器上编辑一个资源
  delete         Delete resources by filenames, stdin, resources and names, or by resources and label selector

Deploy Commands:部署命令
  rollout        Manage the rollout of a resource
  scale          为 Deployment, ReplicaSet, Replication Controller 或者 Job 设置一个新的副本数量
  autoscale      自动调整一个 Deployment, ReplicaSet, 或者 ReplicationController 的副本数量

Cluster Management Commands:群集管理命令
  certificate    修改 certificate 资源.
  cluster-info   显示集群信息
  top            Display Resource (CPU/Memory/Storage) usage.
  cordon         标记 node 为 unschedulable
  uncordon       标记 node 为 schedulable
  drain          Drain node in preparation for maintenance
  taint          更新一个或者多个 node 上的 taints(给节点增加污点,给节点增加以后,能容忍节点污点的pod就能被调度上来,否则就不能被调度,默认任何pod都不能容忍master存在污点),通过给master增加污点来保证master节点只运行apiservice,scheduler,controller-manager等几个重要的系统级组件

Troubleshooting and Debugging Commands:故障排除和调试命令
  describe       显示一个指定 resource 或者 group 的 resources 详情
  logs           输出容器在 pod 中的日志
  attach         Attach 到一个运行中的 container
  exec           在一个 container 中执行一个命令
  port-forward   Forward one or more local ports to a pod
  proxy          运行一个 proxy 到 Kubernetes API server
  cp             复制 files 和 directories 到 containers 和从容器中复制 files 和 directories.
  auth           Inspect authorization

Advanced Commands:高级命令
  diff           Diff live version against would-be applied version
  apply          通过文件名或标准输入流(stdin)对资源进行配置
  patch          使用 strategic merge patch 更新一个资源的 field(s)
  replace        通过 filename 或者 stdin替换一个资源
  wait           Experimental: Wait for a specific condition on one or many resources.
  convert        在不同的 API versions 转换配置文件
  kustomize      Build a kustomization target from a directory or a remote url.

Settings Commands:设置命令
  label          更新在这个资源上的 labels
  annotate       更新一个资源的注解
  completion     Output shell completion code for the specified shell (bash or zsh)这个用于命令补全的

Other Commands:其它命令
  api-resources  Print the supported API resources on the server
  api-versions   Print the supported API versions on the server, in the form of "group/version"
  config         修改 kubeconfig 文件
  plugin         Provides utilities for interacting with plugins.
  version        输出 client 和 server 的版本信息

Usage:
  kubectl [flags] [options]

Use "kubectl <command> --help" for more information about a given command.
Use "kubectl options" for a list of global command-line options (applies to all commands).
在kubectl众多的命令中分了几个类别,基础命令,部署命令,故障排除和调试的命令等。
[root@www kubeadm]# kubectl describe node www.kubernetes.master.com
Name:               www.kubernetes.master.com
Roles:              master
Labels:             beta.kubernetes.io/arch=amd64 节点的标签信息
                    beta.kubernetes.io/os=linux
                    kubernetes.io/arch=amd64
                    kubernetes.io/hostname=www.kubernetes.master.com
                    kubernetes.io/os=linux
                    node-role.kubernetes.io/master=
Annotations:        flannel.alpha.coreos.com/backend-data: {"VtepMAC":"8a:9f:6d:53:53:64"} 注解
                    flannel.alpha.coreos.com/backend-type: vxlan
                    flannel.alpha.coreos.com/kube-subnet-manager: true
                    flannel.alpha.coreos.com/public-ip: 192.168.181.143
                    kubeadm.alpha.kubernetes.io/cri-socket: /var/run/dockershim.sock
                    node.alpha.kubernetes.io/ttl: 0
                    volumes.kubernetes.io/controller-managed-attach-detach: true
CreationTimestamp:  Mon, 10 Jun 2019 12:52:04 +0800   创建时间
Taints:             node-role.kubernetes.io/master:NoSchedule  节点的污点信息(因为现在环境有容器没有运行导致有污点,正常启动的状况下是没有污点的)
                    node.kubernetes.io/unreachable:NoSchedule
Unschedulable:      false   是否不可被调度
Conditions:
  Type             Status    LastHeartbeatTime                 LastTransitionTime                Reason              Message
  ----             ------    -----------------                 ------------------                ------              -------
  MemoryPressure   Unknown   Mon, 10 Jun 2019 18:24:49 +0800   Mon, 10 Jun 2019 21:15:24 +0800   NodeStatusUnknown   Kubelet stopped posting node status.
  DiskPressure     Unknown   Mon, 10 Jun 2019 18:24:49 +0800   Mon, 10 Jun 2019 21:15:24 +0800   NodeStatusUnknown   Kubelet stopped posting node status.
  PIDPressure      Unknown   Mon, 10 Jun 2019 18:24:49 +0800   Mon, 10 Jun 2019 21:15:24 +0800   NodeStatusUnknown   Kubelet stopped posting node status.
  Ready            Unknown   Mon, 10 Jun 2019 18:24:49 +0800   Mon, 10 Jun 2019 21:15:24 +0800   NodeStatusUnknown   Kubelet stopped posting node status.
Addresses:
  InternalIP:  192.168.181.143
  Hostname:    www.kubernetes.master.com
Capacity:
 cpu:                2
 ephemeral-storage:  17394Mi
 hugepages-1Gi:      0
 hugepages-2Mi:      0
 memory:             1863252Ki
 pods:               110
Allocatable:
 cpu:                2
 ephemeral-storage:  16415037823
 hugepages-1Gi:      0
 hugepages-2Mi:      0
 memory:             1760852Ki
 pods:               110
System Info:
 Machine ID:                 47d5d44efe6d410fa2341b7057e32dd7
 System UUID:                363E4D56-AB06-CF53-6653-7CC20E1028E5
 Boot ID:                    9aacd692-da94-428c-8171-944b6e3db9c1
 Kernel Version:             3.10.0-957.el7.x86_64
 OS Image:                   CentOS Linux 7 (Core)
 Operating System:           linux
 Architecture:               amd64
 Container Runtime Version:  docker://18.9.6
 Kubelet Version:            v1.14.1
 Kube-Proxy Version:         v1.14.1
PodCIDR:                     10.244.0.0/24
Non-terminated Pods:         (6 in total)
  Namespace                  Name                                                 CPU Requests  CPU Limits  Memory Requests  Memory Limits  AGE
  ---------                  ----                                                 ------------  ----------  ---------------  -------------  ---
  kube-system                etcd-www.kubernetes.master.com                       0 (0%)        0 (0%)      0 (0%)           0 (0%)         8h
  kube-system                kube-apiserver-www.kubernetes.master.com             250m (12%)    0 (0%)      0 (0%)           0 (0%)         8h
  kube-system                kube-controller-manager-www.kubernetes.master.com    200m (10%)    0 (0%)      0 (0%)           0 (0%)         8h
  kube-system                kube-flannel-ds-amd64-cjs9v                          100m (5%)     100m (5%)   50Mi (2%)        50Mi (2%)      8h
  kube-system                kube-proxy-hrkkz                                     0 (0%)        0 (0%)      0 (0%)           0 (0%)         8h
  kube-system                kube-scheduler-www.kubernetes.master.com             100m (5%)     0 (0%)      0 (0%)           0 (0%)         8h
Allocated resources:
  (Total limits may be over 100 percent, i.e., overcommitted.)
  Resource           Requests    Limits
  --------           --------    ------
  cpu                650m (32%)  100m (5%)  节点资源占用情况
  memory             50Mi (2%)   50Mi (2%)
  ephemeral-storage  0 (0%)      0 (0%)
Events:              <none>

我们同样可以查看master节点的详细信息
[root@www kubeadm]# kubectl describe node www.kubernetes.master.com
Name:               www.kubernetes.master.com
Roles:              master
Labels:             beta.kubernetes.io/arch=amd64
                    beta.kubernetes.io/os=linux
                    kubernetes.io/arch=amd64
                    kubernetes.io/hostname=www.kubernetes.master.com
                    kubernetes.io/os=linux
                    node-role.kubernetes.io/master=
Annotations:        flannel.alpha.coreos.com/backend-data: {"VtepMAC":"36:35:a3:f4:5e:ca"}
                    flannel.alpha.coreos.com/backend-type: vxlan
                    flannel.alpha.coreos.com/kube-subnet-manager: true
                    flannel.alpha.coreos.com/public-ip: 192.168.181.143
                    kubeadm.alpha.kubernetes.io/cri-socket: /var/run/dockershim.sock
                    node.alpha.kubernetes.io/ttl: 0
                    volumes.kubernetes.io/controller-managed-attach-detach: true
CreationTimestamp:  Mon, 10 Jun 2019 21:34:43 +0800
Taints:             node-role.kubernetes.io/master:NoSchedule
Unschedulable:      false
Conditions:
  Type             Status  LastHeartbeatTime                 LastTransitionTime                Reason                       Message
  ----             ------  -----------------                 ------------------                ------                       -------
  MemoryPressure   False   Mon, 10 Jun 2019 21:41:34 +0800   Mon, 10 Jun 2019 21:34:36 +0800   KubeletHasSufficientMemory   kubelet has sufficient memory available
  DiskPressure     False   Mon, 10 Jun 2019 21:41:34 +0800   Mon, 10 Jun 2019 21:34:36 +0800   KubeletHasNoDiskPressure     kubelet has no disk pressure
  PIDPressure      False   Mon, 10 Jun 2019 21:41:34 +0800   Mon, 10 Jun 2019 21:34:36 +0800   KubeletHasSufficientPID      kubelet has sufficient PID available
  Ready            True    Mon, 10 Jun 2019 21:41:34 +0800   Mon, 10 Jun 2019 21:37:33 +0800   KubeletReady                 kubelet is posting ready status
Addresses:
  InternalIP:  192.168.181.143
  Hostname:    www.kubernetes.master.com
Capacity:
 cpu:                2
 ephemeral-storage:  17394Mi
 hugepages-1Gi:      0
 hugepages-2Mi:      0
 memory:             1863252Ki
 pods:               110
Allocatable:
 cpu:                2
 ephemeral-storage:  16415037823
 hugepages-1Gi:      0
 hugepages-2Mi:      0
 memory:             1760852Ki
 pods:               110
System Info:
 Machine ID:                 47d5d44efe6d410fa2341b7057e32dd7
 System UUID:                363E4D56-AB06-CF53-6653-7CC20E1028E5
 Boot ID:                    437add54-a9b7-48d3-bee7-6322b1c8b1ec
 Kernel Version:             3.10.0-957.el7.x86_64
 OS Image:                   CentOS Linux 7 (Core)
 Operating System:           linux
 Architecture:               amd64
 Container Runtime Version:  docker://18.9.6
 Kubelet Version:            v1.14.1
 Kube-Proxy Version:         v1.14.1
PodCIDR:                     10.244.0.0/24
Non-terminated Pods:         (8 in total)
  Namespace                  Name                                                 CPU Requests  CPU Limits  Memory Requests  Memory Limits  AGE
  ---------                  ----                                                 ------------  ----------  ---------------  -------------  ---
  kube-system                coredns-fb8b8dccf-9f7h6                              100m (5%)     0 (0%)      70Mi (4%)        170Mi (9%)     7m7s
  kube-system                coredns-fb8b8dccf-9xzhq                              100m (5%)     0 (0%)      70Mi (4%)        170Mi (9%)     7m6s
  kube-system                etcd-www.kubernetes.master.com                       0 (0%)        0 (0%)      0 (0%)           0 (0%)         6m3s
  kube-system                kube-apiserver-www.kubernetes.master.com             250m (12%)    0 (0%)      0 (0%)           0 (0%)         6m22s
  kube-system                kube-controller-manager-www.kubernetes.master.com    200m (10%)    0 (0%)      0 (0%)           0 (0%)         6m30s
  kube-system                kube-flannel-ds-amd64-l24zj                          100m (5%)     100m (5%)   50Mi (2%)        50Mi (2%)      4m54s
  kube-system                kube-proxy-dpznn                                     0 (0%)        0 (0%)      0 (0%)           0 (0%)         7m6s
  kube-system                kube-scheduler-www.kubernetes.master.com             100m (5%)     0 (0%)      0 (0%)           0 (0%)         6m7s
Allocated resources:
  (Total limits may be over 100 percent, i.e., overcommitted.)
  Resource           Requests     Limits
  --------           --------     ------
  cpu                850m (42%)   100m (5%)
  memory             190Mi (11%)  390Mi (22%)
  ephemeral-storage  0 (0%)       0 (0%)
Events:
  Type    Reason                   Age                    From                                   Message
  ----    ------                   ----                   ----                                   -------
  Normal  NodeHasSufficientMemory  7m36s (x8 over 7m37s)  kubelet, www.kubernetes.master.com     Node www.kubernetes.master.com status is now: NodeHasSufficientMemory
  Normal  NodeHasNoDiskPressure    7m36s (x8 over 7m37s)  kubelet, www.kubernetes.master.com     Node www.kubernetes.master.com status is now: NodeHasNoDiskPressure
  Normal  NodeHasSufficientPID     7m36s (x7 over 7m37s)  kubelet, www.kubernetes.master.com     Node www.kubernetes.master.com status is now: NodeHasSufficientPID
  Normal  Starting                 7m3s                   kube-proxy, www.kubernetes.master.com  Starting kube-proxy.
[root@www kubeadm]# kubectl version
Client Version: version.Info{Major:"1", Minor:"14", GitVersion:"v1.14.1", GitCommit:"b7394102d6ef778017f2ca4046abbaa23b88c290", GitTreeState:"clean", BuildDate:"2019-04-08T17:11:31Z", GoVersion:"go1.12.1", Compiler:"gc", Platform:"linux/amd64"}
Server Version: version.Info{Major:"1", Minor:"14", GitVersion:"v1.14.1", GitCommit:"b7394102d6ef778017f2ca4046abbaa23b88c290", GitTreeState:"clean", BuildDate:"2019-04-08T17:02:58Z", GoVersion:"go1.12.1", Compiler:"gc", Platform:"linux/amd64"}
[root@www kubeadm]# kubectl cluster-info
Kubernetes master is running at https://192.168.181.143:6443  master向外提供的apioserver的地址是多少
KubeDNS is running at https://192.168.181.143:6443/api/v1/namespaces/kube-system/services/kube-dns:dns/proxy
coredns运行获取的路径,并且通过集群外部进行了端口转发的访问方式(也就是代理)

To further debug and diagnose cluster problems, use 'kubectl cluster-info dump'.
B:Kubernetes的增删改查:
[root@www kubeadm]# kubectl run --help
Create and run a particular image, possibly replicated.创建并运行特定的镜像,以副本的形式运行

 Creates a deployment or job to manage the created container(s).以deployment或者job两个控制器的形式来创建并管理容器

Examples:
  # Start a single instance of nginx.
  kubectl run nginx --image=nginx  kubectl run nginx(这个nginx代表控制器的名称) --image=nginx用哪个镜像创建pod资源

  # Start a single instance of hazelcast and let the container expose port 5701 .
  kubectl run hazelcast --image=hazelcast --port=5701

  # Start a single instance of hazelcast and set environment variables "DNS_DOMAIN=cluster" and "POD_NAMESPACE=default"
in the container.
  kubectl run hazelcast --image=hazelcast --env="DNS_DOMAIN=cluster" --env="POD_NAMESPACE=default"

  # Start a single instance of hazelcast and set labels "app=hazelcast" and "env=prod" in the container.
  kubectl run hazelcast --image=hazelcast --labels="app=hazelcast,env=prod"

  # Start a replicated instance of nginx.
  kubectl run nginx --image=nginx --replicas=5 如果需要创建多个pod,只需要在后面指定启动pod资源的个数

  # Dry run. Print the corresponding API objects without creating them.
  kubectl run nginx --image=nginx --dry-run

  # Start a single instance of nginx, but overload the spec of the deployment with a partial set of values parsed from
JSON.
  kubectl run nginx --image=nginx --overrides='{ "apiVersion": "v1", "spec": { ... } }'

  # Start a pod of busybox and keep it in the foreground, don't restart it if it exits.
  kubectl run -i -t busybox --image=busybox --restart=Never (pod资源副本个数少了,会自动补到设定好的副本个数)--restart=Never就代表任何pod副本资源少了都不会自动补

  # Start the nginx container using the default command, but use custom arguments (arg1 .. argN) for that command.
  kubectl run nginx --image=nginx -- <arg1> <arg2> ... <argN>

  # Start the nginx container using a different command and custom arguments.
  kubectl run nginx --image=nginx --command -- <cmd> <arg1> ... <argN>

  # Start the perl container to compute π to 2000 places and print it out.
  kubectl run pi --image=perl --restart=OnFailure -- perl -Mbignum=bpi -wle 'print bpi(2000)'

  # Start the cron job to compute π to 2000 places and print it out every 5 minutes.
  kubectl run pi --schedule="0/5 * * * ?" --image=perl --restart=OnFailure -- perl -Mbignum=bpi -wle 'print bpi(2000)'
  如果我们在创建的容器的时候用到了schedule参数,就代表容器不在是以deployment控制器的形式运行了,而是用jod(类似cronjob)控制器来运行

Options:
      --allow-missing-template-keys=true: If true, ignore any errors in templates when a field or map key is missing in
the template. Only applies to golang and jsonpath output formats.
      --attach=false: If true, wait for the Pod to start running, and then attach to the Pod as if 'kubectl attach ...'
were called.  Default false, unless '-i/--stdin' is set, in which case the default is true. With '--restart=Never' the
exit code of the container process is returned.
      --cascade=true: If true, cascade the deletion of the resources managed by this resource (e.g. Pods created by a
ReplicationController).  Default true.
      --command=false: If true and extra arguments are present, use them as the 'command' field in the container, rather
than the 'args' field which is the default.
      --dry-run=false: If true, only print the object that would be sent, without sending it.
      --env=[]: Environment variables to set in the container
      --expose=false: If true, a public, external service is created for the container(s) which are run
  -f, --filename=[]: to use to replace the resource.
      --force=false: Only used when grace-period=0. If true, immediately remove resources from API and bypass graceful
deletion. Note that immediate deletion of some resources may result in inconsistency or data loss and requires
confirmation.
      --generator='': 使用 API generator 的名字, 在
http://kubernetes.io/docs/user-guide/kubectl-conventions/#generators 查看列表.
      --grace-period=-1: Period of time in seconds given to the resource to terminate gracefully. Ignored if negative.
Set to 1 for immediate shutdown. Can only be set to 0 when --force is true (force deletion).
      --hostport=-1: The host port mapping for the container port. To demonstrate a single-machine container.
      --image='': 指定容器要运行的镜像.
      --image-pull-policy='': 容器的镜像拉取策略. 如果为空, 这个值将不会 被 client 指定且使用
server 端的默认值
  -k, --kustomize='': Process a kustomization directory. This flag can't be used together with -f or -R.
  -l, --labels='': Comma separated labels to apply to the pod(s). Will override previous values.
      --leave-stdin-open=false: If the pod is started in interactive mode or with stdin, leave stdin open after the
first attach completes. By default, stdin will be closed after the first attach completes.
      --limits='': The resource requirement limits for this container.  For example, 'cpu=200m,memory=512Mi'.  Note that
server side components may assign limits depending on the server configuration, such as limit ranges.
  -o, --output='': Output format. One of:
json|yaml|name|go-template|go-template-file|template|templatefile|jsonpath|jsonpath-file.
      --overrides='': An inline JSON override for the generated object. If this is non-empty, it is used to override the
generated object. Requires that the object supply a valid apiVersion field.
      --pod-running-timeout=1m0s: The length of time (like 5s, 2m, or 3h, higher than zero) to wait until at least one
pod is running
      --port='': The port that this container exposes.  If --expose is true, this is also the port used by the service
that is created.
      --quiet=false: If true, suppress prompt messages.
      --record=false: Record current kubectl command in the resource annotation. If set to false, do not record the
command. If set to true, record the command. If not set, default to updating the existing annotation value only if one
already exists.
  -R, --recursive=false: Process the directory used in -f, --filename recursively. Useful when you want to manage
related manifests organized within the same directory.
  -r, --replicas=1: Number of replicas to create for this container. Default is 1.
      --requests='': 资源为 container 请求 requests . 例如, 'cpu=100m,memory=256Mi'.
注意服务端组件也许会赋予 requests, 这决定于服务器端配置, 比如 limit ranges.
      --restart='Always': 这个 Pod 的 restart policy.  Legal values [Always, OnFailure, Never]. 如果设置为
'Always' 一个 deployment 被创建, 如果设置为 ’OnFailure' 一个 job 被创建, 如果设置为 'Never',
一个普通的 pod 被创建. 对于后面两个 --replicas 必须为 1.  默认 'Always', 为 CronJobs 设置为
`Never`.
      --rm=false: If true, delete resources created in this command for attached containers.
      --save-config=false: If true, the configuration of current object will be saved in its annotation. Otherwise, the
annotation will be unchanged. This flag is useful when you want to perform kubectl apply on this object in the future.
      --schedule='': A schedule in the Cron format the job should be run with.
      --service-generator='service/v2': 使用 gnerator 的名称创建一个 service.  只有在 --expose 为 true
的时候使用
      --service-overrides='': An inline JSON override for the generated service object. If this is non-empty, it is used
to override the generated object. Requires that the object supply a valid apiVersion field.  Only used if --expose is
true.
      --serviceaccount='': Service account to set in the pod spec
  -i, --stdin=false: Keep stdin open on the container(s) in the pod, even if nothing is attached.
      --template='': Template string or path to template file to use when -o=go-template, -o=go-template-file. The
template format is golang templates [http://golang.org/pkg/text/template/#pkg-overview].
      --timeout=0s: The length of time to wait before giving up on a delete, zero means determine a timeout from the
size of the object
  -t, --tty=false: Allocated a TTY for each container in the pod.
      --wait=false: If true, wait for resources to be gone before returning. This waits for finalizers.

Usage:
  kubectl run NAME --image=image [--env="key=value"] [--port=port] [--replicas=replicas] [--dry-run=bool]
[--overrides=inline-json] [--command] -- [COMMAND] [args...] [options]

Use "kubectl options" for a list of global command-line options (applies to all commands).
[root@www kubeadm]#  kubectl run nginx-web1 --image=nginx:1.14-alpine --port=80 --replicas=1
使用kubectl命令来运行一个nginx,如果是使用的私有镜像,需要填写私有镜像的地址和端口,暴露的端口(这个其实不用写,默认也会暴露的)运行几个pod,然后以干跑模式运行
kubectl run --generator=deployment/apps.v1 is DEPRECATED and will be removed in a future version. Use kubectl run --generator=run-pod/v1 or kubectl create instead.
deployment已经在后续的新版本中启用了改为了其它的方式来运行了
deployment.apps/nginx-1.1 created (dry run)
可以看到现在的控制器就是deployment形式的
[root@www kubeadm]# kubectl get deployment (我们可以通过getdeployment或者pods来查看我们创建的nginx容器的状态)
NAME         READY   UP-TO-DATE   AVAILABLE   AGE
nginx-web1   0/1     1            0           24s
[root@www kubeadm]# kubectl get pods
NAME                          READY   STATUS              RESTARTS   AGE
nginx-web1-5cff74b67f-sm5dv   0/1     ContainerCreating   0          51s
在上面查询信息中我们需要注意到AVAILABLE和RESTARTS,这两个信息run命令刚刚运行的时候会显示为0,这个是因为pod在创建完之后我们会对它进行就绪性探测(这个就绪就代表这个服务是否准备好了,怎么好了我们是否可以访问)
[root@www kubeadm]# kubectl get deployment
NAME         READY   UP-TO-DATE   AVAILABLE   AGE
nginx-web1   1/1     1            1           7m13s
[root@www kubeadm]# kubectl get pods
NAME                          READY   STATUS    RESTARTS   AGE
nginx-web1-5cff74b67f-sm5dv   1/1     Running   0          7m19s
过一会在看的时候就发现已经准备就绪了(如果你没有使用本地镜像仓库而是基于dockhub的话就会慢一点)
[root@www kubeadm]# kubectl get pods -o wide
NAME                          READY   STATUS    RESTARTS   AGE     IP           NODE                       NOMINATED NODE   READINESS GATES
nginx-web1-5cff74b67f-sm5dv   1/1     Running   0          9m43s   10.244.1.4   www.kubernetes.node1.com   <none>           <none>
我们通过-o wide来查看详细的信息,可以看到ngixn启动的ip,启动在node1上面
在node节点查看网络信息
[root@www ~]# ifconfig
cni0: flags=4163<UP,BROADCAST,RUNNING,MULTICAST>  mtu 1450
        inet 10.244.1.1  netmask 255.255.255.0  broadcast 0.0.0.0
        inet6 fe80::40e7:b9ff:fe13:3775  prefixlen 64  scopeid 0x20<link>
        ether 42:e7:b9:13:37:75  txqueuelen 1000  (Ethernet)
        RX packets 1  bytes 28 (28.0 B)
        RX errors 0  dropped 0  overruns 0  frame 0
        TX packets 26  bytes 3812 (3.7 KiB)
        TX errors 0  dropped 0 overruns 0  carrier 0  collisions 0

docker0: flags=4099<UP,BROADCAST,MULTICAST>  mtu 1500  我们发现通过k8s形式启动的容器就不属于之前所讲到的docker网络了。而属于cni0网络了,而且如果你有多个node节点的话,每个node节点的网络都是不一样的,相互之间不冲突。
        inet 172.17.0.1  netmask 255.255.0.0  broadcast 172.17.255.255
        ether 02:42:c6:e7:aa:13  txqueuelen 0  (Ethernet)
        RX packets 0  bytes 0 (0.0 B)
        RX errors 0  dropped 0  overruns 0  frame 0
        TX packets 0  bytes 0 (0.0 B)
        TX errors 0  dropped 0 overruns 0  carrier 0  collisions 0
我们通过直接run的方式创建的pods节点只能在集群的任意节点内部访问,不支持外部访问。
[root@www kubeadm]# curl 10.244.1.4 我们可以通过k8s集群的任意一个节点来进行访问,除了集群内的节点其它方式都是访问不到的。
<!DOCTYPE html>
<html>
<head>
<title>Welcome to nginx!</title>
<style>
    body {
         35em;
        margin: 0 auto;
        font-family: Tahoma, Verdana, Arial, sans-serif;
    }
</style>
</head>
<body>
<h1>Welcome to nginx!</h1>
<p>If you see this page, the nginx web server is successfully installed and
working. Further configuration is required.</p>

<p>For online documentation and support please refer to
<a href="http://nginx.org/">nginx.org</a>.<br/>
Commercial support is available at
<a href="http://nginx.com/">nginx.com</a>.</p>

<p><em>Thank you for using nginx.</em></p>
</body>
</html>
pods资源是由控制器管理的,我们在创建的时候指明了至少有一个pods资源在云信,当我们手动删除了pods资源,控制器会实时监控到pods资源副本的数量,只要发现少了,就会立即帮忙重新创建一个一模一样的pods资源。
[root@www kubeadm]# kubectl get pods
NAME                          READY   STATUS    RESTARTS   AGE
nginx-web1-5cff74b67f-sm5dv   1/1     Running   0          20m
[root@www kubeadm]# kubectl delete pods nginx-web1-5cff74b67f-sm5dv  我们删除刚才的pods
pod "nginx-web1-5cff74b67f-sm5dv" deleted
[root@www kubeadm]# kubectl get pods 再查看pods发现又新起了一个pods
NAME                          READY   STATUS    RESTARTS   AGE
nginx-web1-5cff74b67f-8ngkn   1/1     Running   0          12s
我们删除了sm5dv结束的pods,发现新起了8ngkn结尾的新pods,这个是因为我们现在的pods是用控制器管理的,因为我们定义的希望至少有一个pods在运行,当控制器发现少了一个pods,就会自动build(构建)一个新的pods
[root@www kubeadm]# kubectl get pods -o wide
NAME                          READY   STATUS    RESTARTS   AGE     IP           NODE                       NOMINATED NODE   READINESS GATES
nginx-web1-5cff74b67f-8ngkn   1/1     Running   0          6m32s   10.244.1.5   www.kubernetes.node1.com   <none>           <none>
这个新的pods的ip也随之更换了。
C:service资源的增删改查:
但是pods资源启动是随机的,当后台有多台机器的时候,新起的pods节点是不知道在那台机器上启动的,当我们访问的时候不能固定ip的访问会导致访问请求因pods资源的变化而得不到应答,所以我们需要固定端点的去访问pods资源,而这个固定就是我们之前提到的service服务。
[root@www kubeadm]# kubectl expose --help
Expose a resource as a new Kubernetes service.

 Looks up a deployment, service, replica set, replication controller or pod by name and uses the selector for that
resource as the selector for a new service on the specified port. A deployment or replica set will be exposed as a
service only if its selector is convertible to a selector that service supports, i.e. when the selector contains only
the matchLabels component. Note that if no port is specified via --port and the exposed resource has multiple ports, all
will be re-used by the new service. Also if no labels are specified, the new service will re-use the labels from the
resource it exposes.

 Possible resources include (case insensitive):

 pod (po), service (svc), replicationcontroller (rc), deployment (deploy), replicaset (rs)

Examples:
  # Create a service for a replicated nginx, which serves on port 80 and connects to the containers on port 8000.
  kubectl expose rc nginx --port=80 --target-port=8000 案例

  # Create a service for a replication controller identified by type and name specified in "nginx-controller.yaml",
which serves on port 80 and connects to the containers on port 8000.
  kubectl expose -f nginx-controller.yaml --port=80 --target-port=8000

  # Create a service for a pod valid-pod, which serves on port 444 with the name "frontend"
  kubectl expose pod valid-pod --port=444 --name=frontend

  # Create a second service based on the above service, exposing the container port 8443 as port 443 with the name
"nginx-https"
  kubectl expose service nginx --port=443 --target-port=8443 --name=nginx-https

  # Create a service for a replicated streaming application on port 4100 balancing UDP traffic and named 'video-stream'.
  kubectl expose rc streamer --port=4100 --protocol=UDP --name=video-stream

  # Create a service for a replicated nginx using replica set, which serves on port 80 and connects to the containers on
port 8000.
  kubectl expose rs nginx --port=80 --target-port=8000

  # Create a service for an nginx deployment, which serves on port 80 and connects to the containers on port 8000.
  kubectl expose deployment nginx --port=80 --target-port=8000

Options:
      --allow-missing-template-keys=true: If true, ignore any errors in templates when a field or map key is missing in
the template. Only applies to golang and jsonpath output formats.
      --cluster-ip='': ClusterIP to be assigned to the service. Leave empty to auto-allocate, or set to 'None' to create
a headless service.
      --dry-run=false: If true, only print the object that would be sent, without sending it.
      --external-ip='': Additional external IP address (not managed by Kubernetes) to accept for the service. If this IP
is routed to a node, the service can be accessed by this IP in addition to its generated service IP.
  -f, --filename=[]: Filename, directory, or URL to files identifying the resource to expose a service
      --generator='service/v2': 使用 generator 的名称. 这里有 2 个 generators: 'service/v1' 和 'service/v2'.
为一个不同地方是服务端口在 v1 的情况下叫 'default', 如果在 v2 中没有指定名称.
默认的名称是 'service/v2'.
  -k, --kustomize='': Process the kustomization directory. This flag can't be used together with -f or -R.
  -l, --labels='': Labels to apply to the service created by this call.
      --load-balancer-ip='': IP to assign to the LoadBalancer. If empty, an ephemeral IP will be created and used
(cloud-provider specific).
      --name='': 名称为最新创建的对象.
  -o, --output='': Output format. One of:
json|yaml|name|go-template|go-template-file|template|templatefile|jsonpath|jsonpath-file.
      --overrides='': An inline JSON override for the generated object. If this is non-empty, it is used to override the
generated object. Requires that the object supply a valid apiVersion field.
      --port='': 服务的端口应该被指定. 如果没有指定, 从被创建的资源中复制
      --protocol='': 创建 service 的时候伴随着一个网络协议被创建. 默认是 'TCP'.
      --record=false: Record current kubectl command in the resource annotation. If set to false, do not record the
command. If set to true, record the command. If not set, default to updating the existing annotation value only if one
already exists.
  -R, --recursive=false: Process the directory used in -f, --filename recursively. Useful when you want to manage
related manifests organized within the same directory.
      --save-config=false: If true, the configuration of current object will be saved in its annotation. Otherwise, the
annotation will be unchanged. This flag is useful when you want to perform kubectl apply on this object in the future.
      --selector='': A label selector to use for this service. Only equality-based selector requirements are supported.
If empty (the default) infer the selector from the replication controller or replica set.)
      --session-affinity='': If non-empty, set the session affinity for the service to this; legal values: 'None',
'ClientIP'
      --target-port='': Name or number for the port on the container that the service should direct traffic to.
Optional.
      --template='': Template string or path to template file to use when -o=go-template, -o=go-template-file. The
template format is golang templates [http://golang.org/pkg/text/template/#pkg-overview].
      --type='': Type for this service: ClusterIP, NodePort, LoadBalancer, or ExternalName. Default is 'ClusterIP'.
      所有pods的类型

Usage:
  kubectl expose (-f FILENAME | TYPE NAME) [--port=port服务端口] [--protocol=TCP|UDP|SCTP] [--target-port=number-or-name容器端口]
[--name=name] [--external-ip=external-ip-of-service] [--type=type指podes的类型] [options]

Use "kubectl options" for a list of global command-line options (applies to all commands).
[root@www kubeadm]# kubectl expose deployment nginx-web1 --name=nginxweb101 --port=80 --target-port=80 --protocol=TCP
service/nginxweb101 exposed
[root@www kubeadm]# kubectl get svc
NAME          TYPE        CLUSTER-IP       EXTERNAL-IP   PORT(S)   AGE
kubernetes    ClusterIP   10.96.0.1        <none>        443/TCP   54m
nginxweb101   ClusterIP   10.111.216.160   <none>        80/TCP    24s
这个利用service创建的pods是用于service通过固定的端点来访问pods,不是用于集群外部节点访问的,而且这种访问是支持通过名称来进行访问的,例如curl nginxweb101,但是前提是这名称能被dns解析到,这个dns是指coredns。
[root@www kubeadm]# kubectl get pods -n kube-system -o wide
NAME                                                READY   STATUS    RESTARTS   AGE   IP                NODE                        NOMINATED NODE   READINESS GATES
coredns-fb8b8dccf-k7dqn                             1/1     Running   0          67m   10.244.0.18       www.kubernetes.master.com   <none>           <none>
coredns-fb8b8dccf-mkmt5                             1/1     Running   0          67m   10.244.0.19       www.kubernetes.master.com   <none>           <none>
etcd-www.kubernetes.master.com                      1/1     Running   0          66m   192.168.181.143   www.kubernetes.master.com   <none>           <none>
kube-apiserver-www.kubernetes.master.com            1/1     Running   0          66m   192.168.181.143   www.kubernetes.master.com   <none>           <none>
kube-controller-manager-www.kubernetes.master.com   1/1     Running   0          66m   192.168.181.143   www.kubernetes.master.com   <none>           <none>
kube-flannel-ds-amd64-bwbtg                         1/1     Running   0          65m   192.168.181.140   www.kubernetes.node1.com    <none>           <none>
kube-flannel-ds-amd64-g889s                         1/1     Running   0          65m   192.168.181.143   www.kubernetes.master.com   <none>           <none>
kube-proxy-6f5bc                                    1/1     Running   0          66m   192.168.181.140   www.kubernetes.node1.com    <none>           <none>
kube-proxy-nv9nj                                    1/1     Running   0          67m   192.168.181.143   www.kubernetes.master.com   <none>           <none>
kube-scheduler-www.kubernetes.master.com            1/1     Running   0          66m   192.168.181.143   www.kubernetes.master.com   <none>           <none>
可以看到coredns的ip是10.244.0.18和10.244.0.19,当然我们肯定不是拿着两个ip来进行解析,coredns也有自己的名称,可以查看下
[root@www kubeadm]# kubectl get svc -n kube-system
NAME       TYPE        CLUSTER-IP   EXTERNAL-IP   PORT(S)                  AGE
kube-dns   ClusterIP   10.96.0.10   <none>        53/UDP,53/TCP,9153/TCP   71m
[root@www kubeadm]# kubectl run client --image=busybox --replicas=1 -it --restart=Never
If you don't see a command prompt, try pressing enter.
/ # cat /etc/resolv.conf
nameserver 10.96.0.10 我们查看此时的dns自动指向了10.96.0.10
search default.svc.cluster.local(default后面的则是kubenetes本地pods资源特定的后缀,而default的代表了默认的名称空间) svc.cluster.local cluster.local localdomain kubernetes.node1.com
options ndots:5
/ #  wget nginx  我们通过wget就能解析到nginx现在所用的ip
Connecting to nginx (10.106.11.13:80)
saving to 'index.html'
index.html           100% |**********************************************************************************************************|   612  0:00:00 ETA
'index.html' saved
/ # wget -o - -q http://nginx:80/   通过访问http就能得到网页内容
wget: can't open 'index.html': File exists
/ # wget -O - -q http://nginx:80/
<!DOCTYPE html>
<html>
<head>
<title>Welcome to nginx!</title>
<style>
    body {
         35em;
        margin: 0 auto;
        font-family: Tahoma, Verdana, Arial, sans-serif;
    }
</style>
</head>
<body>
<h1>Welcome to nginx!</h1>
<p>If you see this page, the nginx web server is successfully installed and
working. Further configuration is required.</p>

<p>For online documentation and support please refer to
<a href="http://nginx.org/">nginx.org</a>.<br/>
Commercial support is available at
<a href="http://nginx.com/">nginx.com</a>.</p>

<p><em>Thank you for using nginx.</em></p>
</body>
</html>
/ #
我们在master上直接删除刚才的pods
[root@www ~]# kubectl get pods
NAME                          READY   STATUS    RESTARTS   AGE
client                        0/1     Error     0          20m
clients                       1/1     Running   0          6m29s
nginx-web1-5cff74b67f-b849m   1/1     Running   0          23m
[root@www ~]# kubectl delete pods nginx-web1-5cff74b67f-b849m 删除位数是b849m的pods资源
pod "nginx-web1-5cff74b67f-b849m" deleted
[root@www ~]# kubectl get pods
NAME                          READY   STATUS              RESTARTS   AGE
client                        0/1     Error               0          20m
clients                       1/1     Running             0          7m6s
nginx-web1-5cff74b67f-nwlq4   0/1     ContainerCreating   0          16s  删除之后自动创建了尾数nwlq4的pods资源
我们再通过busybox来进行访问
/ # wget nginx
Connecting to nginx (10.106.11.13:80)  可以看到当前访问的ip依然是11.13
saving to 'index.html'
index.html           100% |**********************************************************************************************************|   612  0:00:00 ETA
'index.html' saved
/ # wget -O - -q http://nginx:80/
<!DOCTYPE html>
<html>
<head>
<title>Welcome to nginx!</title>
<style>
    body {
         35em;
        margin: 0 auto;
        font-family: Tahoma, Verdana, Arial, sans-serif;
    }
</style>
</head>
<body>
<h1>Welcome to nginx!</h1>
<p>If you see this page, the nginx web server is successfully installed and
working. Further configuration is required.</p>

<p>For online documentation and support please refer to
<a href="http://nginx.org/">nginx.org</a>.<br/>
Commercial support is available at
<a href="http://nginx.com/">nginx.com</a>.</p>

<p><em>Thank you for using nginx.</em></p>
</body>
</html>
由此可见,k8s组件通过标签选择器的管理的标签来关联pods资源,不是通过我们传统认知的地址选择访问的形式,所以不管pods资源如何变化,只要原始的pods是来组与我们创建的那个nginx,并且在expose的时候声明我们的deployment是来自于原始的nginx的,就会纳入我们服务的后端中来。
[root@www ~]# kubectl get pods -o wide
NAME READY STATUS RESTARTS AGE IP NODE NOMINATED NODE READINESS GATES
clients 0/1 Error 0 21m 10.244.2.3 www.kubernetes.node2.com <none> <none>
clientss 1/1 Running 0 11m 10.244.1.13 www.kubernetes.node1.com <none> <none>
nginx-web1-5cff74b67f-nwlq4 1/1 Running 0 14m 10.244.2.4 www.kubernetes.node2.com <none> <none>
[root@www ~]# kubectl get svc -o wide
NAME TYPE CLUSTER-IP EXTERNAL-IP PORT(S) AGE SELECTOR
kubernetes ClusterIP 10.96.0.1 <none> 443/TCP 48m <none>
nginx ClusterIP 10.106.11.13 <none> 80/TCP 20m run=nginx-web1
nginxweb101 ClusterIP 10.106.25.35 <none> 80/TCP 34m run=nginx-web1
我们现在看到nginx是运行在node2机器上,但是无论pods资源运行在那台机器上,他们随之产生的iptables规则是一样的,我们主要关注的不是pods,而是service,当我们expose一个service资源的时候就会随之产生iptables和ipvs规则,当访问10.106.11.13这个ip的请求都会通过产生的iptables或者ipvs规则给调度到后端,这个后端也是指通过标签选择器关联的隔pods资源上。
[root@www ~]# kubectl describe svc nginx   我们可以通过命令来查看pods资源的详细信息
Name:              nginxweb101
Namespace:         default
Labels:            run=nginx
Annotations:       <none>
Selector:          run=nginx
Type:              ClusterIP
IP:                10.98.198.233
Port:              <unset>  80/TCP
TargetPort:        80/TCP
Endpoints:         10.244.1.2:80  后端关联的地址就是这个,而且当pods资源被重构了之后,这个地址会自动变化
Session Affinity:  None
Events:            <none>
[root@www ~]# kubectl get pods
NAME                     READY   STATUS    RESTARTS   AGE
client                   1/1     Running   0          4m11s
nginx-7df9fc476f-kn6g8   1/1     Running   0          10m
[root@www ~]# kubectl delete pods nginx-7df9fc476f-kn6g8  我们删除pods资源
pod "nginx-7df9fc476f-kn6g8" deleted
[root@www ~]# kubectl get pods  重新生成了一个pods资源
NAME                     READY   STATUS    RESTARTS   AGE
client                   1/1     Running   0          4m42s
nginx-7df9fc476f-lhpfx   1/1     Running   0          16s
[root@www ~]# kubectl describe svc nginx
Name:              nginxweb101
Namespace:         default
Labels:            run=nginx
Annotations:       <none>
Selector:          run=nginx
Type:              ClusterIP
IP:                10.98.198.233
Port:              <unset>  80/TCP
TargetPort:        80/TCP
Endpoints:         10.244.1.3:80  发现被关联的ip发生了变化。但是对外service的ip是不会发生变化的
Session Affinity:  None
Events:            <none>
[root@www ~]# kubectl get pods --show-labels 我们一直再强调表情选择器和标签的重要性,我们我们创建的pods资源怎么去查看标签了,可以通过--show-labels来查看
NAME                     READY   STATUS    RESTARTS   AGE     LABELS
client                   1/1     Running   0          7m57s   run=client
nginx-7df9fc476f-lhpfx   1/1     Running   0          3m31s   pod-template-hash=7df9fc476f,run=nginx   run=nginx就是pods资源的镜像
我们通过describe svc nginx查看到固定的serviceip是自动生成的,我们也可以对其进行调整,使用edit参数就能修改,我们对pods资管的ip进行了修改,这个修改会立即反应到crondns的解析记录当中
[root@www ~]# kubectl get svc
NAME          TYPE        CLUSTER-IP      EXTERNAL-IP   PORT(S)   AGE
kubernetes    ClusterIP   10.96.0.1       <none>        443/TCP   69m
nginxweb101   ClusterIP   10.98.198.233   <none>        80/TCP    50m
[root@www ~]# kubectl delete svc nginxweb101  我们删除service pods资源
service "nginxweb101" deleted
[root@www ~]# kubectl expose deployment nginx --name=nginx --port=80 --target-port=80 --protocol=TCP 重新创建一个
service/nginx exposed
[root@www ~]# kubectl get svc
NAME         TYPE        CLUSTER-IP      EXTERNAL-IP   PORT(S)   AGE
kubernetes   ClusterIP   10.96.0.1       <none>        443/TCP   70m
nginx        ClusterIP   10.103.36.133此时ip依然发生变化   <none>        80/TCP    20s
/ # wget -O - -q http://nginx:80/  依然能访问
<!DOCTYPE html>
<html>
<head>
<title>Welcome to nginx!</title>
<style>
......
[root@www ~]# kubectl describe svc nginx
Name:              nginx
Namespace:         default
Labels:            run=nginx
Annotations:       <none>
Selector:          run=nginx
Type:              ClusterIP
IP:                10.103.36.133
Port:              <unset>  80/TCP
TargetPort:        80/TCP
Endpoints:         10.244.1.3:80  后端pods并没有受到影响
Session Affinity:  None
Events:            <none>
[root@www ~]# kubectl describe deployment nginx   我们可以通过命令来显示nginx pods资源的详细信息
Name:                   nginx
Namespace:              default
CreationTimestamp:      Thu, 20 Jun 2019 20:45:45 +0800
Labels:                 run=nginx
Annotations:            deployment.kubernetes.io/revision: 1
Selector:               run=nginx  标签选择器定义的pods资源标签
Replicas:               1 desired 定义了至少要有一个副本资源| 1 updated | 1 total | 1 available | 0 unavailable
StrategyType:           RollingUpdate
MinReadySeconds:        0
RollingUpdateStrategy:  25% max unavailable, 25% max surge
Pod Template:
  Labels:  run=nginx
  Containers:
   nginx:
    Image:        nginx:1.14-alpine
    Port:         80/TCP
    Host Port:    0/TCP
    Environment:  <none>
    Mounts:       <none>
  Volumes:        <none>
Conditions:
  Type           Status  Reason
  ----           ------  ------
  Progressing    True    NewReplicaSetAvailable
  Available      True    MinimumReplicasAvailable
OldReplicaSets:  <none>
NewReplicaSet:   nginx-7df9fc476f (1/1 replicas created)
Events:          <none>
一创建好的deployment控制器副本数量可以动态修改的
一创建好的deployment控制器副本数量可以动态修改的
[root@www ~]# kubectl run myweb --image=nginx:1.14-alpine --port=80 --replicas=2
kubectl run --generator=deployment/apps.v1 is DEPRECATED and will be removed in a future version. Use kubectl run --generator=run-pod/v1 or kubectl create instead.
deployment.apps/myweb created
[root@www ~]# kubectl get deployment -w  如果镜像再创建的途中会先去下载镜像,想动态监控这个过程的话就可以再查看状态后面加上-w(动态监控)
NAME    READY   UP-TO-DATE   AVAILABLE   AGE
myweb   2/2     2            2           79s
nginx   1/1     1            1           75m
[root@www ~]# kubectl get pods -o wide
NAME                     READY   STATUS    RESTARTS   AGE     IP           NODE                       NOMINATED NODE   READINESS GATES
client                   1/1     Running   0          71m     10.244.2.2   www.kubernetes.node1.com   <none>           <none>
myweb-86bfd5b865-k4j9q   1/1     Running   0          3m19s   10.244.2.3   www.kubernetes.node1.com   <none>           <none>
myweb-86bfd5b865-s92dv   1/1     Running   0          3m19s   10.244.1.4   www.kubernetes.node2.com   <none>           <none>
nginx-7df9fc476f-lhpfx   1/1     Running   0          66m     10.244.1.3   www.kubernetes.node2.com   <none>           <none>
我们创建了两个myweb pods资源,分布跑在不同的node节点上
/ # wget -O - -q 10.244.2.3  我们直接访问其中一个myweb的ip是访问的
<!DOCTYPE html>
<html>
<head>
<title>Welcome to nginx!</title>
<style>
.....
[root@www ~]# kubectl expose deployment myweb --name=myapp101 --port=80 我们给myweb创建以一个service
我们重新创建两个pod资源用于看下滚动部署的功能
pods资源在发生变动的时候可以通过监控来动态查看pods资源增删。
[root@www ~]# kubectl get deployment -w 如果镜像再创建的途中会先去下载镜像,想动态监控这个过程的话就可以再查看状态后面加上-w(动态监控)
NAME READY UP-TO-DATE AVAILABLE AGE
myweb 2/2 2 2 79s
nginx 1/1 1 1 75m
D:pods资源的滚动部署,升级,回滚:
[root@www kubeadm]# kubectl run myapp --image=ikubernetes/myapp:v1 --replicas=2
kubectl run --generator=deployment/apps.v1 is DEPRECATED and will be removed in                                                                                          a future version. Use kubectl run --generator=run-pod/v1 or kubectl create ins                                                                                         tead.
deployment.apps/myapp created
[root@www kubeadm]# kubectl get pods -o wide
NAME                     READY   STATUS    RESTARTS   AGE     IP           NODE                       NOMINATED NODE   READINESS GATES
myapp-5bc569c47d-9scqq   1/1     Running   0          4m21s   10.244.2.2   www.kubernetes.node2.com   <none>           <none>
myapp-5bc569c47d-mflc5   1/1     Running   0          4m21s   10.244.1.4   www.kubernetes.node1.com   <none>           <none>
[root@www kubeadm]#
可以看到我们的pods资源是分部在不同机器上的
/ # wget -O - -q 10.244.2.2通过客户端访问
Hello MyApp | Version: v1 | <a href="hostname.html">Pod Name</a>
/ # wget -O - -q 10.244.1.4
Hello MyApp | Version: v1 (注意看现在的版本是v1)| <a href="hostname.html">Pod Name</a>
/ # wget -O - -q 10.244.1.4/hostname.html
myapp-5bc569c47d-mflc5  可以看到访问不同ip的时候对应的pods资源是不同的,因为两个pods名称不一样
/ # wget -O - -q 10.244.2.2/hostname.html
myapp-5bc569c47d-9scqq
[root@www ~]# kubectl expose deployment myapp --name=myweb1 --port=80  我们创建一个service资源去关联到后端的两个pod资源
service/myweb1 exposed
[root@www ~]# kubectl get svc
NAME         TYPE        CLUSTER-IP       EXTERNAL-IP   PORT(S)   AGE
kubernetes   ClusterIP   10.96.0.1        <none>        443/TCP   37m
myweb1       ClusterIP   10.107.136.137   <none>        80/TCP    7s
在用哪个客户端进行访问
/ # wget -O - -q myweb1我们直接访问service名称,
Hello MyApp | Version: v1 | <a href="hostname.html">Pod Name</a>
/ # wget -O - -q myweb1/hostname.html
myapp-5bc569c47d-9scqq
/ # wget -O - -q myweb1/hostname.html
myapp-5bc569c47d-mflc5
/ # wget -O - -q myweb1/hostname.html
myapp-5bc569c47d-9scqq
/ # wget -O - -q myweb1/hostname.html
myapp-5bc569c47d-9scqq
/ # wget -O - -q myweb1/hostname.html
myapp-5bc569c47d-9scqq
/ # wget -O - -q myweb1/hostname.html
myapp-5bc569c47d-9scqq
/ # wget -O - -q myweb1/hostname.html
myapp-5bc569c47d-mflc5
/ # wget -O - -q myweb1/hostname.html
myapp-5bc569c47d-mflc5
可以看到我们反复访问service的时候,service帮我们自动在两个pod资源上来回调度
/ # while true; do  wget -O - -q myweb1/hostname.html; sleep 1 ;done   我们循环对pod资源进行访问,然后我们动态的将pods资源扩展到
myapp-5bc569c47d-9scqq
myapp-5bc569c47d-9scqq
myapp-5bc569c47d-9scqq
myapp-5bc569c47d-9scqq
myapp-5bc569c47d-9scqq
myapp-5bc569c47d-9scqq
myapp-5bc569c47d-mflc5
[root@www ~]# kubectl scale --replicas=5 deployment myapp  我们手动扩展myapp pods资源的数量
deployment.extensions/myapp scaled
[root@www ~]# kubectl get pods
NAME                     READY   STATUS              RESTARTS   AGE
client                   1/1     Running             0          33m
myapp-5bc569c47d-7jlwx   0/1     ContainerCreating   0          10s
myapp-5bc569c47d-9scqq   1/1     Running             0          39m
myapp-5bc569c47d-ghc9z   1/1     Running             0          10s
myapp-5bc569c47d-gvchj   0/1     ContainerCreating   0          10s
myapp-5bc569c47d-mflc5   1/1     Running             0          39m
[root@www ~]#在动态循环访问pods资源,发现请求就被自动调度到新的pods资源上去了,
yapp-5bc569c47d-7jlwx
myapp-5bc569c47d-mflc5
myapp-5bc569c47d-gvchj
myapp-5bc569c47d-mflc5
myapp-5bc569c47d-mflc5
myapp-5bc569c47d-mflc5
myapp-5bc569c47d-mflc5
myapp-5bc569c47d-ghc9z
myapp-5bc569c47d-7jlwx
myapp-5bc569c47d-9scqq
myapp-5bc569c47d-7jlwx
myapp-5bc569c47d-9scqq
myapp-5bc569c47d-gvchj
myapp-5bc569c47d-gvchj
myapp-5bc569c47d-7jlwx
我们在将pods资源缩减下
[root@www ~]# kubectl scale --replicas=3 deployment myapp
deployment.extensions/myapp scaled
[root@www ~]# kubectl get pods
NAME                     READY   STATUS        RESTARTS   AGE
client                   1/1     Running       0          38m
myapp-5bc569c47d-7jlwx   0/1     Terminating   0          4m37s  当我们缩减的时候之前扩展的5个pods资源会随机的终止掉,但是不会删除
myapp-5bc569c47d-9scqq   0/1     Terminating   1          44m
myapp-5bc569c47d-ghc9z   1/1     Running       0          4m37s
myapp-5bc569c47d-gvchj   1/1     Running       0          4m37s
myapp-5bc569c47d-mflc5   1/1     Running       0          44m

现在就是在三个pods资源之间来回调度了
myapp-5bc569c47d-gvchj
myapp-5bc569c47d-gvchj
myapp-5bc569c47d-mflc5
myapp-5bc569c47d-mflc5
myapp-5bc569c47d-ghc9z
pods资源的滚动更新
/ # while true; do  wget -O - -q myweb1; sleep 1 ;done  我们循环访问发现版本是v1的版本,现在将v1升级v2版本
Hello MyApp | Version: v1 | <a href="hostname.html">Pod Name</a>
Hello MyApp | Version: v1 | <a href="hostname.html">Pod Name</a>
Hello MyApp | Version: v1 | <a href="hostname.html">Pod Name</a>
[root@www ~]# kubectl set image --help
Update existing container image(s) of resources.

 Possible resources include (case insensitive):

  pod (po), replicationcontroller (rc), deployment (deploy), daemonset (ds), replicaset (rs)

Examples:
  # Set a deployment's nginx container image to 'nginx:1.9.1', and its busybox container image to 'busybox'.
  kubectl set image deployment/nginx busybox=busybox nginx=nginx:1.9.1

  # Update all deployments' and rc's nginx container's image to 'nginx:1.9.1'
  kubectl set image deployments,rc nginx=nginx:1.9.1 --all

  # Update image of all containers of daemonset abc to 'nginx:1.9.1'
  kubectl set image daemonset abc *=nginx:1.9.1

  # Print result (in yaml format) of updating nginx container image from local file, without hitting the server
  kubectl set image -f path/to/file.yaml nginx=nginx:1.9.1 --local -o yaml

Options:
      --all=false: Select all resources, including uninitialized ones, in the namespace of the specified resource types
      --allow-missing-template-keys=true: If true, ignore any errors in templates when a field or map key is missing in
the template. Only applies to golang and jsonpath output formats.
      --dry-run=false: If true, only print the object that would be sent, without sending it.
  -f, --filename=[]: Filename, directory, or URL to files identifying the resource to get from a server.
  -k, --kustomize='': Process the kustomization directory. This flag can't be used together with -f or -R.
      --local=false: If true, set image will NOT contact api-server but run locally.
  -o, --output='': Output format. One of:
json|yaml|name|go-template|go-template-file|template|templatefile|jsonpath|jsonpath-file.
      --record=false: Record current kubectl command in the resource annotation. If set to false, do not record the
command. If set to true, record the command. If not set, default to updating the existing annotation value only if one
already exists.
  -R, --recursive=false: Process the directory used in -f, --filename recursively. Useful when you want to manage
related manifests organized within the same directory.
  -l, --selector='': Selector (label query) to filter on, not including uninitialized ones, supports '=', '==', and
'!='.(e.g. -l key1=value1,key2=value2)
      --template='': Template string or path to template file to use when -o=go-template, -o=go-template-file. The
template format is golang templates [http://golang.org/pkg/text/template/#pkg-overview].

Usage:
  kubectl set image (-f FILENAME | TYPE NAME) CONTAINER_NAME_1(这里指的是镜像,不是pods资源)=CONTAINER_IMAGE_1 ... CONTAINER_NAME_N=CONTAINER_IMAGE_N
[options]

Use "kubectl options" for a list of global command-line options (applies to all commands).
滚动更新需要使用set命令,使用的方式类似于灰度发布的形式,先把用户请求调度至老版本至上,然后更新一pod资源,就这样轮换着把三个pod资源给更新掉。直至全部更新完毕
[root@www ~]# kubectl get pods
NAME                     READY   STATUS    RESTARTS   AGE
client                   1/1     Running   0          70m
myapp-5bc569c47d-ghc9z   1/1     Running   0          37m
myapp-5bc569c47d-gvchj   1/1     Running   0          37m
myapp-5bc569c47d-mflc5   1/1     Running   0          76m
[root@www ~]# kubectl describe pods myapp-5bc569c47d-ghc9z
Name:               myapp-5bc569c47d-ghc9z
Namespace:          default
Priority:           0
PriorityClassName:  <none>
Node:               www.kubernetes.node1.com/192.168.181.140
Start Time:         Fri, 21 Jun 2019 14:05:00 +0800
Labels:             pod-template-hash=5bc569c47d
                    run=myapp
Annotations:        <none>
Status:             Running
IP:                 10.244.1.8
Controlled By:      ReplicaSet/myapp-5bc569c47d
Containers:
  myapp:
    Container ID:   docker://8f3f27cdf409488ad0a0f9813ac0798d4a58cda34cf1ec66a9                                                                           1e5934b7be7768
    Image:          ikubernetes/myapp:v1我们通过命令可以看到当前pods资源是用的那个镜像资源来创建的
    Image ID:       docker-pullable://ikubernetes/myapp@sha256:9c3dc30b5219788b                                                                           2b8a4b065f548b922a34479577befb54b03330999d30d513
    Port:           <none>
    Host Port:      <none>
    State:          Running
      Started:      Fri, 21 Jun 2019 14:05:01 +0800
    Ready:          True
    Restart Count:  0
    Environment:    <none>
    Mounts:
      /var/run/secrets/kubernetes.io/serviceaccount from default-token-w8x9p (r                                                                           o)
Conditions:
  Type              Status
  Initialized       True
  Ready             True
  ContainersReady   True
  PodScheduled      True
Volumes:
  default-token-w8x9p:
    Type:        Secret (a volume populated by a Secret)
    SecretName:  default-token-w8x9p
    Optional:    false
QoS Class:       BestEffort
Node-Selectors:  <none>
Tolerations:     node.kubernetes.io/not-ready:NoExecute for 300s
                 node.kubernetes.io/unreachable:NoExecute for 300s
Events:
  Type    Reason     Age   From                               Message
  ----    ------     ----  ----                               -------
  Normal  Scheduled  37m   default-scheduler                  Successfully assi                                                                           gned default/myapp-5bc569c47d-ghc9z to www.kubernetes.node1.com
  Normal  Pulled     37m   kubelet, www.kubernetes.node1.com  Container image "                                                                           ikubernetes/myapp:v1" already present on machine
  Normal  Created    37m   kubelet, www.kubernetes.node1.com  Created container                                                                            myapp
  Normal  Started    37m   kubelet, www.kubernetes.node1.com  Started container                                                                            myapp
[root@www ~]# kubectl set image deployment myapp myapp=ikubernetes/myapp:v2
deployment.extensions/myapp image updated
[root@www ~]#
Hello MyApp | Version: v2 | <a href="hostname.html">Pod Name</a>
Hello MyApp | Version: v1 | <a href="hostname.html">Pod Name</a>
Hello MyApp | Version: v2 | <a href="hostname.html">Pod Name</a>
Hello MyApp | Version: v1 | <a href="hostname.html">Pod Name</a>
Hello MyApp | Version: v1 | <a href="hostname.html">Pod Name</a>
Hello MyApp | Version: v2 | <a href="hostname.html">Pod Name</a>
Hello MyApp | Version: v1 | <a href="hostname.html">Pod Name</a>
Hello MyApp | Version: v2 | <a href="hostname.html">Pod Name</a>
Hello MyApp | Version: v2 | <a href="hostname.html">Pod Name</a>
Hello MyApp | Version: v2 | <a href="hostname.html">Pod Name</a>
Hello MyApp | Version: v2 | <a href="hostname.html">Pod Name</a>
Hello MyApp | Version: v2 | <a href="hostname.html">Pod Name</a>
Hello MyApp | Version: v2 | <a href="hostname.html">Pod Name</a>
Hello MyApp | Version: v2 | <a href="hostname.html">Pod Name</a>
Hello MyApp | Version: v2 | <a href="hostname.html">Pod Name</a>
Hello MyApp | Version: v2 | <a href="hostname.html">Pod Name</a>
Hello MyApp | Version: v2 | <a href="hostname.html">Pod Name</a>
Hello MyApp | Version: v2 | <a href="hostname.html">Pod Name</a>
Hello MyApp | Version: v2 | <a href="hostname.html">Pod Name</a>
Hello MyApp | Version: v2 | <a href="hostname.html">Pod Name</a>
Hello MyApp | Version: v2 | <a href="hostname.html">Pod Name</a>
Hello MyApp | Version: v2 | <a href="hostname.html">Pod Name</a>
Hello MyApp | Version: v2 | <a href="hostname.html">Pod Name</a>
可以看到滚动更新的状态,全部更新到了v2的版本了
[root@www ~]# kubectl rollout status deployment myapp  也可以通过命令来查看,当期的版本已经更新成功
deployment "myapp" successfully rolled out
[root@www ~]# kubectl get pods  更新过后pods资源的名称也都发生了改变了
NAME                     READY   STATUS    RESTARTS   AGE
client                   1/1     Running   0          78m
myapp-86984b4c7c-hj629   1/1     Running   0          4m7s
myapp-86984b4c7c-wb7z2   1/1     Running   0          3m37s
myapp-86984b4c7c-z2n87   1/1     Running   0          3m44s
[root@www ~]# kubectl describe pods myapp-86984b4c7c-hj629
Name:               myapp-86984b4c7c-hj629
Namespace:          default
Priority:           0
PriorityClassName:  <none>
Node:               www.kubernetes.node2.com/192.168.181.145
Start Time:         Fri, 21 Jun 2019 14:45:58 +0800
Labels:             pod-template-hash=86984b4c7c
                    run=myapp
Annotations:        <none>
Status:             Running
IP:                 10.244.2.6
Controlled By:      ReplicaSet/myapp-86984b4c7c
Containers:
  myapp:
    Container ID:   docker://2561d1d7c5d944b4fc5336bc7db16598058f88cc7fa7aacbf049de45935603b8
    Image:          ikubernetes/myapp:v2  此时镜像的版本已经升级到v2版本了
    Image ID:       docker-pullable://ikubernetes/myapp@sha256:85a2b81a62f09a414ea33b74fb8aa686ed9b168294b26b4c819df0be0712d358
    Port:           <none>
    Host Port:      <none>
    State:          Running
      Started:      Fri, 21 Jun 2019 14:46:21 +0800
    Ready:          True
    Restart Count:  0
    Environment:    <none>
    Mounts:
      /var/run/secrets/kubernetes.io/serviceaccount from default-token-w8x9p (ro)
Conditions:
  Type              Status
  Initialized       True
  Ready             True
  ContainersReady   True
  PodScheduled      True
Volumes:
  default-token-w8x9p:
    Type:        Secret (a volume populated by a Secret)
    SecretName:  default-token-w8x9p
    Optional:    false
QoS Class:       BestEffort
Node-Selectors:  <none>
Tolerations:     node.kubernetes.io/not-ready:NoExecute for 300s
                 node.kubernetes.io/unreachable:NoExecute for 300s
Events:
  Type    Reason     Age    From                               Message
  ----    ------     ----   ----                               -------
  Normal  Scheduled  5m15s  default-scheduler                  Successfully assigned default/myapp-86984b4c7c-hj629 to www.kubernetes.node2.com
  Normal  Pulling    5m14s  kubelet, www.kubernetes.node2.com  Pulling image "ikubernetes/myapp:v2"
  Normal  Pulled     4m53s  kubelet, www.kubernetes.node2.com  Successfully pulled image "ikubernetes/myapp:v2"
  Normal  Created    4m53s  kubelet, www.kubernetes.node2.com  Created container myapp
  Normal  Started    4m52s  kubelet, www.kubernetes.node2.com  Started container myapp
[root@www ~]# kubectl rollout --help   能升级就能回滚
Manage the rollout of a resource.

 Valid resource types include:

  *  deployments
  *  daemonsets
  *  statefulsets

Examples:
  # Rollback to the previous deployment
  kubectl rollout undo deployment/abc

  # Check the rollout status of a daemonset
  kubectl rollout status daemonset/foo

Available Commands:
  history     显示 rollout 历史
  pause       标记提供的 resource 为中止状态
  resume      继续一个停止的 resource
  status      显示 rollout 的状态
  undo        撤销上一次的 rollout  通过undo参数就能进行回滚,这个回滚有两个选择,一个是你指明版本回滚,还有就是不指明默认回滚到上一个版本

Usage:
  kubectl rollout SUBCOMMAND [options]

Use "kubectl <command> --help" for more information about a given command.
Use "kubectl options" for a list of global command-line options (applies to all                                                                            commands).
[root@www ~]# kubectl rollout undo deployment myapp   我们不指明,直接回滚到上一个版本
deployment.extensions/myapp rolled back
[root@www ~]# kubectl get pods
NAME                     READY   STATUS    RESTARTS   AGE
client                   1/1     Running   0          90m
myapp-5bc569c47d-294qt   1/1     Running   0          83s
myapp-5bc569c47d-qkqnw   1/1     Running   0          85s
myapp-5bc569c47d-v9nxh   1/1     Running   0          81s
[root@www ~]#
可以看到滚动回滚的效果
Hello MyApp | Version: v2 | <a href="hostname.html">Pod Name</a>
Hello MyApp | Version: v1 | <a href="hostname.html">Pod Name</a>
Hello MyApp | Version: v1 | <a href="hostname.html">Pod Name</a>
Hello MyApp | Version: v2 | <a href="hostname.html">Pod Name</a>
Hello MyApp | Version: v1 | <a href="hostname.html">Pod Name</a>
Hello MyApp | Version: v1 | <a href="hostname.html">Pod Name</a>
Hello MyApp | Version: v1 | <a href="hostname.html">Pod Name</a>
Hello MyApp | Version: v1 | <a href="hostname.html">Pod Name</a>
Hello MyApp | Version: v1 | <a href="hostname.html">Pod Name</a>
Hello MyApp | Version: v1 | <a href="hostname.html">Pod Name</a>
Hello MyApp | Version: v1 | <a href="hostname.html">Pod Name</a>
Hello MyApp | Version: v1 | <a href="hostname.html">Pod Name</a>
Hello MyApp | Version: v1 | <a href="hostname.html">Pod Name</a>
Hello MyApp | Version: v1 | <a href="hostname.html">Pod Name</a>
Hello MyApp | Version: v1 | <a href="hostname.html">Pod Name</a>
Hello MyApp | Version: v1 | <a href="hostname.html">Pod Name</a>
Hello MyApp | Version: v1 | <a href="hostname.html">Pod Name</a>
Hello MyApp | Version: v1 | <a href="hostname.html">Pod Name</a>
Hello MyApp | Version: v1 | <a href="hostname.html">Pod Name</a>
我们通过手动的部署,升级,回滚等操作看到了k8s的在此类操作上的高效,便捷等好处,当然k8s也是能实现自动的扩缩容的,而这个扩缩容是基于资源使用率的监控状态来实现,这个资源使用率的就需要监控软件来实现。
我们上面只是从基础功能展示上来实现了k8s的简单使用,但是实际并不是这么使用的,此种方式是最简单,功能单一,不能按照要求定制的方式,后面会介绍基于yml格式定义和创建资源的。
上面的所有访问形式都是在我们集群内部进行的访问,要想在集群外部进行访问需要修改service参数。
上面的所有访问形式都是在我们集群内部进行的访问,要想在集群外部进行访问需要修改service参数。
[root@www .kube]# kubectl edit svc myweb1
# Please edit the object below. Lines beginning with a '#' will be ignored,
# and an empty file will abort the edit. If an error occurs while saving this file will be
# reopened with the relevant failures.
#
apiVersion: v1
kind: Service
metadata:
  creationTimestamp: "2019-06-23T04:09:04Z"
  labels:
    run: myapp
  name: myweb1
  namespace: default
  resourceVersion: "10707"
  selfLink: /api/v1/namespaces/default/services/myweb1
  uid: a3d23b3c-956c-11e9-9101-000c291028e5
spec:
  clusterIP: 10.110.143.20
  ports:
  - port: 80
    protocol: TCP
    targetPort: 80
  selector:
    run: myapp
  sessionAffinity: None
  type: ClusterIP将这个默认参数改成NodePort(注意大小写)
status:
  loadBalancer: {}
 [root@www .kube]# kubectl get svc
NAME         TYPE        CLUSTER-IP      EXTERNAL-IP   PORT(S)        AGE
kubernetes   ClusterIP   10.96.0.1       <none>        443/TCP        120m
myweb1       NodePort    10.110.143.20   <none>        80:32535/TCP我们会看到对外的端口是32535  3m50s
通过浏览器访问集群节点的ip:32535端口即可,而且这个端口还是负载均衡的,当然你的node节点要保证是高可用的,如果你要提个给互联网访问,需要在node节点上面在加上物理的负载均衡器,然后关联到后端的node节点,让用户从负载均衡器访问到后端的node节点,当然你的负载均衡器也需要做好高可用,另外需要做监控对负载均衡器进行健康状态的检查。